background image

/ /

/

/ /

/

/


27

Other useful features

  The USB1 and USB2 terminals cannot be connected 

with USB hard disk drives at the same time.

  When connecting a USB hard disk drive, be sure to 

use a hard disk drive with an AC adapter.

  Do not remove the memory device  

from the TV 

while transferring files.


  Do not insert and remove a USB memory device/

USB hard disk drive to and from the TV repeatedly.

  When using

card first

 a card reader, be sure to insert Memory

 before using the card reader.

  The TV may not be able to recognise the card 

reader.

  Please follow the rules below when the TV is 

displaying the file

   of the USB device:


—Please do not turn off the TV directly

.


—Please don’t disconnect the USB device directly.


—Please be sure to exit from USB interface before 

removing the USB device, otherwise you may lose 

the data , damage the device or TV system may not 

work properly.

  If the TV connects with  

USB-HUB, the TV may not 

be able to recognise all USB memory devices.

NOTE 

  Depending on the USB memory device, the TV may not be 

able to recognise the data.

  It may take time to read the data if the USB memory device 

contains many files


 or folders.

  External subtitles for some video files


 may not be 

supported.

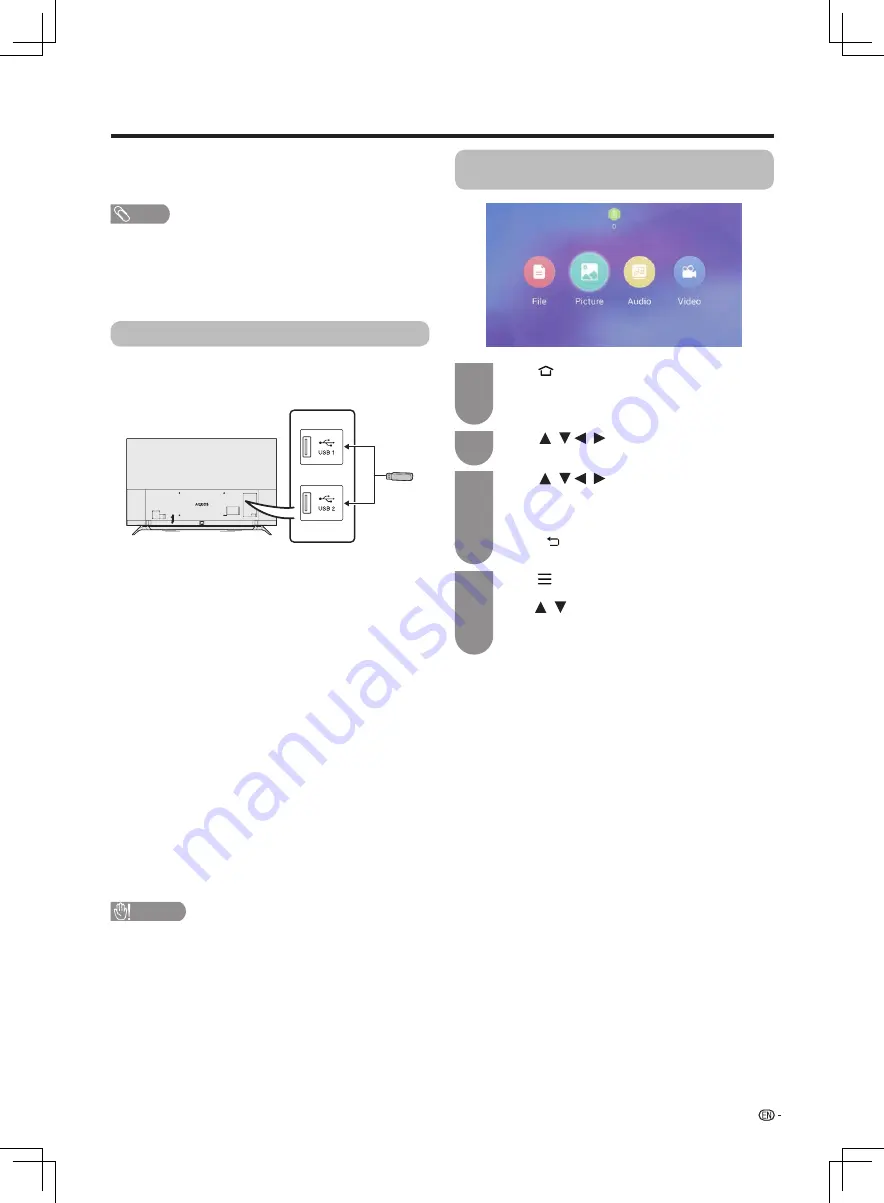
You can connect a USB memory device or a USB hard 

disk drive (HDD) to the TV to enjoy viewing pictures, 

listening to the audio, and watching videos.

Insert the USB memory device with recorded pictures 

audio or videos into the USB 1 or USB 2 terminal on 

the TV.

CAUTION 

• 

Do not use the USB extension cable, otherwise it may 

cause the TV does not work properly.

• 

Please insert the USB device after the TV is


powered


on properly.

Press 

(

HOME

)

 to display the smart home, 

and then touch the slide bar to switch to App 

interface. Select “LocalMM” and then press 

OK

1

Press 

 to select the desired folder, 

such as "File", "Picture", "Audio", "Video", and 

then press 

OK

. Select the desired file

   , and 

then press 

OK

.

  Press   (

RETURN

) on the remote control, you 

can exit to the upper folder.

Press 


(

MENU

)

 to display the USB media 

operation menu when you view a photo or a video. 
Press 

 to select the relevant functions, and 

then press 

OK

To know the buttons for USB media operation in 

detail, please see page 28.

3

4

2

Press 

 to select the device or disk 

drive you want.

Connecting a USB memory device

Playing back files on a USB memory 

device 

Содержание AQUOS LC-60UA50H

Страница 1: ...LC 60UA50H LC 70UA50H ENGLISH 液晶彩色電视機 LCD COLOUR TELEVISION 使用說明書 OPERATION MANUAL 中文 TINS G952WJZZ ...

Страница 2: ...處置和注意事項 9 部件名稱 9 電視機 前視圖 9 電視機 後視圖 10 遙控器 11 電視機操作按鍵 12 配對遙控器 12 在開啟電源之前 13 連接外部設備 14 使用數碼音頻輸出 15 插入 Micro SD記憶卡 市面有售 15 連接 USB 存儲設備 15 連接到網絡 15 裝入電池 16 關於遙控器的注意事項 16 開啟或關閉電視機 17 首次開啟電視機 17 關閉電視機 17 用戶指南 17 觀看電視 選項表 18 聲音切換 18 音頻語言 18 字幕語言 18 回看 18 信息 18 EPG 18 頻道列表 18 頻道編輯 19 數字鍵盤 19 HDMI 選擇 19 電腦顯示模式 19 設置 19 一般設置 19 主題 19 開機狀態 19 語言設置 19 預設輸入法 19 無訊號自動關機 19 定時關機 20 19 待機指示燈 20 開機音效 20 鼠速度 ...

Страница 3: ... 還原 21 頻道設置 22 執行自動頻道搜尋 22 數碼頻道設置 22 模擬頻道設置 22 頻道編輯 22 網絡 22 應用程式 22 選項 23 數碼音頻語言 23 字幕 23 適用於聽力障礙者 23 系統 23 系統訊息 23 法律訊息 23 本地更新 23 系統還原 23 網絡功能 連接到網絡 24 有線安裝准备 24 無線安裝准备 24 網絡設置 25 有線网络連接 25 無線网络連接 25 藍牙設置 25 智能功能 智能界面 26 電視界面 26 應用界面 26 安裝應用 26 應用程式 26 輸入文字 26 瀏覽器 26 其他有用功能 連接 USB 存儲設備 27 播放 USB 存儲設備中的檔案 27 用於 USB 多媒體選項表操作的按鈕 28 與 USB 模式相容的檔案列表 29 附錄 故障分析 31 規格 32 輪廓圖 33 ...

Страница 4: ...乾 由於外殼為塑膠製品 汽油 稀釋劑類的溶劑會導致其變質 或塗料脫落 所以請不要使用此類溶劑來清潔外殼 由於塑膠中含有塑化劑 與某些物質接觸會出現變質 塗料脫落等狀況 所以請遠離殺蟲劑等揮發性物質 另外 請不要 與橡膠和樹脂類製品長期接觸 屏幕的保養方法 在開始清潔屏幕之前 請務必關閉電視機電源 並將電源插頭從插座中 出 清潔屏幕時 請使用柔軟的乾布 棉 絨等質料 來輕輕擦拭屏幕表面 為了保護屏幕 請不要使用不乾淨的布 清洗劑 或附有化學成分的乾 濕抹布等物品來擦拭 因為這樣會造成顯示屏表面的剝落 請注意不要使用質地堅硬的布來擦拭 或擦拭時過於用力 這樣會導致顯示屏表面劃花 屏幕不潔的時候 可以用柔軟的布 棉 絨等質料 稍微用水打濕後 輕輕地擦拭 擦拭時不可過於用力 以免造成顯示 屏表面劃花 如果液晶顯示屏表面黏上了灰塵 請使用市面有售的除塵刷 除靜電刷 來清潔 ...

Страница 5: ...臥床 沙發 地毯或其他類似 物品之上 因為這些物品會堵塞散熱通 風孔 本產品之設計不適用於嵌入式安 裝 所以不要將本機置於像書櫃 機架 等封閉之處 除非提供合適的通風或遵 照本製造商的專門指示說明 本機所用之液晶顯示屏是用玻璃製造的 因此 在受到強力撞擊或被尖銳物刻劃 時會損壞 萬一液晶顯示屏破碎 請小 心不要受到碎玻璃的割傷 熱源 請勿讓本機接近熱源 如取暖器 加熱器 火爐或其他任何會產生熱力的 東西 包括擴音機在內 為防止發生火災 請勿將任何種類的蠟 燭或火焰置於本機的頂部或其附近 為了防止遭受起火或觸電的危險 請勿 將交流電源線置於本機或其他重物之下 請勿在本機之上放置重物或攀爬 於本機之上 這樣做可能導致本 機傾倒而造成傷害 特別要注意 近旁的兒童和寵物 搬運電視機之前 請先把插頭 出 如果不預先 出 很容易拉損電源線 產生觸電危險 液晶顯示屏是用非常高超的技術製造的 具有 8 2...

Страница 6: ...een avoided All third party content or services accessible via this device is provided to you on an as is and as available basis and SHARP and its affiliates make no warranty or representation of any kind to you either express or implied including without limitation any warranties of merchantability non infringement fitness for a particular purpose or any warranties of suitability availability acc...

Страница 7: ...附件 6 隨機附件 請確認如下附件隨同本機附送 遙控器 AA 型電池 x 2 使用說明書 第 16 頁 底座組件 第 7 頁 插入電池使用 第 11 頁 底座組件 L 底座組件 L 底座蓋板 底座蓋板 長螺絲釘 短螺絲釘 R 底座蓋板 R 底座組件 ...

Страница 8: ...台上 平放前 先在平台上铺一层软垫 若要拆下底座組件 請按相反的順序執行以上步驟 底座组件不允許調節角度 本產品未有附帶螺絲批 在安裝過程中 請小心操作 以免您的手被電視機底部和 地面夾到 R 底座組件 R 底座組件 L 底座組件 L 底座組件 將電視機如圖平放於軟墊上 撕下兩側 膠紙 將音箱兩側的底座蓋板取下 將音箱兩側的底座蓋板 小 分別壓進 音箱 的左右空槽內 確保蓋板壓緊 特別說明 如果使用壁掛安裝 請先按照步驟1進 行 取下蓋板之後 將蓋板上的雙面膠隔離紙撕 下 再將蓋板壓進音箱兩側 然後進行壁掛安裝 將左右底座組件分別插入電視機底部的凹 槽內 再向電視機中間位置橫向移動 請確保底座卡住音箱 將6枚螺絲釘分別插入到左右底座的6個 螺絲孔中並擰緊 軟墊 短螺絲釘x2 長螺絲釘x4 隔離紙剝離處 雙面膠 隔離紙剝離處 ...

Страница 9: ...台製作完成後 請放置在平坦的地面上 安裝底座時 需要將電視機正面向下平放 平放前請先在 平台上鋪設一層軟墊以保護屏幕 簡易平台只是臨時平台 請不要施加超過液晶電視機重量 的負荷 3 1 如下圖所示 請取下紙箱底部的卡扣 2 按下圖所示方法 請從頂部拆開包裝箱 並取出頂面的 3 個發泡膠 TOP L TOP C TOP R 1 如圖 A 所示 請將包裝箱正面向下放置 2 將 TOP L 和 TOP R 分別裝入包裝箱內 的右側和左側 裝入位置如圖 B 所示 3 將 TOP C裝入包裝箱內的中間部位 裝入位 置如圖 B 所示 即完成簡易平台的製作 圖B 圖A ...

Страница 10: ...名稱 待機指示燈 壁掛電視機的處置和注意事項 可用另外購買的托架 將電視機安裝在牆上 詳情請參閱另外購買的托架所附之說明書 本電視機只能使用 SHARP 公司推薦的掛牆架來將電視機安裝到牆上 使用其他掛牆架可能導致安裝不穩而引致嚴重人身傷害 安裝液晶彩色電視機需要特別的技能 只有具有專業資格的服務人員才能夠安裝 用戶不可自己進行這項工作 對於不正確 的安裝 或是由於安裝引起的事故或傷害 SHARP 不承擔任何責任 使用另外購買的托架來安裝電視機 可請經資質認證的服務人員用另外購買的托架將電視機安裝到牆上 在開始操作之前 請先仔細閱讀隨同托架提供的使用說明書 ...

Страница 11: ...10 準備 電視機 後視圖 數碼音頻輸出端子 服務專用端子 LAN端子 天線端子 ATV DTV 操作按鍵 色差 影音輸入端子 ...

Страница 12: ...R 遙控器指示燈 8 選項表 顯示電視機的選項表 9 返回 返回到前一個選項表畫面 10 CH 頻道 電視輸入模式 選擇上一個 下一個頻道 11 瀏覽器 按該鈕進入瀏覽器界面 遙控器 11 8 10 7 9 1 5 6 2 4 3 當遙控器處於休眠時 只需按下遙控器上的任何按鍵 除 電源鍵外 去喚醒遙控器便可使用 指示燈 閃燈效果 指示狀態 功能說明 藍燈 快速閃爍 提醒 遙控器配對開始 持續亮3秒 提醒 遙控器配對成功 紅燈 持續3秒慢閃 警告 遙控器電量不足 此時遙控器仍可使用 持續3秒快閃 警告 遙控器電量嚴重不足 此時遙控器不可使用 持續亮3秒 警告 遙控器配對超時 遙控器配對不成功 藍燈 紅燈 交替閃爍 提醒 解除現在的遙控器與電視機之間的配對 此時新遙控器可與電視進行配對 遙控器指示燈 ...

Страница 13: ...器時 請按照下面方法將遙控器與電視 進行配對 配對遙控器 長按電視機上的電源按鈕 畫面會顯示 配 對 關機 的選項 將遙控器靠近電視機左下角 20 厘米以內 同時按下遙控器上的 OK 和 直到遙控器 紅藍燈交替閃爍完畢 1 3 使用電視機背部的按鈕 選擇 配對 然後 按下電視機操作按鈕 再次按下 OK 直到畫面提示配對成功 2 4 如果電視機沒有顯示遙控器配對資訊時 電視機會自動顯 示 配對 界面 按下遙控器上的 OK 和 遙控器會紅 藍燈交替閃爍 待閃爍停止後 再次按下 OK 直到畫面 提示配對成功 若遙控器配對不成功 請再嘗試一次或與客戶服務中心聯 繫 遙控器 鼠功能 智能遙控器內置陀螺儀感測器 可用遙控器的動作感 應去控制電視機 遙控器帶有 鼠功能 適用於在智能界面 通過操作 遙控器來移動螢幕上的游標選擇所需的項目 按下 OK 後進入 當 鼠功能休眠時 輕晃遙控器可以重新啟動 鼠功能...

Страница 14: ...源插頭插入交流電源插座 捆綁電線 如圖所示 將電線夾插入電視機上的孔中 並把電線放入電線夾內捆綁 請將電視機置於靠近交流電源插座之處 並使電源插頭便於插 如長期不使用本電視機 請將交流電源線從交流電源插座中 出 連接天線 為了能盡情享受清晰的電視影像 請使用室外電視天線 以下是關於同軸連接線的連接方法之簡要說明 連接外部設備 關於連接錄影機和 DVD 影碟機等的外部設備 請參閱第 14 頁和第 15 頁 2 3 4 交流電源插座 電視機 後視圖 標準 DIN45325 型 插頭 IEC169 2 75 歐姆同軸連接線 圓形連接線 室內天線端子 75 歐姆類型 天線連接線 市面有售 接至天線端子 在開啟電源之前 為了防止遭受電擊的危險 在連接著電源線時 請不要觸碰接線任何未經絕緣的部份 交流電源線 ...

Страница 15: ...錄機 DVD 影碟機 和電腦等 要觀看外接源的影像 請按遙控器上的 進入智能界面 左右 動 動桿切換至電視界面 選擇您 想要進入的輸入源 按下 OK 進入 當使用色差連接線時 市面有售 當使用影音連接線時 市面有售 當使用HDMI 高清晰度多媒體接口 連接線時 市面有售 數碼電視機機頂盒 STB 錄影機 遊戲機 攝錄機 DVD影碟機 電腦等 音频 右 红 使用電視機機頂盒觀看電視節目時 請使用機頂盒遙控器切換頻道 請按顏色插入各個端子 請按顏色插入各個端子 數碼電視機機頂盒 STB 錄影機 遊戲機 攝錄機 DVD影碟機等 數碼電視機機頂盒 STB 錄影機 遊戲機 攝錄機 DVD影碟機等 R AUDIO L Y PB PR Y 綠 音频 右 红 音频 左 白 PR 红 PB 蓝 视频 黄 音频 左 白 色差與影音端子共用 色差與影音端子共用 ...

Страница 16: ... SD卡槽支援 SD 及 SDHC 類型的記憶卡 但部分記憶卡可能無法支援 本產品支援最高 32GB 的記憶卡 請您盡量選用速度高於 Class4 的記憶卡 以保證讀寫速度更快 進而保證系統性能 記憶卡需要在安全移除或關閉電視機後才可取下 記憶卡不得執行熱插 操作 否則可能會令電視機故障 請時常為記憶卡內的資料備份 防止資料損壞或電視機運作錯 若有任何儲存資料損壞或遺失 SHARP 恕不負責 DIGITAL AUDIO OUTPUT 數碼音頻輸出端子 通常輸出與揚聲器相同的聲音 正在觀看的節目的聲音從該端子輸出 由於設備和軟體的不同 DIGITAL AUDIO OUTPUT 數碼音頻輸出端子 無法輸出某些信號 使用數碼音頻輸出 能夠透過 DIGITAL AUDIO OUTPUT 數碼音頻輸出端子 輸出音頻 從端子輸出 PCM 或 RAW 杜比數碼或 DTS 音頻 連接到外接音頻設備的 光纖...

Страница 17: ...化學物質徹底擦拭乾淨 由於儲存條件不同 隨同本機附送之電池可能會達不到預期的使用壽命 如果將會長期不使用遙控器 那麼請將電池從遙控器中取出 不要將電池暴露在如直射陽光 火等一些過熱的環境中 1 打開電池蓋 在裝入電池時 要注意電池端子的 極性要與電池艙內的極性標記 和 一致 圖 一隻手握住遙控器前端 另 一隻手拉住手繩的細繩部份 圖 將大拇指置於底部凹槽處 圖 用中指和食指向內拉手繩 用 大拇指沿底部凹槽向外推開電池蓋 請把電池蓋由上而下蓋上 2 插入兩枚附送 的 AA 型電池 3 關上電池蓋 關於遙控器的注意事項 切勿使遙控器受到劇烈震動 此外 切勿將遙控器浸泡於液體之中 或將其置於非常潮濕之處 切勿在直射陽光下設置或放置遙控器 熱力將導致遙控器變形 在第一次使用本電視機之前 請插入兩枚 AA 型電池 附送 當電池耗盡 而且遙控器不能操作時 用新的 AA 型電池替換 裝入電池 ...

Страница 18: ...次開啟電視機 如在以上備用模式下需要關閉電源 請 出電視機電源線 電視機接上電源後 進入備用狀態 按下遙控器或電視機上的 POWER 如在已開啟狀態下 按下遙控器上的 POWER 開啟或關閉電視機 首次開啟電視機 關閉電視機 語言設置 開始設置 模式設置 購買電視機之後 當首次開啟電源時 就會顯示出開 始設置的嚮導 請按照選項表所示 一步一步地進行 所需的設置 在開啟電源之前 請先確認以下事項 是否已連接天線 是否已將電源插頭插入電源插座 按下電視上的 POWER 按鈕 顯示開機畫面 之後顯示 語言設置 畫面 第一次開機時間較長 請耐心等待 可以將電視語言設置為 繁體中文 简体中文 或 EN 開始設置 按步驟設置電視機 如您是在家裡觀看電視 建議選擇 家居模式 家居模式 影音模式 設置的預設值為 標準 商店模式 僅商店展示時使用 影音模式 設置的預設 值為 動態 固定 影音模式 改變後 1...

Страница 19: ...表畫面 1 1 1 按下 按下 OK 輸入 來選擇所需的聲 音 按下 來選擇所需的字幕語言 然後按下 OK 輸入 按下 選擇您想要觀看的頻道 並按下 OK 3 3 3 2 2 2 按下 選擇 聲音切換 然後按下 OK 輸入 按下 選擇 字幕語言 然後按下 OK 輸入 按下 選擇 頻道列表 然後按下 OK 輸入 僅在模擬電視 ATV 下可選擇聲音切換 當廣播中含有字幕資訊時 您可以在此切換字幕語言 顯示頻道資訊 在電視全屏播放電視節目或外部輸入源節目時 按下 選項表 鍵 顯示功能表畫面 1 再次按以上 1 2 步驟操作 可返回到當前的 頻道或輸入源 3 2 按下 選擇 回看 然後按下 OK 您可以在當前選擇的輸入源 頻道和前一個輸入源 頻 道之間進行切換 在電視全屏播放電視節目時按下 選項表 鍵 顯示功能表畫面 在電視全屏播放電視節目時按下 選項表 鍵 顯示功能表畫面 1 1 2 2 按下 ...

Страница 20: ...些頻道項目 當您連接外部設備輸出 4K 60Hz 可按下 輸入頻道號碼 來選擇您想 要觀看的頻道 信號時 請使用 HDMI3 端子連接 並選擇 4K 60Hz 刪除 排序 標籤 跳越 可以刪除各個頻道 按下 選擇 删除 按下 OK 輸入 選擇 是 然後按下 OK OK 輸入 可刪除選擇的頻道 頻道位置可以自由地進行排序 可更改各個頻道的名稱 在觀看電視節目時 如果用 CH 頻道 選擇了被設置為 跳越 的頻道 該頻道就會被直接 跳過 名稱的字元最多為 8 個 只有 ATV 下的頻道可更改標籤 在電源關閉之前的 5 分鐘 每隔一分鐘會顯示一次剩餘時 間 頻道編輯 HDMI選擇 數字鍵盤 僅在 HDMI 輸入端口時可選擇電腦顯示模式 開啟後 更適合顯示電腦圖像的文字內容 電腦顯示模式 可根據您的需求設置選項表 開機狀態 主題 設置開機狀態 兩種狀態可供選擇 電視或智能界面 您可以在此更換智能界面...

Страница 21: ... 標準 用於 4 3 標準影像 左右兩側都出現一個邊 緣條 14 9 縮放 用於 14 9 的信箱型影像 左右兩側出現一 個狹窄的邊緣條 並且在某些節目情況下可 以看見頂部和底部也出現邊緣條 全景 在這種模式下 影像被一步步拉闊到屏幕 的兩側邊緣 全屏 用於 16 9 擠壓型影像 16 9 影院 用於 16 9 信箱型影像 在某些節目時頂部 和底部可能出現邊緣條 14 9 影院 用於 14 9 信箱型影像 在某些節目時頂部 和底部可能出現邊緣條 逐點 在畫面上顯示同樣像素數目的影像 只適 用於接收 2160p 訊號時 優化掃描 僅在接收 720p 1080i 1080p 訊號時顯示 優 化掃描 影像 顯示高解像度影像時調節 到最佳 對於某些節目 畫面邊緣可能會 出現雜波 標準 14 9 影院 16 9 影院 全屏 14 9 縮放 全景 由於輸入訊號各有不同 有可能不會顯示某些影像尺寸 14...

Страница 22: ...圖像 值變大 重視的是 亮度 值變小 重視的是對比度 觀看電視 自動音量 低音 高音 平衡 音頻輸出 不同的聲音來源有時音量也不同 如節目及插播的廣 告時段 自動音量控制 自動音量 可通過平衡音量 解決這個問題 可以調整所選擇的影音模式的音頻 用該功能可選擇自己喜歡的音頻輸出制式 音頻 影音模式 請參閱第 20 頁 您可根據個人喜好對音頻進行調整 所選擇的項目 按鈕 按鈕 高音 減弱高音 增強高音 低音 減弱低音 增強低音 平衡 減弱右邊音箱的聲音 減弱左邊音箱的聲音 在 動態 固定 模式下 不能進行音頻調整 即使選擇了 RAW 模擬音頻和視頻輸入音頻仍然按 PCM 格式輸出 即使選擇了 RAW PCM 輸入信號仍然按 PCM 格式輸出 環繞聲 還原 環繞聲功能從揚聲器產生出環繞聲效果 將所有的音頻調校項目重新設定為出廠預設值 所選擇的項目 說明 PCM16 光學輸出格式通常為 PCM 格...

Страница 23: ...索 按照順序調整頻 率搜尋下一個頻道 微調 對當前的頻道進行頻率的微調優化 頻道編輯 請參閱第 19 頁 網絡 應用程式 請參閱第 24 頁和第 25 頁 請參閱第 26 頁 數碼頻道設置 模擬頻道設置 可手動設置某些數碼頻道項目 可手動設置某些模擬頻道項目 執行自動頻道搜尋 執行自動頻道搜尋 執行手動頻道搜尋 訊號資訊 完成自動安裝後 使用本選項表以便自動新增數碼頻 道服務 完成自動安裝後 使用本選項表以便自動新增模擬頻 道服務 在指定頻寬或指定頻道號碼內新增頻道服務 顯示當前節目的 頻道 頻率 訊號強度 和 訊 號品質 訊息 訊號強度 和 訊號品質 是表示檢查天線相應訊號接收 的值 頻道設置 執行自動頻道搜尋 即使設置預置頻道之後 您也可以再進行自動安裝 您可根據個人喜好對頻道進行設置 執行自動頻道搜尋只能搜尋當前模式下的頻道 ...

Страница 24: ...設置不能夠恢復到正常 狀態 那麼請將設置還原到出廠時的預設值 系統 查看和設置系統相關的訊息 若數據與系統不相容 則畫面上會出現一個錯 訊息 按 下 OK 輸入 之後 請重複進入一般設置 系統 本地 更新進行操作 若顯示出錯 訊息 則請檢查 USB 設備是否已可靠地插入 USB 設備中有 2 個或更多的軟件更新文件 USB 存儲器中沒有用於更新系統的數據 軟件更新文件已損壞 軟件更新文件與電視機的軟件不兼容 更新時 請不要切斷電視機電源或進行其他操作 字幕 適用於聽力障礙者 當廣播中含有字幕資訊時 可以在此設置 如果廣播中包含了用於聽覺障礙者的字幕 那麼該字 幕就比其他字幕優先顯示出來 若接收到的廣播訊號中不包含所選語言的字幕 該語言的 字幕是不會顯示出來 如果廣播中沒有包含用於聽覺障礙者的字幕 那麼即使設 置為 開 也不會顯示字幕 僅在數碼電視 DTV 下可進入選項設置 ...

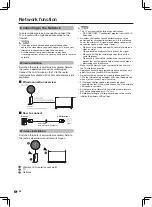
Страница 25: ...器 无線區域网路由器 接入点 電視機 网络 有線連接概覽圖 如何連接 LAN LAN 本电视机具有以下认证 Wi Fi CERTIFIED Wi Fi 联盟的认证手续 並非在所有的居住环境下都能保证有无線區域网连接並保 证其性能 在以下情况下 无線區域网信号可能很差或衰 落 或其连接速度可能变得较慢 在混凝土 有加固钢筋 或金属结构的建筑物中使用时 放置在能阻隔信号的物体附近时 在与其他辐射相同频率的无線设备一起使用时 在微波炉和其他辐射磁场 靜電或电磁干扰的设备附近 使用时 请确认您的网络中的防火牆允许访问到电视机的无線连接 当使用未经 Wi Fi 認证的接入点时 不能保证可正常运行 在使用无線區域网时 需要有一个无線區域网接入点来将 电视机连接到互联网 设置方法请参阅您的接入点的使用 说明书 播放串流媒体内容需要稳定的连接速度 如果无線區域网 的速度不稳定 那么请使用有線连接 由於網絡...

Страница 26: ... 連接藍牙設備的具體操作請參閱螢幕提示進行 將 是否啟用無線網絡連接 設置為 開 後 螢幕 顯示當前附近的無線網絡訊息 如當前無線網絡連接安全性為不開放 按下 OK 調 出輸入法後輸入密碼 有線網絡連接 無線網絡連接 藍牙設置 自動連接 手動連接 添加網絡 系統會嘗試自動獲取 IP 位址等相關資訊 根據頁面提示輸入對應的 IP 地址 子網絡遮罩 預設 網關 首選 DNS 服務器 備用 DNS 服務器 網絡設置 選擇選項表的 設置 然後按下OK 輸入 按下 選擇 網絡 選項 然後按下OK 輸入 螢幕顯示當前網絡訊息 如果您想要在有線網絡和無線網絡之間替換使用時 需要 您每次手動打開選項表 網絡進行切換 視乎使用的設備而定 藍牙設備可能無法正常運作 ...

Страница 27: ... 首選安裝位置 設置是否允許未知安全來源的應用 顯示已安裝的應用列表 可對應用 強制停止 卸 載 清除緩存 或 移至 SD 卡 移至內部儲存 設置首選安裝位置 可選擇 預設 內置儲存 和 外 置儲存 內置儲存空間 顯示SD卡儲存空間 可查看電視內部未使用和總存儲空間 可查看 SD 卡內未使用和總存儲空間 在使用兒童模式應用時 如忘記密碼 請在密碼輸入畫面 中輸入 3001 後進入 重置密碼後進行其它操作 SD卡格式化 SD卡安全卸載 格式化 Micro SD 卡槽中的存儲卡 請在 出 Micro SD 卡槽中的存儲卡之前 進行安全 卸載操作 選擇 SD 卡格式化將導致當前存儲或安裝在 Micro SD 卡 上的內容被完全刪除 已經刪除的內容或應用不可恢復 請謹慎操作 記憶卡不得執行熱插 操作 否則可能會令電視機故障 記憶卡需要在安全移除或關閉電視機後才可取下 請時常為記憶卡內的資料備份 防...

Страница 28: ...器連接到電視機 來觀賞相片 聆聽音樂並觀看影片 將記錄著相片 音樂或影片的 USB 存儲設備插入到電 視機上的 USB1 或 USB2 端子 由於 USB 存儲設備各有不同 電視機可能不能夠識別所記 錄的數據 如果 USB 存儲設備中存儲了許多文件或文件夾 那麼讀取 所記錄的數據可能需要花費相當長的時間 有可能不支援某些視頻文件中的外掛字幕 請勿使用 USB 延長連接線將 USB 存儲設備連接到電視機 的 USB 端子上 否則可能會妨礙電視機正常工作 請打開電視機後再插入 USB 存儲設備 按 下 遙 控 器 上 的 進 入 智 能 界 面 滑 動 SLIDEBAR 切換至應用界面 選擇 SHARP 媒體庫 然後按下 OK 輸入 進入 1 按下 選擇您要進入的設備或驅動 器 2 觀看相片 影片時按 選項表 可顯示 USB 多媒體選項表畫面 通過按 選擇相關功能 然後按 OK 輸 入 進行操...

Страница 29: ...換 播放列表 顯示播放列表 可以從播放列表中選擇播放文件 縮放 按CH 切換相片大小 按 鍵移動 旋轉 旋轉相片 按 逆時針旋轉 按 順時針旋轉 按 返回 鍵退出 幻燈片 幻燈片播放選項 選擇幻燈片播放時的間隔時間 切換模式 電視設置 設置電視選項 字幕選項 視頻播放時設置字幕 可進行字幕顯示 字幕選擇 字幕切換 字幕搜索 字幕 高級設定的設置 音頻選項 視頻播放時選擇音軌 跳越時間 指定播放起點 從輸入的時間開始播放 高級選項 播放設置 視頻播放時 設置中斷點播放 快進快退 單循環 按OK 輸入 鍵播放上一個文件 按OK 輸入 鍵播放下一個文件 快進 按 鍵鍵快進 快退 按 鍵鍵快退 播放上一個文件 播放下一個文件 其他有用功能 ...

Страница 30: ...SRT SSA ASS Subview Vobsub 内部 SSA ASS SRT Vobsub ts MPEG2 MP HL H 264 High profile to level 5 1 H 264 Main profile to level 4 1 H 264 baseline profile to level 4 0 H 264 HP Up to Level 4 1 H 264 AVC MP L4 1 H 264 AVC BP L3 1 H 265 HEVC Main Profile Up to Level 5 4k2k 30 fps H 265 HEVC Main Profile Up to Level 5 1 4k2k 60 fps MPEG Audio support MPEG1 Layer 1 2 MP3 MPEG2 LPCM Dolby Digital Plus Dolb...

Страница 31: ... AAC HE AAC v2 enhanced AAC MPEG4 Enhanced Low Delay AAC 外部 MicroDVD SRT SSA ASS Subview Vobsub 3gp MPEG2 MP HL MPEG 4 SP HL 3 0 MPEG 4 ASP HL 5 0 H 264 HP Up to Level 5 1 H 264 HP Up to Level 4 1 H 264 AVC MP L4 0 H 264 AVC BP L4 0 H 263 MPEG1 Layer 1 2 AMR_NB AAC 外部 MicroDVD SRT SSA ASS Subview Vobsub rmvb Real Video 8 9 10 webm VP8 DTMB AVS Full HD 60P decoderJizhun profile Level 6 2 supports 4...

Страница 32: ...房間是否太亮 在特別明亮的房間裏畫面可能看起來比較暗淡 檢查 色制式的設置 請參閱第 22 頁 電源突然關閉 機器內部的溫度升高 移開擋住通風口的物體 或是清潔通風口 是否設置了定時關機 無訊號自動關機 請參閱第 19 頁和第 20 頁 沒有影像 與其外部設備之間的連接是否正確 請參閱第 14 頁 第 15 頁和第 27 頁 是否選擇了正確的輸入 請參閱第 26 頁 影像調整是否正確 請參閱第 20 頁 天線是否正確地連接好了 請參閱第 13 頁 檢查 色制式的設置 請參閱第 22 頁 沒有聲音 音量是否太低 請參閱第 11 頁 檢查聲音制式的設置 請參閱第 22 頁 電視機有時會發出破裂聲 這並非故障 由於溫度變化 機殼會有輕微的熱脹冷縮 此時可能發出聲響 這並 不影響電視機的性能 無法選擇想要的頻道 切換數碼電視和模擬電視模式 請參閱第 26 頁 無法連接網絡 LAN 連線是否正確連接...

Страница 33: ...i 50Hz 1080i 60Hz 1080p 50Hz 1080p 60Hz 1080p 24Hz 2160p 30Hz HDMI 2 HDMI HDMI輸入 480i 576i 480p 576p 720p 50Hz 720p 60Hz 1080i 50Hz 1080i 60Hz 1080p 50Hz 1080p 60Hz 1080p 24Hz 2160p 30Hz HDMI 3 HDMI HDMI輸入 480i 576i 480p 576p 720p 50Hz 720p 60Hz 1080i 50Hz 1080i 60Hz 1080p 50Hz 1080p 60Hz 1080p 24Hz 2160p 30Hz 2160p 50Hz 2160p 60Hz 僅 HDMI3 端子支援HDR訊號 後面 數碼音頻輸出 光纖數碼音頻輸出 色差 影音輸入 色差輸入 480i 576i 480p 5...

Страница 34: ...33 輪廓圖 附錄 單位 毫米 1 有效區域 2 最薄的部份 LC 60UA50H LC 70UA50H ...

Страница 35: ...control unit 11 The operation button 12 Remote control pairing 12 Before turning on the power 13 Connecting external devices 14 Using digital audio output 15 Inserting a Micro SD memory card commercially available 15 Connecting a USB memory device 15 Connecting to the Network 15 Inserting the batteries 16 Cautions regarding the remote control unit 16 Turning the TV on off 17 Running the TV for the...

Страница 36: ... 23 System System info 23 Legal info 23 Local update 23 System recovery 23 Network function Connecting to the Network 24 Wired installation 24 Wireless installation 24 Network setting 25 Ethernet network connection 25 Wireless network connection 25 Bluetooth 25 Smart function Smart home 26 TV 26 APP 26 Installing Apps 26 Apps 26 Text input 26 Browser 26 Other useful features Connecting a USB memor...

Страница 37: ...mes into contactwith some substances Therefore keep it away from volatile substances such as insecticide In addition do not let it come into contact with objects made of rubber resin etc for a long time Maintenance of the LCD panel Before cleaning the LCD panel be sure to turn off the TV set and unplugthe power cord from the outlet When cleaning the LCD panel use a dry and soft cloth made of cotto...

Страница 38: ...h as radiators heaters stovesand other heat generating products including amplifiers To prevent fire never place any type of candle or naked flames on the top or near the TV set To prevent fire or shock hazard do not place the AC power cord under the TV set or other heavyitems Do not place heavyobjectson this product or stand on it Doing so could cause injury if the product overturns Take specialc...

Страница 39: ... accessible via this device is provided to you on an as is and as available basis and SHARP and its make no warranty or representation of any kind to you either express or implied including without limitation any warranties of merchantability non infringement for a particular purpose or any warranties of suitability availability accuracy completeness security title usefulness lack of negligence or...

Страница 40: ...cessories are providedwith the product AA size battery x 2 Operation manual Page 16 Stand unit Page 7 Remote control unit Used with batteries inserted Page 11 Short Screws x4 x2 Long Screws L Stand unit L Base cover R Base cover Stand unit Base cover R Stand unit ...

Страница 41: ...etweenthe TV bottom and the floor R Stand unit R Stand unit Place the TV on a flat surface with soft cushion on top of it Then remove the adhesive tape on both sides and remove the cover plate on both sides of the loudspeaker box Press the base plate small on both sides of the stereo sound into the left and right empty groove of the sound and make sure the cover plate is pressed tightly Special in...

Страница 42: ...t face down 2 Attach the foam blocksTOP L and TOP R onto the right side and left side of the packing box respectively as shown in FigureB 3 Insert the foam blocksTOP C into the packing box as shown in FigureB Now a simple platform is ready NOTE Put the platformon the flat floor after you have made it When installing the stand you need to put the TV face down on the simple platform Before that put ...

Страница 43: ...ith a wall mount bracket recommended by SHARP The use of other wall mount brackets may result in an unstable installation and may cause serious injuries Installing the TV requires special skills that should only be performed by qualified service personnel Customers should not attempt to do the work themselves SHARP bears no responsibility for improper mounting or mounting that results in accident ...

Страница 44: ... terminal HDMI 2 terminal HDMI 3 terminal USB 2 terminal USB 1 terminal Micro SD card slot COMPONENT AV input terminal Service specific terminal DIGITAL AUDIO OUTPUT terminal LAN terminals Autenna terminal ATV DTV Operation button ...

Страница 45: ...ROWSER Start browser 11 8 10 7 9 1 5 6 2 4 3 NOTE When the remote controlis in sleep mode pleasepress any keys except the power key to wake up the remote control The indicator of the remote control Indicator Performance Instructions state Description Blue Rapid flash Remind Start the pairing For 3 seconds Remind Pairingis OK Red Slow flash for 3 seconds Warning Low battery the remote controlcan st...

Страница 46: ...the remote control unit at the same time the red and blue lights flash alternately Once the flashing stop press OK to completethe Bluetoothpairing If pairingis not succeed pleasetry again or contactthe customerservicecenter Press the button on the TV for a few seconds Pairing and Power off menu will be displayed 1 Point the remote control unit towards the bottom left corner of TV within20cm press ...

Страница 47: ...TV rear view Connecting the antenna cable To enjoy a clearer picture use an outdoor antenna The following is a brief explanation of the types of connections that are used for coaxial cable Standard DIN45325 plug IEC169 2 75 ohm coaxial cable round cable Room antenna terminal 75 ohm type Antenna cable commerciallyavailable Connecting external devices See page 14 and 15 for connecting external equip...

Страница 48: ...idebar to switchto the TV selectthe input source and then press OK When using component cable commercially available When using AV cable commercially available When using HDMI cable commercially available Digital TV STB VCR Game console Camcorder DVD Player PC Digital TV STB VCR Game console Camcorder DVD Player Digital TV STB VCR Game console Camcorder DVD Player NOTE When using a TV set topbox t...

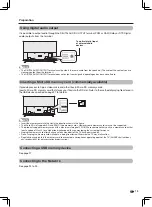
Страница 49: ...edit or the TV has been turned off Do not unplugthe memorycard whiledata is being transferred Otherwisethe TV may malfunction Regularly back up data in the memorycard to preventdata corruptionor operatingerrors of the TV SHARP shallnot bear any responsibility for data corruptionor destruction NOTE The DIGITAL AUDIO OUTPUT terminal usually outputs the same audio from the speakers The audio of the c...

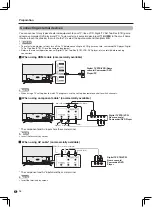
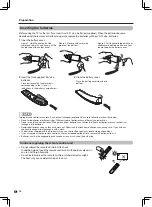
Страница 50: ...pen the batterycover Place batteries with their terminals corresponding to the and indications in the battery compartment Close the batterycover from top to bottom Figure1 Hold the front part of the remote control with one hand pull the handle tope with another hand Figure2 Place your thumb in the groove at the bottom Figure3 Pull the handlerope with your middleand index fingers and use your thumb...

Страница 51: ...ge disappeared Press POWER on the remote controlto turn on the TV If you want to turn off the TV from standby pleasepull out the AC cord User Guide When the TV powers on for the first time after purchase the settingwizard appears Followthe menus and make the necessary settings one after another Confirm the following before turning on the power Is the antennacable connected Is the AC cord pluggedin...

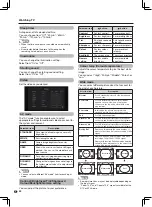
Страница 52: ...lect Subtitle Language and then press OK Press to select AudioLanguage and then pressOK NOTE Select the audio language for ATV only NOTE The time displayed on the EPG is information sent by the TV station Setup preferred subtitle languageif the subtitle languagesare available Press MENU to display the menu screen in full screenTV programs Press MENU to display the menu screen in full screenTV prog...

Страница 53: ...o select them Channelscan be erased individually NOTE Maximum8 alphanumerics can be input Labelingis only available for the ATV mode Program Edit Selectonly when inputtinga signalfrom HDMI terminal It s suitable for computerto display the text content PC Mode Press MENU to display the menu screen with fullscreen HDMI3 TV signals 1 2 Press to select HDMISelect to 4K 60Hz and then press OK When Pres...

Страница 54: ...ou desired Selected item Description Normal For 4 3 standardpictures A side bar appears on each side Zoom 14 9 For 14 9 letterboxpictures A thin side bar appears on each side and you may also see bars on the top and bottom with some programmes Panorama In this mode the pictureis progressively stretched toward each side of the screen Full For 16 9 squeezepictures Cinema 16 9 For 16 9 letterboxpictu...

Страница 55: ...ineimage control and backlight control Off No adjustment Auto volume Bass Treble Balance Different sound sources sometimes do not have the same volumelevel such as a programme and its commercial breaks The automatic volume control Auto volume reducesthis problem by equalizing levels You can adjustthe audio of the selectedAV mode Audio AV mode Please see page 20 Set the audio as you desired Selecte...

Страница 56: ...he current program NOTE The valuesof Signalstrength and Signalquality indicate when to check the appropriate alignment of the antenna NOTE Auto search can only search channels from the current mode You can set the channel manually Manual search Program edit Please see page 19 Item Description Storage to 1 99 Save programmeto your desired channel number Press OK to save Current CH Selectthe channel...

Страница 57: ...ng impaired they will not be displayed even when set to On System info Legal info System recovery Local update From here you can view the Hardwareinfo and Softwareinfo From here you can view the open source licenses This function allows you to transform to the latest softwarevia a USB device System You can view and set the info about the system NOTE If the softwareis not compatible with the system...

Страница 58: ...rtifications from the Wi Fi Alliance A wirelessLAN connectionand performance cannot be guaranteed for all residential environments In the following cases the wirelessLAN signalmay be poor or drop or the connection speed may become slower When used in buildingsmade with concrete reinforced steel or metal When placed near objects that obstruct the signal When used with other wirelessdevicesthat emit...

Страница 59: ...enter the password from software keyboard by pressing OK on the remote control You can select Wi Fi to connect the network Ethernet network connection Wireless network connection Bluetooth DHCP Manual connection Add network Systemwillattemptto obtainIP addressand other information automatically You can setup IP address Gateway Subnet mask FirstDNS and Second DNS following the on screen instruction...

Страница 60: ...plication From here you can setup the default installation location Selectfrom among 3 locations Default Internal External Internal storage SD card storage From here you can view the free space and the total storagespace of TV From here you can view free space and the total storagespace of SD card NOTE When using the childmode app if you forget password pleaseenter the password 3001 to reset Forma...

Страница 61: ... take time to read the data if the USB memorydevice containsmany files or folders Externalsubtitlesfor some video files may not be supported You can connecta USB memorydeviceor a USB hard disk drive HDD to the TV to enjoyviewingpictures listeningto the audio and watchingvideos Insertthe USB memory device with recorded pictures audio or videos into the USB 1 or USB 2 terminalon the TV CAUTION Do no...

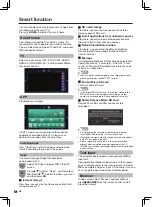
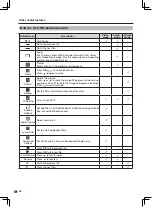
Страница 62: ...ess or to roate the image 90 degress anticlockwise and press or to roate the image 90 degress clockwise Press to exit this mode Sliding Set the Time Intervaland Animationof the slide TV Setting You can set the TV Subtitle Options Set Subtitle On off Subtitle Select SubtitleSwitching Subtitle Search and SubtitleAdvanced Audio Options Select audio track Jump Time Set the startingplaybacktime Advance...

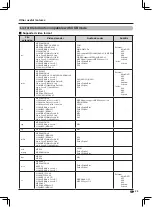
Страница 63: ...by Digital Plus Dolby Digital DTS External MicroDVD SRT SSA ASS Subview Vobsub Inside SSA ASS SRT Vobsub ts MPEG2 MP HL H 264 High Profile to level5 1 H 264 Main Profile to level4 1 H 264 baseline Profile to level4 0 H 264 HP Up to Level4 1 H 264 AVC MP L4 1 H 264 AVC BP L3 1 H 265 HEVC Main Profile Up to Level5 4k2k 30 fps H 265 HEVC Main Profile Up to Level5 1 4k2k 60 fps MPEG Audio support MPEG...

Страница 64: ...0 H 264 HP Up to Level5 1 H 264 HP Up to Level4 1 H 264 AVC MP L4 0 H 264 AVC BP L4 0 H 265 HEVC Main Profile Up to Level5 4k2k 30 fps H 265 HEVC Main Profile Up to Level5 1 4k2k 60 fps MPEG1 Layer 1 2 Dolby Digital Plus Dolby Digital MPEG4 AAC AAC HE AAC AAC HE AAC v2 enhancedAAC MPEG4 EnhancedLow DelayAAC External MicroDVD SRT SSA ASS Subview Vobsub 3gp MPEG2 MP HL MPEG 4 SP HL 3 0 MPEG 4 ASP HL...

Страница 65: ...rnal temperature has increased Removeany objectsblockingthe vent or clean Is the sleep timer no signalpower off See pages 19 and 20 No picture Is the connectionto external equipment correct See pages 14 15 and 27 Is the correct input selected See page 26 Is the pictureadjustment correct See page 20 Is the antennaconnectedproperly See page 13 Check the coloursystemsetting See page 22 No sound Is th...

Страница 66: ... HDMIinput 480i 576i 480p 576p 720p 50Hz 720p 60Hz 1080i 50Hz 1080i 60Hz 1080p 50Hz 1080p 60Hz 1080p 24Hz 2160p 30Hz HDMI 3 HDMI HDMIinput 480i 576i 480p 576p 720p 50Hz 720p 60Hz 1080i 50Hz 1080i 60Hz 1080p 50Hz 1080p 60Hz 1080p 24Hz 2160p 30Hz 2160p 50Hz 2160p 60Hz Support HDR signals for HDMI 3 only Rear Digital Audio Output Optical digital audio output COMPONENT AVINPUT COMPONENT in 480i 576i 4...

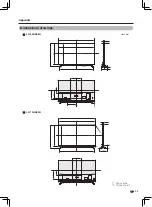
Страница 67: ...33 Dimensional drawings Appendix Unit mm 1 Active area 2 Thinnest part LC 60UA50H LC 70UA50H ...

Отзывы: