background image


3

IMPORTANT SAFETY PRECAUTIONS (Continued)

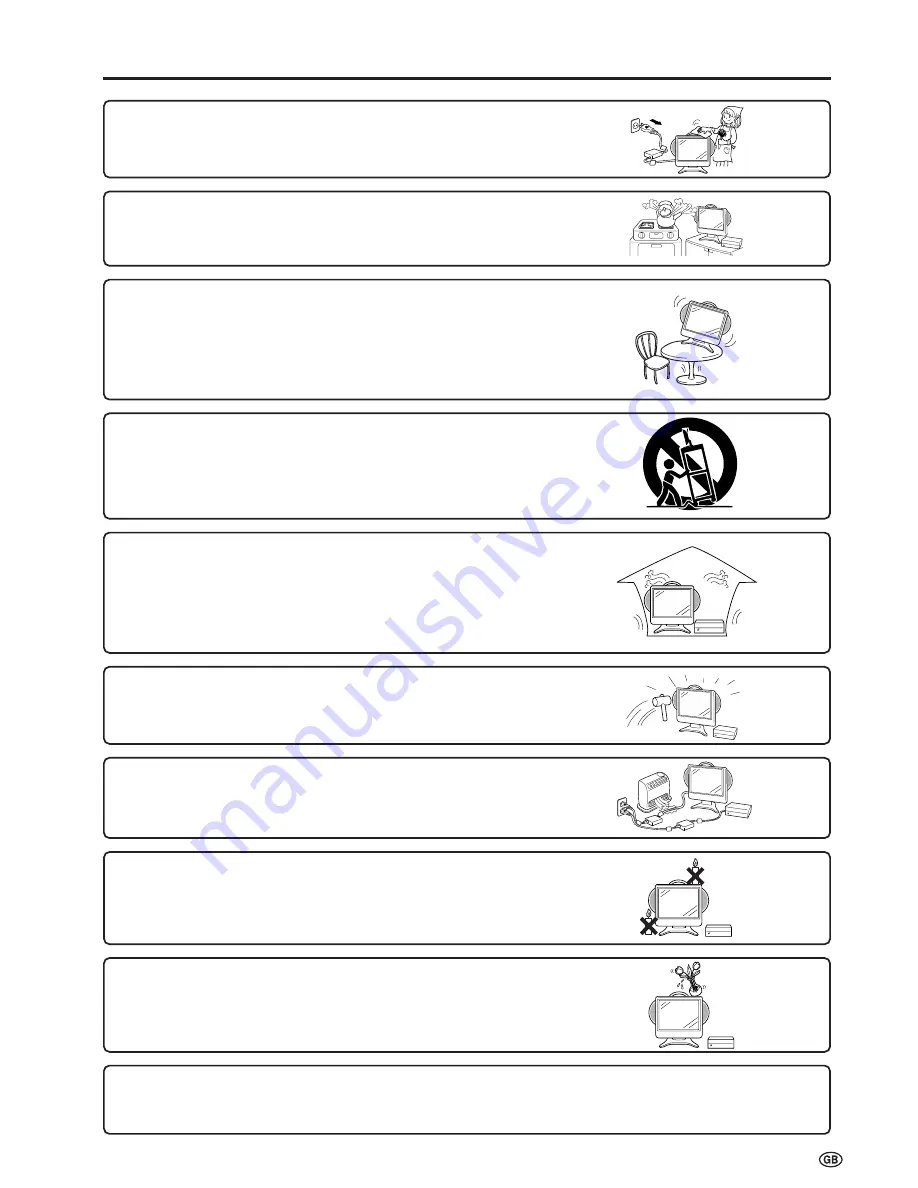
Cleaning—Unplug the power cord from the AC outlet before cleaning the
product. Use a damp cloth to clean the product. Do not use liquid cleaners or
aerosol cleaners.

Water and moisture—Do not use the product near water, such as bathtub,
washbasin, kitchen sink and laundry tub, swimming pool and in a wet
basement.

Stand—Do not place the product on an unstable cart, stand, tripod or
table. Placing the product on an unstable base can cause the product to
fall, resulting in serious personal injuries as well as damage to the product.
Use only a cart, stand, tripod, bracket or table recommended by the
manufacturer or sold with the product. When mounting the product on a
wall, be sure to follow the manufacturer’s instructions. Use only the
mounting hardware recommended by the manufacturer.

When relocating the product placed on a cart, it must be moved with
utmost care. Sudden stops, excessive force and uneven floor surface can
cause the product to fall from the cart.

Ventilation—The vents and other openings in the cabinet are designed for
ventilation. Do not cover or block these vents and openings since insufficient
ventilation can cause overheating and/or shorten the life of the product. Do not
place the product on a bed, sofa, rug or other similar surface, since they can
block ventilation openings. This product is not designed for built-in installation; do
not place the product in an enclosed place such as a bookcase or rack, unless
proper ventilation is provided or the manufacturer’s instructions are followed.

The LCD panel used in this product is made of glass. Therefore, it can break
when the product is dropped or applied with impact. Be careful not to be
injured by broken glass pieces in case the LCD panel breaks.

Heat sources—Keep the product away from heat sources such as radiators,
heaters, stoves and other heat-generating products (including amplifiers).

To prevent fire, never place any type of candle or naked flames on the top or
near the TV set.

To prevent fire or shock hazard, do not expose this product to dripping or
splashing. No objects filled with liquids, such as vases, should be placed on
the product.

The LCD panel is a very high technology product with 921,600 thin film transistors, giving you fine picture details.
Occasionally, a few non-active pixels may appear on the screen as a fixed point of blue, green or red.
Please note that this does not affect the performance of your product.

Содержание AQUOS LC-15L1E

Страница 1: ...llemagne Autriche Italie Hollande Belgique Suisse Royaume Uni Suède Finlande Norvège Espagne Questo prodotto può essere utilizzato soltanto nei seguenti paesi Germania Austria Italia Olanda Belgio Svizzera Regno Unito Svezia Finlandia Norvegia Spagna Este producto puede usarse solamente en los países siguientes Alemania Austria Italia Holanda Bélgica Suiza Reino Unido Suecia Finlandia Noruega Espa...

Страница 2: ...d plug incorporating a 3A fuse Should the fuse need to be replaced a BSI or ASTA approved BS 1362 fuse marked or ASA and of the same rating as above which is also indicated on the pin face of the plug must be used Always refit the fuse cover after replacing the fuse Never use the plug without the fuse cover fitted In the unlikely event of the socket outlet in your home not being compatible with th...

Страница 3: ...17 Switching the TV VIDEO AV1 AV2 AV3 AV4 TV Mode 17 Sound Volume 18 Changing Channels 18 Selecting Menu Items 19 Useful Features 21 Adjusting Picture Settings 21 Adjusting Sound Settings 21 Using Programme Table 22 Programmes 23 Features 27 Battery Charge 29 Transmission Setting 29 On screen Display 31 Child Lock 31 AV Connections 35 Timer Functions 37 NICAM Broadcast Selection 38 A2 Stereo Broad...

Страница 4: ...ding Do not overload AC outlets or extension cords Overloading can cause fire or electric shock Entering of objects and liquids Never insert an object into the product through vents or openings High voltage flows in the product and inserting an object can cause electric shock and or short internal parts For the same reason do not spill water or liquid on the product Servicing Do not attempt to ser...

Страница 5: ...d openings since insufficient ventilation can cause overheating and or shorten the life of the product Do not place the product on a bed sofa rug or other similar surface since they can block ventilation openings This product is not designed for built in installation do not place the product in an enclosed place such as a bookcase or rack unless proper ventilation is provided or the manufacturer s...

Страница 6: ...al reaction in order to generate electricity When the temperature outside is lower the chemical reaction becomes less vigorous and operating time becomes shorter How to Get the Most out of the Battery Turn off the power supply frequently when not in use in order to give the battery longer life The battery is consumed as time elapses even if the battery is not used To prevent consumption 1 If the b...

Страница 7: ...ed at an abnormal electric current or voltage An abnormal chemical reaction occurs inside the battery which may cause the battery to generate heat or smoke rupture or ignite Charge the battery in compliance with the specified charg ing conditions If the battery is charged without compliance to the charging conditions at temperatures greater than the specified temperature at voltages and electric c...

Страница 8: ...pped or blocks of noise to appear Using the product in a reinforced concrete building such as a condominium building or a house of a metal structure Using the product at locations near large scale metallic furniture Using the product in a crowd of people or close to buildings or obstacles etc Using the product at locations where magnetic fields electrostatic and interference occur due to devices s...

Страница 9: ...man nur in die folgende Länder gebrauchen Deutschland Österreich Italien Die Niederlande Belgien Die Schweiz Vereinigtes Königreich Schweden Finnland Norwegen Spanien Ce produit ne peut être utilisé que dans les pays suivants Allemagne Autriche Italie Hollande Belgique Suisse Royaume Uni Suède Finlande Norvège Espagne Questo prodotto può essere utilizzato soltanto nei seguenti paesi Germania Austr...

Страница 10: ... from batteries can cause a rash If chemical leakage is found wipe it off with a cloth The batteries supplied with the product may have a shorter life expectancy due to storage conditions If the remote control is not to be used for an extended period of time remove the batteries from the remote control Preparation Close the cover while engaging the lower claw with the remote control Using Remote C...

Страница 11: ...via the antenna cable not supplied Note Note Always turn the MAIN POWER button of the LCD TV set and the power button of the Wireless Centre to OFF when connecting the AC adapters If there is a Sharp product close to the video controller the product may malfunction during transmission of the video controller Unplug the AC adapters from the LCD TV set Wireless Centre unit and AC wall outlet when th...

Страница 12: ...ote You can change Colour system and Sound system only when Other Countries is selected in Country 5 Press to select Start search OK Back M End E First installation Automatic search Country UK Colour system PAL Sound system I Start search OK Back M End E First installation Language English Deutsch Français Español Italiano Nederlands Svenska Preparation Continued OK Back M End E First installation...

Страница 13: ...scribed in this manual CH MENU TV VIDEO Volume CH MAIN POWER TV VIDEO MENU 18 18 19 17 17 Charge indicator Power Standby indicator Remote sensor window Table stand Detachable Left speaker Right speaker 12 Remote sensor indicator 8 15 10 8 Main unit Top view Control section Main unit Front view ...

Страница 14: ...and release button Handle 1 2 CH MENU E TV VIDEO REVEAL HOLD END M MENU SOUND SUBTITLE SUBPAGE TEXT ROTATE WIDE T CH OK E TV VIDEO REVEAL HOLD END MENU SOUND SUBTITLE SUBPAGE TEXT ROTATE BRIGHT T M T Removing and Attaching the Table Stand Handle Table stand release button Table stand Stand Lift the main unit straight up by holding the handle while depressing the table stand release button Unfold t...

Страница 15: ...sion SIGNAL LEVEL indicator Reception gain Green Communication in progress Red Difficulty in transmission Not lit Not communicating Power indicator Green Operation in progress when power is on Red Standby Power button Front Antenna input terminal Antenna output terminal Rear AV IN1 RGB 21 pin Euro SCART S VIDEO VIDEO AUDIO R AUDIO L AV IN3 Factory adjustment terminal Power input DC 12V Video contr...

Страница 16: ...splayed TV VIDEO Switches the input source between AV1 AV2 AV3 AV4 and TV mode Channel Select MENU Displays the TV menu Volume Flashback Returns to the previous channel Red Picture menu Upwards Downwards Selection Zoom Display Function Teletext mode END Returns to normal screen TEXT Displays the Teletext mode screen Power SOUND Switches the sound mode REVEAL Displays hidden information such as sol...

Страница 17: ...s completely 4 Close the cover of the battery case Align the tabs of the cover with the corresponding grooves in the TV and snap into position 5 With the lever pulled forward lift up on the battery while pushing to the left Always make sure to attach the terminal cover to the removed battery When Removing Lever Lever Charging the Battery Charge the battery when using for the first time Plug the AC...

Страница 18: ... be approximately between 10 C 50 F and 30 C 86 F If the charge indicator begins to flash extremely rapidly at about 3 flashes a second during charging this means that charging is not proceeding normally because the battery may malfunction Replace the battery with the new one Power Continued Brightness Setting bright medium dark Viewing Time about 1 5 hours about 2 hours about 3 hours The remainin...

Страница 19: ...high priority A V 2 1 S 0 6 A V 1 A V 3 A V 4 1 S 0 6 On screen display AV1 mode AV2 mode TV mode TV VIDEO Press the MAIN POWER of the TV main unit Now accessing is displayed on the screen The power standby indicator of the TV main unit turns green Note The On screen indicator disappears after a few seconds Press the power button of the Wireless Centre unit The power indicator of the Wireless Cent...

Страница 20: ...cal value increases Press Volume to decrease the sound volume The numerical value decreases Note You can also use Volume of the TV main unit for this operation To mute the sound Press Mute to temporarily turn off the sound Sound off is displayed Press Mute again to turn off the Mute function Sound on is displayed Note When Volume is pressed in the Mute mode the sound turns on and the volume indica...

Страница 21: ...ND SUBTITLE SUBPAGE TEXT ROTATE WIDE T CH E TV VIDEO REVEAL HOLD END MENU SOUND SUBTITLE SUBPAGE TEXT ROTATE BRIGHT T M T OK The menus can be used to adjust the various settings of your LCD TV set Select the desired menu item by following the steps below Selecting Menu Items Control section of the main unit Using TV Menus Using Direct Control Menu Press MENU on the main unit to display the TV menu...

Страница 22: ...cture menu Contrast 50 Colour 0 Black level 0 Sharpness 0 Tint 0 Reset Back M End E Sound menu Headph vol 3 AV audio sig Sound1 2 Sound wide off Balance 0 0 OK OK Back M End E Programmes Automatic search Manual adjustment Sort Erase programme range Enter change name OK Back M End E Features Brightness bright Rotate normal Auto power off off Battery charge on Transmission setting On screen display ...

Страница 23: ... and 20 2 Press to select the desired adjustment item and then press OK Each item can now be selected or the setting screen appears 3 Press to make the adjustment 4 Press END to exit END Green Press Left Decrease headphones volume Increase the volume of the left speaker Choice Value range 0 60 Sound1 Sound2 Sound1 2 off on 15 15 Press Right Increase headphones volume Increase the volume of the rig...

Страница 24: ...ext or previous list of the Programme table press when the cursor is at a programme in the upper left or lower right position or press when the cursor is at a programme in the left or right column Press OK to display the selected programme 0 Programme table 8 E 9 16 E54 1 S 6 9 E1 17 E56 2 S 8 1 E11 18 E57 3 S1 11 E36 19 4 S11 12 E37 2 5 E 3 13 E38 21 6 E 5 14 E5 22 7 E 6 15 E53 23 OK Back M End E...

Страница 25: ...s MENU to return to the Automatic search screen Press to select Start search and then press OK to begin the automatic programme search Note Note See page 10 for details of the search process After the search is completed press END to exit OK Back M End E Automatic search Country UK Colour system PAL Sound system I Store progr from Start search 0 OK Back M End E 0 0 0 0 0 0 0 0 0 0 0 Store progr fr...

Страница 26: ...tem PAL Sound system PAI Skip off OK Back M End E Programmes Automatic search Manual adjustment Sort Erase programme range Enter change name Programmes Continued 2 Manual adjustment Individual settings of programmes can be adjusted Useful Features Continued OK Channel Select END Adjustment item Channel Frequency Name Colour system Sound system Skip Description The channel changes to the higher or ...

Страница 27: ...ge can be erased 0 OK Back M End E 0 0 0 0 0 0 0 0 0 0 0 Erase programme range 8 E 9 16 E54 1 S 6 9 E1 17 E56 2 S 8 1 E11 18 E57 3 S1 11 E36 19 4 S11 12 E37 2 5 E 3 13 E38 21 6 E 5 14 E5 22 7 E 6 15 E53 23 0 OK Back M End E 0 0 0 0 0 0 0 0 0 0 0 Erase programme range 8 E 9 16 E54 1 S 6 9 E1 17 E56 2 S 8 1 E11 18 E57 3 S1 11 E36 19 4 S11 12 E37 2 5 E 3 13 E38 21 6 E 5 14 E5 22 7 E 6 15 E53 23 OK Ba...

Страница 28: ... The character at the input position blinks Press to select the input position and then press to select the desired character Press OK to accept the name entered and then press END to exit 0 OK Back M End E 0 0 0 0 0 0 0 0 0 0 0 Enter change name 8 E 9 16 E54 1 _ 6 9 E1 17 E56 2 S 8 1 E11 18 E57 3 S1 11 E36 19 4 S11 12 E37 2 5 E 3 13 E38 21 6 E 5 14 E5 22 7 E 6 15 E53 23 0 OK Back M End E 0 0 0 0 ...

Страница 29: ...wer off off Battery charge on Transmission setting On screen display Child lock Selected item Brightness Rotate Auto power off only TV mode Battery charge Transmission setting On screen display Child lock Factory setting bright Maximum brightness normal Normal image orientation off This feature is inactive o on Auto Setting change medium Brightness 60 Suitable for viewing in well lit areas Saves e...

Страница 30: ...Continued Rotate normal Normal Rotate horizontally Rotate mirror Rotate rotate Rotate upside down Rotate vertically Rotate horizontally and vertically ROTATE Rotate normal R o t a t e m i r r o r Rotate rotate Rotate upside down 1 2 You can change the setting screen of BRIGHTNESS and ROTATE directly 1 Directly Setting the BRIGHTNESS Press BRIGHT to display the Brightness screen Each time you press...

Страница 31: ...END M MENU SOUND SUBTITLE SUBPAGE TEXT ROTATE WIDE T CH OK E TV VIDEO REVEAL HOLD END MENU SOUND SUBTITLE SUBPAGE TEXT ROTATE BRIGHT T M T Transmission Setting When shipped from the factory the Channel of the Transmission setting is set to Auto and the Distance is set to near However when reception is poor due to the presence of an interference source in close proximity change the settings for Cha...

Страница 32: ...Displayed in yellow 3 Setting Distance Select the Distance that yields the best reception Press to select Distance and then press OK Press to select the desired distance and then press OK Adjusting distance setting is displayed on the screen and the communication distance is set automatically Press END to exit Note If reception has become poor after changing the locations of the Wireless Centre an...

Страница 33: ...on blocks the viewing of any channel for which the child lock has been set To use the Child Lock function you first need to define your PIN Personal Identification Number 1 Defining a PIN Perform steps 1 and 2 in Features to display the Features screen Press to select Child lock Press OK to display the PIN input screen Input the desired four digit PIN e g 1234 with Channel Select Note Be sure to m...

Страница 34: ...PIN Child lock OK Back M End E Child lock For all programmes For individual progr only Change PIN 5678 Cancel PIN Perform steps 1 to 3 in 1 Defining a PIN to display the PIN input screen Enter your four digit PIN e g 1234 with Channel Select and then press OK Note Note Numbers entered are hidden with If the PIN has been input incorrectly Wrong PIN is displayed When the PIN is correctly entered the...

Страница 35: ...ecurring Child Lock The lock is activated everyday unless no is selected Input the start and end time for a once only Child Lock The length of the period should be up to 24 hours Useful Features Continued Channel Select END OK Warning The timer takes its clock information from the Teletext broadcast The teletext broadcast may be in a different time zone and therefore child lock timer may not activ...

Страница 36: ... 2 S 8 1 E11 18 E57 3 S1 11 E36 19 4 S11 12 E37 2 5 E 3 13 E38 21 6 E 5 14 E5 22 7 E 6 15 E53 23 END OK Note When a Child Lock is activated the Programmes and First installation items are not displayed in the TV menu and cannot be selected Channel Select Perform steps 1 to 2 in 2 Changing Cancelling a PIN to display the Child lock screen Press to select For individual progr only and then press OK ...

Страница 37: ... various types of equipment the picture may become skewed In this case select the AFC Automatic Frequency Control mode that will improve the picture Switching between AV input signals may be slow depending on the settings in Colour system If you want to speed up signal switching switch Auto in Colour System to the current reception colour system When Colour system is set to Auto it may not be poss...

Страница 38: ...o select For decoder connected to AV1 and then press OK to display the decoder programme selection screen Press and or to select the programme for the decoder and then press OK Repeat the same procedure if you want to specify other decoder programmes Press MENU to return to the For programmes screen Press to select Sound from AV1 and then press OK Press to select the desired sound source Press END...

Страница 39: ...current time HH MM SS with Channel Select Press to select the desired item and then press OK See the table below Press to make the adjustment If you select for Switch off or Alarm input the desired time with Channel Select Press END to exit Yellow OK Back M End E Timer functions Time Switch off no Alarm no Alarm volume 0 1 2 3 4 5 6 Choice Input value Value range HH MM SS no HH MM no HH MM 0 39 Ad...

Страница 40: ...ted the TV sound is output monaurally Bilingual When the LCD TV set is receiving a bilingual programme the Sound 1 mode is automatically selected Each time you press SOUND the mode changes as follows Sound 1 Sound 2 Sound 1 2 Mono Monaural The LCD TV set is receiving a monaural broadcast Each time you press SOUND the mode changes between Nicam and Mono NICAM Broadcast Selection Mo n o S t e r e o ...

Страница 41: ...ess SOUND the mode changes between Stereo and Mono When Mono is selected the TV sound is output monaurally Bilingual When the LCD TV set is receiving a bilingual programme the Sound 1 mode is automatically selected Each time you press SOUND the mode changes as follows Sound 1 Sound 2 Sound 1 2 Mono Useful Features Continued A2 Stereo Broadcasts Mo n o S t e r e o S o u n d 1 S o u n d 2 S o u n d ...

Страница 42: ...subpages a control line holding the operating instructions for subpages can be displayed on line 24 369 SHARP TEXT 1 2 3 4 5 6 7 8 9 10 11 12 13 14 1 5 1 6 17 18 19 2 0 2 1 2 2 23 02 5 2 21 100 200 369 SHARP TEXT 1 2 3 4 5 6 7 8 9 10 11 12 13 14 1 5 1 6 17 18 19 2 0 2 1 2 2 23 02 5 2 21 100 200 CH MENU E TV VIDEO REVEAL HOLD END M MENU SOUND SUBTITLE SUBPAGE TEXT ROTATE WIDE T CH OK E TV VIDEO REV...

Страница 43: ... line 4 Using the TOP table When TOP Teletext is being broadcast you can display the TOP table with the current programme data if one exists Press OK to display the TOP table The Teletext page is temporarily turned off Press to select the desired item Press to select topics column 1 or subtopics column 2 if they exist Press OK A page associated with the selected item is displayed CH MENU E TV VIDE...

Страница 44: ... yellow When selecting the character set pressing OK will change the letters to grey for an instant and then return them back to yellow Press END to exit 6 Useful Features for Teletext HOLD on the remote control can be used to hold the current teletext page Press the button again to cancel the hold mode can be used to zoom the current teletext page as below ABC DEF ABC DEF The screen displays each...

Страница 45: ...O input terminal are selected for the AV IN 3 input When viewing video from the VIDEO input terminal do not connect anything to the S VIDEO input terminal For details concerning usage and connection of external devices see the respective operation manuals Connecting External Devices It is possible to enjoy video and sound by connecting a VCR and home video game system to the terminals located on t...

Страница 46: ...ue 12 Not used 19 Video output 6 Audio left input 13 Earth for red 20 Video input PAL SECAM NTSC 7 BLUE input 14 Not used 21 Plug shield Connecting External Devices Continued IN OUT AV IN2 AV AV IN3 AV IN3 IR MOUSE POWER INPUT DC12V FACTORY SETTING VIDEO S VIDEO AUDIO AV IN1 RGB L R 21 pin Euro SCART connector To AV IN1 21 pin Euro SCART terminal Decoder Wireless Centre IN OUT AV IN2 AV AV IN3 AV ...

Страница 47: ...rd ANT S VIDEO AUDIO DIGITAL OPTICAL CO AXIAL OUT IN TV R L AUDIO VIDEO R L AUDIO VIDEO R L DVD player Decoder To Audio Video output terminal To Video control terminal To AV IN3 S VIDEO terminal To AV IN2 AV terminal To S VIDEO output terminal To Audio Video output terminal To input output terminal Rear Front VCR etc Installation example The video controller should be fixed with the accessory tape...

Страница 48: ... TEXT ROTATE WIDE T CH OK E TV VIDEO REVEAL HOLD END MENU SOUND SUBTITLE SUBPAGE TEXT ROTATE BRIGHT T M T CH MENU E TV VIDEO REVEAL HOLD END M MENU SOUND SUBTITLE SUBPAGE TEXT ROTATE WIDE T CH E TV VIDEO REVEAL HOLD END MENU SOUND SUBTITLE SUBPAGE TEXT ROTATE BRIGHT T M T OK Turn on the power supply for Wireless Centre Turn on the power supply for the external equipment Regarding operating method ...

Страница 49: ...iven to the S VIDEO input terminal When signals from external devices connected to the Wireless Centre do not appear to be transmitted to the main unit properly connect the external devices to the AV IN4 terminal of the main unit VIDEO S VIDEO AUDIO R L How to Fix Cable Clamps AUDIO AV IN4 VIDEO S VIDEO L R Red Yellow White Red White Yellow Game system VCR DVD etc Audio Video cord commercially ava...

Страница 50: ...hange the orientation or location of the main unit or Wireless Centre Make sure Picture adjustment is properly adjusted The fluorescent lamp may have reached the end of its service life Make sure the S VIDEO terminal has nothing connected Make sure the volume is not set to minimum Make sure the sound is not set to mute Make sure the headphones are not connected Make sure the antenna cable is prope...

Страница 51: ...be considered that the battery of the remote control has run out Reference page 6 6 30 6 6 45 45 45 Troubleshooting Continued Cautions regarding use in high and low temperature environments When the unit is used in a low temperature space e g room office the picture may leave trails or appear slightly delayed This is not a malfunction and the unit will recover when the temperature returns to norma...

Страница 52: ...omobiles trains high voltage lines neon lights etc There may be interference between the antenna cable and power cable Try positioning them further apart Is the unit receiving interference from other devices Transmission antennas of radio broadcasting stations and transmission antennas of amateur radios and cellular phones may also cause interference Use the unit as far apart as possible from devi...

Страница 53: ...language English German French Spanish Italian Swedish Dutch Russian Power requirement TV main unit DC 15 V AC 110 240 V 50 60 Hz Wireless Centre DC 12 V AC 110 240 V 50 60 Hz Weight Main unit 5 4 kg without table stand approx 6 3 kg with table stand Wireless Centre 1 2 kg Accessories Wireless remote control Remote control holder R 03 dry batteries 2 AC adapters 2 AC cord Table stand Battery Wirel...

Страница 54: ...H MENU E TV VIDEO REVEA L HOLD END M MENU SOUND SUBTIT LE SUBPAGE TEXT ROTAT E WIDE T CH OK E TV VIDEO REVEA L HOLD END MENU SOUND SUBTIT LE SUBPAGE TEXT ROTAT E BRIGHT T M T 228 59 81 97 280 100 494 269 5 50 50 415 445 5 5 198 5 145 5 ...

Страница 55: ...ENTAL AVANCÉ Nous suggérons de retirer les instructions suivantes des pages 53 et 55 en anglais Le mode d emploi étant multilingue il est suggéré aussi de le faire pour les autres langues Si l on a oublié son numéro de code personnel et que VERROUILLAGE PARENTAL AVANCÉ ne peut pas être débloqué suivrez la procédure ci dessous 1 Appuyez sur MENU pour faire apparaître le menu de télévision 2 Appuyez...

Страница 56: ...54 ...

Страница 57: ...esactivar la PROTECCIÓN PARA NIÑOS AVANZADA siga este procedimiento 1 Pulse MENU para ver el menú de TV 2 Pulse para selecconar Varios y luego pulse OK para ver la pantalla Varios 3 Pulse para seleccionar Restricción niños luego pulse OK 4 Aparecerá el menú de introducción del PIN 5 Introduzca 3001 con Selección de canales Aparecerá el menú de ajuste de Restricción niños y el PIN se borrará Ahora ...

Страница 58: ...56 ...

Страница 59: ...drukt in Japan TINS A928WJZZ 03P10 JKM SHARP CORPORATION Printed on post consumer recycled paper Gedruckt auf Nachverbraucher Recyclingpapier Imprimé sur du papier recyclé Stampato su carta riciclata Impreso en papel reciclado Tryckt på slutkonsumerat återanvänt papper Gedrukt op na verbruik recycled papier ...

Отзывы: