13
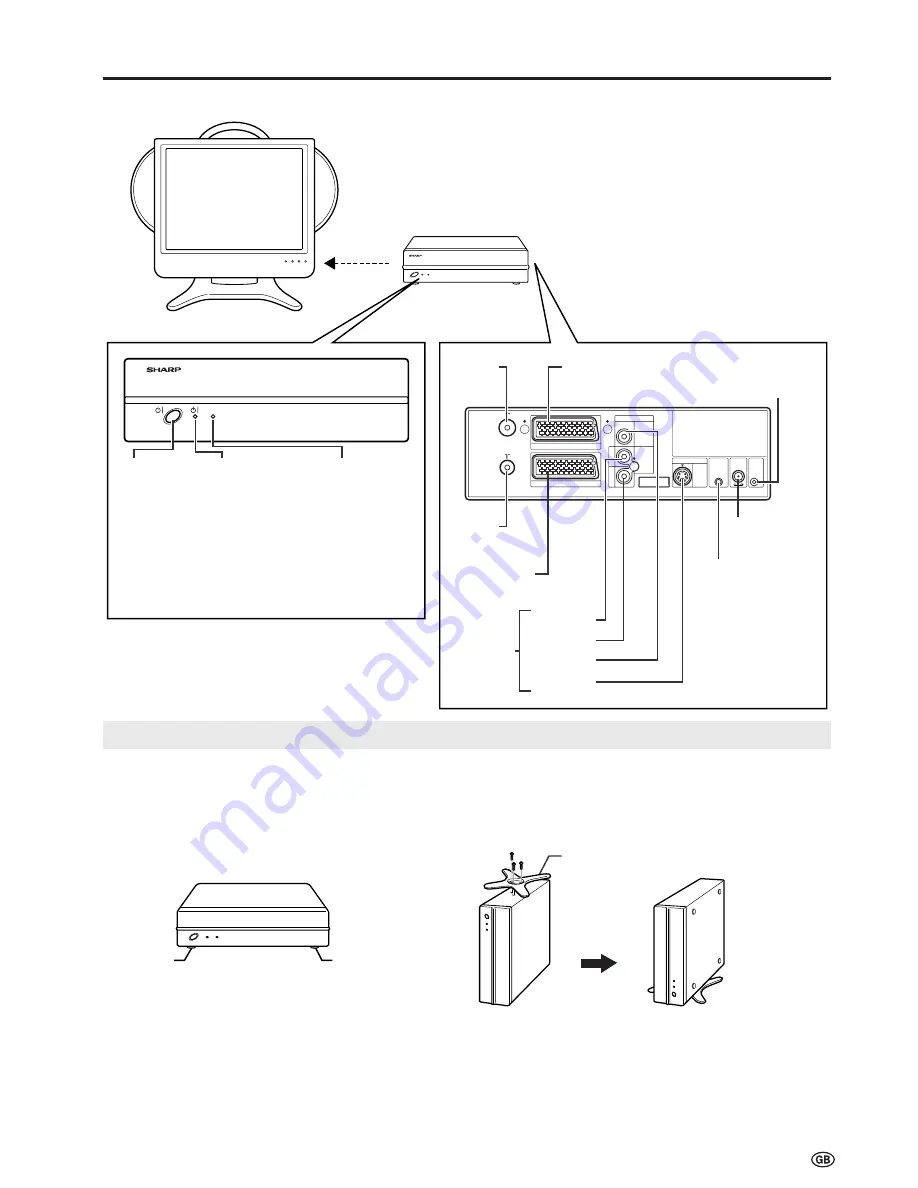
Wireless Centre Part Names
* Failure to securely fasten the stand may cause the Wireless
Centre to tip over during use.
* When placing the Wireless Centre upright, make sure to use
the SCART to SCART flat cable (commercially available) for
a connection. The use of this cable can prevent the Wireless
Centre from falling down (See page 44).
Wireless Centre
stand
Rubber foot
Rubber foot
Power Indicator
When the TV is turned off with the remote control, the
Wireless Centre is switched to standby (power indicator
is lit red). (There may be a time lag of about 5 to 6
seconds.)
Setting Up the Wireless Centre
IN
OUT
AV-IN2(AV)
AV-IN3
AV-IN3
IR
MOUSE
POWER
INPUT
DC12V
FACTORY
SETTING
VIDEO
S-VIDEO
AUDIO
AV-IN1(RGB)
L
R
SIGNAL LEVEL
Transmission
SIGNAL LEVEL
indicator
(Reception gain)
· Green:
Communication
in progress
· Red:
Difficulty
in transmission
· Not lit:
Not communicating
Power indicator
· Green:
Operation in
progress
(when power is on)
· Red: Standby
Power
button
Front
Antenna
input
terminal
Antenna
output
terminal
Rear
AV-IN1 (RGB)
(21-pin Euro-SCART)
S-VIDEO
VIDEO
AUDIO (R)
AUDIO (L)
AV-IN3
Factory
adjustment
terminal
Power input
DC 12V
Video control
terminal
AV-IN2 (AV)
(21-pin AV-SCART)
Wireless Centre
Main unit
•
The Wireless Centre can be placed horizontally or upright.
• When placing horizontally:
The side on which the rubber feet are attached is the
bottom.
• When placing upright:
Fasten the stand to the bottom of the Wireless Centre with
the screws provided.
Placing the Wireless Centre Where You Want It
We recommend placing the Wireless Centre in an area
where there are no obstructions to impede radio wave
transmission/reception.
(Do not place the Wireless Centre in a box.)


