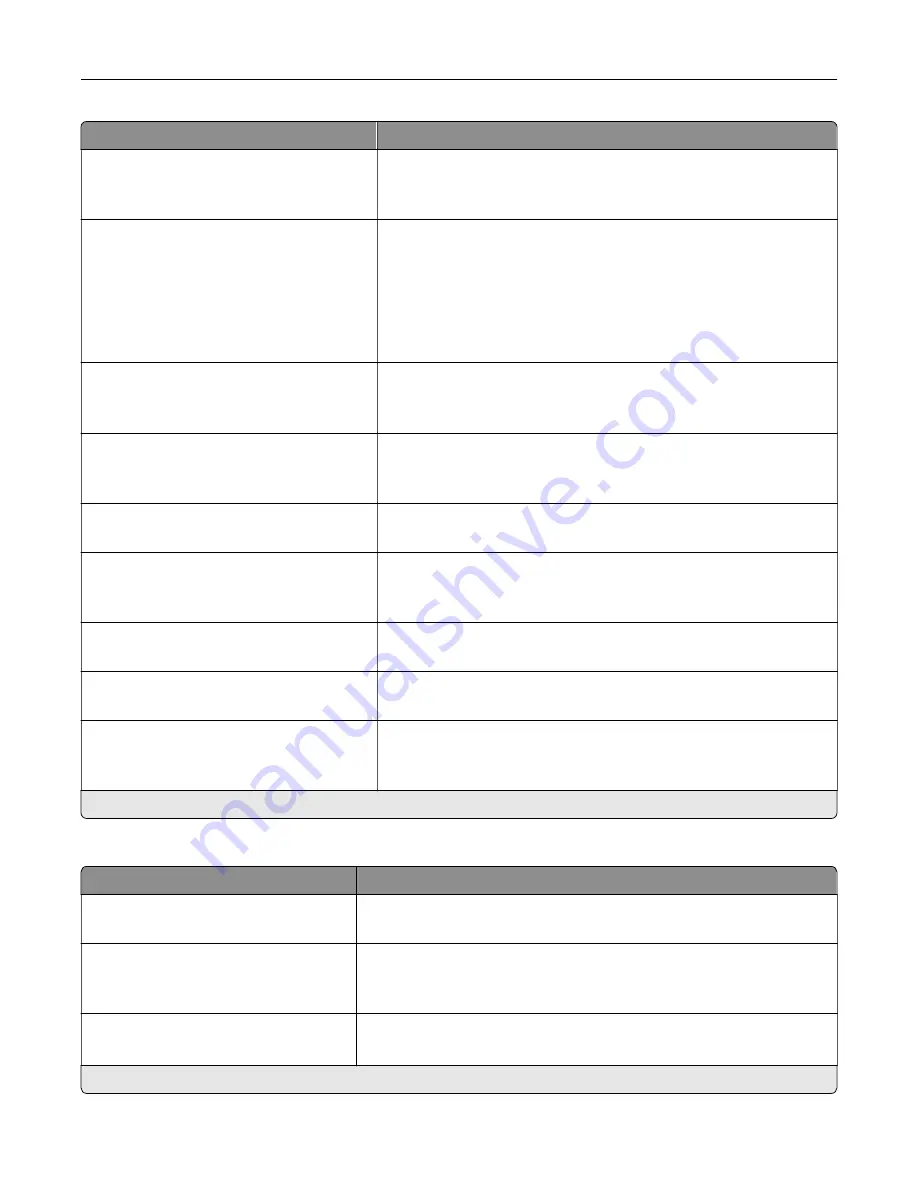
Menu item
Description
Contrast
Best for content*
0–5
Specify the contrast for the scanned image.
Background Removal
Background Detection (Content
‑
based*)
Level (0*)
Remove the background color or image noise from the original
document.
Notes:
•
Content-based removes the background color from the original
document.
•
Fixed removes image noise from a photo.
Mirror Image
Off*
On
Create a mirror image of the original document.
Negative Image
Off*
On
Create a negative image of the original document.
Shadow Detail
‑
4 to 4 (0*)
Adjust the shadow detail in the scanned image.
Scan Edge to Edge
Off*
On
Scan the original document from edge to edge.
Sharpness
1–5 (3*)
Adjust the sharpness in the scanned image.
Temperature
‑
4 to 4 (0*)
Generate a bluer or redder output of the original document.
Blank Pages
Blank Page Removal (Remove*)
Blank Page Sensitivity (5*)
Set the sensitivity of scans in relation to blank pages in the original
document.
Note:
An asterisk (*) next to a value indicates the factory default setting.
Admin Controls
Menu item
Description
Max E
‑
mail Size
0–65535 (0*)
Set the allowable file size for each e
‑
mail.
Size Error Message
Specify an error message that the printer sends when an e
‑
mail exceeds
its allowable file size.
Note:
You can type up to 1024 characters.
Limit Destinations
Limit sending of e
‑
mail only to the specified list of domain name.
Note:
Use a comma to separate each domain.
Note:
An asterisk (*) next to a value indicates the factory default setting.
Understanding the printer menus
84
Содержание 679
Страница 48: ...Scanning 48 ...
Страница 126: ... ADF glass pad Scanner glass Scanner glass pad 3 Close the scanner cover Maintaining the printer 126 ...
Страница 134: ...4 Remove the used pick tires one after the other 5 Unpack the new pick tires Maintaining the printer 134 ...
Страница 136: ...Maintaining the printer 136 ...
Страница 138: ...7 Insert the new pick roller assembly 8 Flip the tray base and then insert the tray insert Maintaining the printer 138 ...
Страница 144: ...Paper jam in door A 1 Remove the tray 2 Open door A Clearing jams 144 ...
Страница 147: ...6 Insert the imaging unit Note Use the arrows inside the printer as guides Clearing jams 147 ...
Страница 153: ...4 Close the ADF cover Clearing jams 153 ...
Страница 197: ...b Connect the ISP extended cable to the ISP connector Upgrading and migrating 197 ...
Страница 198: ...c Install the hard disk Upgrading and migrating 198 ...


