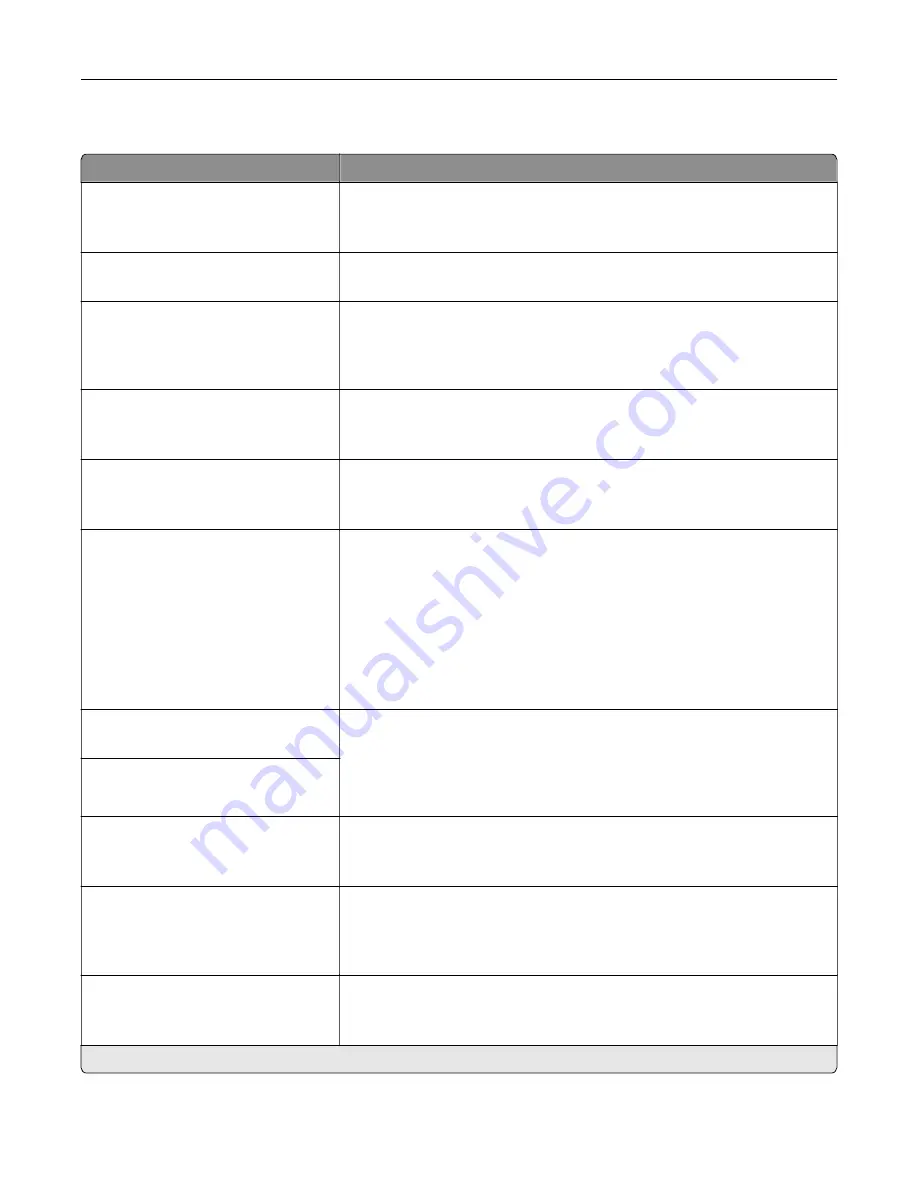
PCL
Menu item
Description
Font Source
Resident*
All
Choose the source which contains the default font selection.
Font Name
[List of available fonts]
Select a font from the specified font source.
Symbol Set
[List of available symbol set]
Specify the symbol set for each font name.
Note:
A symbol set is a set of alphabetic and numeric characters,
punctuation, and special symbols. Symbol sets support the different
languages or specific programs such as math symbols for scientific text.
Pitch
0.08–100 (10*)
Specify the font pitch for scalable monospaced fonts.
Note:
Pitch refers to the number of fixed
‑
space characters in a horizontal
inch of type.
Orientation
Portrait*
Landscape
Specify the orientation of text and graphics on the page.
Lines per Page
1–255
Specify the number of lines of text for each page printed through the PCL®
datastream.
Notes:
•
This menu item activates vertical escapement that causes the
selected number of requested lines to print between the default
margins of the page.
•
60 is the U.S. factory default setting. 64 is the international factory
default setting.
PCL5 Minimum Line Width
1–30 (2*)
Set the initial minimum stroke width.
Notes:
•
Jobs printed in 1200 dpi use the value directly.
•
Jobs printed in 4800CQ use half the value.
PCLXL Minimum Line Width
1–30 (2*)
A4 Width
198 mm*
203 mm
Set the width of the logical page on A4
‑
size paper.
Note:
Logical page is the space on the physical page where data is
printed.
Auto CR after LF
On
Off*
Set the printer to perform a carriage return after a line feed control
command.
Note:
Carriage return is a mechanism that commands the printer to move
the position of the cursor to the first position on the same line.
Auto LF after CR
On
Off*
Set the printer to perform a line feed after a carriage return control
command.
Note:
An asterisk (*) next to a value indicates the factory default setting.
Understanding the printer menus
68
Содержание 679
Страница 48: ...Scanning 48 ...
Страница 126: ... ADF glass pad Scanner glass Scanner glass pad 3 Close the scanner cover Maintaining the printer 126 ...
Страница 134: ...4 Remove the used pick tires one after the other 5 Unpack the new pick tires Maintaining the printer 134 ...
Страница 136: ...Maintaining the printer 136 ...
Страница 138: ...7 Insert the new pick roller assembly 8 Flip the tray base and then insert the tray insert Maintaining the printer 138 ...
Страница 144: ...Paper jam in door A 1 Remove the tray 2 Open door A Clearing jams 144 ...
Страница 147: ...6 Insert the imaging unit Note Use the arrows inside the printer as guides Clearing jams 147 ...
Страница 153: ...4 Close the ADF cover Clearing jams 153 ...
Страница 197: ...b Connect the ISP extended cable to the ISP connector Upgrading and migrating 197 ...
Страница 198: ...c Install the hard disk Upgrading and migrating 198 ...


