Sargent & Greenleaf, Inc.
One Security Dr.
Nicholasville, KY 40340-0930 USA
Phone: (800)-826-7652
Fax: (800)-634-4843
5
Sargent & Greenleaf S.A.
9, Chemin du Croset
1024 Ecublens, Switzerland
Phone: +41-21 694 34 00
Fax: +41-21 694 34 09
Document 630-821
Revised 03/18/2019
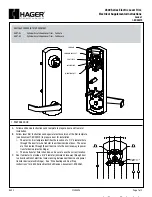
Place the keypad base over the keypad extension, pull all excess cable
throughthe center hole (as shown), line up the keypad base mounting screw
holes with those in the door, and use the included 8-32 (or M4) machine screws
to securely fasten the mounting base to the door. It will also hold the keypad
extension and number plate (if used) firmly in place. The raised, circular post
near the edge of the base will be very near the bottom of the keypad. Use this
feature as a reference to help you orient the base correctly before you fasten it
into place. The extension can be mounted in four different orientations. Pick the
one that best suits your particular application.
The following check should be performed three times with the door remaining OPEN.
At the keypad, enter 10 10 10 10 #. The lock will BEEP three times and its bolt will retract. Turn the safe handle to verify that the lock is unlocked. Turn
the safe handle to the locked position. The green STATUS 1 LED on the keypad extension will light briefly. The safe door should remain open for the
three operational checks. You can close the safe door and turn the handle to the locked position after the third operational check. The lock bolt will
extend, and the lock will BEEP three times. In addition, the green STATUS 1 LED on the keypad extension will light briefly. Test the safe’s handle to
make sure it is securely
1. From the front of the safe, connect the five-conductor cable (the larger one) to the keypad extension base.
The connector and receptacle are “keyed,” so the connector will only seat when oriented correctly. Route the
cable as shown here. Make sure the connector is fully seated in the keypad extension receptacle. Note the
self-adhesive pad to the right of the cable receptacle. Once the connector is plugged in, remove the protec-
tive backing from this pad. Pull all excess cable through the center opening to the front of the extension
base. Then line up the base’s mounting screw holes with those in the door, and press the extension against
the door.
2.
3. At the front of the safe, install a new 9-volt battery in each of the keypad’s two battery holders. Duracell®
brand batteries are recommended. Support the top of each holder with a thumb or finger as each battery is
inserted. This will help prevent bending or breaking the holder posts.
4. The keypad cable connector is shaped so that it will fit into the keypad receptacle only when aligned cor-
rectly. Insert the connector into the receptacle in the underside of the keypad. If it does not seat easily, do
not force it. This means you need to turn it 180
0
before attempting to insert it again.
5. Place the keypad over the base. Make sure the keypad cable is clear of the pad’s two spring clips as you push
the keypad firmly onto the base. It should snap into place. If you need to remove the keypad, pull the bottom
(area nearest the S&G logo) away from the mounting base first. Never allow the keypad to hang by the at-
tached cable.
6. Attach the lock Serial number to the Keypad Extension plate.
Keypad and Keypad Extension Installation
The installation is complete, but do not close the safe door until
successfully completing the following lock test.
Lock Test


