10
11
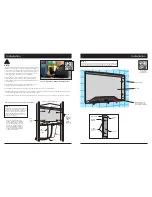
FINISHED WALL
FRAMING
MEMBER
NOTE:
GLASS
FACE-
PLATE
SEALS
DIRECTLY
TO
FINISHED
WALL
SURFACE
SEALANT
CREATES
WATER-
TIGHT
SEAL
COMPLETELY
INSTALLED
BACK BOX AND
TV ASSEMBLY
Step 4
Allow waterproof sealant 24 hours to cure at 72 degrees Fahrenheit before exposing to moisture. (or
recommended time designated by sealant instructions)
Once fully cured, use a razor blade or utility knife to carefully remove excess sealant.
Installation
Installation
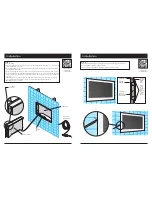
PASS-
THROUGH
PORT
LOW VOLTAGE
POWER CABLE
2) BACK BOX
1/8"
BEAD
SEALANT
1) TV ASSEMBLY
Step 3
Install TV Assembly:
A) Place TV assembly face down on a clean, dry surface near the installed back box. Make all necessary connections and
ensure LCD operation is successful.
B) Before applying adhesive, “dry fit” the TV assembly in back box. Notice that the gravity lock mounts engage. Ensure
functionality in installed position.
C) Remove TV assembly from back box. Do not disconnect any wires. Clean any residue from glass and remove debris.
D) Generously apply 1/8" bead of supplied waterproof sealant to glass face as close to the edge as possible. Affix to wall
surface, ensuring gravity lock mounts are fully engaged. Sealant should seep out the front on all edges to provide the
best seal.
E) Immediately after TV assembly is installed and sealed, again verify functionality of LCD and remote. If operation has
been compromised by the installation, corrections can easily be made before the sealant has cured.
F) Wipe dripping or excessive sealant.
Scan to watch
the 2-minute
installation video
Scan to watch
the 2-minute
installation video
Содержание Hydra HY-19. 5
Страница 12: ...22 23 Notes Notes ...


