Setra Systems SRIMV Скачать руководство пользователя страница 14

14 
 

Menu Operation 


Menu key – Provides access to the menu structure 


Down arrow key – Allows selection of numerical parameters. Pushing the down arrow causes the digits 

to move upwards in a 1 digit count and will wrap around. The cursor below the indicated item in the 

current menu item indicates that this is the digit that is being changed. If you don’t need to make a 

change to that position press the enter key to move to the next position to the right. 


Enter key – Use this key to move left to right in a current menu screen. It is also used to save the 

current menu items selected settings, or to confirm the current menu operation. Press the Enter key to 

save the current settings; the display will show the current setting value and flash twice, and prompt the 

user that the value currently set has been saved. There is no “back” button, so if the user proceeds past 

the desire parameter they must go back to the start of that menu screen. 


Return/Silence button – This button provides a quick way to return to the home screen from anywhere 

within the menu structure. It has the secondary purpose of temporarily silencing the audible alarm. If 

the mute timeout setting is reached the audible alarm will again sound.   
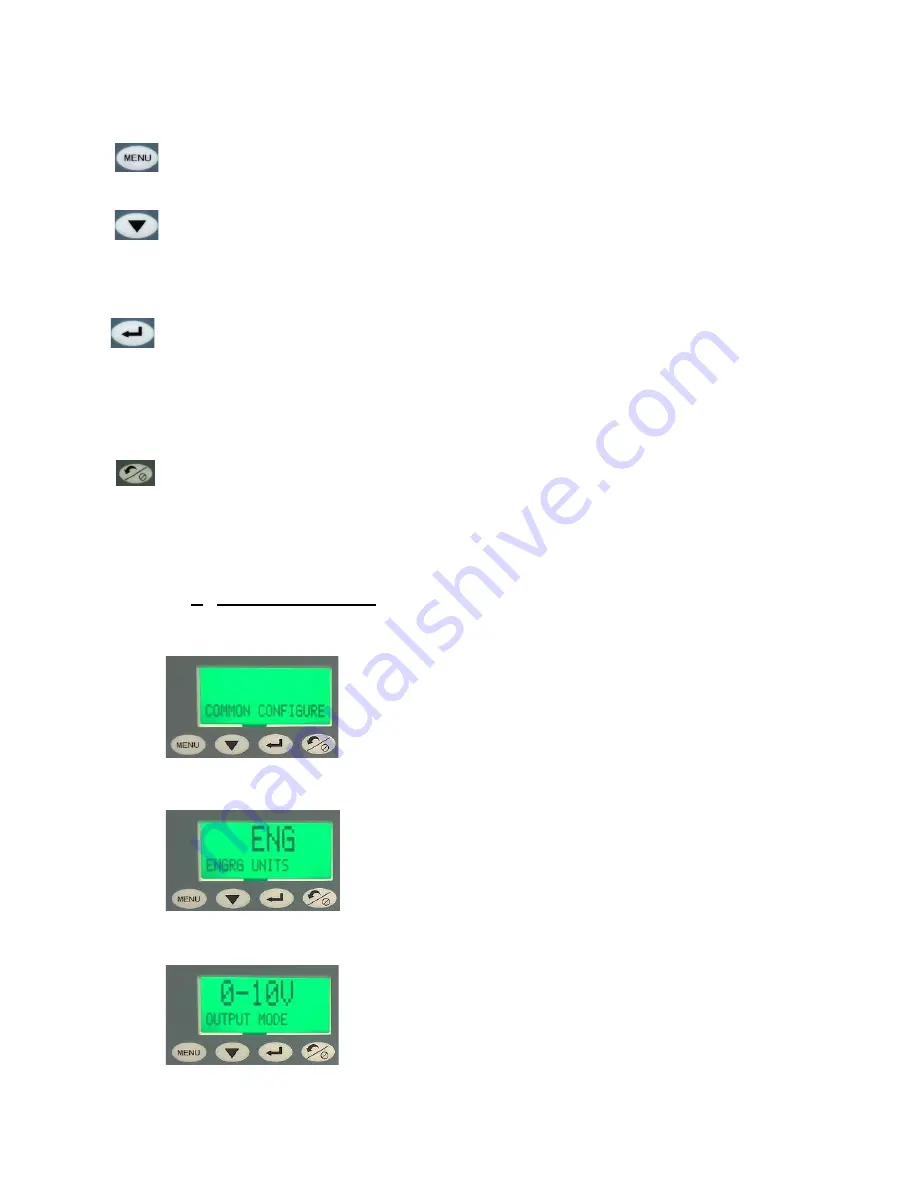
 

Menu Screens   

1.


Common Configuration 


Menu Setup 


Runs through the setup screens to set all 

parameters to desired set points. Below are all of 

the parameters that must be selected.


Engineering Units 


User selectable for either English or Metric 

units. Choose “enter” to activate the engineering 

units menu. The engineering units will flash and 

then press the “down arrow” to select desired 

units. Press “enter” to select.


Output Mode


User selectable output mode: 0-5V, 0-10V or 4-

20mA. Choose “enter” to activate the output 

mode menu. The output mode will flash and then 

press the “down arrow” to select desired mode. 

Press “enter” to select.


Содержание SRIMV

Страница 1: ...1 Setra Velocity Monitor SRIMV Installation and Operation Manual...

Страница 2: ...2...

Страница 3: ...3 Table of Contents 1 0 Features and Intended Use 2 0 SRIMV Included parts 3 0 Installation 4 0 Menu Navigation and Configuration 5 0 Setting up the SRIMV menu...

Страница 4: ...Alarm delay mute timeout alarm enable disable buzzer enable disable SPDT Relay for remote alarms including Setra Remote Annunciator SRAN Ease of Installation and Calibration Flush mount mounts flush t...

Страница 5: ...averaging probe Averaging Flow sensor Part 242915 xx The SRIMV can be used with any manufacturer s probe The k factor flow coefficient must be entered into the SRIMV at commissioning The default sett...

Страница 6: ...re snapped together The two snaps are located on the left and right sides of the front panel A 1 5mm 1 16 inch Allen wrench or paper clip can be used to open the concealed snap fastening system The re...

Страница 7: ...ter installation to prevent scratching of the display during the installation process Remove parts and place them on flat surface Apply pressure on the side of the box to open the snap fit or use an A...

Страница 8: ...ounting directly into the wall create an opening approximately 2 8 71 mm by 5 4 134 mm If using the 3 gang box use 6 machine screws to mount the ears of the SRIM rear housing to the electrical box If...

Страница 9: ...9 Fig 3 6 Wiring Diagram SRIMV...

Страница 10: ...sed AN2 output of humidity sensor if used 0 5 1 5 0 10 VDC COM 15V Power Common return 15VDC Power for remote annunciator if used 15 VDC 50mA RLY1 NO Relay 1 Normally open contact 3A 120 VAC 28 VAC re...

Страница 11: ...11 Figure 3 8 Wiring SRIMV Notes Relay 1 RLY1 is a SPDT relay that can be used to signal a remote unit of an alarm condition The relay contacts are rated for 3 A 120 VAC 3A 28VDC...

Страница 12: ...the base until the bezel snaps to the base on the 2 sides Be sure to carefully align the 2 parts and push straight in There are alignment features on the front bezel and rear housing 4 0 Menu Navigati...

Страница 13: ...dicates that the velocity or pressure or flow the temperature and humidity is within the allowable alarm limits Note that the alarm will occur if any of the 3 monitored parameters are outside of their...

Страница 14: ...e is no back button so if the user proceeds past the desire parameter they must go back to the start of that menu screen Return Silence button This button provides a quick way to return to the home sc...

Страница 15: ...activate the Alarm Delay menu The menu will flash then press the down arrow to select correct digit enter moves to next digit Mute Timeout Sets the desired amount of time to engage Mute Timeout Choose...

Страница 16: ...ACH If Velocity is chosen After choosing to display and monitor Velocity from the Common Configure section set the parameters for that output K Factor The K factor is provided by the manufacturer of t...

Страница 17: ...ed temp source Press enter to select Enter Temperature If Temp Source set up is chosen manually enter the temperature Choose enter to activate the Enter Temp menu The menu will flash then press the do...

Страница 18: ...he menu will flash then press the down arrow to select desired mode Press enter to select Velocity Range Sets velocity range in either ft min or m s Choose enter to activate the Velocity Range menu Th...

Страница 19: ...t comes from the external sensor whereas the set up option is added manually if there is no temperature sensor used Temp is used to calculate air density Default is 70 degrees Fahrenheit or 21 1 degre...

Страница 20: ...imit Choose enter to activate the F Alarm L Limit menu The menu will flash then press the down arrow to select desired digit Press enter to select and move to next digit Flow Alarm Enable Enables or d...

Страница 21: ...o activate the F Alarm Enable menu The menu will flash then press the down arrow to select desired mode Press enter to select Zero Calibration Tares out any Zero pressure error This must be done with...

Страница 22: ...en press the down arrow to select desired digit Press enter to select and move to next digit Temperature Source Choose between an analog sensor input from external sensor or set up The sensor input co...

Страница 23: ...rm High Limit Sets the alarm for the high side ACH limit Choose enter to activate the A Alarm H Limit menu The menu will flash then press the down arrow to select desired digit Press enter to select a...

Страница 24: ...hen press the down arrow to select desired mode Press enter to select Temperature Min Vin Enter the minimum temperature that corresponds to the min analog output T_Min Vin Choose enter to activate the...

Страница 25: ...t Press enter to select next digit Temperature Alarm High Limit Sets the alarm for the high side temperature limit Choose enter to activate the T Alarm H Limit menu The menu will flash then press the...

Страница 26: ...imum Vin Input the minimum humidity that corresponds to the min analog output H Min Vin Choose enter to activate the H Min Vin menu The menu will flash then press the down arrow to select desired digi...

Страница 27: ...d digit Press enter to select next digit Humidity Alarm High Limit Sets the alarm for the high side humidity limit Choose enter to activate the H Alarm H Limit menu The menu will flash then press the...

Страница 28: ...mple 2 Setting the password 4 digit numerical protection Press the menu key to get the Common Configure screen Next press the button until reaching the PASSWORD ENABLE screen If ENABLE password is cho...

Страница 29: ...hat calibration was successful Full scale calibration Note the full range adjustment should be completed after zero adjustment Span adjustment should only be performed if a very accurate and stable Fu...

Страница 30: ...is noti ed in advance of and the product is returned to SETRA transportation prepaid Unless otherwise speci ed in a manual or warranty card or agreed to in writing and signed by a SETRA of cer SETRA...

Отзывы: