


Creating a detailed location plan
92
1
2
3
4
5
6
7
8
9
10
11
12
13
14
15
16
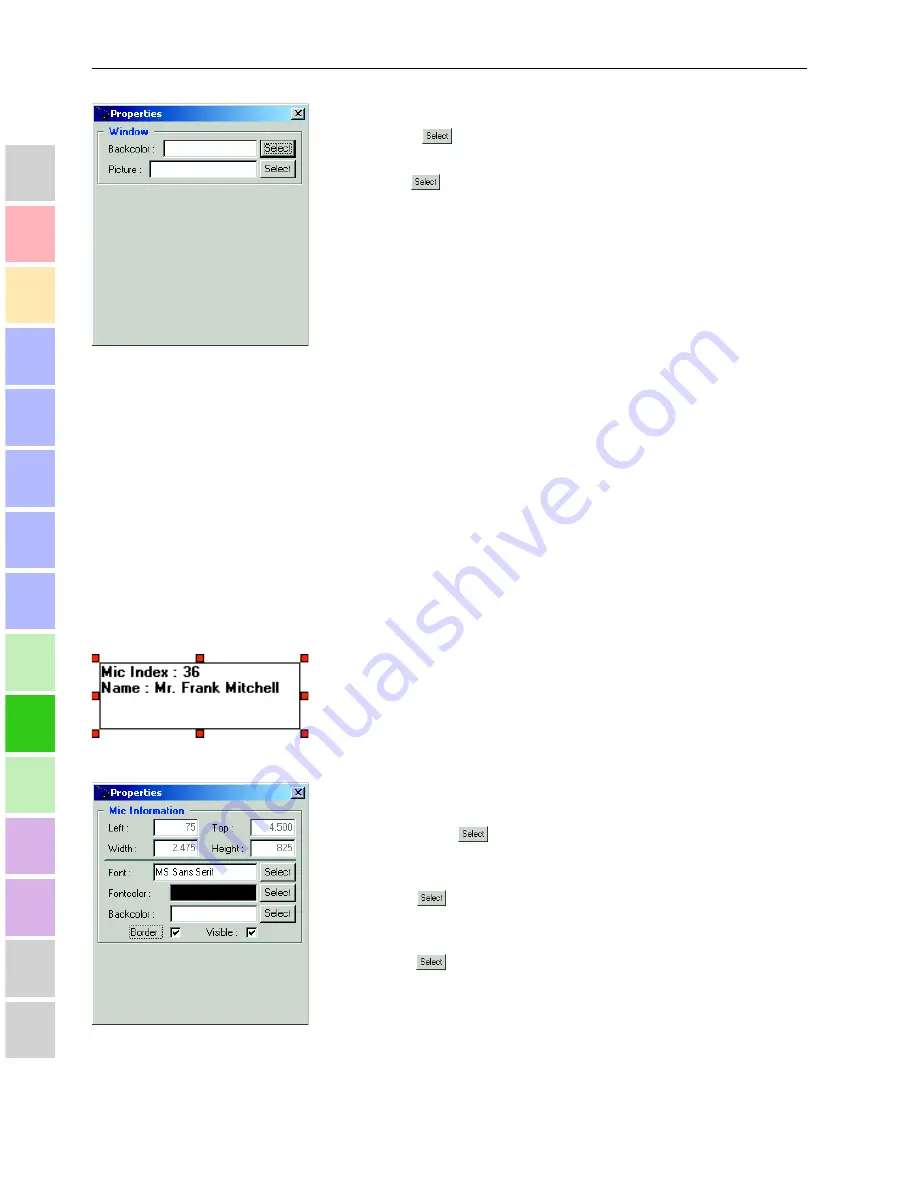
The “Properties” dialog box opens.
Click the
button behind the “Backcolor” field to select a
background color.
Click the
button behind the “Picture” field to select a
*.bmp
file
that you want to use as “wallpaper”.
*.bmp
files are pixel graphic files and are e.g. produced by scanners,
etc.
Save the
*.cfg
file and exit the program.
Re-start the program.
The selected
*.bmp
file is now used as “wallpaper”.
Note:
Please note that your
*.bmp
file is scaled to the full screen size of the
“Editor” window. This can result in slight distortion or negatively
affect the resolution.
For best results, use an image editing program for pixel graphics (e.g.
“
Start\Programs\Accessories\Imaging
”) to set your image
to exactly 1046 x 863 pixels and a resolution of 72 dpi.
Editing the “Microphone Information” field
The “Microphone Information” field is used to display information on the
individual conference consoles. This field can later be displayed in the
conference management program.
To edit the “Microphone Information” field:
Click the “Microphone Information” field.
The eight red sizing handles appear and allow you to size-up or size-
down the field, to change its shape by dragging one of the sizing
handles with the mouse pointer.
Right-click the “Editor” window.
The shortcut menu opens.
Select “Properties” from the shortcut menu or press the “F4” key.
The “Properties” dialog box opens.
To change the font type and size for the “Microphone Information”
field, click the
button behind the “Font” field and select a
different font type and/or size.
To change the color of the font for the “Microphone Information” field,
click the
button behind the “Fontcolor” field and select the
desired color.
To change the background color of the “Microphone Information” field,
click the
button behind the “Backcolor” field and select the
desired background color.
Click “Border” if you do not want a border around the “Microphone
Information” field.
The check mark disappears and the “Microphone Information” field is
displayed without border.
Содержание SDC 3000
Страница 1: ...SDC Conference System System Manual ...
Страница 2: ......
Страница 3: ...SDC Conference System System Manual Installation and Operating Manual ...
Страница 6: ......
Страница 12: ...Safety information 14 1 2 3 4 5 6 7 8 9 10 11 12 13 14 15 16 ...
Страница 16: ...The technology used 18 1 2 3 4 5 6 7 8 9 10 11 12 13 14 15 16 ...
Страница 24: ...The system cables 26 1 2 3 4 5 6 7 8 9 10 11 12 13 14 15 16 ...
Страница 38: ...The voting function 40 1 2 3 4 5 6 7 8 9 10 11 12 13 14 15 16 ...
Страница 64: ...Voting 66 1 2 3 4 5 6 7 8 9 10 11 12 13 14 15 16 ...
Страница 70: ...Operating the chairperson unit 72 1 2 3 4 5 6 7 8 9 10 11 12 13 14 15 16 ...
Страница 102: ...Assigning microphones to the conference console icons 104 1 2 3 4 5 6 7 8 9 10 11 12 13 14 15 16 ...
Страница 112: ...Intervening in a conference 114 1 2 3 4 5 6 7 8 9 10 11 12 13 14 15 16 ...
Страница 118: ...System diagnosis 120 1 2 3 4 5 6 7 8 9 10 11 12 13 14 15 16 ...
Страница 120: ...Replacing the microphone 122 1 2 3 4 5 6 7 8 9 10 11 12 13 14 15 16 ...
Страница 125: ...Specifications 127 1 2 3 4 5 6 7 8 9 10 11 12 13 14 15 16 ...


