4
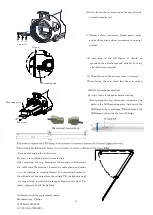
(4) According to the left figure, it should be
grounded the external ground reliably by using
attached crimp terminal.
(5) Close the cap in the reverse order to removal.
When closing the cap, check that there is no gap
L E N
Connecters
<LED lamp exchange method>
Be
sure
to
turn off the power before starting
After opening the cap, disconnect connectors and
pull out the LED mounting plate. And rotate the
LED lamp tube to exchange.
Please i
nstall the
LED lamp by showing the logo of Philips.
Grounding sign
No gap
M5 screw
Mounting plate
(2) After loosen the set screw, open the cap in using
accessory special tool.
(3) Remove three connecters. Install power wires
and earthing wire and set connecters to original
position.
Disconnect connectors
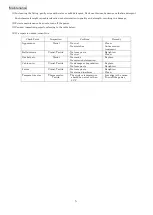
<In case of changing the inclination>.
Be sure to turn off the power before starting.
After removing the cap, disconnect the connectors. Disconnect
the cable from the terminal. Loosen the cable gland and make
sure the lighting is movable.Remove the mounting bracket on
the other side of the hinge from the ceiling. Tilt the lighting until
it is long enough to pull out the lamp as shown on the right. For
safety, support and tilt the lighting.
<Information on the replacement lamp>.
Manufacturer
:
Philips
14W: HO14W 865 T8
1
4.7
W: UO1
4.7
W865T8
Содержание WLZAA14021
Страница 7: ...7 ...


