background image


2-8 

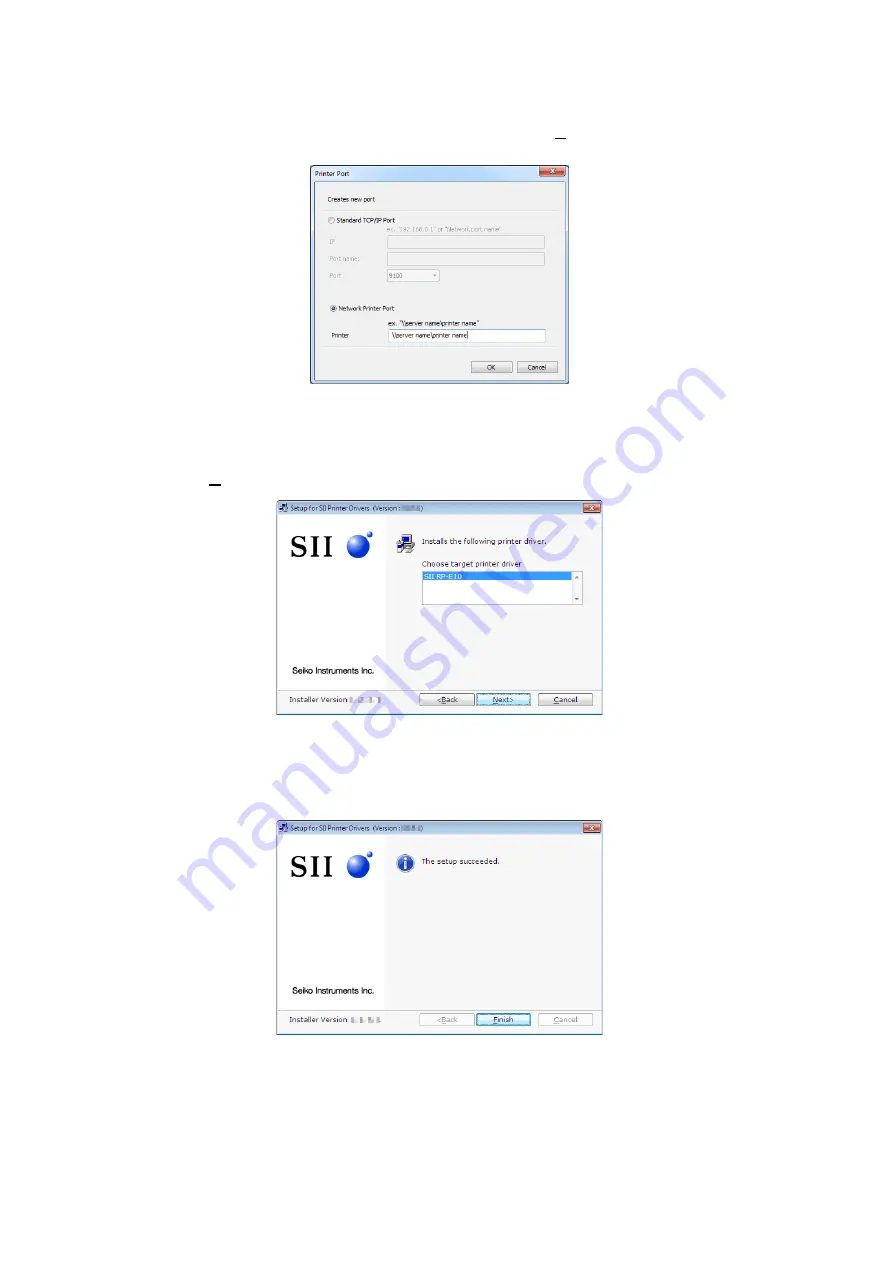
6.  When the new port creation window is displayed, select "Network Printer Port" and 

specify [Printer], and then click the [OK] button. When the port is added to the port list 
on the installation method selection window, click the [Next>] button. 


Screen 2-15 New port creation 

7.  When the driver selection window is displayed, select a driver to install, and then click 

the [Next>] button. 


Screen 2-16 Driver selection 

8.  When the installation of the printer driver is completed, the completion window is 

displayed. 


Screen 2-17 Exit installation   


Содержание RP-E10 Series

Страница 1: ...RP E10 SERIES PRINTER DRIVER OPERATIONS MANUAL U00127037201 ...

Страница 2: ...nts Inc hereinafter referred to as SII has prepared this technical reference for use by SII personnel licensees and customers The information contained herein is the property of SII and shall not be reproduced in whole or in part without the prior written approval of SII SII reserves the right to make changes without notice to the specifications and materials contained herein and shall not be resp...

Страница 3: ...o as printer driver provided by Seiko Instruments Inc This document basically uses screenshots and display layouts of Windows 7 for explanation Symbols This section describes symbols used in this document Notes and limitations are described Caution Supplemental information and related matters are described Reference ...

Страница 4: ...ows XP Windows XP Microsoft Windows Embedded POSReady 2009 Windows POSReady 2009 Microsoft Windows Vista Windows Vista Windows Server 2008 Windows Server 2008 Microsoft Windows 7 Windows 7 Microsoft Windows Embedded POSReady 7 Windows POSReady 7 For screens and terms of each operating system used later in this document refer to Descriptions of Windows XP when using Windows POSReady 2009 Descriptio...

Страница 5: ...nt Generic name of the following fonts specific to the printer driver Device font Barcode font 2D barcode font Control font ControlA font Special font Generic name of the following fonts in the IPD font which are used to output printer commands Barcode font 2D barcode font Control font ControlA font Head drive Setting for the thermal head to be divided into several blocks for printing Maintenance ...

Страница 6: ...d Printers For Windows XP Printers and Faxes folder displayed by selecting Start Control Panel Printers and Other Hardware Printers and Faxes Print server properties The Print server properties described in this document mean the properties displayed by one of the following operations For Windows 7 Print Server Properties displayed by clicking any printer icon in the Printer folder and selecting P...

Страница 7: ...me My Documents Friendly name SII RP E10 etc For Windows Vista and Windows 7 Drive on which Windows is installed Users User name Documents Friendly name SII RP E10 etc Disclaimer SII has carefully designed this product to ensure that it is problem free However SII is not liable for any direct indirect or consequential damages or loss caused by or related to the use of this software ...

Страница 8: ...on Installation Procedure 2 2 2 2 2 Installation with USB connection 2 3 2 2 3 Installation with serial connection 2 5 2 2 4 Installation with TCP IP connection 2 6 2 2 5 Installation of the shared printer 2 7 Chapter 3 Printing Preferences 3 1 3 1 Overview 3 1 3 2 Layout 3 1 3 2 1 Displaying Layout Window 3 2 3 3 Paper Quality 3 3 3 3 1 Displaying Paper Quality Window 3 3 3 4 Document Settings 3 ...

Страница 9: ...mark Window 3 29 3 6 2 Checking Settings in Setting View 3 30 3 6 3 Checking Categories in Setting List 3 30 3 6 4 Displaying Watermark Settings Window 3 31 3 6 5 Using Watermark 3 32 3 7 Advanced Options 3 33 3 7 1 Displaying Advanced Options Window 3 33 Chapter 4 Property 4 1 4 1 Overview 4 1 4 2 General 4 2 4 2 1 Displaying General Window 4 2 4 3 Sharing 4 3 4 3 1 Displaying Sharing Window 4 3 ...

Страница 10: ...5 6 1 Displaying NV Image Window 5 21 5 6 2 Displaying Registration Window 5 23 5 6 3 Displaying Edit Window 5 25 5 6 4 Registering NV Image 5 27 5 6 5 Editing Image Data 5 27 5 6 6 Saving Setting and Image of Image Data to File 5 27 5 7 Codepage 5 28 5 7 1 Displaying Codepage Window 5 28 5 7 2 Displaying Registration Window 5 30 5 7 3 Displaying Character View Window 5 33 5 7 4 Registering Codepa...

Страница 11: ... 7 3 1 Selecting Type of Barcode Font 7 5 7 3 2 Printing Barcode Font 7 6 7 4 2D Barcode Font 7 9 7 4 1 Selecting Type of 2D Barcode Font 7 9 7 4 2 Printing 2D Barcode Font 7 10 7 5 Control Font 7 11 7 5 1 Selecting Type of Control Font 7 11 7 5 2 Using Control Font 7 11 7 6 ControlA Font 7 13 7 6 1 Selecting Type of ControlA Font 7 13 7 6 2 Using ControlA Font 7 13 ...

Страница 12: ...er 1 2 1 Operating Systems The printer driver supports the following operating systems Supported architectures are described in parentheses Windows XP 32 bits Windows POSReady 2009 Windows Vista 32 bits Windows Server 2008 32 bits Windows 7 32 bits and 64 bits Windows POSReady 7 32 bits and 64 bits 1 2 2 Computers The printer driver supports the following computers PC AT compatible machines ...

Страница 13: ...S5 2 Initialized Response Selection Init Response 0 Enable 2 3 MS5 3 Print Data Handling When an Error Occurs Error Through 0 Enable 4 If the 7 bits length is set in the serial communication settings the printer driver cannot be used For serial connection the communication settings of the port should match those of the printer For the setting method see 4 4 Port For TCP IP connection only RAW prot...

Страница 14: ...itations Abnormal printing in standby mode Windows XP sleep mode Windows Vista and Windows 7 or hibernate mode which is a part of the Windows standard function is not guaranteed including garbled characters If the setting of dedicated print processor SII Print Processor including FILE output is disabled all reduction function is disabled If the printer is disabled in Peripheral Equipment Selection...

Страница 15: ...taller This installation requires logon to the computer with administrator privileges The Windows Logo Test warning may be displayed during installation but proceed with the installation If you want to use the provided communication library you need to install it separately For details refer to RP E10 Series Communication Library Operations Manual Caution If the printer driver is no longer needed ...

Страница 16: ...the information on the printer driver to install is displayed click the Next button Screen 2 1 Information on printer driver to install 3 When the SOFTWARE LICENSE AGREEMENT is displayed read it carefully select Agree and then click the Next button 4 When the setup type selection window is displayed select Install or Setup and then click the Next button Screen 2 2 Select setup type Do not install ...

Страница 17: ...on procedure of the USB connection 5 When the installation method selection window is displayed select Plug and play install Uses usb port and then click the Next button Screen 2 3 Select installation method USB connection 6 When the installation confirmation window is displayed click the Next button to start the installation Screen 2 4 Confirm installation 7 When the printer driver registration c...

Страница 18: ...re Wizard is displayed by the plug and play Screen 2 6 Welcome to the Found New Hardware Wizard 9 Select Install the software automatically Recommended and then click the Next button to install the printer driver If you remove the USB cable after the printer driver was successfully installed connect it to the same USB port that you used to install the driver when you want to reconnect it If the pr...

Страница 19: ...ed select Manual install and the connection port and then click the Next button Screen 2 7 Select installation method serial connection 6 When the driver selection window is displayed select a driver to install and then click the Next button Screen 2 8 Driver selection 7 When the installation of the printer driver is completed the completion window is displayed Screen 2 9 Exit installation ...

Страница 20: ...s displayed select Manual install and Add New Port Screen 2 10 Select installation method TCP IP connection 6 When the new port creation window is displayed select Standard TCP IP Port and specify IP Port name and Port and then click the OK button When the port is added to the port list on the installation method selection window click the Next button Screen 2 11 New port creation ...

Страница 21: ...printer driver is completed the completion window is displayed Screen 2 13 Exit installation 2 2 5 Installation of the shared printer This section continues to describe the installation procedure of the shared printer 5 When the installation method selection window is displayed select Manual install and Add New Port Screen 2 14 Select installation method shared printer ...

Страница 22: ...ort list on the installation method selection window click the Next button Screen 2 15 New port creation 7 When the driver selection window is displayed select a driver to install and then click the Next button Screen 2 16 Driver selection 8 When the installation of the printer driver is completed the completion window is displayed Screen 2 17 Exit installation ...

Страница 23: ...e order and page format Paper Quality Sets the print mode Document Settings Sets the print format Font Sets the IPD font Watermark Sets an overlapping image on the printed content To display the setting windows in the Printing Preferences dialog follow the steps below 1 Right click a printer icon in the Printer folder to display the sub menu 2 Click Printing Preferences from the sub menu Details o...

Страница 24: ... Orientation Selects the print direction 1 Portrait Landscape Page Order Selects the order of pages to print Front to Back Back to Front Page Format Sets the number of pages per sheet Pages per Sheet Selects the number of pages to print per sheet 1 2 4 6 9 16 Advanced Displays the advanced option dialog For details see 3 7 Advanced Options ...

Страница 25: ...en 3 2 Paper Quality window Item Description Initial Value Tray Selection Sets the paper source Paper Source Selects the paper source Fixed to Automatically Select Automatically Select Color Selects the print mode 1 2 Black White Uses the halftone of the system standard Color Uses the halftone of the printer driver Advanced Displays the advanced option dialog For details see 3 7 Advanced Options ...

Страница 26: ... Options 3 4 Document Settings Sets the print format 3 4 1 Displaying Document Settings Window Select the Document Settings tab to display the window below Screen 3 3 Document Settings window Item Description Initial Value Setting view Shows the setting state of main functions with marks For details of marks see 3 4 2 Checking Settings in Setting View Preset Setting view Setting list ...

Страница 27: ...change is confirmed Preset Sets previously registered settings at a time for a specific usage 80mm Receipt Setting 58mm Receipt Setting 80mm Marked Paper Setting 58mm Marked Paper Setting A4 80mm Reduction Setting A4 58mm Reduction Setting User Setting For details of the settings of each preset see 3 4 4 Using Preset 3 4 2 Checking Settings in Setting View The following table describes the marks d...

Страница 28: ...tart is set for the drawer and at the lower right when Print End is set in 3 4 7 Displaying Option Settings Window 3 4 3 Checking Categories in Setting List The following table describes the functional categories displayed in the Setting List Category Description General Settings Sets basic items such as initialization and print speed Paper Cut Marked Paper Settings Sets parameters about the paper...

Страница 29: ...cified preset Note that a message about the changed settings is not displayed The following table describes the available preset types and their settings Preset Type Item Description Advanced Options Paper Size 80 mm 58 mm Document Settings General Settings Reduction None Paper Cut Marked Paper Settings Paper Cut Full Cut Each job Feed to Cut Position Enabled Marked Paper Form Feed Disabled Form F...

Страница 30: ... Print Start Drawer Disabled ON Time 50 ms 80mm Marked Paper Setting 58mm Marked Paper Setting OFF Time 200 ms Advanced Options Paper Size A4 Document Settings General Settings Reduction Fit 80mm Width Fit 58mm Width Paper Cut Marked Paper Settings Paper Cut Full Cut Each page Feed to Cut Position Enabled Marked Paper Form Feed Disabled Form Feed Position Correct 0 dot Option Settings Print Start ...

Страница 31: ...eral Settings Initialize Enabled Speed High Density 100 Margin Minimum Bottom Margin Direction Front to Back Option Settings Common to all timings Enable disable logo Disabled Feed 0 dot Buzzer OFF Send Command Blank Print End Drawer type Disabled ON Time 50 ms OFF Time 200 ms Watermark Watermark Settings Common Settings Image None ...

Страница 32: ...ettings window Item Description Initial Value General Settings Sets basic items such as initialization and print speed Initialize Selects whether or not to initialize the printer before printing Enabled Disabled Speed Sets the print speed low or high 1 Low Middle Quality Middle Silent High Density Sets the print density Unit 70 to 130 100 ...

Страница 33: ...o Back Back to Front Reduction Sets the reduction print 3 None Fit 80mm Width Fit 58mm Width Scale 25 to 100 Unit 1 If you are using the F W version 1 02 or earlier select the Speed except Middle Silent 2 If the print size is less than 3 cm paper is fed to 3 cm 3 When you select Back to Front the IPD font cannot be used 4 When you select other than None the IPD font cannot be used ...

Страница 34: ... to see direction by setting Back to Front Saving margins You can save paper by setting Margin to shorten the margin length To save the margin from the print start to the first print data To save the margin from the last print data to the paper cut Minimum Margin Minimum Top Margin Minimum Bottom Margin Maximum Margin For more information on margin refer to 6 3 Margin Reference ...

Страница 35: ...per Cut Marked Paper Settings window Item Description Initial Value Paper Cut Settings Sets parameters about the paper cut Paper Cut Selects the paper cut method None Full Cut Each job Partial Cut Each job Full Cut Each page Partial Cut Each page Partial Cut Between pages 1 Feed to Cut Position Selects whether or not to feed to the cut position Enabled Disabled ...

Страница 36: ...ed Position Correct Sets the form feed position correction Unit dot 74 to 255 0 2 1 Full cut is used for the last page 2 If you are using the F W version 1 02 or earlier do not enter less than 69 to Form Feed Position Correct If you enter it Form Feed Position Correct is disabled 3 4 7 Displaying Option Settings Window Select Options Settings in the Setting List to display the window below Screen ...

Страница 37: ...r or not to show the logo Disabled Enabled Keycode Selects the keycode of the logo 00 to 99 Logo Position Selects the position to print the logo Left Center Right Drawer Sets parameters about the drawer 1 Drawer Selection Selects the drawer to use Disabled 2 Drawer 1 3 Drawer 2 ON Time Sets the ON time of the drawer Unit ms 4 2 to 510 50 OFF Time Sets the OFF time of the drawer Unit ms 4 5 2 to 51...

Страница 38: ...value of Print Start 4 Enter an even number If you enter an odd number it is internally rounded to a value within the range 5 It should be equal to or greater than four times of the ON time to protect circuits 6 You cannot enter data directly 3 4 8 Using Binary Editor For a control in which you need to enter arbitrary numeric data the binary editor is used Click the Edit button for such a setting ...

Страница 39: ...re not available with any of the following settings Orientation in 3 2 1 Displaying Layout Window Landscape Direction in 3 4 5 Displaying General Settings Window Back to Front Reduction in 3 4 5 Displaying General Settings Window Other than None Image in 3 6 4 Displaying Watermark Settings Window NV Image Caution ...

Страница 40: ...ription Setting view Shows whether the IPD font can be used or not in the current settings with marks For details of marks see 3 5 2 Checking Settings in Setting View Setting list Displays the font category names When you select a category name the corresponding setting window is displayed Setting view Setting list ...

Страница 41: ...etting List in the Font window Category Description Device Font Settings Sets the character code table and others for the device font Barcode Font Settings Sets the type barcode size and others for the barcode font 2D Barcode Font Settings Sets the type barcode size and others for the 2D barcode font ControlA Font Settings Sets parameters about the printer command assigned to the ControlA font Set...

Страница 42: ...3 20 3 5 4 Displaying Device Font Settings Window Select Device Font Settings in the Setting List to display the window below Screen 3 9 Device Font Settings window ...

Страница 43: ...Latin America Arabia Character Code Table Selects the character code table Codepage 437 USA Standard Europe Katakana character set Codepage 850 Multilingual Codepage 860 Portuguese Codepage 863 Canadian French Codepage 865 Nordic Codepage 1252 Windows Latin 1 Codepage 852 Latin 2 Codepage 858 Euro Codepage 864 Arabic Codepage 1250 Windows Latin 2 Codepage 1251 Windows Cyrillic Codepage 1253 Window...

Страница 44: ...play the window below Screen 3 10 Barcode Font Settings window Item Description Initial Value Settings Sets parameters about the barcode font Font Name Selects the barcode font IPD Barcode1 IPD Barcode2 IPD Barcode3 IPD Barcode4 IPD Barcode5 IPD Barcode6 IPD Barcode7 IPD Barcode8 IPD Barcode9 IPD Barcode10 ...

Страница 45: ... Start Stop Character Sets the start character and stop character 1 Start Selects the start character of CODABAR A B C D Stop Selects the stop character of CODABAR A B C D Size Selects the barcode size Width Sets the element width Unit dot Thin element width of the barcode is represented in dots 2 to 6 3 Height Sets the height of the barcode in dots Unit dot 1 to 255 162 ...

Страница 46: ...egrees to right 180 degrees 90 degrees to left Test Print Sets parameters about the test print Position Selects the alignment of the barcode Left Center Right Info Selects whether or not to include the setting content ON OFF Test Data Enters the data for test print Up to 64 characters of only one byte are available Print Prints the barcode with the entered settings and data 3 1 Displayed only when...

Страница 47: ...ow Item Description Initial Value Settings Sets parameters about the 2D barcode font Font Name Selects the 2D barcode font IPD 2D Barcode1 IPD 2D Barcode2 IPD 2D Barcode3 IPD 2D Barcode4 IPD 2D Barcode5 System Selects the system of the 2D barcode QR Code Model 2 PDF417 Size Sets one module size Unit dot When System is QR Code Model 2 2 to 11 6 When System is PDF417 2 to 4 3 ...

Страница 48: ... to left Test Print Sets parameters about the test print Position Selects the alignment of the 2D barcode Left Center Right Info Selects whether or not to include the setting content in the test print ON OFF Test Data Enters the data for test print Up to 64 characters of one byte and two byte are available Print Prints the 2D barcode with the entered settings and data 2 1 Displayed only when PDF41...

Страница 49: ...clicking the Edit button Print Runs the command selected in the list 1 Edit Starts the binary editor 2 Data entered in the binary editor is displayed in Command selected in the list Up to 256 bytes can be specified For details of the binary editor see 3 4 8 Using Binary Editor Delete Clears the Command field selected in the list 1 2 1 Not available when a blank Command field is selected in the lis...

Страница 50: ...d by a user to the printer in advance is used as the overlapping image To use the watermark you should register the NV image For details of registering NV image see 5 6 NV Image If the size of the NV image to be used as the watermark is greater than the print area the watermark will not be printed Caution ...

Страница 51: ...6 2 Checking Settings in Setting View Setting list Displays the watermark settings by category When you select a category name the corresponding setting window is displayed For details of the displayed categories see 3 6 3 Checking Categories in Setting List Click at the left of a category to display the items in the category An item whose setting is changed is displayed in red until the change is...

Страница 52: ...op Center Top Right Left Center Right Position Bottom Left Bottom Center Bottom Right 3 6 3 Checking Categories in Setting List The following settings are displayed in the Setting List in the Watermark window Category Description Watermark Settings Sets parameters about the watermark The watermark settings are described in subsequent sections ...

Страница 53: ...3 31 3 6 4 Displaying Watermark Settings Window Select the Watermark tab to display the window below Screen 3 14 Watermark Settings window ...

Страница 54: ...nfo Selects whether or not to include the setting content in the test print ON OFF Print Prints the watermark with the entered settings and data 1 When you select other than None the IPD font cannot be used 2 Not displayed when Image is set to None 3 6 5 Using Watermark This section describes the procedure to use the watermark 1 Register an image used for the watermark in 5 6 NV Image 2 Select NV ...

Страница 55: ...Layout or Paper Quality window to display the window below Screen 3 15 Advanced Options window Item Description Initial Value Paper Output Sets the paper size and the number of copies Paper Size Selects the paper size to use 1 58 mm 80 mm A4 2 Letter 3 Copy Count Enters the number of copies to print Unit Copy 1 to 9999 ...

Страница 56: ...Features Selects the advanced printing features Enabled Disabled Pages per Sheet Layout Selects the page layout in a sheet 5 Right then Down Down then Right Left then Down Down then Left Color Printing Mode Selects the color print mode System Driver This setting works in conjunction with the Color setting in 3 3 Paper Quality 6 Halftoning Selects the halftoning 7 Auto Select Super Cell Dither 2x2 ...

Страница 57: ...apanese environment 3 The initial value of the environment other than Japanese 4 Available only when you select Color for Color described in 3 3 Paper Quality 5 Not displayed in Windows XP 6 If you select System Color in the Paper Quality window is changed to Black White or if you select Driver Color in the Paper Quality window is changed to Color For details refer to 3 3 Paper Quality 7 If you se...

Страница 58: ...ing Sets shared printers Ports Sets output ports Tool Displays the version information of the printer driver and the start buttons for various tools To display the setting windows in the Properties dialog follow the steps below 1 Right click a printer icon in the Printer folder to display the sub menu 2 Click Printer Properties from the sub menu Details are described in subsequent sections For the...

Страница 59: ...on Printer name Reviews or changes the printer friendly name Location Enters the location of the printer Comment Enters a comment Model Displays the printer driver name Preferences Displays the Printing Preferences window Print Test Page Performs the Windows test print 1 1 The test printing by Print Test Page will not produce a whole page printout on the paper whose width is for compact printers S...

Страница 60: ...w below Screen 4 2 Sharing window Item Description Share this printer When you select this check box and enter an arbitrary share name in Share name then the printer driver can be used by any computer on the network Share name Enters the share name of the printer Additional Drivers This function is not supported ...

Страница 61: ... 4 Port Sets output ports 4 4 1 Displaying Ports Window Select the Ports tab to display the window below Screen 4 3 Ports window A shared printer may not work properly depending on the network usage Caution ...

Страница 62: ...Select COM X Serial Port and click the Configure Port button When the COM properties window is displayed configure the same communication settings as those of the printer 3 When using the communication library select Hardware for Flow Control 4 Select 8 bits for Data bit 5 When cleared the tools and the communication library become unavailable 6 When using the communication library clear the selec...

Страница 63: ...4 6 Screen 4 4 Tool window Item Description Version information Displays the file information of the printer driver Tool start buttons Clicks a button to start the corresponding tool ...

Страница 64: ... of the printer driver Test Print Performs the test print with arbitrary content NV Image Edits and registers the image to be used as the logo or watermark or manages the registered NV images Codepage Edits and registers the font data that the user can register or manages the registered codepages Other Exports the printer driver setting to a file or imports an exported file To use all functions of...

Страница 65: ...r 5 2 1 Displaying Information Window Select Information in the tool panel to display the window below Screen 5 1 Information window Item Description Connection state Displays the connection state with the printer Online Indicator green Offline Indicator gray ...

Страница 66: ...e selected Status History 2 If cleared the latest printer status is always selected in Status History Every time the printer status changes the latest data is selected and Status History automatically scrolls If selected even when the selected printer status in Status History changes the information is not updated and Status History does not scroll automatically Status History The response history...

Страница 67: ...tatus is the same as the last one the display is not updated 6 When you click the Save button the data contained in Status History at that time will be saved Later printer status responses will not be included in the saved status history file However if any entries exceeding 100 entries are deleted after clicking the Save button the deleted history entries are not saved but the printer status resp...

Страница 68: ...ery waiting status 0x00000800 Yes 0x00000000 Low Drawer sensor status 0x00008000 High 0x00000000 No FLASH memory rewriting 0x00010000 Yes 0x00000000 Printer Peripheral device selection 0x00020000 Other An acquirable response value can be found by adding the above value However all bits turn 0 for disconnection or communication error The values not described above are reserved If a disconnection or...

Страница 69: ... As dialog 3 Click the Save button in the Save As dialog 5 2 5 Displaying Hardware Window Select the Hardware tab in the Information window to display the window below Screen 5 3 Hardware window Item Description Hardware Displays the following hardware information retrieved from the printer main body F W Version main F W Version boot Model name Refresh Retrieves the hardware information from the p...

Страница 70: ...ance Counter Displays the following maintenance counter values Number of dot lines for paper feed Unit dot Thermal head activation times Unit dot Autocutter drive times Unit Times Number of dot lines for paper feed integrated Unit dot Thermal head activation times integrated Unit dot Autocutter drive times integrated Unit Times Refresh Retrieves the maintenance counter values from the printer agai...

Страница 71: ...the tool panel to display the window below Screen 5 5 Memory Switch window Item Description Default Settings Restores the factory default settings The settings currently being edited will be lost 1 2 MS tabs Changes the display items of the memory switch Item Displays item names of the memory switch function ...

Страница 72: ...dited will be lost Print Prints the current settings of the printer 1 Register to Printer Sends the currently displayed settings to the printer to change the printer settings 1 4 1 Not available when the values are not retrieved from the printer 2 The settings are not applied until you click Register to Printer 3 A value that is out of the range is automatically rounded to a value within the range...

Страница 73: ...utton 3 Click the Register to Printer button 5 3 3 Saving Memory Switch Settings to File This section describes the procedure to save the memory switch settings as a memory switch file 1 Click the Save button 2 Enter the location and file name to save the memory switch file in the Save As dialog 3 Click the Save button in the Save As dialog ...

Страница 74: ...isplaying Log Window Select Log in the tool panel to display the window below Screen 5 6 Log window If log output is enabled it can slow the printer driver performance Please avoid unnecessary log output Log output is not guaranteed when a log file is open Caution ...

Страница 75: ...he log 3 Enabled Disabled Information Selects whether or not to output information to the log 3 Enabled Disabled Document Information Selects whether or not to output the document information 3 4 Enabled Disabled When you select Enabled the data sent to the printer when printing is saved to a file for each job Log Output Sets the log output destination 3 Log To save the log as a log file log enter...

Страница 76: ...iod may be prolonged by 1 day at a maximum 2 When the log file exceeds 32 MB a new log file is generated and the original one is kept for the retention period with the same file name with a number _001 appended to the end 3 Not available when Log is set to Disabled 4 When this function is used in a printer sharing environment it cannot be set from the client side 5 Not available when Log is Disabl...

Страница 77: ... Output Module ID Module 01xxxxxx 02xxxxxx Modules related to the tool 03xxxxxx 04xxxxxx Modules related to the printer driver 05xxxxxx 06xxxxxx Modules related to bidirectional communication The following table lists the log types Log Type Level Description Remarks INF Information Successful operation log Example input output data WAR Warning Log which is not related to information and error ERR ...

Страница 78: ...s as strings to be sent to the printer when executing Do Test Print The displayed test print content is retrieved when you select a preset configure the print content in the Command group or load the command information from a saved test print file stp 1 Up to 128 commands can be added to Command List Delete Deletes the command selected in Command List from the list 2 If the empty row at the botto...

Страница 79: ...her or not to send the initialization command when starting the test print 4 Enabled Disabled Command Sets parameters about the test print content Alignment Adds the position to print characters barcodes and images to Command List An alignment setting remains valid until another alignment command is inserted Align Left Centered Align Right Characters Adds the characters entered in Character Data a...

Страница 80: ...en adding them to Command List If you click Line Feed when Character Data is empty then only a linefeed command is added to Command List Barcode Adds the barcode standard and the data entered in Barcode Data to Command List together 7 Barcode Type Selects the type of barcode for test print UPC A UPC E JAN13 EAN JAN8 EAN CODE39 ITF CODABAR CODE128 CODE93 JAN13 add on2 JAN13 add on5 QR Code Model 2 ...

Страница 81: ...he data entered in Custom Command Data to Command List 12 Custom Command Data Displays a custom command To enter data use the binary editor which is displayed by clicking the Edit button Edit Starts the binary editor Data entered in the binary editor is displayed in Custom Command Data Up to 64 bytes can be specified For details of the binary editor see 3 4 8 Using Binary Editor Cut Adds the setti...

Страница 82: ...r to the technical reference The input method differs from the one for barcode font 10 Fixed with the current selection when you select Sample Image B for the image selection 11 If you specify a user specified image file when Sample Image A or Sample Image B is selected for the image selection the image selection is automatically changed to User Specified Image 12 Not available when the Custom Com...

Страница 83: ...in the Open dialog 4 Click the Do Test Print button 5 5 3 Saving Test Print Information to File This section describes the procedure to save the test print information as a test print file 1 Click the Save button 2 Enter the location and file name to save the test print file in the Save As dialog 3 Click the Save button in the Save As dialog ...

Страница 84: ...ed NV images 5 6 1 Displaying NV Image Window Select NV Image in the tool panel to display the window below Screen 5 8 NV Image window The NV image is an image data that is registered in the NV memory non volatile memory in the printer If you turn off the power of the printer this data is retained Reference ...

Страница 85: ...a Save Saves the settings and images of the image data added to Image Data List as an image data file snv 2 The default location is the Root folder Amount of Remainder Memory Displays the free memory You can perform the memory defragmentation Before Defrag Displays the free memory before defragmentation After Defrag Displays the free memory after defragmentation Defragment Reallocates the user are...

Страница 86: ...n you exit the tool last time is restored File The name for managing the image data to be registered to the printer 1 This name is automatically assigned when the image data is added to Image Data List Keycode The image data number used when registering the image data to the printer A keycode that is not yet registered in the printer is assigned automatically To change the assigned keycode select ...

Страница 87: ...ata selected in Image Data List to the printer After registration of the image data Amount of Remainder Memory is updated If the keycode of an image data to be registered is already registered a message appears confirming the overwrite NV Image List Displays the list of the NV images already registered in the printer 5 Keycode Displays the keycodes of the NV images already registered in the printe...

Страница 88: ...as to fit 80 mm paper 72 mm print width when being loaded If a color image is specified it is converted to the monochrome image when being loaded 4 Not available when Image Data List contains no image data 5 If the NV image information cannot be retrieved from the printer is displayed for the first row of the list 6 Not available when NV Image List contains no NV image 5 6 3 Displaying Edit Window...

Страница 89: ...o right Rotate 180 degrees Rotate 90 degrees to left If you rotate the image by 90 degrees from the current angle when Fit 80mm Width is selected then Fit 80mm Width is cleared Dither Selects the dithering pattern 1 2x2 4x4 6x6 8x8 Error Diffusion Lightness Sets the lightness of the image data 1 3 100 to 100 0 Contrast Sets the contrast of the image data 1 3 100 to 100 0 Setting 100 makes the whol...

Страница 90: ... Registration window To Load Settings and Images from Saved Image Data File for Registration 1 Click the Open button 2 Select a saved image data file in the Open dialog 3 Click the Open button in the Open dialog 4 Select loaded image data in Image Data List 5 Click the Register to Printer button in the Registration window 5 6 5 Editing Image Data This section describes the procedure to edit image ...

Страница 91: ...ges 5 7 1 Displaying Codepage Window Select Codepage in the tool panel to display the window below Screen 5 11 Codepage window Codepage A codepage is a set of characters that are collected by language and used as a device font This tool allows the user to create a new codepage and edit the existing one Reference ...

Страница 92: ...ist Back Changes the font data displayed in Preview to the previous page 1 Next Changes the font data displayed in Preview to the next page 1 File Displays the file name of the font data displayed in Preview Open Loads and displays the saved font data file scp Save Saves the settings and images of the font data added to Font Data List as a font data file scp 2 The default location is the Root fold...

Страница 93: ...he list at the time when you exit the tool last time is restored You cannot select more than one font data in Font Data List File The name for managing the font data to be registered to the printer 1 This name is automatically assigned when the font data is added to Font Data List Size Selects the size of the font data 24x12 16x8 When you change the setting it is applied to Preview and Character V...

Страница 94: ...new font data The display of Preview is cleared to be blank and font data with a new file name is added to Font Data List Open the font data Adds a specified font data file to Font Data List You can select bmp and bin of width 16 x height 14 characters 2 Copy of font data Duplicates the font data selected in Font Data List with a different file name and adds it to Font Data List 3 The size type an...

Страница 95: ...Deletes the codepage selected in Codepage List from the printer 5 After the deletion of the codepage Amount of Remainder Memory is also updated Test Print Prints the codepage selected in Codepage List 5 1 Not editable 2 If a font data file to be loaded is in binary format the size and type are determined to be displayed in Font Data List If a font data file to be loaded is a BMP file containing co...

Страница 96: ...ou can draw a line When you right click or press the Delete key on a black block it changes to white and when you drag the mouse while holding the right mouse button down you can change black blocks to white continuously Overlay Overlays the character selected in Preview on Character View 1 Any image already contained in Character View is not cleared by the overlay Flip Swaps the character display...

Страница 97: ...Country of the new file added to Font Data List 3 Select the Character View tab and edit the character of each address 4 Select the Registration tab and then select the file whose characters you edited from Font Data List 5 Click the Register to Printer button on the Registration window To Specify Font Data File for Registration 1 Click the Open the font data button 2 Specify a font data file to r...

Страница 98: ... button 5 Edit the selected character in Character View 6 Select the position to register the edited character in Preview 7 Click the Overwrite button 5 7 6 Saving Setting and Image of Font Data to File This section describes the procedure to save the setting and image of a codepage as a font data file 1 Click the Save button 2 Enter the location and file name to save the font data file in the Sav...

Страница 99: ...orts an exported file The setting to be imported or exported is the printer driver setting information including the ControlA font setting information 5 8 1 Displaying Other Window Select the Other in the tool panel to display the window below Screen 5 14 Other window ...

Страница 100: ...t file in the Save As dialog The specification is displayed in the Export File field Export Exports the printer driver setting information including the ControlA font setting information to the file specified in the Export File field 1 You cannot import an export file exported in different language environment In addition when the user defined paper is selected in paper size the setting is not imp...

Страница 101: ...roll paper size which is actually used for printing Paper size Printable area size specified on the printer driver Standard paper Paper sizes that are automatically registered on installation User defined paper Custom sizes that can be newly registered by users When you want to specify user defined paper use the paper size printable area size instead of the output paper size Standard paper other t...

Страница 102: ...paper width O u t p u t Printable area Bottom margin Top margin Paper size 用 紙 高 さ Output paper height Paper height Right margin Left margin The above figure is just a print image The cut position varies depending on the setting in Feed to Cut Position described in 3 4 6 Displaying Paper Cut Marked Paper Settings Window ...

Страница 103: ... mm User defined paper 25 6 mm to 54 mm 30 mm to 3276 mm 58 mm 54 mm 3276 mm 80 mm 72 mm 3276 mm A4 210 mm 297 mm Standard paper Letter 215 9 mm 279 4 mm 80 mm User defined paper 25 6 mm to 72mm 30 mm to 3276 mm Specify paper sizes as follows Paper width Output paper width Left margin Right margin Paper height Output paper height Paper feed between head and cutter For details of the margin and the...

Страница 104: ... data within the paper size which does not contain the print data plus the length of the paper feed between head and cutter The length of the paper feed between head and cutter depends on the combination of Margin in 3 4 5 Displaying General Settings Window and Paper Cut and Feed to Cut Position in 3 4 6 Displaying Paper Cut Marked Paper Settings Window The following table shows the combinations o...

Страница 105: ...r Settings Window is set to other than None and Feed to Cut Position is set to Disabled the paper will be cut inside the printable area by the length from head to cutter If the paper width setting on the printer and the width of the paper size on the printer driver do not match the printed layout may corrupt Due to the printer mechanism the actual output paper height may be slightly different from...

Страница 106: ...the Width field in Paper size 6 Type the height for the new paper size in the Height field in Paper size 7 Click the Save Form button to save the form Screen 6 1 How to add a new paper size Adding a user defined paper size requires logon to the computer with administrator privileges When adding a user defined paper size review Paper Size Range in 6 2 Paper Size Among the paper sizes listed in the ...

Страница 107: ...2D barcode using the printer Control Font Special font to use printer commands registered in advance ControlA Font Special font to use printer commands registered by users TrueType Font The TrueType font allows you to change character decorations such as italic type and the font size flexibly It also enables almost WYSIWYG print The TrueType font is printed as image data When a large amount of dat...

Страница 108: ...following settings are needed Orientation in 3 2 1 Displaying Layout Window Portrait Direction in 3 4 5 Displaying General Settings Window Front to Back Reduction in 3 4 5 Displaying General Settings Window None Image in 3 6 4 Displaying Watermark Settings Window None Special fonts are not displayed as images in the preview and edit windows When you use special fonts print results may exceed the s...

Страница 109: ...e height 5 5 points 16x8 Double width IPD Font B Wide 1 11 5 points Western 16x8 Double height Double width 8 5 points 24x12 Standard font IPD Font A Japanese 2 17 points 24x12 Double height 8 5 points 24x12 Double width IPD Font A Wide Japanese 2 17 points 24x12 Double height Double width 5 5 points 16x8 Standard font IPD Font B Japanese 2 11 5 points 16x8 Double height 5 5 points 16x8 Double wid...

Страница 110: ...ce font from the application 2 Select the font size 5 5 8 5 11 5 or 17 and character set font script Western or Japanese 3 Enter text Example of print setting Japanese environment Microsoft WordPad Font Name IPD Font A Japanese Font Size 8 5 Character Set Font Script Japanese Screen 7 1 Example of device font print setting Japanese environment Example of print setting other than Japanese environme...

Страница 111: ...indow 7 3 1 Selecting Type of Barcode Font There are the following types of barcode font Font Name Font Size Character Set IPD Barcode1 IPD Barcode2 IPD Barcode3 IPD Barcode4 IPD Barcode5 IPD Barcode6 IPD Barcode7 IPD Barcode8 IPD Barcode9 IPD Barcode10 8 5 points Western When you specify the rotation of the barcode set the print speed to low If the print speed is high the print quality of the bar...

Страница 112: ...ngs Window 2 Select a barcode font one of IPD Barcode1 to IPD Barcode10 from the application 3 Select the font size 8 5 and character set font script Western 4 Enter barcode data Example of print setting Microsoft WordPad Font Name IPD Barcode1 Font Size 8 5 Character Set Font Script Western Screen 7 3 Example of barcode font print setting The following table describes the input conditions of barc...

Страница 113: ...2f CODABAR One or more characters 0x3a For details of setting start and stop codes A to D see 3 5 5 Displaying Barcode Font Settings Window CODE128 Two or more characters 0x00 to 0x7f 1 2 3 CODE93 One or more characters 0x00 to 0x7f 2 3 JAN13 add on 2 12 to 13 2 characters 0 to 9 0x30 to 0x39 JAN13 add on 5 12 to 13 5 characters 0 to 9 0x30 to 0x39 1 Available data depends on the CODE selection CO...

Страница 114: ...1 FNC 1 FNC 1 FNC 1 2 FNC 2 FNC 2 FNC 2 3 FNC 3 FNC 3 FNC 3 4 FNC 4 FNC 4 FNC 4 2 To use 0x00 to 0x1f and 0x7f set Hex Input in 3 5 5 Displaying Barcode Font Settings Window to Enabled to enter codes 3 0x20 is only available when Hex Input is enabled in 3 5 5 Displaying Barcode Font Settings Window ...

Страница 115: ...nt There are the following types of 2D barcode font Font Name Font Size Character Set IPD 2D Barcode1 IPD 2D Barcode2 IPD 2D Barcode3 IPD 2D Barcode4 IPD 2D Barcode5 8 5 points Western Japanese 1 1 In environment other than Japanese set the Character Set Font Script to Western In Japanese environment set the Character Set Font Script to Japanese When you specify the rotation of the 2D barcode set ...

Страница 116: ... Select a 2D barcode font one of IPD 2D Barcode1 to IPD 2D Barcode 5 from the application 3 Select the font size 8 5 and character set font script Western or Japanese 4 Enter 2D barcode data Example of print setting Japanese environment Microsoft WordPad Font Name IPD 2D Barcode1 Font Size 8 5 Character Set Font Script Japanese Type QR Code Model 2 Screen 7 4 Example of 2D barcode print setting Ja...

Страница 117: ...ation or by making a program This section describes the method to print the control font by using a general application Microsoft WordPad Microsoft WordPad can print the control font only in Windows XP and Windows Vista Windows 7 does not support the function 1 Select the control font from the application IPD Control 2 Select the font size 8 5 and character set font script Western 3 Enter characte...

Страница 118: ...Open drawer 1 250ms h NV image 00 print 48 48 G NV image 00 Normal print 48 48 i NV image 01 print 48 49 H NV image 01 Normal print 48 49 j NV image 02 print 48 50 I NV image 02 Normal print 48 50 k NV image 03 print 48 51 J NV image 03 Normal print 48 51 l NV image 04 print 48 52 K NV image 04 Normal print 48 52 m Start rotating characters by 180 degrees P Feed Partial cut n End rotating characte...

Страница 119: ...ints Western 7 6 2 Using ControlA Font To use the ControlA font you can use it from a general application or by making a program This section describes the method to print the ControlA font by using a general application Microsoft WordPad Microsoft WordPad can print the ControlA font only in Windows XP and Vista Windows 7 does not support the function 1 Change the ControlA font setting to use in 3...

Страница 120: ...7 14 Screen 7 7 Print setting example of ControlA font ...

Страница 121: ... Avenue Suite 250 Torrance CA 90501 USA Telephone 1 310 517 7778 Facsimile 1 310 517 7779 Seiko Instruments GmbH Siemensstrasse 9 D 63263 Neu lsenburg Germany Telephone 49 6102 297 0 Facsimile 49 6102 297 222 Seiko Instruments H K Ltd 4 5 F Wyler Center 2 200 Tai Lin Pai Road Kwai Chung N T Kowloon Hong Kong Telephone 852 2494 5160 Facsimile 852 2424 0901 Specifications are subject to change witho...

Отзывы: