background image


23 

16A4A4-00003E-2 


4.2.2 

Installing the Touch Screen Driver 

1) 

Connect the TM and the computer with an USB cable. 

2) 

Installation of the driver will start. 

3) 

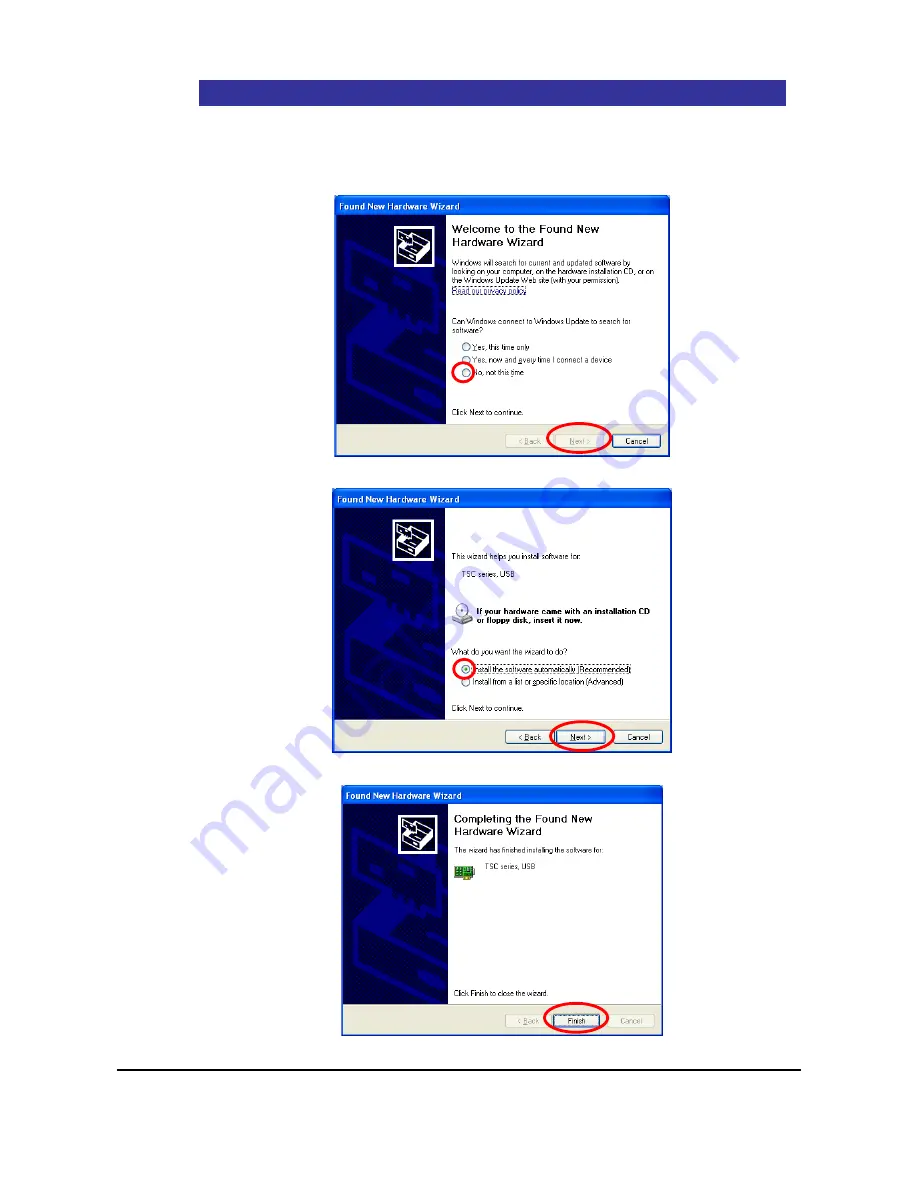
If a window as below appears, install the driver according to the procedure below. 
Select 

“No, not this time” and click [Next].   


4) 

Choose 

“Install the software automatically (Recommended)” and click [Next].   


5) 

Installation is complete. Click [Finish] and close the window. 


Содержание TMH Series

Страница 1: ...i TM Model H High Grade Model Touch Screen Monitor TMH Series Instruction Manual 10 4 TMH 310 DC00 01 12 1 TMH 312 DC00 01 Seedsware Corporation http www seedsware co jp global ...

Страница 2: ... any way for damages or losses nor be held responsible for any claims by a third party as a result of using this product Other product and company names mentioned herein may be the trademarks of their respective owners Precautions for Safe Use Please go through and follow the below precautions before use Safety Symbol Legends Safety symbols listed below are noted throughout this manual for the TM ...

Страница 3: ...s transport equipment trains automobiles ship etc crime disaster prevention devices various safety devices and medical equipment that does not concern life support be sure to have safety features including redundancy and false operation prevention measures incorporated into the entire system Display will black out when the backlight goes out If mistakenly operated in this condition it might result...

Страница 4: ...nic solvents Do not use in areas where rapid temperature change can cause condensation It may cause malfunctions In order to prevent product temperature from rising do not use in areas where heat can be trapped Also prevent storing in areas of high temperature Do not use or store TM in locations exposed to direct sunlight fine particles oil smoke and steam Do not use or store all precision equipme...

Страница 5: ... a basic characteristic of the LCD display and not a malfunction In order to avoid image lags change the displayed image periodically and avoid displaying the same image for a long period of time Handling of Analog Resistive Touch Screens 1 Applications that require a point on the touchscreen to be pressed for a long time may cause failures due to its structural features 2 The touch screen is made...

Страница 6: ...nds 9 2 5 Wiring 10 2 6 Operations 13 3 OSD 14 3 1 OSD Menu 15 3 2 OSD Menu Operation 16 4 Mouse Emulation Software 18 4 1 System Requirements 19 4 2 Installing Procedure 20 4 3 Multi monitor Setting 25 4 4 Calibration 26 5 Maintenance 29 5 1 Maintenance 30 6 Troubleshooting 31 6 1 Display 32 6 2 Touch Screen 33 7 Others 34 7 1 Warranty and Repair 35 7 2 Production Discontinuance 36 7 3 Inquiries ...

Страница 7: ...1 16A4A4 00003E 2 1 Features Chapter Contents 1 1 Features 2 ...

Страница 8: ...ector DC power input 12V 24V compliant USB Type B for the touch screen interface Long life for industrial equipment high luminance LCD Analog resistive touch screen Possible to realize the same operation environment as the mouse Multi display Contrast function Brightness adjusting function Product Certifications UL61010 UL cUL ...

Страница 9: ...A4A4 00003E 2 2 Product Configuration Chapter Contents 2 1 Standard Accessories 4 2 2 Names and Functions of Each Parts 5 2 3 Panel Installation 6 2 4 Installing to Stands 9 2 5 Wiring 10 2 6 Operations 13 ...

Страница 10: ...4 16A4A4 00003E 2 2 1 Standard Accessories Accessory list 2pc Installation Guide 2pc Mounting Bracket 1set 4pcs Power Connector 1pc Gasket 1pc preinstalled to unit ...

Страница 11: ...are noted FCC Label FCC statement Power Connector Connects to accessory connector FG Terminal Connects with FG cables DVI Connector Image signal input connector Connects with DVI cable Analog RGB Connector Connector for image signal input Connects with D SUB15 Pin Mini Cable USB B type Connector Touch screen I F connector Connects to USB cable Dial Switch Use for operating power ON OFF and OSD Mou...

Страница 12: ...dropped Please be careful not to drop the product 2 3 1 Installation Conditions When mounting to panels be sure to have enough room to insert and remove the cables and the mounting brackets Consider specification temperature between TM and the structure or parts and be sure to have good ventilation Use in specified ambient operating temperature and ambient operating humidity Ambient operation temp...

Страница 13: ...the unit before shipment Make sure it is properly installed before use A gasket used for a long time or have once been installed may have scratches or dirt on it and could have lost much of its protection effect In order to maintain the stable protection effect be sure to change the gasket on a regular basis Gasket Groove Insert gasket along the groove ...

Страница 14: ...e bracket Tighten the screw a little at a time in four locations working diagonally Appropriate torque for tightening varies depending on the model Please refer to below chart for the appropriate torque Model Appropriate torque TMH 310 DC00 01 0 7N m TMH 312 DC00 01 1 0 1 2N m Note If the screw of the mounting bracket is not perpendicular to the panel the unit might fall from the panel If screw is...

Страница 15: ...low VESA Standard 100mm 100mm 100mm 100mm Use M4 screws and tighten with torque of 0 7 to 0 8N m The penetration depth of the M4 screws shall be no more than 8mm VESA Standard VESA is an abbreviation for Video Electronics Standards Association an industry group that establishes standards concerning displays for computers VESA establishes SVGA standards and VL bus standards and standardized below 2...

Страница 16: ...Electronics Clamp Screw Size M2 Mounting Screw Size M2 5 Torque 0 3N m Compliant Wire Wire type Single wire Stranded wire Conductor size AWG14 30 Wire Stripping Length When using stranded wire the twisting of the core wire must be appropriate in order to avoid fine wires of the core wire from short circuiting with each other or electrodes nearby Wiring Procedures Wire the power cables as instructe...

Страница 17: ... Connect a lightening surge absorber for lightening surge measures 8 Separate lightening surge absorber connection E1 and grounding of TM E2 9 Choose the lightening surge absorber so the power voltage maximum increase does not exceed the maximum capacity voltage circuit of the lightening surge absorber Cautions for Grounding 1 Have a dedicated grounding for power source cable FG Grounding resistan...

Страница 18: ...diagram Please connect to the power source last Install the Ferrite Core to the cable if noise measures are necessary Note When using the analog RGB cable you may see misalignment or flickering of the screen Make display adjustments to improve these phenomenons Refer to 3 2 2 Adjusting Display Screen for details Computer USB Cable Analog RGB Cable DVI Cable FG Ground DC12V 24V Connect last ...

Страница 19: ...e monitor Press and hold the switch for more than two seconds to turn the power off Wait five seconds before turning back on the power after turning the power off 2 6 2 OSD Operation Press the switch when the TM display is ON to start the OSD Adjust the value or the selected item by turning the switch clockwise or counter clockwise Push switch to determine the chosen item and or the value Press Tu...

Страница 20: ...nts can be made with the OSD On Screen Display OSD is operated with a dial switch The value set will be retained and will not be deleted when power is shut down and until setting is changed intentionally Chapter Contents 3 1 OSD Menu 15 3 2 OSD Menu Operation 16 ...

Страница 21: ...ma value Color Temp 5800K 6500K 7500K 9300K sRGB 6500K Adjust color temperature User Adjust R G B individually 0 255 Color Effect Standard Dynamic Movie Photo Vivid Standard Adjust color effect User Adjust R Y G C B M individually 0 100 Auto Color Automatically adjust color tone Exit Go back to main menu INPUT Auto Select Auto Select Automatically select image input VGA Switch image input to analo...

Страница 22: ... sub menu to go back to the main menu 2 Select EXIT of the main menu to end the OSD If an operation is aborted the OSD will automatically end at the time set on the OSD Timer Refer to 3 2 6 Setting Auto Close Time of OSD Menu for how to set the OSD Timer 3 2 2 Adjusting Display Screen Automatic adjustment will start if input by analog image signal If the display is not appropriate try automatic ad...

Страница 23: ...Do not display other windows 2 Open the OSD menu 3 Select COLOR Auto Color 4 Automatic adjustment will start and the OSD menu will close automatically Note Depending on the liquid crystal solidity difference you may not necessarily get the color you expect 3 2 6 Setting Auto Close Time of OSD Menu Set the time to automatically close the OSD menu The set time is Set Value x seconds Enter 0 to displ...

Страница 24: ...e TSC DD can be downloaded via our web site Be sure to download the driver that suits your computer bit size URL http www seedsware co jp support download Chapter Contents 4 1 System Requirements 19 4 2 Installing Procedure 20 4 3 Multi monitor Setting 25 4 4 Calibration 26 ...

Страница 25: ...e operation check of Windows 8 8 1 10 4 1 2 Installment Requirements Hardware There must be 10MB of free space and data file storing capacity in the system drive 4 1 3 Others 1 When using Windows 7 and inputting by touch on the multi monitor the graphic driver must support DirectX9 and be WDDM 1 0 or of greater version 2 Touch screen operation will be single touch mouse input only ...

Страница 26: ...file downloaded to the computer to be used 2 USB cable should not be connected at this point 3 Double click the Installer exe icon 4 NET Framework2 0 x86 installation confirmation window will be displayed 5 Review the License Agreement for adding of Microsoft Software If you can agree to the License conditions select I Agree 6 After NET Framework2 0 is installed a Setup Wizard will start Click Nex...

Страница 27: ... the folder destination click Next Or if you do have to make changes click Browse specify your folder destination and click Next 9 Confirm Installation window will appear Click Next 10 You may see a message dialog as below several times during the installation Click Install or Continue Anyway For Windows 7 8 10 ...

Страница 28: ...22 16A4A4 00003E 2 For Windows XP 11 Installation is complete Click Close to end the Wizard 12 A window as below will appear Click Yes and reboot your computer ...

Страница 29: ...USB cable 2 Installation of the driver will start 3 If a window as below appears install the driver according to the procedure below Select No not this time and click Next 4 Choose Install the software automatically Recommended and click Next 5 Installation is complete Click Finish and close the window ...

Страница 30: ...24 16A4A4 00003E 2 6 Select Start All Program DMC DMC Touch Panel Configuration and open the Properties window 7 If USB controller 0 is displayed then the driver has been installed successfully ...

Страница 31: ...or 1 Select Start All Program DMC DMC Touch Panel Configuration and open the Properties window 2 Click Device and open the device screen 3 Click Identify and the number of the monitor will be displayed in the center of the TM display 4 Choose the monitor number in the Operation area to the number displayed on the TM 5 Click Apply to reflect the setting ...

Страница 32: ...the computer The initial setting will be store in the TM Follow below procedure to set the save location of the calibration data 1 Select Start All Program DMC DMC Touch Panel Configuration and open the Properties window 2 Click Device and open the device screen 3 Place a check in the box of Use EEPROM to enable EEPROM and save the calibration data in the TM unit ...

Страница 33: ...s window 2 Choose 4p of the Calibration points and click Calibration 3 TM will display a screen as below diagram 1 4 Touch the red center of the blue cross displayed 5 The cross will turn red as shown in 2 and another blue cross will appear on the display 6 Touch the red center of the newly shown blue cross and repeat in order shown below Use of a touch pen is recommended 1 2 3 4 ...

Страница 34: ... be recognized as the blue cross and thus will have the wrong calibration results Be sure to touch the red center of the blue cross 8 Touch anywhere off the OK Cancel and make sure the touch points are not wrong 9 To set the calibration data tap OK 10 To cancel the calibration tap Cancel For a more detailed procedure or other information refer to readme pdf included in the Mouse Emulation Software...

Страница 35: ...29 16A4A4 00003E 2 5 Maintenance Chapter Contents 5 1 Maintenance 30 ...

Страница 36: ...ndition check periodically for below points Ambient Environment 1 Ambient temperature is within the specified range 0 50 2 Ambient humidity is within the specified range 10 85 RH No condensing wet bulb temperature is 39 or below 3 Operating pressure is within the specified range 800 1114hpa Electrical Specification 1 Voltage is within the permissible range DC12V 20 DC24V 20 Installation 1 Connecto...

Страница 37: ...31 16A4A4 00003E 2 6 Troubleshooting If problems still remain and cannot be solved contact your dealer or refer to 7 3 Inquires and contact us Chapter Contents 6 1 Display 32 6 2 Touch Screen 33 ...

Страница 38: ...o 3 2 2 Adjusting Display Screen Adjust H Position V Position by OSD Menu Display 5 Vertical lines bars appear on the screen Part of screen is flickering Try the Auto Adjustment Refer to 3 2 2 Adjusting Display Screen Adjust Pixel Clock by OSD Menu Display 6 Entire screen is flickering Right Left of screen is not displayed Try the Auto Adjustment Refer to 3 2 2 Adjusting Display Screen Adjust Phas...

Страница 39: ... are connected Try touch screen calibration Refer to 4 4 Sensor Calibration for details 2 Touch operation is not effective Make sure the USB cable used to connect to the computer is connected securely and properly Reboot the computer Check that the touch screen driver is installed properly 3 There is no touch sound Touch sound may not be output depending on the computers configuration Choose to or...

Страница 40: ...34 16A4A4 00003E 2 7 Others Chapter Contents 7 1 Warranty and Repair 35 7 2 Production Discontinuance 36 7 3 Inquiries 37 ...

Страница 41: ... equipment and or usage of inappropriate consumables and media 7 If the product is repaired remodeled modified or disassembled by a party other than Seedsware 8 If the product cannot be identified by a serial number 9 Any malfunctions defects and or damages that are to have been caused on your behalf This warranty covers only the product itself Any damages on site repairs and replacement driven by...

Страница 42: ...36 16A4A4 00003E 2 7 2 Production Discontinuance In the event of production discontinuance an announcement will be made on our website six months prior to the last possible order reception date ...

Страница 43: ...s and registered trademarks of Microsoft Corporation USA in the United States and other countries Other product company names mentioned herein are also trademarks registered trademarks of their respective owners 2 nd Edition October 2016 USCO America Inc 136 W Valletts Street Elmhurst IL 60126 USA Phone 630 832 0438 510 931 9046 E mail sales uscoamerica com Business hours 9 00a m to 5 45p m Centra...

Отзывы: