background image

IP address or DDNS domain being entered directly into a web browser’s address 

bar (as an example: http://202.96.133.134: 9008 or 

http://ipcamera.dyndns.org:9008).  9008 being the port number forwarded in the 

router at the location (LAN) of the camera.


Enter in the Host box: 202.96.133.134, Http Port box:9008 or Host: 

ipcamera.dyndns.org, Http Port: :9008.   Enter the 


correct User Name and 

Password then click  'Add'. More cameras can be listed in the same way. 


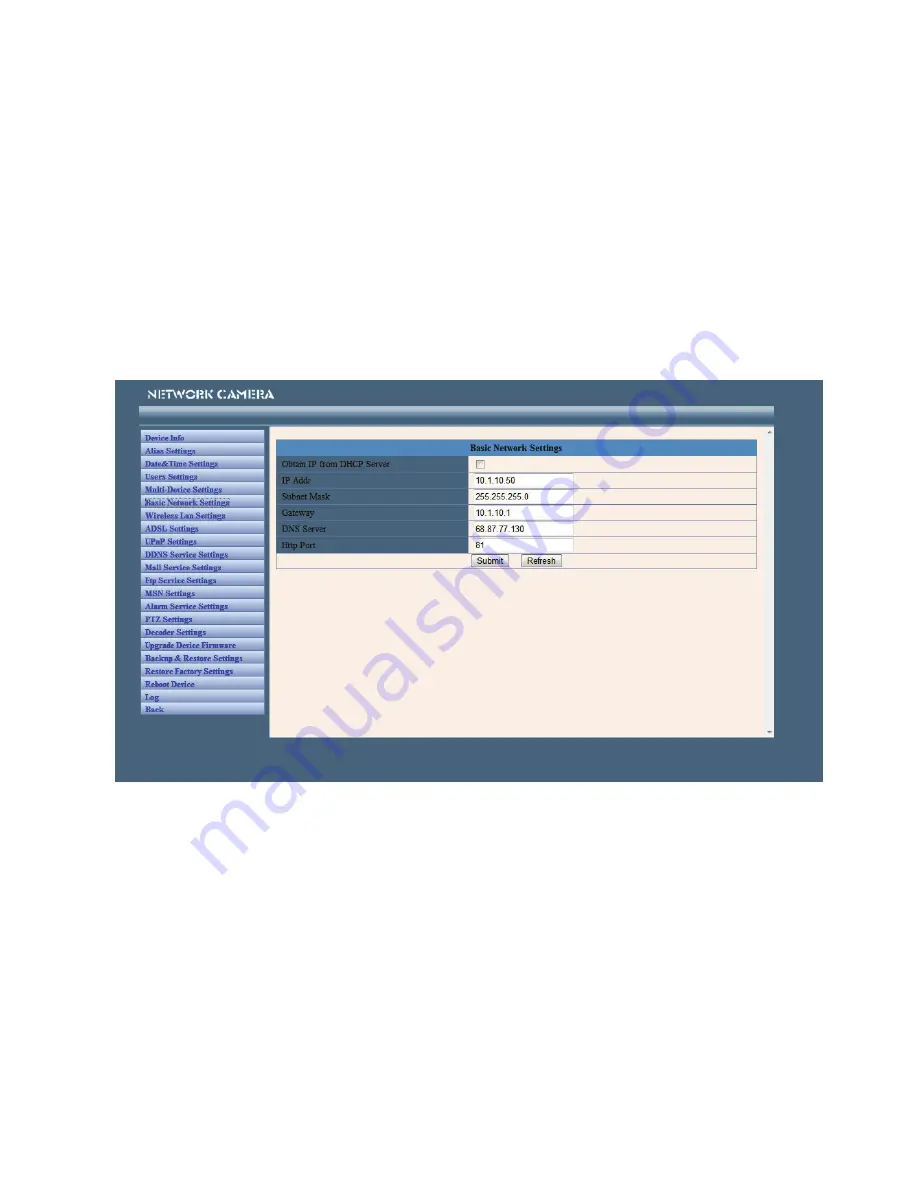
Basic Network Settings  

If the router that the IP camera connects to has a DHCP function, you can choose 
'Obtain IP from DHCP Server" The network parameters will automatically fill in.


HTTP Port

 - In most cases, you can leave this value as 81, however, if your 

Internet Service Provider blocks this port, you may have to switch to another port 

number such as 8005.  


Wireless LAN Settings 


Enter the wireless settings page of the Wireless Router to find out the SSID, 
Channel, Encryption and Authentication details. This camera supports WEP and 
WAP security encryption.  


Содержание SLW-163

Страница 1: ...Model SLW 163 Wireless Pan Tilt IP Camera w IR Owner s Manual 15540 Herriman Blvd Noblesville IN 46060 www security labs com Customer Support 1 800 774 0284 ...

Страница 2: ...Windows PC and configure it for your particular requirements NOTES ON WINDOWS AND MAC COMPATIBILITY Your IP camera setup is best accomplished using a Windows PC with Internet Explorer Certain features may not be readily available using the Safari Firefox or Chrome browsers FEATURES Camera combines a high quality CMOS imager with a powerful wireless web server for clear images sent to anywhere on y...

Страница 3: ...luded antenna to the camera 2 Connect power to the camera only using the power supply provided 3 Using the included Ethernet cable connect the camera to your network s router or switch We recommend you set up the camera initially on your network using a wired connection before you use the camera in Wi Fi mode 4 Insert the included Installation CD into your PC s CD drive The installation screen sho...

Страница 4: ...t upon completion of the installation and a new icon will appear on the desktop automatically called IP Camera Tool 7 Double click the icon to start the IP Camera Tool software The software is designed to search the Local Area Network LAN for any similar IP cameras or devices ...

Страница 5: ... the operation of the camera itself Allowing the installation of the ActiveX control used with the camera is needed The security settings of Internet Explorer can be adjusted if needed Please see further information in the Appendix 8 Right click on the camera now showing in the list on your screen that you wish to use five options are then displayed Basic Properties Displays Device ID System Firmw...

Страница 6: ...Mask The default subnet mask of the camera is 255 255 255 0 Gateway Make sure it is in the same subnet with your PC IP address Default Gateway address is 192 168 1 1 DNS IP address of your Internet Service Provider ISP Port LAN port assigned for the camera usually 81 User Password Default User admin Password _________ leave space empty 10 After completing the Network Configuration Click OK Note Yo...

Страница 7: ...before activating the WiFi feature It is important for the camera to first have an IP Address and Subnet that are compatible with your wireless network 1 With the LAN cable still attached to your camera connect to it using the IP Camera Tool or by entering the local IP address into your web browser address bar 2 Login with your user name and password Default is User name admin Password leave empty...

Страница 8: ...e camera at its intended location Please confirm WiFi transmission from the location of the camera before installing the accessory mounting bracket Note If you are having difficulty properly connecting to the camera flush the ARP buffer IP Camera Tool right click camera on list Flush ARP Buffer OPERATION ADDITIONAL SETTINGS Main User Interface as seen with Internet Explorer Device Status Camera s ...

Страница 9: ... image and select Save picture as to select a folder to store your snapshots By default the date and time the snapshot was taken will be included in the file name Headphone Microphone Movie Icons Click the headphone icon to hear audio from the area near your camera Click the microphone icon to speak via your PC s microphone to the camera s speaker Click the icons again to turn the selected functio...

Страница 10: ...n the stop button to their right will stop the automatic scans Note The infinity icons Switch and Switch Off are reserved for future use Preset Up to 8 preset positions can be entered for easy access to commonly viewed points of interest Manually pan tilt the camera to the first view desired and click the word Set Manually pan tilt the camera to the second desired view select 2 from the drop list ...

Страница 11: ...f your IP camera Data Time Settings Set the time and date If your camera is connected to the internet checking the Sync with NTP Server box and selecting time nist gov is suggested for the best accuracy and synchronization with other cameras you may own User Settings You can configure up to 8 user names and passwords and the permission level of each user as Administrator Operator or Visitor Visito...

Страница 12: ...sing Internet Explorer ActiveX Mode in the Multi Device Settings page you can see all similar cameras found on your LAN The 1st Device is the default IP camera You can add more cameras to the list in the network for monitoring Up to 9 IP cameras can be viewed simultaneously with Internet Explorer To add cameras on the LAN Click The 2nd Device and double click the IP camera from the Device List in ...

Страница 13: ... More cameras can be listed in the same way Basic Network Settings If the router that the IP camera connects to has a DHCP function you can choose Obtain IP from DHCP Server The network parameters will automatically fill in HTTP Port In most cases you can leave this value as 81 however if your Internet Service Provider blocks this port you may have to switch to another port number such as 8005 Wir...

Страница 14: ...amera that will remain the same making it easier for you to contact your camera via the internet The system supports protocols from some DDNS providers such as dyndns org Enter the following information once the DDNS information has been setup User and Password The User Name and Password used when applying for the domain name DDNS Host The domain name DDNS or Proxy Server If you access the DDNS ho...

Страница 15: ...Mail Service Settings Configure the Email addresses that will receive and send mails after a motion detection alarm ...

Страница 16: ... screen if the e mail parameters have been entered correctly Report Internet IP by Mail Sends an e mail when the camera is powered up or the IP address is changed FTP Service Settings Note When Alarm Service Settings Upload Image on Alarm is checked the FTP Service takes effect FTP Server The FTP server address FTP port The port usually is 21 FTP Mode Supports standard POST mode and passive PASV m...

Страница 17: ...iggered to send email alerts and upload images Motion Detection Sensitivity You can choose a level from 1 to 10 The most sensitive is 10 Send Mail on Alarm Sends picture mail information to the set Email address after a motion alarm is triggered Upload Image on Alarm Enable this function to upload an image after a motion alarm Scheduler Enable this function to schedule the times when you wish for ...

Страница 18: ...5 11 23 8000 into the address bar of your preferred web browser or 2 Add the WAN IP and port number to the Multiple Device Settings using Internet Explorer or 3 Register and use your camera with a DDNS service Getting a Static IP address from your ISP is the preferred way to go If you are only able to get a Dynamic IP address one that changes periodically you may consider using a DDNS provider DDN...

Страница 19: ... be available for your device APPENDIX Frequently Asked Questions What do I do if I have forgotten the administrator User Name and or password To reset the administrator User Name and password Press and hold down the RESET BUTTON for 5 seconds Release the power button and the User Name and password will be reset back to the factory default administrator User Name and Password Default administrator...

Страница 20: ... many visitors will slow down the image frame rate 4 Choice of switch or hub Use a switch for multiple IP cameras rather than a hub Pop up appears saying Fail to connect to the device This prompt may appear if using multiple cameras Enter the Multi Device Settings page login as an Administrator to check if all Device settings are correct Can t access my camera on the internet 1 The ActiveX control...

Страница 21: ...has a Virtual Map Function add the camera s IP address and port number to the Virtual Map List Internet Explorer Security Settings If you see a message that Internet Explorer is blocking an ActiveX control you will need to check your browser setup by following the procedure a Open Internet Explorer under Tools select Internet Options Select Security and then click Custom Level ...

Страница 22: ...Click the options as shown below ...

Страница 23: ......

Страница 24: ... clicking on Trusted Sites on the Security Page and adding the IP address of the camera to the Trusted Sites list Trusted sites can have their own set of security settings that are much less restrictive to ActiveX and other common internet threats ...

Страница 25: ...OLATION OF PRIVACY FROM ILLEGAL RECORDINGS MADE ON THIS UNIT THE USER OWNER ASSUMES FULL LIABILITY FOR ANY AND ALL RECORDINGS MADE FROM THIS UNIT IN A SECURITY OR SURVEILLANCE OPERATION OR IN ANY OTHER USE SECURITY LABS IS NOT RESPONSIBLE FOR RECORDINGS THAT VIOLATE LAWS OR THAT MAY PROVE OFFENSIVE OR TEND TO INCRIMINATE ANOTHER INDIVIDUAL LOCAL STATE AND FEDERAL LAWS MUST BE OBSERVED REGARDING AL...

Отзывы: