background image


Rev. 3.0      13/06/16 


Operation using a 3-key radio control (BeFree x3 - X6):


Using the BeFree x3 – x6 radio control ensures the same oper-

ation as for the BeFree x1 version. The radio control’s two side 

keys, (-) and (+), also allow you to select commands (Up – Stop 
– Down) for 3 different utilities (BeFree x3) or 6 different utilities 

(BeFree x6). Pressing and holding the two side keys (-) and (+) 

for  a  few  seconds  also  enables  and  disables  operation  of  the 

sun  sensor  (the  selection  is  confirmed  by  a  quick  Up/Down 
movement of the motor). 

Z

ONE AND 

G

ENERAL 

C

ENTRALIZATION


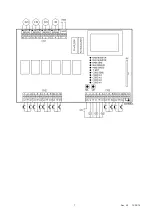
Centralization with cable and keys 

The centralization of two or more control units via wire enables 

simultaneous raising or lowering of the connected shutters. To 
do this you need to connect the control units with a bus of three 

wires in parallel to the inputs of the General UG (Up) and DG 

(Down) commands and the “GND Signal” common reference. 

This allows you to control the 4 motors independently or simul-
taneously  with  the  UZ  (Up)  and  DZ  (Down)  zone  commands 

and  centralize  other  control  units  with  the  UG  (Up)  and  DG 

(Down) general commands. 

A

NEMOMETER OPERATION


The electronic control unit raises the sun shade whenever the 
wind exceeds the selected threshold. 

S

UN 

S

ENSOR OPERATION


The electronic control unit lowers the sun shade after 10 

minutes of brightness greater than the Sun Sensor’s selected 

threshold; this is indicated by the SUN LED which lights up. 
The control unit then raises the blind after 10 minutes during 

which the brightness is below the selected threshold. 

R

AIN 

S

ENSOR OPERATION


The electronic control unit raises the blind as soon as the sensi-
tive part of the rain sensor is touched by water. The RAIN LED 

lights up. 

P

ROGRAMMING 

K

EYS AND 

I

NDICATOR 

L

ED 


SEL key

:


this selects the function to be stored. The LED flash-

es to indicate your selection. Keep pressing the key to find the 

required function. The selection remains active for 15 seconds 

(during which time the LED keeps flashing) after which the con-

trol unit then returns to its original state. 

SET key

: this key programs the function selected with the SEL 

key. 


Indicator LED


LED on: stored option.  

LED off: option not stored.  

LED flashing: option selected.  

---------------------- MAIN MENU -----------------


LED reference          LED off                                      LED on 

1) CODE M1          No code                     Code TX Pgm. M1 
2) CODE M2          No code                     Code TX Pgm. M2 
3) CODE M3          No code                     Code TX Pgm. M3 
4) CODE M4          No code                     Code TX Pgm. M4 
5) CODE SENS.    No code                     Code Pgm. sensors 
6) T. MOT.             Motor time 2 min.           Motor time Pgm. 
7) WIND SPEED    Wind safety 25 Km/h    Wind safety Pgm.                   
8) SUN SENSOR   Sun sensor = OFF            Sun sensor = ON                
9) RAIN SENSOR  Rain sensor = OFF       Rain sensor = ON                 
10) SUN            Presence of Sun = No          Presence of Sun = Yes               
11) RAIN           Presence of Rain = No         Presence of Rain = Yes                 

10)  CODE M1 

(Programming the radio control for Motor 1) 


Programming the 1 or 2 key radio control. 

The  radio  control  transmission  codes  are  programmed  as  fol-
lows: press the SEL key and M1 CODE LED will start flashing; 

at  the same  time send the  first  pre-selected  code  with  the re-
quired  radio control:  M1  CODE  LED  will  start  flashing  quickly; 

send  the  second  code  to  be  stored,  M1  CODE  LED  remains 

ON  and  programming  will  be  complete.  If  the  second  code  is 

not send within 10 seconds, the control unit exits the program-
ming phase, selecting operation with 1 key of the radio control. 

If  all  the codes  are stored  and  you  try  to  repeat  the  program-

ming phase, all the indicator LEDs will start flashing very quick-

ly to indicate no more codes can be stored. 

Programming the “BeFree” 3-key radio control 

The  entire  “BeFree”  radio  control  can  be  configured  by  pro-

gramming just the Up Key.  

The “BeFree” radio control’s codes are programmed as follows: 
press the SEL key and M1 CODE LED will start flashing; at the 

same time, press the UP key on the required radio control. At 

the same time, M1 CODE LED remains ON and programming 

will  be  complete.  If  all  the  possible  radio  controls  have  been 
stored and you try to repeat the programming phase, all the in-

dicator LEDs will start flashing very quickly to indicate no more 

codes can be stored. 

11)  CODE M2 

(Programming the radio control for Motor 2) 


Follow the CODE M1 instructions in paragraph 1) above to pro-

gram the radio control for motor 2, initially pressing the SEL key 

twice. 

12)  CODE M3 

(Programming the radio control for MOTOR 3) 


Follow the CODE M1 instructions in paragraph 1) above to pro-
gram the radio control for motor 3, initially pressing the SEL key 

three times. 

13)  CODE M4 

(Programming the radio control for MOTOR 4)


Follow the CODE M1 instructions in paragraph 1) above to pro-
gram the radio control for motor 4, initially pressing the SEL key 

four times. 

CODE ALL 

(Programming the radio control for all 4 motors)  

Follow the CODE M1 instructions in paragraph 1) above to pro-
gram the radio control for all four motors, initially pressing the 

SEL key five times. 

14)  CODE SENS.  

(Programming the wireless sensors)


Programming the Wireless sensor (Sun – Wind – Rain). 

The  Wireless  Sensor’s  transmission  code  is  programmed  as 

follows:  use  the  SEL  key  to  select  the  flashing  SENS  CODE 

LED; at the same time, send the Wireless Sensor code via the 

dedicated  key  situated  inside  the  sensor.  SENS  CODE  LED 
stays  ON  and  programming  will  be  complete.  If  the  Wireless 

Sensor code is not sent within 2 minutes, the control unit exits 

the  programming  phase.  If  all  the  possible  Wireless  Sensor 

codes  are  already  on  the  memory,  all  the  indicator  LEDs  will 
start flashing very quickly during the programming operation to 

indicate no more codes can be stored. 

 
Deleting the codes


Stored Wireless Sensor codes are deleted as follows: press the 

SEL key and SENS CODE LED will start flashing; next, press 

the SET key and SENS CODE LED will switch off, and the pro-

cedure is complete. 

Signalling


Should there be no communication between the Wireless Sen-

sor and the control unit for 20 minutes, the shutter is automati-

cally raised as a safety precaution. If communication continues 

to be down, other controls will in any case always keep the con-
trol unit in safe mode. 

15)  LED T. MOT. 

(Programming Motor Time, max 4 minutes) 


The  control  unit  comes  with  a  motor  power  time  set  at  two 

minutes (LET T.MOT. OFF). 
The motor time must be programmed as follows when the shut-

ter is down:  

Press the SEL key until the LED T.MOT key flashes, then press 

Содержание 93070000

Страница 1: ...ndo locale normalmente aperti per l a zionamento del serramento si otterrà il seguente funzionamen to relativo ad ogni singolo motore U1 2 3 4 comandano la Salita fino allo scadere del tempo mo tore D1 2 3 4 comandano la Discesa del serramento se si in via un comando nello stesso senso di marcia prima dello sca dere del tempo motore la centrale effettua l arresto del serra mento se si invia un com...

Страница 2: ...ioggia ON 10 SUN Presenza Sole No Presenza Sole Si 11 RAIN Presenza Pioggia No Presenza Pioggia Si 1 CODE M1 Programmazione del radiocomando per il con trollo del Motore 1 Programmazione del radiocomando 1 o 2 Tasti La programmazione dei codici di trasmissione del radiocoman do è eseguita nel seguente modo premere il tasto SEL LED CODE M1 inizierà a lampeggiare allo stesso tempo inviare il primo c...

Страница 3: ...el se guente modo posizionarsi con il tasto SEL sul lampeggio del LED SUN SENSOR poi premere per un istante il tasto SET nello stesso tempo il LED SUN SENSOR rimarrà acceso e l abilitazione del Sensore Sole sarà completata E possibile ri petere l operazione per disabilitare il Sensore Sole Abilitazione del Sensore Sole con radiocomando 3 tasti BeFree x3 X6 L abilitazione del Sensore Sole può esser...

Страница 4: ...to del LED SUN e la salita per un tempo di 5 sec Test Sensore Pioggia bagnare la parte sensibile del Sensore Pioggia nello stesso istante la centrale comanderà l accensione del LED RAIN e la salita per un tempo di 5 sec Terminato il test assicurarsi di aver asciugato la parte sensibile del sensore pioggia prima di utilizzare la centrale nel normale funzionamento Programmazione La centrale è fornit...

Страница 5: ...nta nessun tipo di dispositivo di sezionamento della linea elettrica 230 Vac sarà quindi cura dell installatore prevedere nell impianto un dispositivo di sezio namento E necessario installare un interruttore omnipolare con categoria III di sovratensione Esso deve essere posizio nato in modo da essere protetto contro le richiusure accidenta li Per i collegamenti alimentazione e uscita motori si rac...

Страница 6: ...izioni potrebbe provocare danni e gravi incidenti Esaminare frequentemente l impianto per rilevare eventuali segni di danneggiamento Non utilizzare il dispositivo se è ne cessario un intervento di riparazione Attenzione Tutte le operazioni che richiedono l apertura dell involucro col legamento cavi programmazione ecc devono essere esegui te in fase di installazione da personale esperto Per ogni ul...

Страница 7: ...7 Rev 3 0 13 06 16 ...

Страница 8: ... inputs of the local control keys normally open for run ning the shutter will ensure the following operation U1 U2 U3 U4 UZ control raising for the configured motor time D1 D2 D3 D4 DZ control lowering of the shutter sending a command for the same direction before the motor stops run ning the control unit stops the shutter sending a command for the opposite direction before the motor stops running...

Страница 9: ...end the second code to be stored M1 CODE LED remains ON and programming will be complete If the second code is not send within 10 seconds the control unit exits the program ming phase selecting operation with 1 key of the radio control If all the codes are stored and you try to repeat the program ming phase all the indicator LEDs will start flashing very quick ly to indicate no more codes can be s...

Страница 10: ...ash alternately you then have 30 seconds within which to select the functions of the extended menu using the SEL and SET keys after another 30 seconds the control unit returns to the main menu EXTENDED MENU LED reference LED off LED on A CODE M1 Step by step Manual P P S Aut B CODE M2 Step by step Venetian blind P P S Aut C CODE M3 Simultaneous start up 5 sec sequential start up D CODE M4 Start up...

Страница 11: ...utomatic Sensors in this way the control unit temporarily blocks automatic motion when a stop command is given during movement until the next rais ing or lowering command The control unit comes with the Au tomatic Movement Lock disabled to enable this function pro ceed as follows enable the extended menu the SUN and RAIN LEDs flash to confirm this press the SEL key until the T MOT LED flashes then...

Страница 12: ...nimum re quirements Installation must be carried out according to EN 60335 2 97 Specification for safety of household and similar electrical ap pliances part 2 Particular requirements for drives for rolling shutters awnings blinds and similar equipment The control unit must be connected permanently to the power supply and it is not equipped with a 230 V a c electric line sec tioning device The ins...

Страница 13: ...13 Rev 3 0 13 06 16 ...

Страница 14: ...e radio en mémoire CARACTÉRISTIQUES DE FONCTIONNEMENT Fonctionnement Boutons commande Locale ou de Zone En raccordant aux entrées U1 U2 U3 U4 UZ et D1 D2 D3 D4 DZ en basse tension des boutons de commande locale nor malement ouverts pour l actionnement du volet nous obtien drons le fonctionnement suivant pour chaque moteur individuel U1 U2 U3 U4 UZ commandent la Montée jusqu à l écoulement du temps...

Страница 15: ...Led éteinte option non mémorisée Led clignotante option sélectionnée MENU PRINCIPAL Référence LED LED Eteinte LED Allumée 1 CODE M1 Aucun code Code TX Pgm M1 2 CODE M2 Aucun code Code TX Pgm M2 3 CODE M3 Aucun code Code TX Pgm M3 4 CODE M4 Aucun code Code TX Pgm M4 5 CODE CAPT Aucun code Code Capteurs Pgm 6 T MOT Temps moteur 2 min Temps Moteur Pgm 7 WIND SPEED Sécurité Vent 25 Km h Sécurité Vent ...

Страница 16: ... touche SEL sur LED WIND SPEED ensuite appuyer sur la touche SET pour lancer la procédure de programmation simultanément la LED WIND SPEED commencera à faire un double clignotement à chaque double clignotement de la LED WIND SPEED équivaut une augmentation de 5 Km h appuyer sur la touche SET une fois atteint le seuil souhaité au même moment se produira la mémorisation de la valeur sélectionnée et ...

Страница 17: ...moment la LED CODE M4 s allumera de fa çon permanente et la programmation sera terminée Répéter l opération si l on souhaite modifier la configuration précédente E CODE CAPT Test Capteurs par Fil La centrale permet de vérifier le fonctionnement des Capteurs reliés et le sens correct de rotation Au moment de l installation nous conseillons de positionner le rideau dans une position in termédiaire p...

Страница 18: ...ande Montée c est à dire que si le cap teur détecte de la pluie il commande la Montée du volet Si vous souhaitez que le capteur en détectant de la pluie com mande la Descente du volet procéder de la façon suivante s assurer d avoir activé le menu étendu mis en évidence par le clignotement alterné des leds SUN et RAIN se placer avec la touche SEL sur le clignotement de la LED RAIN SENSOR puis appuy...

Страница 19: ...xi gences minimum de sécurité est de toute façon à la charge de l installateur Nous recommandons d effectuer l installation conformément à la norme EN 60335 2 97 Appareils de électrodomestiques et analogues sécurité partie 2 Règles particulières pour les motorisations de volets stores rideaux et équipements enrou lables analogues La centrale doit être continuellement branchée au réseau d alimentat...

Страница 20: ...20 Rev 3 0 13 06 16 ...

Страница 21: ...Funcionamiento Pulsadores comando Local o de Zona Conectando a las entradas U1 U2 U3 U4 UZ y D1 D2 D3 D4 DZ a baja tensión pulsadores de comando locales normalmente abiertos por la acción del cerramiento se obtendrá el siguiente funcionamiento relacionado a cada uno de los motores U1 U2 U3 U4 UZ controlan la Subida hasta que termine el tiempo motor D1 D2 D3 D4 DZ controlan la Bajada del cerramient...

Страница 22: ...arpadeante opción seleccionada MENÚ PRICIPAL Referencia Led Led Apagado Led Encendido 1 CODE M1 Ningún código Código TX Pgm M1 2 CODE M2 Ningún código Código TX Pgm M2 3 CODE M3 Ningún código Código TX Pgm M3 4 CODE M4 Ningún código Código TX Pgm M4 5 CODE SENS Ningún código Código Sensores Pgm 6 T MOT Tiempo motor 2 min Tiempo Motor Pgm 7 WIND SPEED Seguridad Viento 25 Km h Seguridad Viento Pgm 8...

Страница 23: ...ne provista con el umbral de intervención de la Seguridad viento igual a 25 Km h LED WIND SPEED OFF La programación de la selección umbral Seguridad viento es efectuada de la siguiente manera posicionarse con el botón SEL en LED WIND SPEED después oprimir el botón SET para poner en marcha el procedimiento de programación al mismo tiempo el LED WIND SPEED iniciará a hacer un doble parpadeo cada par...

Страница 24: ...res conectados entre ellos se activen simultáneamente La central viene provista por el fabricante sin el tiempo de retardo de inicio de los 4 motores si se desea programar un tiempo de retardo de inicio enmarcado entre 1 y 120 segundos proceder de la siguiente forma asegurarse de haber habilitado el menú extendido indicado por el parpadeo del Led SUN y Led RAIN posicionarse con el botón SEL en el ...

Страница 25: ...n el botón SEL en el parpadeo del LED SUN a continuación oprimir el botón SET en el mismo instante el LED SUN SENSOR se encenderá permanentemente y la programación habrá sido concluida Repetir la operación si se desea recuperar la configuración anterior I RAIN SENSOR Inversione moto comando Pioggia La central viene provista por el fabricante con la asociación Comando lluvia Comando de Subida o el ...

Страница 26: ...ediencia efectiva de las obligaciones y el alcance de los requisitos mínimos de seguridad está a cargo del instalador Se recomienda efectuar la instalación respetando la normativa EN 60335 2 97 Seguridad de los aparatos de uso doméstico y similares parte 2 Normas particulares para motores de movimiento de persianas toldos para externos toldos y aparatos enrollables similares La central debe ser co...

Страница 27: ...27 Rev 3 0 13 06 16 ...

Страница 28: ...hrung enthält die Zentrale keinen gespeicherten Funksteuerungscode BETRIEBSMERKMALE Betriebsweise Lokale und Zonen Indem an die Eingänge U1 U2 U3 U4 UZ und D1 D2 D3 D4 DZ in Niederspannung Knöpfe für Lokale Steuerungen offene Ruhestellung für die Betätigung der Schließvorrichtungen an geschlossen werden erfolgt der Betrieb im Verhältnis zu jedem einzelnen Motor folgendermaßen U1 U2 U3 U4 UZ steuer...

Страница 29: ...Funktion gelangen Die Auswahl bleibt für 15 Sekunden ak tiv was durch die blinkende LED angezeigt wird danach kehrt die Zentrale in ihren ursprünglichen Zustand zurück Taste SET bewirkt die Programmierung der mit der Taste SEL gewählten Funktion Anzeige LED LED eingeschaltet Option gespeichert LED ausgeschaltet Option nicht gespeichert LED blinkt Option ausgewählt HAUPTMENÜ Bezugs Led LED ausgesch...

Страница 30: ...en der LED WIND SPEED entspricht einem Anstieg von 5 Km h Beispiel 5maliges Blinken der LED WIND SPEED 25 Km h Auswahl des Schwellwertes der Wind Funktion zwischen 5 und 40 Km h Die Zentrale wird mit einem Schwellwert von 25 Km h geliefert LED WIND SPEED OFF Für die Programmierung des ausgewählten Schwellwertes der Wind Funktion folgendermaßen vorgehen gehen Sie mit der Taste SEL auf die LED WIND ...

Страница 31: ...r Start Die Zentrale ermöglicht die Programmierung der Startverzöge rungszeit der 4 Motoren hierdurch kann ein gleichzeitiger Start anderer Gruppen mit 4 parallel geschalteten Motoren verhindert werden Die Zentrale wird werkseitig ohne Startverzögerungs zeit der 4 Motoren geliefert sollte ein Start mit einer Startver zögerung zwischen 1 und 120 Sekunden erwünscht sein fol gendermaßen vorgehen verg...

Страница 32: ...e Menü aktiviert zu haben angezeigt durch das Blinken der LED SUN und der LED RAIN gehen Sie mit der Taste SEL auf das Blinklicht der LED SUN SENSOR dann die Taste SET drücken gleichzeitig schaltet die LED SUN SENSOR auf Dauerlicht und die Programmierung ist abgeschlossen Den Vorgang wiederholen wenn die vorhe rige Konfiguration rückgestellt werden soll I RAIN SENSOR Umkehrung des Laufbefehls Rege...

Страница 33: ...utomatisiert werden kann Der Installateur ist darüber hinaus für die Einhaltung der Normen sowie für das Erreichen der Mindestsicherheitsanforderungen verantwortlich Die Installation muss unter Beachtung der Norm EN 60335 2 97 Sicherheit von Haushaltsgeräten und ähnlichen Vorrich tungen Teil 2 Besondere Normen für Motoren zum Bewegen von Rollläden Außenmarkisen Markisen und ähnlichen Roll vorricht...

Страница 34: ...34 Rev 3 0 13 06 16 ...

Страница 35: ... CARACTERÍSTICAS FUNCIONAIS Funcionamento Botões de comando Local ou de Zona Conectando às entradas U1 U2 U3 U4 UZ e D1 D2 D3 D4 DZ em baixa tensão dos botões de comando local normalmente abertos para avançar o fechamento obtém se o seguinte fun cionamento relativo a cada motor individualmente U1 U2 U3 U4 UZ comandam a Subida até terminar o tempo do motor D1 D2 D3 D4 DZ comandam a Descida do fecha...

Страница 36: ...ligado Led Aceso 1 CODE M1 Nenhum código Código TX Pgm M1 2 CODE M2 Nenhum código Código TX Pgm M2 3 CODE M3 Nenhum código Código TX Pgm M3 4 CODE M4 Nenhum código Código TX Pgm M4 5 CODE SENS Nenhum código Código Sensores Pgm 6 T MOT Tempo motor 2 min Tempo Motor Pgm 7 WIND SPEED Segurança Vento 25 Km h Segurança Vento Pgm 8 SUN SENSOR Sensor Sol OFF Sensor Sol ON 9 RAIN SENSOR Sensor Chuva OFF S...

Страница 37: ...ocedimento de programação Ao mesmo tempo o LED WIND SPEED inicia a realizar uma dupla intermitência a cada dupla intermitência do LED WIND SPEED equivale um aumento de 5 Km h pressionar a tecla SET para obter o limi te desejado No mesmo momento determina se a memori zação do valor seleccionado e o LED WIND SPEED permane ce aceso por exemplo 5 duplas intermitências do LED WIND SPEED 25 Km h É possí...

Страница 38: ...e a progra mação terá sido terminada Repetir a operação se desejar mo dificar a configuração anterior E CODE SENS Teste Sensores com Fio A central permite verificar o funcionamento dos Sensores co nectados e o correcto sentido de rotação No momento da in stalação aconselha se posicionar a cortina na posição inter média para que sejam verificados os movimentos de confir mação durante os testes Depo...

Страница 39: ...ensor co manda a Subida do fechamento ao detectar a chuva Se de sejar que o sensor quando detectar a chuva comande a de scida do fechamento seguir estas instruções certificar se de ter habilitado o menu completo evidenciado pela intermitência dos Leds SUN e RAIN posicionar se com a tecla SEL na in termitência do LED RAIN SENSOR e a seguir pressionar a tecla SET no mesmo instante o LED RAIN SENSOR ...

Страница 40: ...os de segurança é responsabilidade do instalador Aconselha se efectuar a instalação de acordo com a EN 60335 2 97 Segurança dos aparelhos de uso doméstico e similar parte 2 Normas particulares para motores de movi mentação para persianas toldos cortinas e aparelhagens de enrolar e similares A central deve ser conectada permanentemente à rede de alimentação e não apresenta nenhum tipo de dispositiv...

Страница 41: ...41 Rev 3 0 13 06 16 ...

Страница 42: ... KENMERKEN Werking Drukknoppen voor bediening Lokaal of Zone Wanneer de drukknoppen voor besturing lokaal normaal open verbonden worden aan de ingangen U1 U2 U3 U4 UZ en D1 D2 D3 D4 DZ bij lage spanning voor de activering van de zijgeleider bekomt men de volgende werking met betrekking tot iedere motor apart U1 U2 U3 U4 UZ besturen Omhoog tot het uitvallen van de motortijd D1 D2 D3 D4 DZ besturen ...

Страница 43: ...ammering uit van de functie gekozen met de toets SEL SignaleringsLed Led aan optie gememoriseerd Led uit optie niet gememoriseerd Led knipperend optie geselecteerd HOOFDMENU Referentie Led Led Uit Led Aan 1 CODE M1 Geen enkele code Code TX Pgm M1 2 CODE M2 Geen enkele code Code TX Pgm M2 3 CODE M3 Geen enkele code Code TX Pgm M3 4 CODE M4 Geen enkele code Code TX Pgm M4 5 CODE SENS Geen enkele cod...

Страница 44: ...elijk aan 25 Km u LED WIND SPEED OFF De programmering van de selectie drempel Veiligheid wind gebeurt op de volgende manier ga met del toets SEL naar LED WIND SPEED druk daarna op de toets SET om de procedure van de programmering op te starten op hetzelfde moment begint het LED WIND SPEED een dubbele knippering te geven iedere dubbel knippering van het LED WIND SPEED komt overeen met een verhoging...

Страница 45: ...dien men een uitsteltijd bij het starten wil programmeren begrepen tussen 1 en 120 seconden dient men als volgt tewerk te gaan zorg ervoor dat het uitgebreide menu geactiveerd werd weergegeven door het knipperlicht Led SUN en Led RAIN ga met de toets SEL naar het knipperlicht LED CODE M4 druk daarna op de toets SET voor de gewenste uitsteltijd als de toets losgelaten wordt gaat op hetzelfde moment...

Страница 46: ...s voltooid De handeling herhalen indien men de vorige configuratie wenst terug te zetten I RAIN SENSOR Inversie beweging commando Regen De centrale wordt geleverd door de constructeur met als instelling Commando Regen Commando Omhoog ofwel de sensor die regen detecteert stuurt het Omhoog gaan van de zijgeleider Indien men wenst dat de sensor die regen detecteert het Neerlaten van de zijgeleider aa...

Страница 47: ...gheidsvereisten is niettemin op last van de installateur Het is aanbevolen om de installatie uit te voeren volgens de norm EN 60335 2 97 Veiligheid van apparaten voor huishoudelijk gebruik en gelijkaardig deel 2 Bijzondere normen voor motoren voor de beweging van rolluiken buitenweringen gordijnen en gelijkaardige oprolbare apparaten De centrale dient permanent aangesloten te zijn op het netwerk v...

Страница 48: ...48 Rev 3 0 13 06 16 ...

Страница 49: ...ll ingångarna U1 U2 U3 U4 UZ och D1 D2 D3 D4 DZ i lågspän ning för styrning av tillslutningsanordningen får man följande funktion för varje enskild motor U1 U2 U3 U4 UZ styr höjningen tills motortiden förfaller D1 D2 D3 D4 DZ styr sänkningen av tillslutningsanordningen om man skickar mer än ett kommando för samma driftriktning in nan motortiden förfaller stoppar centralen tillslutningsanordnin gen...

Страница 50: ...v fjärrkontroll med 1 eller 2 knappar Programmeringen av fjärrkontrollens överföringskoder utförs på följande vis tryck knappen SEL lampan CODE M1 börjar blinka skicka samtidigt den första förvalda koden med önskad fjärrkontroll lampan CODE M1 börjar blinka snabbt skicka den andra koden som ska memoriseras lampan CODE M1 förblir tänd och programmeringen är klar Om den andra koden inte skickas inom...

Страница 51: ...i en sekund för att bekräfta aktiveringen av solsensorn och lampan SUN SENSOR förblir tänd Det är möjligt att upprepa opera tionen för att deaktvera solsensorn genom att följa samma pro cedur men hålla intryckt knappen i fem sekunder 72 RAIN SENSOR ON OFF regnsensor Deaktivering av regnsensorn Anordningen levereras med regnsensorn aktiverad lampan RAIN SENSOR ON Deaktiveringen av regnsensorn kan g...

Страница 52: ... att lamporna SUN och RAIN blinkar gå med knappen SEL till den blinkande lampan CODE SENSOR och tryck sedan på knappen SET lampan CODE SENSOR tänds permanent och programmer ingen är klar Upprepa operationen för att återställa föregående konfiguration Viktigt för test av trådlösa sensorer se manualen för trådlös sensor F T MOT Blockera automatiska rörelser Centralen gör det möjligt att blockera de ...

Страница 53: ...llandet av minimisäkerhetskraven ligger alltid under installatörens ansvar Det rekommenderas att utföra installationen med hänsyn till EN 60335 2 97 Säkerhet för hushållsapparater och liknande del 2 Speciella normer för drivmotorer för jalusier markiser rullgardiner och liknande upprullande apparaturer Centralen ska kopplas permanent till strömförsörjningsnätet och inte omfatta någon typ av frånsk...

Страница 54: ...54 Rev 3 0 13 06 16 ...

Страница 55: ...ικές ρυθμίσεις ο σταθμός δεν έχει κανένα αποθηκεύμενο κωδικό τηλεκοντρόλ στην μνήμη ΧΑΡΑΚΤΗΡΙΣΤΙΚΑ ΛΕΙΤΟΥΡΓΙΑΣ Λειτουργία κουμπιών Τοπικού ελέγχου ή Γενικού Συνδέοντας στις εισόδους U1 U2 U3 U4 UZ e D1 D2 D3 D4 DZ σε χαμηλή τάση μερικά κουμπιά τοπικού ελέγχου κανονικά ανοιχτά για την ενεργοποίηση του μηχανισμού επιτυγχάνετε την εξής λειτουργία για κάθε κινητήρα U1 U2 U3 U4 UZ διατάζουν την Άνοδο μ...

Страница 56: ...μπί SEL Φωτεινές Λυχνίες Λυχνία αναμμένη η επιλογή αποθηκεύτηκε Σβηστή Λυχνία η επιλογή δεν αποθηκεύτηκε Λυχνία Αναβοσβήνει η επιλογή που έχει γίνει ΚΕΝΤΡΙΚΟ ΜΕΝΟΥ Αναφορά Λυχνία Λυχνία Σβηστή Λυχνία Αναμμένη 1 CODE M1 Κανένας κωδικός Κωδικός TX Pgm M1 2 CODE M2 Κανένας κωδικός Κωδικός TX Pgm M2 3 CODE M3 Κανένας κωδικός Κωδικός TX Pgm M3 4 CODE M4 Κανένας κωδικός Κωδικός TX Pgm M4 5 CODE SENS Καν...

Страница 57: ...η του καθορισμένου κατωφλιού Ασφαλείας ανέμου εκτελείτε με τον εξής τρόπο τοποθετηθείτε με το κουμπί SEL στην ΛΥΧΝΙΑ WIND SPEED η λυχνία θα αρχίσει να κάνει ενα διπλό αναβόσβημα σε κάθε διπλό αναβόσβημα της ΛΥΧΝΙΑΣ WIND SPEED αντιστοιχεί μια αύξηση των 5 Km h μέχρι που να φθάσει στην τιμή του κατωφλιού ασφαλείας που έχει αποθηκευτεί για παράδειγμα 5 διπλά αναβοσβήματα της ΛΥΧΝΙΑΣ WIND SPEED 25 Km ...

Страница 58: ...DE M2 και μετά πατήστε το κουμπί SET για να ενεργοποιήσετε την λειτουργία Περσίδα ή τοποθετηθείτε με το κουμπί SEL στο σημείο που αναβοσβήνουν η ΛΥΧΝΙΑ CODE M1 και η ΛΥΧΝΙΑ CODE M2 και μετά πατήστε το κουμπί SET γαι να ενεργοποιήσετε την λειτουργία Βήμα Βήμα Αυτόματοι Αισθητήρες C CODE M3 Ταυτόχρονη ή διαδοχική εκκίνηση Ο σταθμός σας παρέχεται από τον κατασκευαστή με ενεργοποιημένη την αυτόματη εκ...

Страница 59: ...που αναβοσβήνουν τοποθετηθείτε με το κουμπί SEL στο σημείο που αναβοσβήνει η ΛΥΧΝΙΑ WIND SPEED και στην συνέχεια πατήστε το κουμπί SET την ίδια στιγμή η ΛΥΧΝΙΑ WIND SPEED θα ανάψει μόνιμα και ο προγραμματισμός θα έχει ολοκληρωθεί Επαναλάβετε την διαδικασία αν επιθυμείτε να επαναφέρετε την προηγούμενη ρύθμιση H ΑΙΣΘΗΤΗΡΑΣ ΗΛΙΟΥ Αντιστροφή της φοράς της κίνησης της διάταξης Ηλίου Ο κατασκευαστής σας...

Страница 60: ... αυτές και η εξασφάλιση των βασικών απαιτήσεων ασφαλείας αποτελούν ευθύνη του συναρμολογητή Σας συνιστούμε να εκτελέσετε την εγκατάσταση σύμφωνα με την EN 60335 2 97 Ασφάλεια ηλεκτρικών συσκευών οικιακής και παρόμοιας χρήσης μέρος 2 Ειδικές απαιτήσεις για συστήματα κίνησης για ρολά τέντες περσίδες και παρόμοιο εξοπλισμό Ο σταθμός πρέπει να συνδεθεί οριστικά με το δίκτυο τροφοδότησης και δεν φέρει ...

Страница 61: ...61 Rev 3 0 13 06 16 ...

Отзывы: