SL-300-1D5 Series
13-21NM Marine Lanterns
Latest products and information available at
www.sealite.com
13
2. Connect the SL-300 Series Lantern to a Power Source & the Computer
Now that the programming software has been run, you will need to connect the lantern to your computer
& power supply so that it can receive programming commands.
Once connection is made, the software automatically determines the colour and pre-programmed
settings of the lantern.
Connecting the Lantern to a Power Source
Option 1: Battery
• Connect the blue negative wire of the lantern to the battery negative terminal
• Connect the brown positive wire of the lantern to the battery positive terminal
Option 2: 24V Power Supply
• Connect the blue negative wire of the lantern to the power supply negative terminal
• Connect the brown positive wire of the lantern to the power supply positive terminal
CAUTION:
to avoid personal injury do not position the lantern at eye level.
Connecting the Lantern to the Computer
• Plug the Bulgin connector end of the programming cable into the lantern PC Programming Port, and
the serial port end of the cable into your computer serial/communication port (RS232-E)
PLEASE NOTE:
The programming cable provided is suitable for use with desktop PC’s. If you require
connection to your notebook/laptop, a Serial Port to USB cable may need to be purchased.
3. Establish the Programmer-to-Lantern Computer Connection (COM Port)
Now that the lantern is connected to the computer and the Sealite PC Configuration software has been
run, the user must create the programmer-to-lantern connection.
The COM Port is the hardware port which the computer accesses when communicating with the lantern.
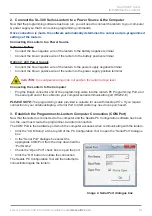
• Click the “COM Setup” at the top left of the PC Configuration Tool to open the “Serial Port” dialogue
box
• In the “Serial Port” dialogue box select the
appropriate COM Port from the drop down field for
“Port Name”
• Check the “Open Port” check box to open the port
• Click the “OK” button to initiate the connection
The Sealite PC Configuration Tool will then attempt to
connect/interrogate the lantern.
Image 2. Serial Port dialogue box
Содержание SL-300-1D5 Series
Страница 1: ...SL 300 1D5 Series 13 21 NM Marine Lanterns V1 3 INSTALLATION SERVICE MANUAL ...
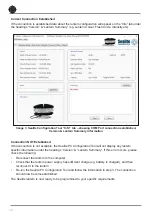
Страница 12: ...12 Image 1 Sealite PC Configuration Tool ...
Страница 50: ...50 ...
Страница 51: ...SL 300 1D5 Series 13 21NM Marine Lanterns Latest products and information available at www sealite com 51 ...


