6.15.
FEED PRESSURE
6.15.1.
Correct feed pressure holds the blade in the cut. Feed pressure is supplied by the weight of the head. Maximum material removal rate
corresponds with the proper pressure. Optimum feed pressure ensures that maximum power is used for cutting. If the feed pressure is
too low, the blade will not dig into the material properly. Too much feed pressure will cause the blade to dig too deeply, bogging down
the motor, and possibly burning it out. In addition, blade “shocking” could result.
6.15.2.
Feed pressure is controlled by the feed regulator. The regulator creates a force which counteracts the feed pressure. The force from
the feed regulator can be adjusted to create any feed pressure up to the set maximum.
6.15.3.
Having the correct feed pressure will produce the optimum feed rate and the fastest cut. Incorrect pressure, whether too great or too
small, will put less power into the cut and reduce the feed rate.
6.15.4.
Curled shavings indicate correct feed pressure.
6.15.5.
Thick discontinuous chips indicate too much pressure. Turn knob clockwise.
6.15.6.
Powdery chips indicate too little pressure. Turn knob counter clockwise.
6.15.7.
Extra energy will be used to produce powdered chips rather than smooth shavings; this will produce more heat and dull the blade.
6.16.
COOLANT TANK
6.16.1.
The coolant reservoir can hold up to four and a half gallons of coolant. For proper operation, the pump must be completely submerged
in fluid.
6.16.2.
C
heck that the fluid level is sufficient before attempting wet-cut operations. Usually four gallons is sufficient.
6.16.3.
C
heck that the tank is not filled with debris.
WARNING! DO NOT
allow shavings to flow through the pump. Change the fluid and clean the tank often. Whenever possible, the
chips should be cleaned out of the chip tray before they are washed into coolant reservoir.
6.17.
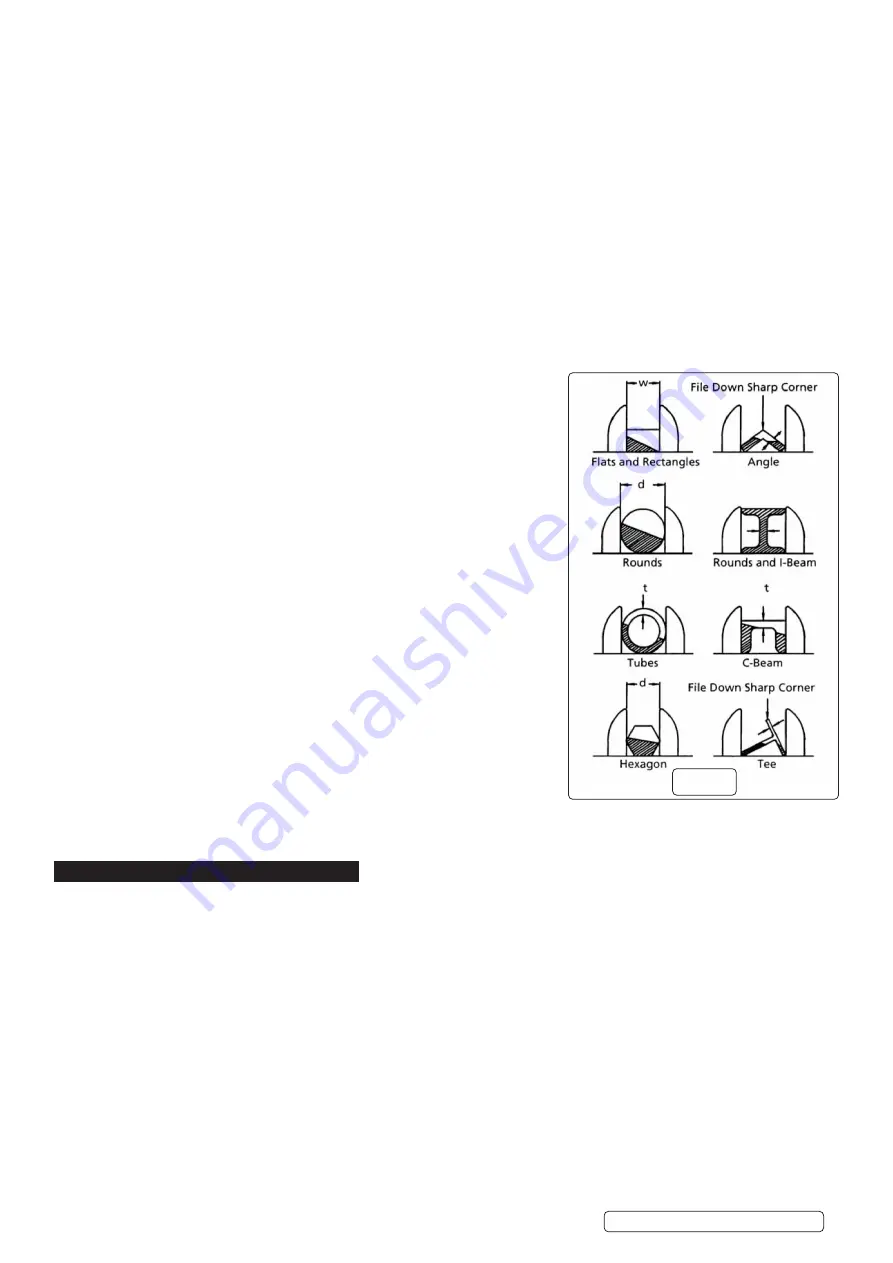
POSITIONING FIG 15
6.17.1.
The vice is designed to keep the workpiece steady while it is being cut. The vice
should only have to counteract the cutting forces. Using the proper position will help
produce a safe and accurate cut. These general rules about positioning apply to
most situations:
9
The workpiece should rest flat on the workbed without the need for side support.
9
The entire length of the work should be supported.
8
DO NOT
balance the work piece on the workbed. Use support stands to prevent the
work from falling off after the cut.
9
Avoid positions which will cause the blade to encounter sharp edges. If sharp
corners cannot be avoided, file down the point that the blade will contact.
6.18.
CHECK THE BLADE PATH
6.19.
B
efore the saw is plugged in, check to see that blade path is clear and that:
9
All blade guards are in place.
9
There is no debris inside the blade guard or covers.
9
There is no debris on the blade or blade wheels.
9
All hoses and line cords are out of the blade path.
WARNING DO NOT
operate saw unless all guards are in place and the workpiece
is the only object that will encounter the blade teeth.
6.20.
CUTTING FLUIDS
6.20.1. Using a cutting fluid can improve the cutting conditions and keep them more
consistent throughout the cut by:
6.20.2.
Lubricating the blade, which reduces the friction between it and the workpiece.
6.20.3.
Taking heat away from the cut and preventing the workpiece and blade from
overheating.
6.20.4.
D
issipating the built-up heat because hot metals become tough and more difficult to
cut and blades become dull at an accelerated rate.
NOTE:
Because much of the built-up heat comes from friction between the blade and the
workpiece, cutting fluids are often referred to as “coolants”.
6.20.5.
T
he importance of cutting fluids increases with blade speed and toughness of the material.
6.20.6. We recommend the use of either NCO/5L : Neat Cutting Oil 5L or SCO/5L : Soluble Cutting Oil 5L.
7. ADJUSTMENTS
7.1.
HORIZONTAL STOP ADJUSTMENT
7.1.1.
Place head in the horizontal position.
7.1.2.
Loosen the nut on the horizontal stop.
7.2.
TRACKING ADJUSTMENT
7.2.1.
The tracking is adjusted by positioning the idler wheel shaft. The positioning is done with the hex head bolts only if the upper socket
head bolts are loose.
7.2.2.
Loosen the three socket head bolts.
7.2.3.
Adjust the tilt with hex head bolts. For correct tracking, refer to Fig.6. Turn 1/4 revolution at a time.
7.2.4.
Check the blade tension and adjust if necessary.
7.2.5.
Recheck the tracking.
7.2.6.
Once the proper position has been found, tighten the bolts securely.
7.3.
ADJUSTING GUIDE BEARINGS
7.3.1.
If the blade is not perpendicular to the bed or not in line with the blade wheels, adjustment is necessary.
NOTE:
There should be .000-.001” clearance between the blade and the guide bearings.
7.3.2.
The guide bearings are adjusted using an eccentric location system. The inner guide bearings are fixed and cannot be adjusted. The
outer guide bearings are mounted to eccentric sleeves and can be adjusted.
7.3.3.
Loosen socket head bolt with a wrench. Rotate the eccentric shaft to locate bearings in desired positions.
7.4.
WORK STOP ADJUSTMENT
7.4.1.
Loosen the knob holding the work stop casting to the work stop bar.
7.4.2.
Adjust the work stop casting to the desired length position.
fig.15
Original Language Version
© Jack Sealey Limited
S
M353CE.V3 Issue 1 23/01/20


