


Installation
21
Installing an external Viper drive
The external Viper 200 drives (STU62001LW and STU62001WD) are compact
subsystems that connect to the host computer through an external SCSI port.
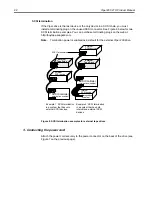
Installing an external drive involves the three simple steps shown below:
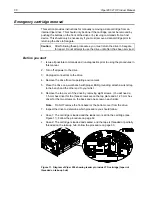
1. Configuring an external drive
Setting the SCSI ID
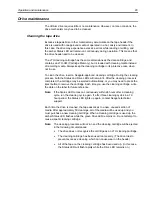
Make sure that the drive is turned off. Then set the SCSI ID for the drive using the
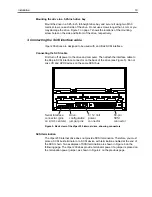
push-button switch on the back of the external drive, as shown in Figure 7. The
change will take effect when you turn the drive back on.
+
–
68-pin wide SCSI
connectors
SCSI ID selector
On/Off switch
AC Power
connector
Figure 7. Back of external Viper 200 showing switches and connectors
2. Connecting the SCSI interface cable
The external Viper 200 provides two 68-pin, shielded connectors on the rear panel of
the enclosure (see Figure 7). Either connector can be used as a SCSI IN or SCSI
OUT connection, so you can use either connector to attach the drive to a host
computer or to another SCSI device.
Note:
Turn off all power before connecting or disconnecting SCSI cables.