background image

STS11 Touchscreen Programmable Thermostat


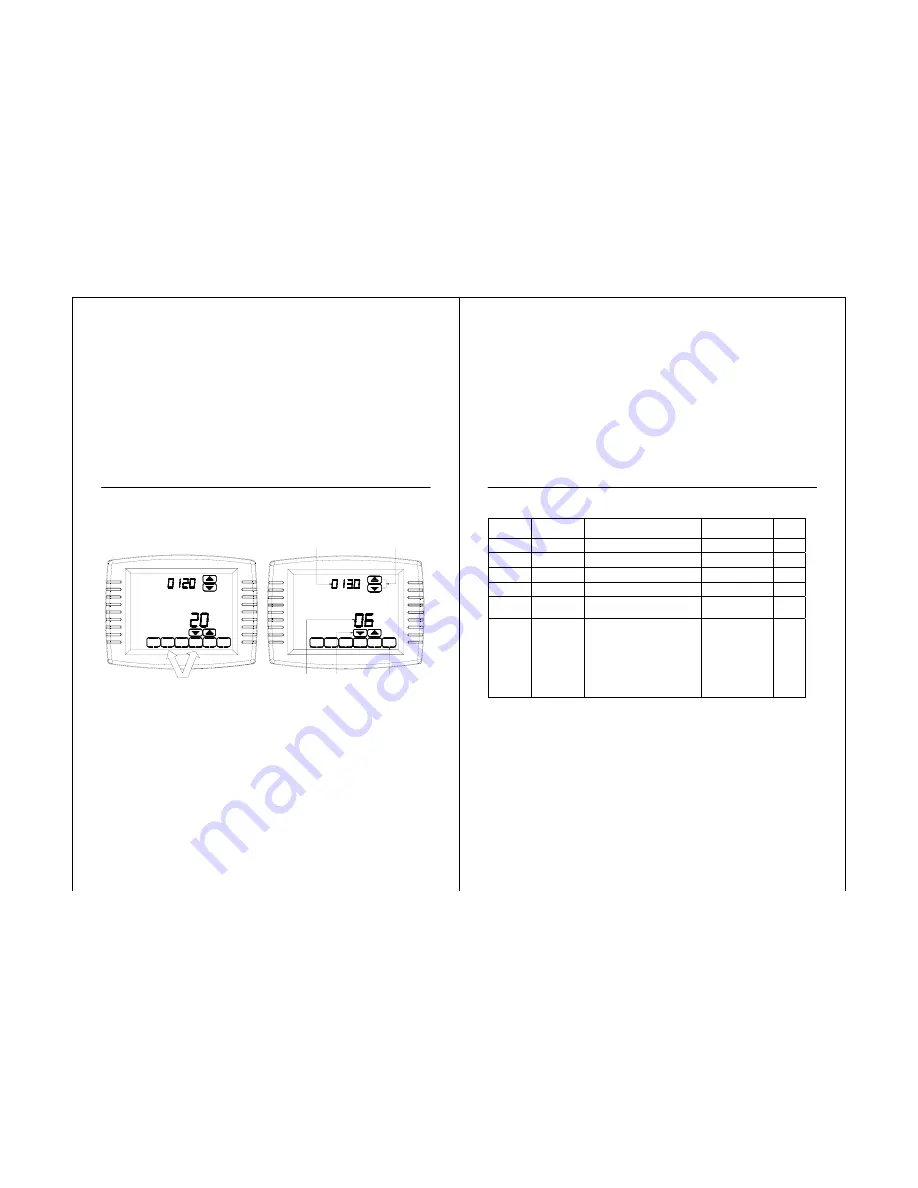
3. Release the two blank keys when the 
screen on the thermostat matches the 
screen below. 

4. See screen below to review how the 
thermostat keys are used during Installer 
Setup. See Tables 3-5 for the Installer Setup 
Numbers and Settings. 

5. Press the DONE key to exit the Installer 
Setup screen. 

44


DONE

DONE

INSTALLER SETUP
NUMBER

ADVANCE TO

NEXT INSTALLER
SETUP

CURRENT
SETTING

CHANGE THE
CURRENT
SETTING

PRESS TO EXIT
INSTALLER SETUP

STS11 Touchscreen Programmable Thermostat


Table 3. Installer Setup Menu. 

45 

Installer 

Setup 

Number 

Installer Setup 

Name 

Settings Notes 

Initial 

Setting 
Record 

0120 

Date 

(Year Upper) 

Select first two digits of current calendar 
year (20 for year 2001-2099) 

It cannot be changed 


0130 

Date  

(Year Lower) 

Select last two digits of current calendar 
year (08 for year 2008, etc) 

2001 - 2099 available 


0140 Date 

(Month) 

Select number that represents current 
calendar month 


0150 Date 

(Day) 

Select number that represents current 
calendar date 


0160  

Schedule Options 

0-nonprogrammable 
4-7-day programmable 

When it is changed, the 
schedule must be 
reprogrammed 


0170 

System Type 

Selection 

1-1 heat/1 cool conventional (factory 
setting) 
2-single-stage heat pump (no auxiliary heat) 
3-heat only conventional (no fan) Also for 
750mV. 
4-heat only conventional (with fan) 
5-heat only (power to open and power to 
close zone valves or normally-open zone 
valves) 
6-cool only conventional 
 

Available options and 
defaults vary by 
thermostat. System 
selection automatically 
modifies some default 
settings and/or hides 
other Installer Setup 
options. 


NOTE:  

For easier installer setup, write the selected options in the "INITIAL SETTING RECORD" column. 


Содержание STS11

Страница 1: ...STEM MORE SCHED HOLD CLOCK SCREEN AUTO FAN WED PM AUTO HEAT STS11 Touchscreen Programmable Thermostat Contents Application Features 2 Specifications 4 Installation 14 Wiring 18 Power the Thermostat 30 Installer Setup 43 Installer System Test 53 User Manual 56 Programming 62 Troubleshooting 86 1 ...

Страница 2: ... temperature and thermostat in the dark Menu driven programming make setup effortless Beautiful ergonomic design is smart and sophisticated to match your customer lifestyle Touchscreen interaction Real time clock keeps time during power failures and automatically updates to daylight savings Saving Changes notification lets you know when the schedule changes have been saved Change check reminders l...

Страница 3: ...s Heat only with fan Cool only 750 mV heating systems Changeover Manual or Auto changeover selectable System setting HEAT OFF COOL AUTO Fan setting AUTO ON CIRC 4 STS11 Touchscreen Programmable Thermostat Electrical Ratings Terminal Voltage 50 60 Hz Running Current W Heating 20 30 VAC 1 AMP max W Heating Power pile 750 mVDC 100 mAMP Y Cooling 20 30 VAC 1 AMP max G Fan 20 30 VAC 1 AMP max Temperatu...

Страница 4: ...hium battery with ten year life is inside the thermostat Under normal use the lithium battery will maintain the calendar and time settings The Alkaline batteries maintain the calendar and time after lithium battery is no longer functional 6 STS11 Touchscreen Programmable Thermostat Cool Indication STS11 Touchscreen Thermostats show Cool On on the screen when Cool is activated Heat Indication STS11...

Страница 5: ...re Series System Stages Application STS11 1H 1C STS11 Standard Mounting Means STS11 Touchscreen Thermostat Mounts directly on the wall in the living space using mounting screws and anchors provided Outdoor Sensor Mounts outside of living space with mounting clip and screws provided Remote Indoor Sensor Mounts directly on the wall using mounting screws and anchors provided Dimensions 1 STS11 Touchs...

Страница 6: ...mm STS11 Touchscreen Programmable Thermostat 5 98 in 152mm 4 48in 114mm 1 235 in 30 60mm 11 Fig 2 Touchscreen Thermostat Back Case dimensions in inches mm STS11 Touchscreen Programmable Thermostat 1 51 in 38 5mm 0 84 in 21 5mm 1 77 in 45mm 1 67 in 42 5mm ...

Страница 7: ...m R 0 0 4 i n 1 m m R 0 0 9 8 in 2 5 m m 1 10 in 28 1mm 0 62 in 16mm 1 56 in 39 7mm 0 24 in 6 2mm 0 44 in 11 2mm R0 098 in 2 5m m 0 08 in 2mm 1 49 in 38mm 0 1 7 in 4 2 m m STS11 Touchscreen Programmable Thermostat Fig 4 Cover Plate dimensions in inches mm 13 3 29 in 83 5mm 0 85 in 21 5mm 3 29 in 83 5mm 5 35 in 136mm 4 13 in 105mm ...

Страница 8: ...ting installation use these instructions to check out the product operation Selecting Location Install the thermostat about 5 ft 1 5m above the floor in an area with good air circulation at average temperature See Fig 5 Do not install the thermostat where it can be affected by Drafts or dead spots behind doors and in corners Hot or cold air from ducts Radiant heat from sun or appliances Concealed ...

Страница 9: ...emove the wallplate from the wall and if drywall drill two holes in the wall as marked For firmer material such as plaster drill two holes Gently tap anchors provided into the drilled holes until flush with the wall 4 Position the wallplate over the holes pulling wires through the wiring opening See Fig 6 5 Insert the mounting screws into the holes and tighten 16 STS11 Touchscreen Programmable The...

Страница 10: ...ith nonflammable insulation to prevent drafts from affecting the thermostat 6 See Fig 9 through 16 for typical wiring hookups Fig 7 Selecting terminal identifications for system type 18 CONVENTIONAL HEAT PUMP SCREW TERMINALS S1 S2 C R RC L S1 S2 C R RC W Y G O B Y G STS11 Touchscreen Programmable Thermostat Table 1 Selecting Terminal Identifications for System Type System Type Wallplate Terminal I...

Страница 11: ...n relay O B see Note 3 Changeover valve for heat pump system L see note 4 Equipment monitor for heat pump system S1 S2 Optional outdoor or indoor remote sensor 21 NOTES 1 When used in a single transformer system leave metal jumper wire in place between RC and R If used on a two transformer system remove metal jumper wire between RC and R 2 Common wire is optional when thermostat is used with batte...

Страница 12: ...RE SENSOR 3 COMPRESSOR CONTACTOR OPTIONAL 24VAC COMMON CONNECTION R C 1 2 FAN RELAY HEAT RELAY STS11 Touchscreen Programmable Thermostat 1 POWER SUPPLY PROVIDE DISCONNECT MEANS AND OVERLOAD PROTECTION AS REQUIRED 2 OPTIONAL OUTDOOR OR INDOOR REMOTE SENSOR AVAILABLE ON SELECT MODELS WIRES MUST HAVE A CABLE SEPARATE FROM THE THERMOSTAT CABLE 3 REMOVE FACTORY INSTALLED JUMPER Fig 10 Typical hookup of...

Страница 13: ...Y G OUTDOOR INDOOR TEMPERATURE SENSOR 3 HEAT RELAY OPTIONAL 24VAC COMMON CONNECTION R C 1 2 STS11 Touchscreen Programmable Thermostat 1 POWER SUPPLY PROVIDE DISCONNECT MEANS AND OVERLOAD PROTECTION AS REQUIRED 2 FACTORY INSTALLED JUMPER 3 OPTIONAL OUTDOOR OR INDOOR REMOTE SENSOR AVAILABLE ON SELECT MODELS WIRES MUST HAVE A CABLE SEPARATE FROM THE THERMOSTAT CABLE Fig 12 Typical hookup of heat only...

Страница 14: ...OR TEMPERATURE SENSOR 3 R C 1 2 W B R TR TR MOTOR OR VALVE CONVENTIONAL S1 S2 C R RC W Y G STS11 Touchscreen Programmable Thermostat 1 POWER SUPPLY PROVIDE DISCONNECT MEANS AND OVERLOAD PROTECTION AS REQUIRED 2 FACTORY INSTALLED JUMPER 3 OPTIONAL OUTDOOR OR INDOOR REMOTE SENSOR AVAILABLE ON SELECT MODELS WIRES MUST HAVE A CABLE SEPARATE FROM THE THERMOSTAT CABLE Fig 14 Typical hookup of heat only ...

Страница 15: ... OPTIONAL 24VAC COMMON CONNECTION R C 1 2 FAN RELAY 29 STS11 Touchscreen Programmable Thermostat 1 POWER SUPPLY PROVIDE DISCONNECT MEANS AND OVERLOAD PROTECTION AS REQUIRED 2 FACTORY INSTALLED JUMPER 3 O B TERMINAL SET TO CONTROL AS EITHER O OR B IN THE INSTALLER SETUP 4 OPTIONAL OUTDOOR OR INDOOR REMOTE SENSOR AVAILABLE ON SELECT MODELS WIRES MUST HAVE A CABLE SEPARATE FROM THE THERMOSTAT CABLE F...

Страница 16: ...tween RC and R Two Transformer System Connect power side of Cooling transformer to RC terminal Remove factory installed jumper Connect common side of Cooling transformer to the compressor contactor relay etc Connect power side of Heating transformer to the R terminal Connect the common side of the Heat relay to the C terminal STS11 Touchscreen Programmable Thermostat Installing Batteries 1 Install...

Страница 17: ...r where the settings cannot be tampered with there is good air circulation it can measure true outdoor ambient temperature there is a flat surface maximum distance between outdoor sensor and touchscreen thermostat is 65 ft 20m See fig 20 Do not mount the sensor in direct sunlight where hot or cold air blows on the sensor Discharge line from an outdoor compressor unit vent or fan causes inaccurate ...

Страница 18: ...arge inductive loads such as motors line starters lighting ballasts and large power distribution panels Use shielded cable to reduce interference when rerouting is not possible IMPORTANT Erratic temperature readings from a sensor can occur as a result of any of the wiring practices that are not to local and national electrical standards Follow wiring these practices to assure correct operation Use...

Страница 19: ...es ordinances and regulations 1 Wire Outdoor Sensor to S1and S2 terminals on the thermostat If leadwire provided is not long enough you need an extra cable to reach the hole at maximum distance between the outdoor sensor and the touchscreen thermostat is 65 ft a Using color coded 18 gauge thermostat wire is recommended For example of general wiring of sensor see Fig 21 b Pigtail wiring can be used...

Страница 20: ...led pipes or ducts b Drafts from fireplaces or other heat sources c Convection or radiant heat from the sun or electrical equipment Cold areas caused by a Concealed pipes or ducts b Drafts from windows and doors Unheated areas on the other side of the wall location Dead air areas a Behind doors furniture and curtains b In corners and alcoves 4 Mark the area on the wall selected for mounting the Se...

Страница 21: ...ipment Avoid poor wiring connections Avoid intermittent or missing building earth ground 40 STS11 Touchscreen Programmable Thermostat CAUTION Electrical Shock Hazard Can cause electrical shock or equipment damage Disconnect power supply before connecting wiring Wiring must comply with local and national codes ordinances and regulations 1 Wire Indoor Sensor to S1 and S2 terminals on the thermostat ...

Страница 22: ... FROM THERMOSTAT CABLE R C 1 2 435 0013 3 S1 S2 C R RC W Y G S1 S2 C R RC 435 0013 1 2 S1 S2 C R RC 1 2 435 0013 435 0013 435 0013 435 0013 435 0013 435 0013 435 0013 435 0013 435 0013 435 0013 435 0013 435 0013 STS11 Touchscreen Programmable Thermostat INSTALLER SETUP Follow these steps to enter the Installer Setup 1 Press and release the SYSTEM Key 2 Press and hold the two blank keys on either s...

Страница 23: ...t be changed 0130 Date Year Lower Select last two digits of current calendar year 08 for year 2008 etc 2001 2099 available 0140 Date Month Select number that represents current calendar month 0150 Date Day Select number that represents current calendar date 0160 Schedule Options 0 nonprogrammable 4 7 day programmable When it is changed the schedule must be reprogrammed 0170 System Type Selection 1...

Страница 24: ...ressors factory setting 1 2 4 5 6 other cycle rate settings 0230 NOT USED STS11 Touchscreen Programmable Thermostat Table 3 Installer Setup Menu CONTINUED 47 Installer Setup Number Installer Setup Name Settings Notes Initial Setting Record 0240 Cycles per hour cph for 1st Stage Conventional Heat 1 1 cph used for steam and gravity 3 3 cph used for hot water system and high efficiency 90 or better f...

Страница 25: ...Touchscreen Programmable Thermostat Table 3 Installer Setup Menu CONTINUED 49 Installer Setup Number Installer Setup Name Settings Notes Initial Setting Record 0340 Remote Temperature Sensor Outdoor or Indoor 0 no remote temperature sensor 1 outdoor temperature sensor for display only 2 can not be select 3 indoor temperature sensor Defaults and Options depend on System Type selection Indoor Temper...

Страница 26: ...rements of heating set point Shown in 1 2 C 0610 Cool Temperature Range Stop 50 99 temperature range 1 F increments of cooling set point Shown in 1 2 C 0640 Clock Format 12 12 hour clock factory setting 24 24 hour clock STS11 Touchscreen Programmable Thermostat Table 3 Installer Setup Menu CONTINUED 51 Installer Setup Number Installer Setup Name Settings Notes Initial Setting Record 0650 Extended ...

Страница 27: ...Use offset to have thermostat temperature match independent reading 0710 Reset Thermostat 0 no thermostat reset 1 resets all Installer Setup Options to default values and resets schedule to default setting Only calendar settings and time are retained STS11 Touchscreen Programmable Thermostat INSTALLER SYSTEM TEST Use the Installer System Test to test the W Y and L terminals CAUTION Equipment Damag...

Страница 28: ...TEM TEST NUMBER STS11 Touchscreen Programmable Thermostat Installer System Tests Table 4 Installer System Test System Test Number Test Type System Status Number and Description Test 1 Cooling System Test 1 Cool stage 1 turn on 0 Cool is off Test 2 Fan System Test 1 Fan turns on 0 Fan turns off Test 3 Heating System Test 1 Heat stage 1 turn on 0 Heat is off Press the Next button to go to the beginn...

Страница 29: ...ECTED HOLD SETS A PERMANENT HOLD AND ACTIVATES VACATION HOLD SYSTEM SELECTS EM HEAT OFF COOL AUTO EMER SCREEN LOCKS OUT THE SCREEN TO ALLOW FOR CLEANING CLOCK SETS THE TIME FORWARD OR BACK SCHED ENTERS SCHEDULING MODE STS11 Touchscreen Programmable Thermostat System and Fan Settings System The System key selections vary based on your heating and or cooling system type HEAT Thermostat controls the ...

Страница 30: ...Room Set To SYSTEM COOL TUE AM HEAT OFF CANCEL DONE STS11 Touchscreen Programmable Thermostat 3 Release the center blank key when the screen on the thermostat matches the screen below 4 See the screen below to review how the thermostat keys are used during the User Setup See Table 5 for the User Setup numbers and settings 5 Press the DONE key to exit the User Setup screen 59 DONE DONE INSTALLER SE...

Страница 31: ...about three months 3 60 fan run time days about six months 4 90 fan run time days about nine months 5 120 fan run time days about one year 6 365 fan run time days about three years Table 5 User Setup Settings 60 STS11 Touchscreen Programmable Thermostat Table 5 User Setup Settings CONTINUED Installer Setup Number Installer Setup Name Settings 0510 Humidifier Pad Replacement Reminder 0 humidifier p...

Страница 32: ...can control up to four different schedule periods per day WAKE Period when you awaken and want your home at a comfortable temperature DAY Period when you are away from home and want an energy saving temperature EVENING Period when you return home and want your home return to a comfortable temperature SLEEP Period when you are asleep and want an energy saving temperature NOTE Schedule times are in ...

Страница 33: ... To exit schedule without saving changes press CANCEL key any time Cancel a Schedule Period 1 Press SCHED key 2 Press EDIT key 3 Select the Day s of the week desired 4 Press schedule period you want to cancel WAKE DAY EVENING or SLEEP Once selected the period flashes 5 Press CANCEL PERIOD key 6 The time temperature s and fan setting disappear The bar above the selected period is removed indicating...

Страница 34: ...EP 66 See note 5 CANCEL SLEEP WAKE DAY EVENING DONE AUTO FAN CANCEL PERIOD COOL PROG DAY MON TUE WED THU FRI HEAT MONTUE WEDTHUFRI AM HEAT CANCEL SLEEP WAKE DAY EVENING DONE AUTO FAN CANCEL PERIOD COOL EDIT PROG DAY STS11 Touchscreen Programmable Thermostat Manual Override of Fan Schedule Use Fan key to change fan mode by pressing fan AUTO fan is automatically following the Fan schedule choices ar...

Страница 35: ... To SYSTEM SCHED HOLD CLOCK SCREEN AUTO FAN TUE HEAT CANCEL Override Until PM STS11 Touchscreen Programmable Thermostat 69 Vacation Hold Change temperature setting for a designated number of days 1 Press HOLD key twice Screen shows Override Until and 1 DAYS 2 Press the Up and Down arrow keys to set the desired temperature while away on vacation Notice that Override Until days is shown on the scree...

Страница 36: ...ride Until DAYS CANCEL CLEAN SCREEN STS11 Touchscreen Programmable Thermostat 2 Use damp cloth slightly moistened with water or household glass cleaner to clean the screen 3 Repeat the above steps as necessary IMPORTANT Do not spray any type of liquid directly on the thermostat itself If using household glass cleaner spray cleaner on cloth Then use a cloth to clean the thermostat screen 4 Press th...

Страница 37: ...from shutting down due to lack of battery power Screen Locks Partially Locked Screen When partially locked the screen indicates Screen Locked for 5 to 7 seconds whenever the user attempts to press a key that is locked Pressing a locked key while Screen Locked is shown flashes Screen Locked on the screen In this mode all keys are locked except the Temperature Up and Down arrow keys User can change ...

Страница 38: ...mote Indoor Temperature If a remote indoor temperature sensor is installed the thermostat displays the inside temperature on the screen from the remote sensor s The thermostat internal temperature sensor is not used ONE REMOTE INDOOR SENSOR INSTALLED OPTIONAL If one remote indoor temperature sensor is used the screen showing the Inside temperature reading shows the temperature at the indoor remote...

Страница 39: ...ited using the MORE key or from the Installer Setup To view or reset the reminder before it expires follow these steps using the MORE key 1 Press the MORE key until the filter reminder appears on the screen This is the number of fan run time days remaining on the filter reminder Room Set To SYSTEM MORE SCHED HOLD CLOCK SCREEN AUTO FAN TUE PM HEAT RESET Override Until RENEW FILTER Room Set To SYSTE...

Страница 40: ...program schedule to the time that the comfort temperature is desired The thermostat then turns on the heating or cooling at just the right time to have the home reach the scheduled temperature at the scheduled time For example get up at 6 00 AM and want the temperature to be 70 F Set the Wake period for 6 00 AM and 70 F The thermostat then turns on the heat before 6 00 AM to raise the temperature ...

Страница 41: ...creen Programmable Thermostat 81 Special Heat Pump Operation Heat Pump Indication Requires 24VAC Common Connection E5 indication is located in the screen of the thermostat It is only visible when lighted When the L terminal is wired to an equipment monitor this is operational in the HEAT OFF COOL or AUTO positions When the E5 is illuminated call for service See Fig 26 Fig 26 L terminal switch to R...

Страница 42: ...umber 0180 is set to Electric Table 8 Sequence of Operation for Power Open and Power Closed Valves or Normally Open Valves System Setting Fan Setting Call for Action Energize Terminals Screen Message OFF AUTO None None None HEAT N A None Y None HEAT N A Heat W Heat On System Setting Fan Setting Call for Action Energize Terminals Screen Message OFF AUTO None O Ba None COOL AUTO None O B a None COOL...

Страница 43: ...nsor has a negative temperature coefficient NTC which means that resistance decreases as the temperature increases The sensor can be used to provide one remote sensor input see Fig 23 or as a temperature averaging network with multiple Sensors connected as shown in Fig 24 Checkout For best results allow Wall Mount Temperature Sensor to absorb the air moving through the room for a minimum of twenty...

Страница 44: ...Verify operation of equipment in System Test mode Table 10 Troubleshooting CONTINUED Symptom Possible Cause Action Heating equipment failure Check for 24VAC at the equipment on the secondary side of the transformer between power and common If voltage is not present check the heating equipment to find the cause of the problem Check for 24VAC between the heat terminal W and transformer common If 24V...

Страница 45: ...ment does not turn off and heat temperature setting is set below room temperature Heat On is not in the display Heating equipment is not a heat pump but System Type Installer Setup Number 0170 is set to Heat Pump Set System Type Installer Setup Number 0170 to match the installed heating and or cooling equipment STS11 Touchscreen Programmable Thermostat STS11 Touchscreen Programmable Thermostat 89 ...

Отзывы: