


2. Press the
Start
button to start the system. It takes approximately 2 seconds before the High Pressure Pump
Motor starts. Do not press any other switch.
3. Measure the AC voltage between terminals (AC Systems) or (DC systems) on the main terminal strip.
4. If the measured voltage measured the System voltage, then the problem may be in the power cable attached
to the motor, or the motor's internal wiring/windings.
5. If low or no voltage is present, then check for proper operation of the High Pressure Pump contactor. To
deactivate the contactor, press the
Stop
button. To activate the contactor again, press the
Start
button.
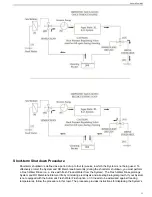
6. If the contactor is mechanically operating, but no voltage is present at the motor terminals, then the High Pressure
Pump Motor contactor may be at fault.
7. If the contactor does not operate mechanically, then measure the DC voltage between A1 and A2 terminals on
the High Pressure Pump Motor contactor coil. It should read 12V DC when activated.
8. If the contactor coil is receiving 12V DC but inoperative then the contactor’s coil may be bad. Replace the
contactor.
9. If 12V DC is not present when the High Pressure Pump is activated, trace the wires to the main circuit board
and measure the DC voltage at the terminals. It should read 12V when activated.
10. Confirm that the HP Pump
Stop
button is illuminated on the Touch Screen when the High Pressure Pump is
activated. When the HP Pump
Stop
button is illuminated, the HP terminals on the Control Printed Circuit Board
should be receiving 12 VDC. If this is not the case, then replace the main circuit board.
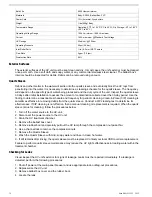
High Pressure (HP) Pump
The HP pump is a positive displacement plunger pump made of high-grade duplex material specifically designed
for sea water Reverse Osmosis applications. This pump is not commercially available and is specifically manufactured
to Sea Recovery Corporation specifications.
• As with all positive displacement pumps, the HP pump must receive a minimum amount of water at a positive
pressure. A vacuum at the inlet of the pump will cause cavitation and damage.
• This pump is manufactured to very tight tolerance spacing between moving parts. Any debris entering the pump
will cause extensive and expensive damage to the internal parts. The Sea Recovery Pre-filter will stop any debris
and protect the High Pressure Pump. Use caution when changing filter elements and do not allow any debris
from the pre-filter element to enter the outlet port of its housing.
• If this pump requires maintenance within the warranty period, and--if after examination by Sea Recovery
Corporation--is found to be non-operational due to a warranty failure, it will be repaired or replaced with a rebuilt
pump at Sea Recovery Corporation's discretion. If the pump requires maintenance outside of the warranty period
or is damaged due to non-warranty reasons, then it will be repaired or replaced (for a fee) with a rebuilt pump
depending on the severity of damage. For repair or replacement, contact Sea Recovery for a Material Return
Authorization and shipping instructions.
High Pressure Pump Problems and Solutions:
1. High Pressure Pump flow is normal when the System's operating pressure is below 100 PSI, but the flow drops
or becomes erratic and pulsates as pressure is applied.
a. Worn High Pressure seals from normal use require replacement.
b. Worn High Pressure Pump's valves, valve seats, valve springs and or valve seat O-rings are broken or worn
due to normal use and are allowing internal bypass. Repair the pump with a valve and seal kit.
2. High Pressure Pump is noisier than usual and pulsations are observed in hoses and gauges.
a. Worn or broken valve, valve spring or valve seat. Repair the pump with a valve and seal kit.
b. Pump is experiencing cavitation and is not receiving sufficient feed water at its inlet due to a blockage prior
to the pump’s inlet port. Clear the blockage in the feed water line.
3. High Pressure Pump Leaks Oil
a. Determine source of leak and replace appropriate associated seal.
4. High Pressure Pump leaks water between manifold and drive end.
a. Inlet Packings may be worn due to normal use; due to operation under a vacuum condition; or because
pump has been operated dry, without inlet feed water.
b. Repair the pump with a seal kit.
Aqua Matic XL 2200 - 3600
66
Содержание Aqua Matic XL Series
Страница 2: ......
Страница 10: ......
Страница 28: ......
Страница 38: ......
Страница 45: ...45 Commissioning...
Страница 46: ......
Страница 58: ......
Страница 76: ......
Страница 89: ...Chapter 10 Appendix 89...
Страница 90: ...ABS Certificate of Design Assessment Aqua Matic XL 2200 3600 90...
Страница 91: ...FCC Compliance 91 Appendix...
Страница 92: ...DNV ISO 9001 Certificate Aqua Matic XL 2200 3600 92...
Страница 93: ...Single Phase Electrical Motor Wiring 93 Appendix...
Страница 94: ...Three Phase Electrical Motor Wiring Aqua Matic XL 2200 3600 94...
Страница 95: ...Three Phase Transformer Wiring 95 Appendix...
Страница 96: ...New System Initial Readings Form Aqua Matic XL 2200 3600 96...
Страница 97: ...Daily System Readings 97 Appendix...
Страница 98: ......
Страница 99: ...Chapter 11 Exploded Parts Views 99...
Страница 100: ...Exploded Parts View...
Страница 103: ...7 8 9 10 11 12 13 14 15 16 17 20 19 18 21 22 23 24 25 26 1 2 3 4 5 6 Exploded Parts View 4...
Страница 107: ...6 10 14 10 6 10 4 10 13 8 14 10 6 5 7 7 5 11 12 3 2 3 3 2 3 10 4 7 9 7 1 4 Exploded Parts View 8...
Страница 111: ...14 13 2 16 13 12 3 8 10 9 7 1 5 4 6 14 13 15 15 17 13 12 11 18 15 Exploded Parts View 12...
Страница 113: ...19 16 2 21 16 14 3 9 11 10 8 1 5 4 6 12 22 20 18 16 17 15 15 13 7 Exploded Parts View 14...
Страница 115: ...2 3 10 12 11 9 1 5 4 21 13 20 18 15 19 18 19 15 17 14 16 8 18 15 7 Exploded Parts View 16...
Страница 117: ...10 26 11 9 5 5 4 20 1 7 18 3 2 16 13 15 12 14 13 23 24 21 24 25 Exploded Parts View 18...
Страница 119: ...12 10 13 11 5 5 4 6 1 9 20 3 2 17 16 14 18 15 19 17 16 14 18 15 8 7 Exploded Parts View 20...
Страница 128: ...6 7 2 3 2 5 10 10 12 1 11 8 9 8 11 6 7 4 2 13 14 29...
Страница 131: ...6 15 7 13 18 11 16 27 25 26 21 1 4 3 2 3 12 19 9 17 14 23 8 20 9 19 5 27 16 24 22 10 Exploded Parts View 32...
Страница 138: ...Chapter 12 Electric Diagrams Foldouts 101...
Страница 139: ...Aqua Matic XL Series Three Phase Wiring Diagram...
Страница 140: ......
Страница 141: ......
Страница 142: ...Sea Recovery 2630 E El Presidio Street Carson CA 90810 sales searecovery com www searecovery com PN B6513100001...


