background image

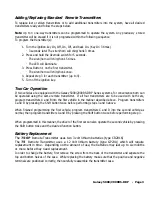
· The LED will illuminate.

3.  Press and release Button 1 on the first transmitter then on the second transmitter.

· The siren/horn will chirp/honk once for every transmitter learned.

4.  Turn off the ignition key.
5.  The siren/horn will chirp/honk 3 times to indicate the system has exited programming mode.

LCD Transmitter Battery Replacement

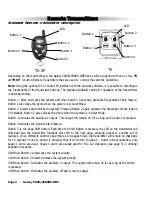
Your Galaxy Remote Transmitter uses a 1.5 volt AAA alkaline battery, which will require replacement in time.

Depending on the amount of use, the battery may last up to 3 months before it needs replacement. When

the battery needs replacing, the system’s operating range will decrease, the LCD display will show only one

of three bars in the battery icon, or the display and sounds may suddenly stop and start as the battery

voltage drops below minimum.

In order to change the battery, first slide the battery door locking pin to the side.  Carefully slide the battery

cover downward until it is free. While replacing the battery make sure that the positive and negative

terminals are positioned correctly, then carefully reassemble the transmitter case.
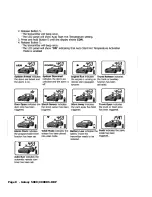
Setting The Time

The LCD display is equipped with a 12-hour clock that in addition to displaying the time, offers an alarm

clock function as well as a remote activation timer.

To set the time:

1. Press and hold Buttons 2 and 3 for three seconds.

· The remote will beep two times and three bars will be shown indicating time set mode is entered.

2. Press and release Button 2 until the correct hour is displayed. (hold button to scroll).

3. Press and release Button 3 until the desired minute is displayed. (hold button to scroll).

4. When the desired time is displayed, press Button 5 to store.

· The remote will beep 3 times to indicate the time has been set.

Setting The Alarm Clock

The alarm clock function can be set to play an alert melody at a specific time of day.
To set the alarm clock function:

1. Press and hold Buttons 2 and 3 until the remote beeps three times.

· The alarm clock bell and three bars will be shown indicating alarm clock set mode is entered.

2. Press Button 2 until the desired hour is displayed.
3. Press Button 3 until the desired minute is displayed. The button may be held down to scroll faster.
4. When the desired time is displayed, press Button 5 to store.

· The remote will beep 3 times to indicate the alarm clock has been set.

To disable the alarm clock function:

1. Press and hold Buttons 2 and 3 until the remote beeps three times.

· The alarm clock bell and three bars will be shown indicating alarm clock set mode is entered.

2. Press Button 1 to disable the alarm clock.

· The remote will beep 3 times and show OFF to indicate the alarm clock has been disabled.

Setting The Daily Start Function 

( transmitter must be within 1500ft to reliably start)

The Daily Start Function provides a timer that allows the vehicle to automatically remote start at a preset

time of day , everyday until the feature is turned off.

Galaxy 5000/2000RS-DBP    -  Page 5

Содержание 2000RS

Страница 1: ...GALAXY 5000RS 2000RS SERIES DBP DATA BUS PORT VEHICLE SECURITY SYSTEM WITH REMOTE START PRODUCT MANUAL...

Страница 2: ...ear if required for repair and or replacement of any defective parts A copy of the original purchase and installation receipt must accompany any products returned for warranty service Warranty is limi...

Страница 3: ...Page 13 Automatic Start Mode Page 14 Turbo Timer Feature Page 14 Manual Transmission Remote Starting Page 15 5 Extended Features Page 16 Ignition Door Locking Page 16 Ignition Door Unlocking Page 16...

Страница 4: ......

Страница 5: ...hen pressed System Contents Main Unit with built in ScyNet Network Interface Port One 5 Button 2 Way LCD Remote and One 1 Way 5 Button Remote Transmitter RS 2W 1 models Two 5 Button Random Code Remote...

Страница 6: ...ain on for as long as the button is pressed Button 4 Activates the Remote Start feature Button 5 is the Page Shift button Each time the Shift Button is pressed the LED on the transmitter will illumina...

Страница 7: ...with both cars program transmitters A and B into the first vehicle in the manner described above Program transmitters C and D by pressing the Shift button twice before performing steps 3 and 4 above...

Страница 8: ...essing button 5 will activate the Page 2 function Pressing button 5 for 2 seconds activates the system s confirmation feature which will then display the current status of the system armed disarmed en...

Страница 9: ...ee bars will be shown indicating time set mode is entered 2 Press and release Button 2 until the correct hour is displayed hold button to scroll 3 Press and release Button 3 until the desired minute i...

Страница 10: ...t Start Temperature 2 step procedure for second step see page 7 under h o The Automatic Hot Start setting sets the temperature threshold If automatic start is set to hot temperature setting the starte...

Страница 11: ...and display on if enabled or off if disabled VLT Valet mode function sets and resets the security system s valet mode this function is enabled only when the system is disarmed unlocked Set or reset th...

Страница 12: ...Page 8 Galaxy 5000 2000RS DBP...

Страница 13: ...ssing button 5 will activate the Page 2 function Pressing button 5 for 2 seconds activates the system s confirmation feature which will then display the current status of the system armed disarmed eng...

Страница 14: ...rameter you wish to change use buttons 3 4 to scroll up or down to chage the time or date Save the changes by pressing button 5 Setting AutoStart Time Select Start Time setting by pressing buttons 1 o...

Страница 15: ...by pressing button 3 Use buttons 1 2 to highlight the time parameter you wish to change use buttons 3 4 to scroll up or down to chage the time Save the changes by pressing button 5 Symbol is displayed...

Страница 16: ...ress button 3 to select the system features Siren Chirp Enable Disable Select Siren Chirp setting by pressing buttons 1 or 2 to highlight the feature Press button 3 to select it Sytem Responce Passive...

Страница 17: ...button 5 Setting AutoStart Hot Temperature Threshold Select Cold Temp Time setting by pressing buttons 1 or 2 to highlight the feature Press button 3 to select it Use buttons 3 4 to scroll up or down...

Страница 18: ...by pressing buttons 1 or 2 to highlight the feature Press button 3 to select it Start Time 1 This feature sets the system Autostart 1 time Select Sytem Clock Sync by pressing buttons 1 or 2 to highli...

Страница 19: ...it Use buttons 1 2 to highlight hours or minutes use buttons 3 4 to scroll up or down to chage the time Use buttons 1 2 to highlight Set Time press button 3 The security system responce Select Alarm H...

Страница 20: ...HOT START 2 Release Button 5 The transmitter will beep The display will show Auto Start Cold Temperature setting 3 Press and hold Button 5 until the display shows CONFIRM 4 Release Button 5 The transm...

Страница 21: ...ress and hold buttons 2 4 simultanously for 3 seconds to release the transmitter from Lockout Out of Range Report pager report if no responce from the unit ADDITIONAL FUNCTION ICONS Engine Start Engin...

Страница 22: ...or engine run minute timer if remote start activated 20 min max Battery Status displays remaining battery life Wakeup Alarm displays Wakeup alarm enabled Autostart Remote Start Autostart enabled Tran...

Страница 23: ...ptional sensor is disturbed When the alarm triggers the siren will sound the horn will honk and the parking lights will flash If the system is triggered by the doors hood or trunk the system will alar...

Страница 24: ...ng the Shift button before Arming Locking or Disarming Unlocking the system will bypass the chirp honk confirmations and allow one time silent operation Note The open zone warning chirps will not be b...

Страница 25: ...stem 1 Unlock the door using the key 2 Enter the vehicle The system will trigger and the siren will sound 3 Turn the ignition key to the ON position 4 Press and hold the override switch until the alar...

Страница 26: ...e Start System so that the vehicle may be operated by a mechanic or parking attendant To activate the Valet Mode 1 Turn the ignition switch to the ON position 2 Press and hold the override switch for...

Страница 27: ...Down When the the Remote Start feature is active any of the following actions will shut down the engine 1 Pressing Button 4 After the engine shuts down the doors will lock if the optional keyless entr...

Страница 28: ...eds the preset value factory default 138oF See the 2 way LCD Remote Transmitter section for Auto Start Cold or Hot Temperature Activation To disable Auto Start function Do one of the following Turn ig...

Страница 29: ...t the System 1 Be sure the system is not in Valet Mode 2 Press and hold Button 4 for three seconds The parking lights will turn on The LED will flash rapidly The engine will start and run for the dura...

Страница 30: ...optional features such as power trunk release power window activation power sunroof control auxiliary lighting audio video system control and more The Pulsed operation setting allows an output to act...

Страница 31: ...tarting during engine servicing 6 Verify with the owner the mounting locations for all visible components including the LED and Override switch 7 Verify with the owner the optional features of the Gal...

Страница 32: ...the Siren Choose a siren mounting location that is away from heat sources such as exhaust manifolds and where it cannot be easily accessed from underneath the vehicle Be sure to face the siren downwa...

Страница 33: ...he vehicle s tach wire or a fuel injector wire if the tachless mode does not provide satisfactory operation Pin 3 WHITE RED WIRE Auxiliary 2 Output 500 mA Connect to a relay or module for an optional...

Страница 34: ...d only when the parking lights are on and set the internal parking light relay jumper to the proper polarity For parking light circuits exceeding 10 amps a relay is required For vehicle s with indepen...

Страница 35: ...n transmitter lights will flash twice Turn off the ignition the engine will stay running Now push and release the button on the push switch the siren will chirp once The Turbo Timer feature is now can...

Страница 36: ...ng Parameters to factory default settings 1 Enter System Programming 2 Press Transmitter Button 3 The siren horn will chirp honk 6 times indicating that the reset signal was received All System Progra...

Страница 37: ...ort Off Ignore 11 Aux 1 Mode Pulsed Timed Latched 12 Aux 2 Mode Pulsed Timed Latched 13 Aux 3 Mode Pulsed Timed Latched 14 Disarm with Aux 1 Disabled Enabled 15 Aux 2 Activate on Arm Off On 16 Aux 3 O...

Страница 38: ...nterface and Wizard software any auxiliary function can be programmed to output for 1 second up to 255 seconds 12 Auxiliary 2 Mode Selects from momentary 10 second timed or latched operation for Auxil...

Страница 39: ...the engine enter Branch 23 Press Button 3 to learn the vehicle s tach signal The siren will chirp three times to confirm that the tach signal was learned If the tach signal was not learned the siren...

Страница 40: ...o Warn Away report will be sent to the pager 32 Anti Carjack Type Selects one of three modes for Anti Carjacking Active Passive or Full Time Manual When selected pressing Button 4 will automatically e...

Страница 41: ...Galaxy 5000 2000RS DBP Relay Diagrams Positive Dome Light Activation Negative Dome Light Activation Positive Horn Honk Negative Horn Honk Starter Defeat Anti Grind Negative Glow Plug...

Страница 42: ...rity Vacuum Adding Actuators Follow the diagrams below for connecting basic door lock systems For Two Stage door lock systems separately unlocks driver and passenger doors see following pages Door Loc...

Страница 43: ...5000 2000RS DBP Series is equipped with a dedicated Passenger Unlock output allowing Two Stage Door Lock operation When connected as shown below disarming the system will unlock only the driver s doo...

Страница 44: ...Page 40 Galaxy 5000 2000RS DBP Two Stage Door Lock Diagrams cont d Two Stage Reverse Polarity Two Stage Adding Actuators...

Страница 45: ...wo conditions 1 This device may not cause harmful interference 2 This device must accept any interference received including interference that may cause undesired operation Technical Information Built...

Страница 46: ...orm tach learn procedure Hood Trigger is active hood is open wire is shorted to ground or pin switch is defective 4 Times Brake Trigger is active Brake switch input is shorted to ground or incorrect 5...

Страница 47: ...Galaxy 5000 2000RS DBP Page 43 Shock Sensor Adjustment Clock wise increases sensitivity Shock Sensor Adjustment...

Страница 48: ...t 500mA Black Ground Red 12V Battery Input 3 Violet Door Trigger Input Green Door Trigger Input White Black Hood Trunk Input Orange Armed Output 500mA Violet White Factory Alarm Disarm Output 500mA Wh...

Отзывы: