background image

In a continued commitment to improve quality, the Manufacturer reserves the right to


make component changes or design changes when necessary. 


OWNER

S MANUAL


TC70105S Tiller/Cultivator


Rev. 12

/

14/2018


WARRANTY POLICY


Scotts Warranty policy


American Lawn Mower Company 

The Great States Corporation   

7444 Shadeland Station Way 

Indianapolis, IN 46256 USA 

Phone 

1

-

800

-

618

-

7474  


scotts.americanlawnmower.com


Copyright All Rights Reserved.


• 

3 Year limited warranty

 on all Scotts corded tillers from date of purchase when used for personal, household, or family use. 


The Great States Corp. (GSC) warrants to the original owner that this Scotts product and service part is free from defects in      

materials and workmanship and agrees to repair or replace any defective product or part for the warranty period as stated above.


• 

Warranty voided if used for commercial or industrial purposes or any other improper use as determined by GSC.


• 

Warranty does not include repairs necessary due to operator

s abuse or negligence (including overloading the product     

beyond capacity or immersion in water), or the failure to assemble, operate, maintain or store the product according to the 

instructions in the owner

s manual. 


• 

This warranty does not cover


 

Wear items, including but not limited to 

-

 drive belts & gears, tines, cutting blades, mower blades, saw chains, mulching 

blades, blower fans, spool covers, trimmer line, blower and vacuum tubes, guide bars, high pressure hoses, wheels, 

handles, augers, worn bags, power cables, and other items subject to wear over time. 


 

Wear on batteries, including but not limited to –


drops, wear and breakage on charger, exposure to extreme                 

temperature swings (hot or cold), battery left on charger too long, battery left uncharged for too long, and misuse or 

abuse of the battery.  


• 

This warranty does not cover damage caused by cold, heat, rain, excessive humidity or other environmental extremes.


• 

This warranty does not cover normal deterioration of the exterior finish or normal wear and tear on the products including, 
but not limited to scratches, cracks, dents, or damage caused by outside chemicals. 


• 

This warranty is not transferable and only applies to new products sold directly from an authorized retailer. This warranty 
does not apply to any product, new or used, purchased through unauthorized third

-

party channels. For information on      

authorized dealers, contact our customer support hotline at 1

-

800

-

618

-

7474 (Mon

-

Fri 8am

-

5pm Est)


• 

Any incidental, indirect or consequential loss, damage, or expense that may result from any defect or malfunction of the 
products is not covered by the warranty. 


• 

The warranty does not include installation, assembly or normal adjustments explained in the operator

s manual. The         

expense of delivering the product to the vendor and the expense of returning the product or replacement parts to the owner 

is not covered by the warranty. 


Additional Warranty Limitations


Some states do not allow the exclusion or limitation on how long an implied warranty lasts, so the above limitation may not apply 

to you. Products sold damaged or incomplete, sold 

as is, or sold as reconditioned are not covered under the warranty. 


Damage or liability caused by shipping, improper handling, improper assembly, incorrect voltage, improper wiring, improper 

maintenance, improper modification or the use of accessories and/or attachments not specifically recommended is not covered 

by this warranty. 


Proof of purchase, original dated sales receipt, must accompany all warranty claims.


For claims go to scotts.americanlawnmower.com or call our customer support hotline from 8am

-

5pm EST, Mon

-

Fri at


1

-

800

-

618

-

7474


Содержание TC70105S

Страница 1: ...ER COM OR CALL 1 800 618 7474 BETWEEN 8 00AM 5 00PM EST FOR ASSISTANCE SAVE THIS MANUAL FOR FUTURE REFERENCE This product has been engineered and manufactured to our high standard for dependability ease of operation and operator safety Properly cared for it will give you years of rugged trouble free performance WARNING To reduce the risk of injury the user must read and understand the owner s manu...

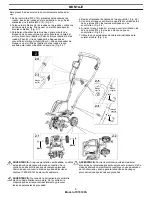
Страница 2: ...on the circuit or outlet to be used for the tiller cultivator Receptacles are available having built in GFCI protection and may be used It is possible to tie the extension cord and power cord in a knot to prevent them from becoming disconnected during use Make the knot as shown then connect the plug end of the power cord into the receptacle end of the extension cord This method can also be used to...

Страница 3: ...ING Do not operate the tiller cultivator near underground electrical cables telephone lines pipes or hoses If the tiller cultivator strikes a foreign body turn it off immediately wait for the tines to stop and check for damage If necessary repair before restarting If the tiller cultivator starts to vibrate abnormally turn it off immediately and check for the cause Vibration is generally a warning ...

Страница 4: ... Upper handle section 11 Wheel hub cap 2 Bail wire 12 Wheel frame lock pin 3 Switch box and power cable assembly 13 Motor housing 4 Cable clip 14 Protective shield 5 Cord retainer 15 Tine assembly D 6 Wing nut 16 Tine assembly C 7 J bolt M6 17 Tine assembly B 8 Center handle section 18 Tine assembly A 9 Lower handle section II 19 Tine lock pin 10 Lower handle section I 20 Wheel 4 Model TC70105S 1 ...

Страница 5: ...ls Fig 2 1 3 To lower wheel frame push the lock button on back of motor housing to release the frame Step A Lower the wheel frame Step B and pull out the lock pin on lower handle section Step C Align lock pin to the hole in wheel frame then release it to lock the wheel frame in position Fig 2 2 WARNING If any parts are damaged or missing do not operate this product until the parts are replaced Fai...

Страница 6: ...n Ensure holes in Tine Hubs and shaft are aligned Insert Lock Pin into the through holes and pull Lock pin ring downward to lock the Pin into place Be sure to install Tines as shown in Fig 3 Tines cannot be secured if assembled in other sequence of Tine position Fig 3 In the event the lock Pins are lost or misplaced Tines A and D may be secured using the extra M8X40 Hex head bolts and M8 Lock nuts...

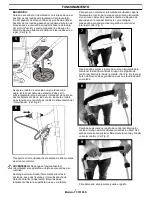
Страница 7: ... any person or object directly in its path Hold the tiller cultivator firmly while starting The tines will pull the tiller cultivator forward during operation Lower the tines slowly into the ground being tilled To start the tiller cultivator grip the center of the handle firmly with your left hand Using your right hand push the safety lock button on the switch box and hold to allow activation of t...

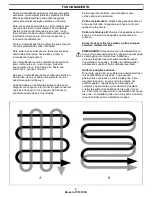
Страница 8: ...footing Do not work on extremely steep slopes For preparing seed beds we recommend using one of these tilling patterns Tilling Pattern A Make two passes over area to be tilled the second at a right angle to the first Tilling Pattern B Make two passes over area to be tilled the second overlapping the first Before use remove any visible stones or other foreign bodies from the area CAUTION Before mov...

Страница 9: ...place the tine assemblies with new ones when necessary Call 1 800 618 7474 for assistance WARNING Injury can occur while working on the tines Wear protective gloves Tine Removal and Installation Fig 10 Lift the Lock Pin rings and remove the Lock Pins at both ends of the shaft Remove Tine A and D from the shaft Remove the M8x40 bolts and M8 Hex lock nuts at both ends of the shaft Remove Tine B and ...

Страница 10: ...omponents are loose Switch off Wait till tines comes to a complete stop Remove jammed objects Tiller cultivator must be repaired Call our customer service help line at 1 800 618 7474 for assistance Tighten all components Arrange for repair if noises continue Abnormal vibrations Blades damaged or worn Working depth too large Replace damaged or worn blades Set to correct working depth Poor results W...

Страница 11: ...___________ CALL US FIRST Call us first with questions about operating or maintaining your tiller at 1 800 618 7474 between 8 00 a m 5 00 p m Eastern Standard Time or get assistance on scotts americanlawnmower com Always mention the model number when ordering kits items for this tool No Kit Item Number Description QTY 1 RTC105S TK Tine Kit 1 2 RTC135 105S HDW Hardware Kit 1 3 RTC135 105S WK Wheel ...

Страница 12: ...tery left uncharged for too long and misuse or abuse of the battery This warranty does not cover damage caused by cold heat rain excessive humidity or other environmental extremes This warranty does not cover normal deterioration of the exterior finish or normal wear and tear on the products including but not limited to scratches cracks dents or damage caused by outside chemicals This warranty is ...

Страница 13: ...800 618 7474 ENTRE LAS 8 00 Y LAS 17 00 HORA DEL ESTE DE LOS ESTADOS UNIDOS GUARDE ESTE MANUAL PARA CONSULTAS FUTURAS Este producto fue diseñado y fabricado de acuerdo con nuestros altos estándares de confiabilidad facilidad de operación y seguridad para el operario Si se trata con cuidado esta herramienta le otorgará años de óptimo rendimiento y resistencia ADVERTENCIA Para reducir el riesgo de s...

Страница 14: ... la etiqueta Ante la duda utilice el siguiente calibre más grueso Cuanto más bajo es el número de calibre más grueso es el cable El cable de extensión y el cable de alimentación se pueden atar para evitar que se desconecten durante el uso Realice el nudo como se muestra en la imagen y luego conecte el enchufe del cable de alimentación en el receptáculo del cable de extensión Este método también se...

Страница 15: ...detengan y verifique si hay daños Si fuera necesario repare las piezas dañadas antes de volver a poner en marcha la herramienta Si el rotocultivador comienza a vibrar de manera inusual apáguelo de inmediato y revíselo para detectar la causa Generalmente la vibración advierte la existencia de un problema PELIGRO RIESGO DE CORTES Use guantes y sea prudente cuando limpie o realice el mantenimiento al...

Страница 16: ...0 5 amperios 4 Modelo TC70105S 1 N Descripción N Descripción 1 Mango superior 11 Tapa del cubo de la rueda 2 Gatillo 12 Pasador de bloqueo 3 Conjunto de cable de alimentación e interruptor 13 Caja del motor 4 Sujetador de cable 14 Escudo protector 5 Retenedor de cable 15 Púa D 6 Tuerca mariposa 16 Púa C 7 J perno M6 17 Púa B 8 Mango central 18 Púa A 9 Mango inferior II 19 Pasador de bloqueo 10 Man...

Страница 17: ...aja del motor para soltar el bastidor Paso A Baje el bastidor de las ruedas Paso B y tire del pasador de bloqueo que se encuentra en el mango inferior Paso C Alinee el pasador de bloqueo con el orificio del bastidor de las ruedas luego suéltelo para trabar el bastidor en posición Fig 2 2 ADVERTENCIA Si alguna pieza falta o está dañada no utilice este producto hasta reponer la pieza en cuestión De ...

Страница 18: ...n alineados Inserte el pasador de bloqueo a través de los orificios y empuje el aro del pasador de bloqueo hacia abajo para bloquear el pasador en el lugar Cerciórese de instalar las púas como se muestra en la Fig 3 Las púas no pueden sujetarse si se ensamblan en otra secuencia de posición de las púas Fig 3 Cubo Pasador de bloqueo Ø8 Púa D Púa C Púa B Púa A Pasador de bloqueo Ø8 Cubo Cubo Cubo En ...

Страница 19: ...o el rotocultivador si una persona u objeto se encuentra en su recorrido Sostenga el rotocultivador firmemente mientras lo enciende Las púas llevarán el rotocultivador hacia delante durante la operación Baje las púas lentamente hacia la superficie que se va a labrar Para poner en marcha el rotocultivador cultivador agarre firmemente el centro de la manija con su mano izquierda Con su mano derecha ...

Страница 20: ...se de apoyo firme y segura No trabaje en pendientes demasiado pronunciadas Para preparar semilleros recomendamos usar estos patrones de labranza Patrón de labranza A Realice dos pasadas sobre el área a ser labrada la segunda en ángulo recto con respecto a la primera Patrón de labranza B Realice dos pasadas sobre el área a ser labrada la segunda superpuesta a la primera Antes de usar retire las pie...

Страница 21: ...IA Se pueden producir lesiones mientras se trabaja con las púas Utilice guantes de protección Extracción e instalación de púas Fig 10 Levante los aros de los pasadores de bloqueo y retire los pasadores de bloqueo situados en ambos extremos del eje Retire las púas A y D del eje Retire los pernos M8x40 y las tuercas hexagonales M8 situados en ambos extremos del eje Retire las púas B y C del eje Para...

Страница 22: ...es flojos Apague la unidad Espere hasta que las púas se detengan por completo Quite los objetos atascados El rotocultivador debe ser reparado Comuníquese con nuestra línea de ayuda de atención al cliente al 1 800 618 7474 para recibir asistencia Ajuste bien todos los componentes Disponga la reparación si persisten los ruidos Vibraciones inusuales Las cuchillas están dañadas o gastadas La profundid...

Страница 23: ... el número de serie en el espacio provisto a continuación MODELO N º __TC70105S_____ NÚMERO DE SERIE__________________ Mencione siempre el serial del modelo cuando ordene kits para el mismo N Número de kit Número de artículo Descripción Cantidad 1 RTC105S TK Kit de púa 1 2 RTC135 105S HDW Kit de hardware 1 3 RTC135 105S WK Kit de ruedas 1 4 RTC135 105S HK Kit de manija 1 LLÁMENOS PRIMERO Si tiene ...

Страница 24: ...siado tiempo y mal uso o abuso de la batería Esta garantía no cubre los daños causados por el frío el calor la lluvia el exceso de humedad u otras condiciones ambientales extremas Esta garantía no cubre el deterioro normal del acabado exterior ni el desgaste normal de los productos incluidos entre otros los arañazos grietas abolladuras o daños causados por productos químicos externos Esta garantía...

Страница 25: ... COMPOSEZ LE 1 800 618 7474 ENTRE 08 h 00 et 17 h 00 HEURE NORMALE DE L EST POUR TOUTE ASSISTANCE CONSERVEZ CE MANUEL POUR POUVOIR LE CONSULTER ULTÉRIEUREMENT Ce produit a été conçu et fabriqué selon notre norme élevée de fiabilité de facilité d utilisation et de sécurité de l utilisateur Correctement entretenu il vous procurera des années de service intensif et sans soucis AVERTISSEMENT Afin d év...

Страница 26: ...étique En cas de doute utilisez le calibre immédiatement supérieur Plus le numéro de calibre est bas plus le câble est lourd Il est possible de nouer la rallonge et le câble d alimentation afin de les empêcher de se déconnecter pendant l utilisation Effectuez le nœud comme illustré branchez ensuite la prise du câble d alimentation dans l extrémité femelle de la rallonge Cette méthode peut égalemen...

Страница 27: ...r Si le cultivateur la griffe commence à vibrer de façon anormale arrêtez le immédiatement et recherchez la cause du problème Des vibrations signalent généralement un problème DANGER RISQUE DE COUPURES Portez des gants et faites preuve de prudence lorsque vous nettoyez ou effectuez l entretien du cultivateur de la griffe Arrêtez toujours le cultivateur la griffe débranchez le de la source d alimen...

Страница 28: ...escription 1 Section supérieure du guidon 11 Enjoliveur de roue 2 Fil 12 Tige de verrouillage 3 Ensemble contacteur et câble d alimentation 13 Carter du moteur 4 Attache de câble 14 Tôle de protection 5 Dispositif de retenue de câble 15 Peigne D 6 Écrou à oreilles 16 Peigne C 7 J boulon M6 17 Peigne B 8 Section centrale du guidon 18 Peigne A 9 Section inférieure du guidon II 19 Tige de verrouillag...

Страница 29: ...rouillage à l arrière du carter de moteur pour dégager le châssis Étape A Abaissez le châssis de roue Étape B et retirez la goupille de verrouillage de la section inférieure du guidon Étape C Alignez la goupille de verrouillage avec le trou dans le châssis de roue puis relâchez la pour verrouiller en position le châssis de roue Fig 2 2 AVERTISSEMENT Si des pièces sont endommagées ou manquantes n u...

Страница 30: ...igne et l axe sont alignés Insérez la tige de verrouillage dans les trous et tirez l anneau de la tige de verrouillage vers le bas pour bloquer la tige en place Assurez vous d installer les peignes comme illustré à la Fig 3 Les peignes ne peuvent être fixés si assemblés dans une autre séquence de position de peignes Fig 3 Manche Manche Manche Manche Tige de verrouillage Ø8 Peigne D Peigne C Peigne...

Страница 31: ...une personne ou un objet se trouve directement sur le chemin de l appareil Maintenez fermement le cultivateur la griffe au démarrage Les dents font avancer le cultivateur la griffe pendant son fonctionnement Abaissez lentement les peignes dans le sol à labourer Pour démarrer la griffe cultivateur saisissez fermement le centre de la poignée avec votre main gauche Avec votre main droite appuyez sur ...

Страница 32: ... pas sur des pentes trop abruptes Pour la préparation des lits de semences nous recommandons d utiliser un de ces motifs de labourage Motif de labourage A Faites deux passes sur la surface à labourer la seconde étant effectuée à angle droit par rapport à la première Motif de labourage B Faites deux passes sur la surface à labourer la deuxième chevauchant la première Avant d utiliser enlevez les pi...

Страница 33: ...ire Appelez le 1 800 618 7474 pour obtenir de l aide AVERTISSEMENT Un travail sur les dents entraîne des risques de blessures Portez des gants protecteurs Retrait et installation du peigne Fig 10 Levez les anneaux de la tige de verrouillage et enlevez les tiges de verrouillage aux deux extrémités de l axe Enlevez les peignes A et D de l axe Enlevez les boulons M8 X 40 et les écrous de blocage hexa...

Страница 34: ...le moteur Attendez que les dents s arrêtent complètement de tourner Enlevez les objets coincés Le cultivateur la griffe doit être réparé Appelez notre service clientèle au 1 800 618 7474 pour obtenir de l assistance Resserrez tous les composants Prenez des dispositions pour faire effectuer les réparations si le bruit continue Vibrations anormales Les lames sont endommagées ou usées La profondeur d...

Страница 35: ...série dans l espace prévu ci dessous NUMÉRO DE MODÈLE ___TC70105S____ NUMÉRO DE SÉRIE__________________ Toujours mentionner le numéro de modèle lors de la commande de kits pour cet outil N Numéro de kit Numéro d article Description Quantité 1 RTC105S TK Kit de peigne 1 2 RTC135 105S HDW Kit de hardware 1 3 RTC135 105S WK Kit de roue 1 4 RTC135 105S HK Kit de poignée 1 APPELEZ NOUS D ABORD Appelez ...

Страница 36: ...ssée trop longtemps non chargée et une mauvaise utilisation ou un mauvais traitement de la batterie Cette garantie ne couvre pas les dommages causés par le froid la chaleur la pluie l humidité excessive et les autres conditions environnementales extrêmes Cette garantie ne couvre pas la détérioration normale de la finition extérieure ou l usure normale sur les produits y compris notamment les érafl...

Отзывы: