MAINTENANCE
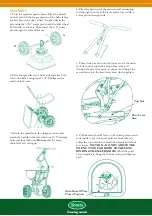
7. Using a grease gun, lubricate the grease fittings on
the axle bearing housings and gear carrier. Apply a
small amount of grease to the gear teeth. Install the two
gearbox cover halves and secure with the three retainer
clips. Insert the screen inside the hopper and secure it
with factory installed clips.
1. Empty the spreader after each use. Return the unused material
to its original container and seal to prevent moisture-caused
clumping.
2. Wash the spreader thoroughly and dry in sunny or heated area.
Wipe or blow off excess water to revent corrosion. Clean all
residue from rotor plate.
Grease Fittings
3. Periodically grease the axle bearing housings as indicated in
assembly step #7.
4. Periodically oil the pivot points on the main shutoff/rate
control linkage, as well as the spring inside the rate control
housing.
5. Periodically clean and inspect the gears by removing the
gearbox cover halves. Apply a small amount of grease to the gear
teeth for lubrication. Apply grease at the gear carrier fittings
indicated in assembly step #7. Be sure to reinstall gearbox cover
halves prior to use.
6. Maintain tire pressure at 20 psi maximum.
7. If the axle requires disassembly, be sure to reassemble it so the
drive wheel attaches on the right side. Incorrect spread patterns
will result if the rotor plate does not rotate in a counter-clockwise
direction.
Grease Fittings
7. A hopper cover is provided with your new spreader. Use it to
protect turf product inside the hopper from light rain or windy
conditions during transportation.
HOW TO USE
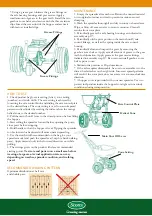
1. Check product bag for rate setting (letter), cone setting
(number), and swath width. The rate setting is achieved by
loosening the rate control knob and sliding the rate control plate
to the desired letter. The cone setting is used to control-spread
pattern and is adjusted by rotating the index tab on the orange
helical cone to the desired number.
Rate Control Plate
Helical Cone
2. Pull the main shutoff lever to the closed position before filling
the hopper.
3. Start rolling the spreader forward before opening the ports;
close ports before stopping.
4. Hold handle so that the hopper is level. Tipping the spreader
too far forward or backward will cause uneven spreading.
5. Use the swath width recommended on the bag for your
spreader model and push the spreader at 3 mph (a brisk walking
pace). Apply material only in the forward direction, not while
pulling.
Main Shut Off Lever
6. The settings given on the product label are recommended
starting points.
Test rate and pattern on a small area before
treating a large area. Actual application rate can vary
depending on weather, spreader condition, and walking
speed.
Cone Setting
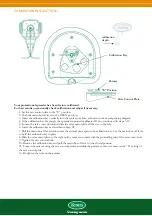
RECOMMENDED WALKING PATTERN
Optimum distribution at half rate
and double pass.


