


3
© 2007-2009 SCK Direct, Inc. 229-51363 Rev C www.MySCK.com
INSTALLATION
Location
1.
There should be a power outlet within 8 feet of
the mounting location. If using the Ethernet
SmartDirect 2, you will also need Ethernet cables
that are long enough to reach the SmartDirect 2
from your connection. A10-foot Ethernet cable is
supplied.
2.
Find an open and easily accessible area to mount
the SmartDirect 2 for the best reception.
If using the GPRS version, screw on and open the
antenna. If using the Ethernet version, go to the
next step.
Mounting the SmartDirect 2
1.
Once you have chosen a location, use the tem-
plate guide included with this manual and mark
the locations of the (4) mounting holes. Again,
view the tentative positioning and ensure there
are no location problems.
2a. Drill the (4) holes with the appropriate drill bit, as
defined in
Tools Required
. If using the four (4)
supplied wall anchors, tap them in using a ham-
mer. If not using the wall anchors screw in the
screws leaving the screw backed off enough to
slide on the SmartDirect 2. Then tighten down
the screws.
2b. If holes cannot be drilled, use the supplied
Velcro. Before mounting, clean the surface with
the supplied alcohol pad. Adhere two pieces of
the Velcro to the back of the SmartDirect 2 and
then two pieces to the mounting surface. Press
the SmartDirect 2 firmly against the mounting
surface and verify it is secure.
Mounting the Power Supply Kit
(part number 213-50759-01)
Once the SmartDirect 2 is installed, the power supply
should be mounted.
1.
With the supplied alcohol pad, clean the desired
mounting surface and the one side of the power
supply to which you will be applying the Velcro.
2.
Adhere the Velcro to the mounting surface and
the power supply.
3.
Press the Velcro side of the power supply firmly
to the Velcro on the mounting surface.
4.
Verify the power supply is mounted securely.
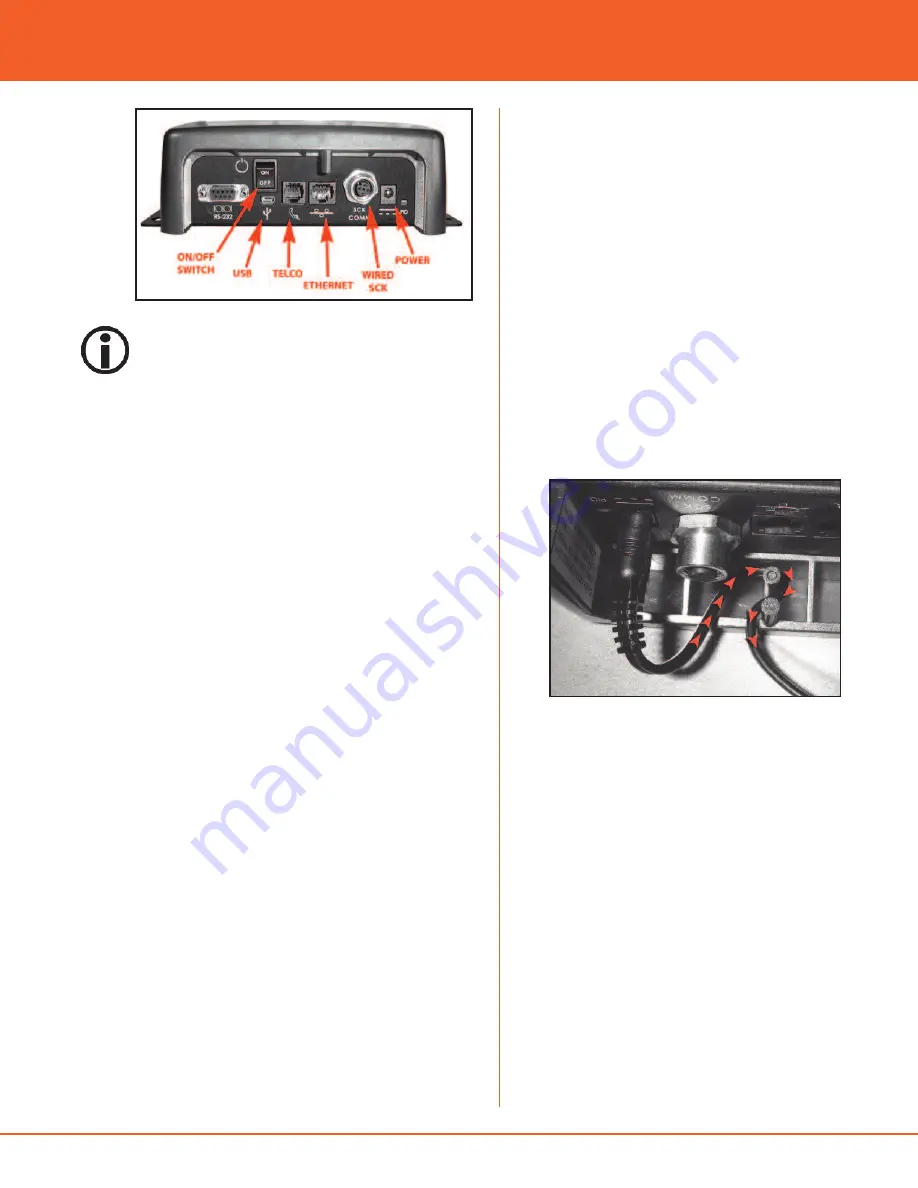
Powering Up and Connecting
1.
Insert the power cord into the supplied power
supply. Then plug the power supply into the
SmartDirect 2. Plug the power cord into the out-
let. Turn the power switch to the ON position.
NOTE
: ONCE THE POWER SUPPLY IS PLUGGED
INTO THE SMART DIRECT 2 UNIT, WRAP THE
CORD AROUND THE BUILT IN STRAIN RELIEF.
2.
At this time if you are using an Ethernet
SmartDirect 2, plug your Ethernet cable into the
port. If you have a GPRS version go to the next
step.
3.
When unit is powered up, check the power/sta-
tus LED indicator sequence against the charts on
the next page.
4.
Install all other wired and wireless devices.
5.
Call the SCK Helpdesk at 1-866-840-4271 (8:00
a.m. to 5:00 p.m. EST) to confirm your system is
up and running.
INSTALL IN AN EASILY ACCESSIBLE LOCATION WHERE
EMPLOYEES CAN ACCESS TO REBOOT THE EQUIPMENT
IF NECESSARY. INSTALLING IN HARD TO REACH
PLACES (FOR EXAMPLE: ABOVE CEILING TILES) IS NOT
RECOMMENDED.
installation guide