Maintenance
05.00|0889002_ROTA-S plus 2.0 |en
35
•
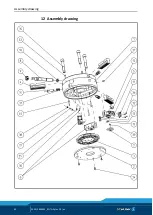
Remove the jaws from the guideways (see chapter "Handling
•
Place the chuck on its front, undo the screws (item 34) and
remove the cover (item 2).
•
When taking out the drive ring (item 3), pay attention to the
indicator pin (item 17) which has been pre-loaded by the spring
(item 38).
•
Take the spring and the indicator pin out of the bore hole in the
chuck body (item 1).
•
Pull off the sliding blocks (item 7) from the wedge bars (items 5
and 6) and carefully remove the O rings (item 39).
•
Remove the cylindrical pin (item 30).
•
Insert the assembly key (item 99) using the spindle's hexagonal
head (item 8) and unscrew the spindle screw (item 8) with the
actuation key. The spindle (item 8) can now be completely
screwed out of the wedge bar (item 5) with the actuation key.
•
The pressure bolts (item 14) are pre-loaded by the springs
(item 31). After the cylindrical pins (item 45) are driven out of
the chuck body with a suitable sliding hammer, the springs
(item 31) and the pressure bolts (item 14) can be removed.
•
Carefully remove the wedge bars (items 5 and 6) from the
chuck body (item 1) and take off the locking slide (item 13) with
the spring (item 32), the traverse slide (item 15) and the slide
(item 12).
•
Unscrew the screws (item 36) and remove the wipers (item 11).
•
Take the seat of bearing (item 10) out of the chuck body.
The chuck is now completely disassembled.
Clean all parts carefully with degreasing agent and check for wear
and damage.
Replace damaged parts with original SCHUNK spare parts only!
Before installation, lubricate all individual components with
LINOMAX plus grease.


