background image

5

MZM 100

MZM 100 B

Operating instructions

Solenoid interlock

EN

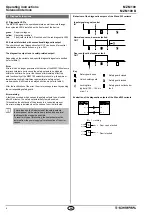
5.  Operating principles and latching force adjustment

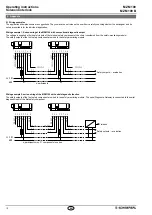
5.1  Mode of operation of the safety outputs

- of MZM 100 variant "Solenoid interlock monitored"

The safety outputs are enabled, when the following conditions are met:

• the actuator has been detected and

•  the interlock is locked, the magnetic force is > 500 N

The unlocking of the solenoid interlock causes the safety outputs to be 

disabled within the risk time As long as the actuator is present on the 

solenoid interlock, the unlocked solenoid interlock can be locked again 

In that case, the safety outputs are re-enabled

The latching force F is permanently measured and checked In this way, 

soiling of the solenoid interlock can be detected If the latching force 

drops below 500 N, the release signal for the safety outputs Y1 / Y2 is 

not given

- of MZM 100 B variant "Actuator monitored"

The safety outputs are enabled, when the following conditions are met:

• the actuator has been detected, the latching force is active and

•  locking with magnetic force > 500 N possible

Due to the permanent monitoring of the closed magnetic circuit, the 

safety outputs Y1/Y2 are only enabled during the latching, when the 

magnetic circuit is properly closed and the latching force can also be 

obtained when activated If the metal surfaces are soiled or damaged, 

the enabling signal is not transmitted

The unlocking of the MZM 100 B does not lead to a switch-off. 

Violent separation of solenoid interlock and actuator 

(only in connection with "Solenoid interlock monitored")

The solenoid interlock has a latching force F of 500 N 

When the actuator and the interlock are separated in an 

unauthorized and violent way, the safety guard is opened 

and the enabling paths are switched off within 150 ms 

This is signalled through the yellow and red LED blinking 

alternatively To bring the system back in operational 

condition, the safety guard needs to be closed first and the 

solenoid control must be switched off and back on; the yellow 

and red LED now are blinking simultaneously With the safety 

guard closed, an anti-tampering period of 10 minutes must 

be waited until the LEDs go out Now, the system is back 

operational after the soilenoid control has been switched off 

and back on (The actuator nor the solenoid interlock are 

damaged!)

5.2  Description of the latching force adjustment

The latching force of the MZM 100 with ordering suffix -RE can be set in 

8 steps of approx 10 N each within a range of approx 30 N to approx 

100 N To this end, the adjustment target MZM 100 TARGET is used 

directly on the fitted MZM 100

Adjustment of the latching force

1)  Open the safety guard and isolate the MZM 100 from the voltage 

supply Either switch off the voltage supply or pull out the connector

2)  Put the adjustment target with the active side on the identification 

plate of the MZM 100

3)  Switch the voltage supply of the MZM 100 back on and wait at least 

10 seconds before removing the adjustment target The component 

searches for the adjustment target When the adjustment mode is 

active, the safety outputs remain disabled

4)  Remove the adjustment target again from the component  

The yellow LED of the MZM 100 will repeatedly flash briefly to  

show the currently set latching force level (eg 4 flashes = 4th 

latching force level approx 60 N)

5)  Put the adjustment target approx 1 second back on the solenoid 

interlock with the safety guard open to gradually increase the latching 

force by steps of approx 10 N each The number of flashes will 

increase accordingly

The modified latching force can be checked directly on the safety 

guard If necessary, the latching force can be increased by another 

step When latching force level 8 is reached, level 1 will be activated 

when the adjustment target is placed back on the component

6)  Switch off the voltage supply of the MZM 100 once more to 

permanently save the chosen latching force

When the component is switched off, the adjustment mode is quit 

After the voltage supply is switched back on, the MZM 100 is ready for 

operation

Latching force indication

If the voltage supply of the MZM 100 B is switched on when the  

safety guard is open, the yellow LED will show the set latching force for 

10 seconds by means of repeated brief flashes (eg 4 × flashes = 4th 

latching force level approx 60 N)

Description of the latching force adjustment for the MZM 100-...-SD 

with serial diagnostic function

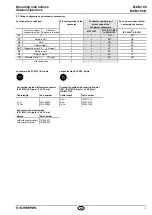
The latching force can be adjusted through the latching force bits 1-3  

of the request byte in 8 steps within a range of 30 … 100 N (45  115 N 

with permanent magnet)

Latching force bit

Latching force RE

Latching force REM

3

2

1

0

0

0

approx 30 N

approx 45 N

0

0

1

approx 40 N

approx 55 N

0

1

0

approx 50 N

approx 65 N

0

1

1

approx 60 N

approx 75 N

1

0

0

approx 70 N

approx 85 N

1

0

1

approx 80 N

approx 95 N

1

1

0

approx 90 N

approx 105 N

1

1

1

approx 100 N

approx 115 N

The actual latching forces may deviate from the specified 

values owing to the different influences (eg angled position 

of actuator, contamination or damage to metal surface, etc)

When the guard system is opened for the first time from the 

locked status, higher latching forces may be experienced on 

account of residual magnetism

Содержание MZM 100

Страница 1: ...ively used in accordance with the versions listed below or for the applications authorised by the manufacturer Detailed information regarding the range of applications can be found in the chapter Product description 1 5 General safety instructions The user must observe the safety instructions in this operating instructions manual labelled with the caution or warning symbol above the country specif...

Страница 2: ...e upon request or can be downloaded from the Internet at www schmersal com 2 4 Purpose The safety switchgears are classified according to ISO 14119 as type 4 interlocking devices The MZM 100 is designed for application in safety circuits and is used for monitoring the position of movable separating safety guards A door detection sensor monitors the closed condition of the safety guard The optional...

Страница 3: ...se duration on input signal 1 0 ms With test pulse interval of 100 ms Classification ZVEI CB24I Countersink C1 Source C1 C2 C3 Electrical data Safety outputs Safety outputs Y1 and Y2 Switching elements normally open function 2 channel OSSD p type Fuse rating short circuit proof Utilisation category DC 13 Ue Ie 24 VDC 0 25 A Rated operating current Ie each max 0 25 A Leakage current Ir 0 5 mA Volta...

Страница 4: ...tolerate internal functional tests of the solenoid interlock with cyclic switch off of the safety outputs for max 2 ms typically 1 ms The switch off stage of the test cycle is temporarily reduced by an active ohmic discharge of the cable If the safety sensor is connected to electronic safety monitoring modules we recommend that you set a discrepancy time of min 100 ms The safety inputs of the safe...

Страница 5: ...prox 100 N To this end the adjustment target MZM 100 TARGET is used directly on the fitted MZM 100 Adjustment of the latching force 1 Open the safety guard and isolate the MZM 100 from the voltage supply Either switch off the voltage supply or pull out the connector 2 Put the adjustment target with the active side on the identification plate of the MZM 100 3 Switch the voltage supply of the MZM 10...

Страница 6: ...cross wire short will lead to a delayed shut down refer to table 2 After the rectification of the error the error message is reset by opening the corresponding safety guard Error warning A fault has occurred which causes the safety outputs to be disabled after 30 minutes The safety outputs initially remain enabled This enables the shutdown of the process in a controlled manner An error warning is ...

Страница 7: ...en 0 V On Off Off 0 V 0 V Safety guard closed actuator in safety guard can be locked 0 V On Off Flashes 24 V 24 V Safety guard closed and locked 24 V On Off On 24 V 24 V Solenoid interlock cannot be locked Safety guard not correctly closed or magnet soiled 24 V On Off Off 0 V 0 V Error warning1 actuator in 0 V 24 V On Flashes 2 flashes on 24 V 0 V Error 0 V 24 V On Flashes 2 Off 0 V 0 V 1 after 30...

Страница 8: ... diagnostic channels are wired in series The diagnostic data are transmitted through the series wiring of the inputs and outputs Max 31 safety switchgear with serial diagnostics can be wired in series For the evaluation of the serial diagnostics line either the PROFIBUS Gateway SD I DP V0 2 or the Universal Gateway SD I U are used This SD Gateway is integrated as a slave in an existing field bus s...

Страница 9: ...tatus signals and the safety outputs by means of an example of MZM 100 variant Solenoid interlock monitored System condition LED Safety outputs Response byte bit n green red yellow Y1 Y2 7 6 5 4 3 2 1 0 Safety guard open On Off Off 0 V 0 0 0 X 0 0 0 0 Safety guard closed actuator in On Off Flashes 0 V 0 0 0 X 0 0 1 0 Safety guard closed and locked On Off On 24 V 0 0 0 X 0 1 1 1 Solenoid interlock ...

Страница 10: ...t safety component are wired to the safety monitoring module X1 Y1 X2 Y2 1 2 3 5 6 8 X1 X2 A1 A2 Y1 Y2 1 2 3 5 6 8 X1 4 Y1 4 Y1 X2 7 Y2 7 Y2 OUT A1 A2 OUT SPS PLC IN SPS PLC SPS PLC IN 24 VDC GND SPS PLC n participants Safety outputs evaluation Wiring example 2 series wiring of the MZM 100 with serial diagnostic function The safety outputs of the first safety component are wired to the safety moni...

Страница 11: ...t 1 4 4 YE BK OUT Diagnostic output SD output 5 5 GY GY X2 Safety input 2 6 6 PK PK Y2 Safety output 2 7 7 BU VT IN Solenoid control SD input 8 8 RD OR without function 9 Connector plug ST M23 8 1 pole Connector plug ST2 M12 8 pole 1 2 9 3 4 5 6 7 8 5 8 4 3 2 1 7 6 Connecting cables with female connector IP67 M23 8 1 pole 8 x 0 75 mm Connecting cables with coupling female IP67 IP69 M12 8 pole 8 x ...

Страница 12: ...6 2011 Notified body which approved the full quality assurance system referred to in Appendix X 2006 42 EC TÜV Rheinland Industrie Service GmbH Alboinstr 56 12103 Berlin ID n 0035 Person authorised for the compilation of the technical documentation Oliver Wacker Möddinghofe 30 42279 Wuppertal Place and date of issue Wuppertal December 2 2016 Authorised signature Philip Schmersal Managing Director ...

Отзывы: