


3
ENGLISH
PLEASE KEEP THIS GUIDE
This guide contains important information about your lock!
• Default User Codes and Programming Code are located on the sticker on the back of
this guide! You will need these if you ever need to reset your lock back to factory default
settings!
• The sticker also contains your serial number, which may be needed for warranty and
customer service support.
• Instructions for adding and deleting User Codes, changing the lock behavior,
troubleshooting, customer service and more are explained in this guide!
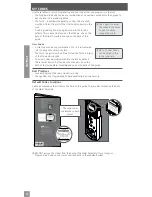
LOCK SETUP
Follow these steps to get your lock set up and ready to use.
1
Decide if you want to use the Nexia Home Intelligence System.
If you want to use the Nexia Home Intelligence System, see
Nexia™ Home Intelligence
Functions on page 12
. You can control all of the lock functions from the portal after
you’ve enrolled your lock.
2
Decide what length you want the User Codes for the lock to be.
You can set User Codes to be from 4 - 8 digits in length. The default length is 4 digits. All
User Codes must be the same length. Any time you change the User Code length, all current
User Codes will be deleted from the lock.
• See
Change User Code Length
on page 7.
3
Add/Delete User Codes.
The lock comes preset with two unique User Codes. You can either use these codes or remove
them and program your own codes.
• See
Add User Code
and
Delete User Code
on page 7.
4
Decide if you want to use the Auto-Lock feature or not.
When the Auto-Lock feature is enabled, the lock will automatically relock itself 30 seconds
after being unlocked.
• See
Enable/Disable Auto-Lock
on page 7.
5
Turn on the alarm and decide which mode you want to use.
The alarm is turned off by default. If you want to use the alarm, you’ll need to turn it on and
decide on a mode.
• See
Programming the Alarm
on page 8.
WARRANTY AND FCC/IC STATEMENTS
- Connect the equipment into an outlet on a circuit
different from that to which the receiver is connected.
- Consult the dealer or an experienced radio/TV technician
for help.
This device complies with Part 15 of the FCC Rules.
Operation is subject to the following two conditions:
1. This device may not cause harmful interference, and
2. This device must accept any interference received,
including interference that may cause undesired operation.
Changes or modifications not expressly approved by the
party responsible for compliance could void the user’s
authority to operate the equipment.
RF Exposure
To comply with FCC/IC RF exposure requirements for
mobile transmitting devices, this transmitter should only be
used or installed at locations where there is at least 20 cm
separation distance between the antenna and all persons.
Under Industry Canada regulations, this radio transmitter
may only operate using an antenna of a type and
maximum (or lesser) gain approved for the transmitter by
Industry Canada. To reduce potential radio interference to
other users, the antenna type and its gain should be so
chosen that the equivalent isotropically radiated power
(e.i.r.p.) is not more than that necessary for successful
communication.
This Device complies with Industry Canada License-exempt
RSS standard(s). Operation is subject to the following
two conditions: 1) this device may not cause interference,
and 2) this device must accept any interference, including
interference that may cause undesired operation of the
device.


