background image

Disassembly

2 - 8 Removing the Hard Disk Drive

2.Disassembly

Removing the Hard Disk Drive

The hard disk drive can be taken out to accommodate other 2.5" serial (SATA) hard disk drives with a height of 9.5mm 
(h). Follow your operating system’s installation instructions, and install all necessary drivers and utilities (as outlined in 

Chapter 4 of the User’s Manual

) when setting up a new hard disk.

Hard Disk Upgrade Process

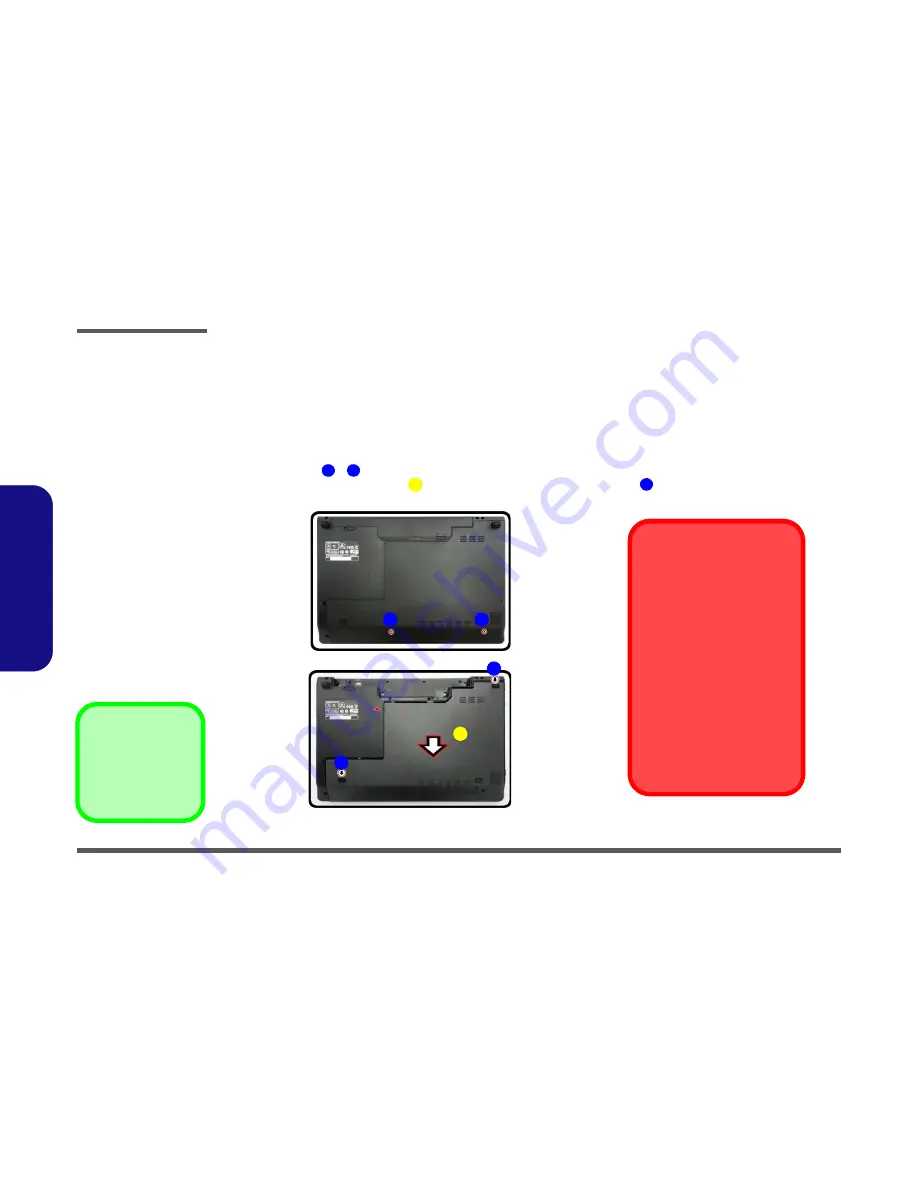
Figure 4

HDD Assembly 

Removal

a. Remove the screws.
b. Slide the component bay 

cover out.

3. HDD Bay Cover

2  Screws

1.

Turn 

off

 the computer, and remove the battery (

page 2 - 5

).

2.

Remove screws 

 - 


from the hard disk bay cover (

Figure 4a

).  

3.

Remove the hard disk bay cover 


(

Figure 4b

) by sliding the cover at point 


in the direction of arrow

.

1

2

6

3

4

HDD System Warning

New HDD’s are blank. Before you 
begin make sure:

You have backed up any data 
you want to keep from your old 
HDD.

You have all the CD-ROMs and 
FDDs required to install your op-
erating system and programs.

If you have access to the internet, 
download the latest application 
and hardware driver updates for 
the operating system you plan to 
install. Copy these to a remov-
able medium.

a.

b.

1

2

4

4

3

Содержание XMG A502

Страница 1: ......

Страница 2: ...down properly and don t forget to save your work Remember to periodically save your data as data may be lost if the battery is depleted Do not expose the computer to any shock or vibration Do not plac...

Страница 3: ...o a compatible outlet have a qualified electrician install one When you want to unplug the power cord be sure to disconnect it by the plug head not by its wire Make sure the socket and any extension c...

Страница 4: ...r hands or metal objects Battery Guidelines The following can also apply to any backup batteries you may have If you do not use the battery for an extended period then remove the battery from the comp...

Страница 5: ...rals you want to use with the computer e g keyboard and mouse to their ports 5 Attach the AC DC adapter to the DC In jack at the rear of the computer then plug the AC power cord into an outlet and con...

Страница 6: ...MB L3 Cache 32nm DDR3 1333MHz TDP 45W i7 2640M 2 80GHz i7 2620M 2 70GHz 4MB L3 Cache 32nm DDR3 1333MHz TDP 35W Intel Core i5 Processor i5 2540M 2 60GHz i5 2520M 2 50GHz i5 2450M 2 50GHz i5 2430M 2 40G...

Страница 7: ...rino Ultimate N 6300 Wireless LAN 802 11a g n Factory Option Intel Centrino Wireless N 105 Wireless LAN 802 11b g n Factory Option Intel Centrino Advanced N 6235 Wire less LAN 802 11a g n Bluetooth 4...

Страница 8: ...duction External Locator Top View with LCD Panel Open Figure 1 Top View 1 PC Camera Optional 2 LCD 3 Power Button 4 GPU Button 5 LED Indicators 6 Hot Key Buttons 7 Keyboard 8 Built In Microphone 9 Tou...

Страница 9: ...n External Locator Front Right Side Views Figure 2 Front View 1 LED Indicators Figure 3 Right Side View 1 Headphone Out Jack 2 Microphone In Jack 3 S PDIF Out Jack 4 USB 2 0 Port 5 Optical Device Driv...

Страница 10: ...ft Side Rear View Figure 4 Left Side View 1 DC In Jack 2 Vent 3 External Monitor Port 4 RJ 45 LAN Jack 5 2 USB 3 0 Ports 6 HDMI Out Port 7 Multi in 1 Card Reader 8 Combined eSATA USB 3 0 Port LEFT SID...

Страница 11: ...1 Introduction External Locator Bottom View Figure 6 Bottom View 1 Battery 2 Component Bay Cover 3 Vent 4 Speakers Overheating To prevent your com puter from overhea ting make sure no thing blocks an...

Страница 12: ...ing the connection make sure the connector is oriented in the same way The pin1 side is usually not indicated Pressure sockets for multi wire connectors To release this connector type grasp it at its...

Страница 13: ...Do not pull on the wire 6 Peripherals Turn off and detach any peripherals 7 Beware of static discharge ICs such as the CPU and main support chips are vulnerable to static electricity Before handling a...

Страница 14: ...de the latch in the direction of the arrow Figure 1a 3 Slide the latch in the direction of the arrow and hold it in place Figure 1a 4 Slide the battery in the direction of the arrow Figure 1b 1 2 6 3...

Страница 15: ...thout much pressure 9 Press the module in and down towards the mainboard until the slot levers click into place to secure the module 10 Replace the component bay cover Figure 3f by sliding the cover a...

Страница 16: ...component bay cover out 3 HDD Bay Cover 2 Screws 1 Turn off the computer and remove the battery page 2 5 2 Remove screws from the hard disk bay cover Figure 4a 3 Remove the hard disk bay cover Figure...

Страница 17: ...ly out of the bay Figure 5e 7 Remove the screw and the mylar cover from the 1st hard disk Figure 5f 6 3 4 6 5 6 7 8 9 10 4 c d 6 e 3 f 9 8 7 10 5 3 HDD Bay Cover 5 HDD Assembly 9 Mylar Cover 10 HDD 1...

Страница 18: ...he screw and the casing from the hard disk Figure 6j 12 Reverse the process to install a new hard disk do not forget to replace all the screws and covers 11 12 13 14 15 16 17 18 g h i j 18 11 12 13 14...

Страница 19: ...off the computer remove the battery page 2 5 and hard disk page 2 8 2 Remove the screw at point Figure 7a 3 Use a screwdriver to carefully push out the optical device at point Figure 7b 4 Insert the n...

Страница 20: ...you reconnect the antenna cable to the 1 2 socket Figure 11b 1 Turn off the computer turn it over and remove the battery page 2 5 and the component bay cover page 2 6 2 The Wireless LAN module will be...

Страница 21: ...will need to use Pin Eject Tool to do this Figure 12a 3 Turn the computer over unsnap up the LED cover module from point on the left of the computer towards the right Figure 12b as indicated by arrow...

Отзывы: