background image


9


when cleaning the thermal imager, first disconnect the power supply,  
wipe with a damp cloth. 

Do not use substances containing alcohol, 

benzene,  thinners  or  other  flammable  substances  to  clean  or 
maintain the IR camera  

The use of these substances may lead to fire.  
  
10


Do not handle the power cord if your hands are wet  

Handling  it  with  wet  hands  may  lead  to  electrical  shock.  When 

unplugging the cord, ensure that you hold the solid portion of the plug. 
Pulling on the flexible portion of the cord may damage or expose the wire 
and insulation, creating the potential for fires and electrical shocks.  

  
11


Do not install the camera on unstable frame or  wall, otherwise 

it will lead to human damage.  

  
12


In  case  of  the  following  circumstances  please  immediately 

contact our company:  

a.


Power supply line or control line breakage.  

b.


Using the wrong types of power or voltage.  

c.


. Falling or casing damage  

d.


abnormal performance of Products  

e.


operation according to the user's manual  still not  work.  


Warning: 

Do not trigger the laser pointer in human or animal eyes. Exposure 

to the laser produced by the laser pointer may damage eyesight.  


1.1.2

 Notice


1


In the transport, storage and installation process, prevents the pressure, 

vibration and water immersion, otherwise it will cause equipment damage.  

2


If you want to change the installed thermal imager position, please make 

sure that the power is off before moving or reinstall the thermal imager.  

3


Please install equipment in good ventilation condition.   

4


If thermal imager is not working properly, please contact the supplier, do 

not  in  any  way  to  remove  or  modify  thermal  imager.  For  unauthorized 
modification or repair the resulting problems, manufacturers do not assume 
responsibility.  


Содержание CK350-W

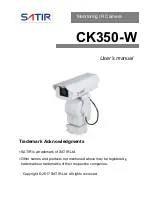
Страница 1: ...cknowledgments SATIR is a trademark of SATIR Ltd Other names and products not mentioned above may be registered g trademarks or trademarks of their respective companies Copyright 2017 SATIR Ltd All rights reserved Monitoring IR Camera ...

Страница 2: ...infrared corporation SATIR without permission any organization or individual shall not copy reproduce all or part of the contents SAT reserves the right to change the functions and configurations of our products without prior notice Any questions please contact us or our legitimate dealers You can visit our website www satir com to learn about our latest products and news ...

Страница 3: ...ad first 1 Introductions 4 Parts introduction 5 Equipment installations 6 Devices connection 15 Remote landing 16 WEB setting 20 Software Setup 34 Troubles Shooting 37 Appendix Performance parameters 39 3 ...

Страница 4: ... is not expressly described this guide 5 Please use the provided type of power supply voltage if the voltage of the installation location is not clear contact us 6 Avoid fire or electric shock do not let the PTZ overload 7 Stop operating immediately if it emits smoke or noxious fumes Failure to do so may result in fire or electrical shock Immediately turn the IR camera s power off remove the IR ca...

Страница 5: ...ct our company a Power supply line or control line breakage b Using the wrong types of power or voltage c Falling or casing damage d abnormal performance of Products e operation according to the user s manual still not work Warning Do not trigger the laser pointer in human or animal eyes Exposure to the laser produced by the laser pointer may damage eyesight 1 1 2 Notice 1 In the transport storage...

Страница 6: ...ternal surfaces You can avoid this by placing the IR camera in the plastic case bundle and letting it adjust to temperature changes slowly before removing it from the case If Condensation Forms Inside the IR Camera Stop using the camera immediately if you detect condensation Continue to use may damage the IR camera Wait until moisture evaporates completely before resuming use Long term storage If ...

Страница 7: ...network transmission technology common functions such as camera settings over temperature alarm auto video recording and much more can be adjusted remotely via a standard Ethernet network cable It can be configured as a stand a lone monitoring system or can also be incorporated into existing site systems which have an online monitoring system 2 Introductions Application ...

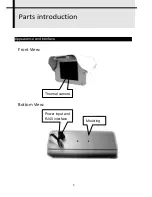
Страница 8: ...5 Appearance and interface Front View Bottom View Thermal camera Mounting Power input and RJ45 interface ...

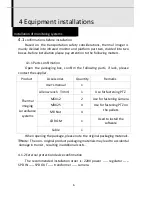
Страница 9: ...al imaging surveillance systems User s manual 1 Allen wrench 3mm 1 Use for fastening PTZ M6X12 2 Use for fastening Camera M8X25 4 Use for fastening PTZ on the pallets M8 Nut 4 CD ROM 1 Used to install the software Cable 1 When opening the package please note the original packaging materials Note The non original product packaging materials may lead to accidental damage in transit resulting in addi...

Страница 10: ...mble the PTZ 4 3 Verification of installation space and installation location For security the mechanical connection and connectors used to support the head must be able to withstand a sufficient load the selected installation location must be a solid non shedding phenomenon to ensure that the bracket on the wall rather than the surface coating material Note 1 the installation space Make sure the ...

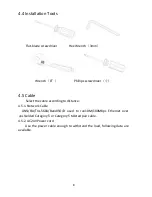
Страница 11: ...r 小 4 5 Cable Select the cable according to distance 4 5 1 Network Cable ANSI EIA TIA 568A BandISO D used to run10M 100Mbps Ethernet over unshielded Category 5 or Category 5 twisted pair cable 4 5 2 AC24V Power cord Use the power cable enough to withstand the load following data are available ...

Страница 12: ...e requirements for power cord advise clients to construction please refer to the table 4 5 3 Video cable for customized version 75Ω impedance total copper 95 preparation of copper mesh shield coaxial cable The following models with transmission distance data for reference 75 3 about 220m SYV75 3 220 75 5 about 300m SYV75 5 300 75 7 about 450m SYV75 7 450 4 5 4 RS 485 Communication cable for custom...

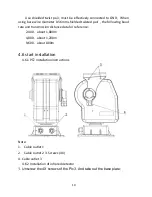
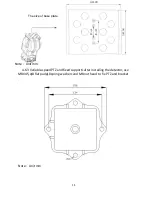
Страница 13: ...aud rate and transmission distance data for reference 2 400 about 1 800m 4 800 about 1 200m 9 600 about 800m 4 6 start installation 4 6 1 PTZ installation instructions Note 1 Cable outlet 1 2 Cable outlet 2 3 Screws 4X 4 Cable outlet 3 4 6 2 Installation of infrared detector 1 Unscrew the 4X screws of the Pic3 And take out the base plate ...

Страница 14: ...1 Note Unit mm 4 6 3 Variable speed PTZ and fixed supports after installing the detector use M8X45 φ8 flat pad φ8 spring washers and M8 nut head to fix PTZ and bracket Note Unit mm The size of base plate ...

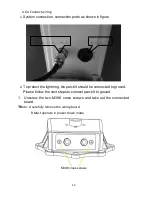
Страница 15: ... protect the lightning the pan tilt should be connected to ground Please follow the next steps to connect pan tilt to ground 1 Unscrew the two M3X8 cross screws and take out the connected board Note A carefully remove the wiring board B Must operate in power down mode M3X8 cross screws ...

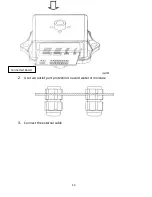
Страница 16: ...13 oard 2 Use two outlet port protection to avoid water or moisture 3 Connect the external cable Connected Board ...

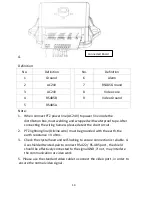
Страница 17: ...ness please detect the short circuit 2 PTZ lightning line Olivine wire must be grounded with the earth the earth resistance 4 ohms 3 Check the crystal head and self locking to ensure connection is reliable 4 Use shielded twisted pair to connect RS 422 RS 485 port the shield should be effectively connected to the signal GND if not may interfere the communication or video work 5 Please use the stand...

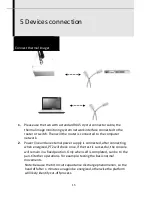
Страница 18: ...nected after connecting when energized PTZ will check once if the test is successful the console will remain in a fixed position Only when self is completed can be to the pan tilt other operations For example testing the basic normal movements Note because the tilt circuit capacitance discharge phenomenon so the head off after 1 minute can again be energized otherwise the platform will likely iden...

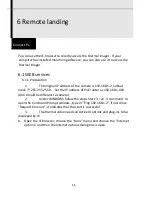
Страница 19: ...he IP address of PoE router as 192 168 1 XXX XXX should be different to camera 2 Under WINDOWS follow the steps Start run command to open the Command Prompt window type in Ping 192 168 1 2 if not show Request time out it indicates that the start is successful 3 The thermal video needs an ActiveX controls and plug ins to be displayed by IE 1 Open the IE browser choose the tools menu and choose the ...

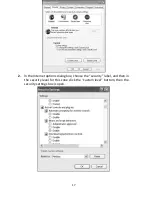
Страница 20: ...17 2 In the Internet options dialog box choose the security label and then in the security level for this zone click the custom level bottom then the security settings box is open ...

Страница 21: ...r options retain the default value After the first time log in the video server interface debug is passed and the browsing function and other function is used regular if want to ensure the security of IE then you can reset Internet security level for this zone as default value or custom other levels directly 6 1 2 Log on 1 Input the IP address in to the IE address bar for example 192 168 104 233 T...

Страница 22: ... items as below Items Content language Chinese or English User Name Input the User Name the default value is Admin Password Input the Password the default value is Admin Port The digital port of the camera the default value is 3000 4 Click the OK button to enter the thermal imaging preview screen As shown below ...

Страница 23: ...20 Note 1 Different types of thermal camera will get different thermal video 2 Microsoft IE version 6 0 or above 7 1 PTZ control 1 Click the Device item after log on 7 WEB setting WEB server settings ...

Страница 24: ... The protocol of controlling PTZ the default is Pelco P Status The status of PTZ the default is 9600 Address The address of PTZ the default is 2 SetView Set the angle of PTZ pointing CallView Rotate PTZ to the angle of SetView Speed The speed of rotating PTZ ...

Страница 25: ...play through the right part of the interface Brightness Contrast Saturation not used yet Tone not used yet 2 Adjust the display mode under the images Single screen Four screen Nine screen Sixteen screen Full screen 7 3 Advanced Settings Click the General setting item after log on to inter the Advance setting 7 3 1 General setting Click the General setting item after log on ...

Страница 26: ...23 Here you can set the video block area the display frame rate and stream ...

Страница 27: ...24 7 3 2 Video parameter Click on the right part of the interface to set video parameter Here you can change detail settings such as the frame rate rate of resolution ...

Страница 28: ...ick OSD on the right part of the interface to set Character overlap Here you can set the characters such as adding the channel name time date additional characters can also change the character superimposing position ...

Страница 29: ... settings Port Alarm on the right part of the interface to set this parameter Only need to change the items like the picture when encountering the following conditions a Thermal imager network module reset b Thermal imager does not alarm ...

Страница 30: ...27 7 3 5 Network parameters 1 Wire setting Click Wire Setting on the right part of the interface to set this parameter Here you can set gateway IP address DNS WEB port according to the reality ...

Страница 31: ...amic DNS is a method protocol network service that provides the capability for a networked device such as a router or computer system using the Internet Protocol Suite to notify a Domain Name System DNS name server to change in real time the active DNS configuration of its configured hostnames addresses or other information ...

Страница 32: ...ameter Here you can set the PPPOE account number password according to the reality Generally used when ADSL broadband access is needed The Point to Point Protocol over Ethernet PPPoE is a network protocol for encapsulating Point to Point Protocol PPP frames inside Ethernet frames ...

Страница 33: ...e to set this parameter Here you can see imager network module serial number firmware version 2 System information Click System Information on the right part of the interface to set this parameter Here you can see system resource utilization ratio of imager network module also can do reset restart operations ...

Страница 34: ...31 3 Access platform Click Access platform on the right part of theinterface to set this parameter The existing platform is compatible with the ONVIF protocol can be start according to actual need ...

Страница 35: ... this parameter The setting for this project is as follows Items Content User List Select user User Name User s name Old pwd Old password New Pwd New password Password Confirm Confirm new password Authority User s authority Add Add new user Delete Delete user Modify Pwd Modify password ...

Страница 36: ...33 5 Connect info Click Connect Info on the right part of the interface to set this parameter Here you can see the current thermal imager connection information ...

Страница 37: ...choose the box file then click Upgrade button and wait for the prompts to complete the upgrade NVS SYSTEM hereinafter referred to as NVS is stored in the supplied CD ROM Software folder 8 1 Software Description NVS system is a computer network based and multiple channel monitoring system The system uses advanced computer data compression technology and network transmission technology via a standar...

Страница 38: ...35 8 2 Software Setup 1 Double click the program file icon then customize the Setup or use the default setup 8 Software Setup Client Installation ...

Страница 39: ...36 Click Next button to start the installation ...

Страница 40: ...37 8 3 Software Operation Specific software instructions see the supplied manual Shortcut Key F1 Open the software instructions F2 Open server search software F3 Show the software version ...

Страница 41: ...rd failure overhaul PTZ self test can not be carried or accompanied by a noise Insufficient power supply Please replace the power supply PTZ stuck Please check the PTZ Mechanical failure overhaul PTZ self test is normal but the infrared monitor can not connect Network Cable is poor contact Please check if the network cable is good contact Router or switch is not turned on Turn on the router or swi...

Страница 42: ...trol line Circuit board failure overhaul Infrared image lost when the PTZ rotating Lack of power input Please check whether the input voltage could meet the requirements Infrared video cable is poor contact Reconnect the video cable Circuit board failure overhaul Thermal image can not be displayed on the computer Computer and thermal imager connection error Reconnect the computer and the thermal i...

Страница 43: ...40 Not set the over temperature alarm value Re set the over temperature alarm value Error alarm settings Re set alarm setting in accordance with 7 3 4 Circuit board failure overhaul ...

Страница 44: ...rmat H 264 D1 Network output frame rate 1 30Hz Measurement range 20 250 up to2000 Accuracy 2 or 2 of reading Functions spot analysis maximum minimum temperature Auto tracking Isothermal analysis Area analysis Trend Analysis Isothermal analysis parameter settings emissivity ambient temperature Power consumption heating normal Operating temperature 35 to 50 Storage temperature 40 to 70 Humidity 90 n...

Страница 45: ...42 Product specifications and designs are subject to change without notice There may be minor differences between this manual and the actual screen ...

Отзывы: