background image

9

Stand 05/2018 MK TM

BETRIEB

Um das Gerät mit Wasser oder Getränken zu füllen, nehmen 

Sie den Deckel ab, indem Sie ihn gegen den Uhrzeigersinn 

drehen, bis er sich aus der Verschlussvorrichtung löst.

Füllen Sie das Gerät mit Wasser, um es zu kochen; oder mit 

Getränken, wie Kaffee, Glühwein oder Tee, um diese zu 

erhitzen und warm zu halten. Achten Sie dabei unbedingt 

darauf, dass Sie das Gerät mindestens bis zur Min-Markierung 

und höchstens bis zur Max-Markierung befüllen.

Setzen Sie den Deckel wieder auf den Behälter und schließen 

Sie ihn, indem Sie ihn im Uhrzeigersinn drehen, bis er in der 

Verschlussvorrichtung einrastet.

Bevor Sie das Gerät anschließen, vergewissern Sie sich, dass 

die Spannung und die Frequenz der Strom-versorgung mit 

den Angaben auf dem Typenschild übereinstimmen! Andere 

Spannungen können zur Überhitzung des Gerätes führen! 

Sollte alles passen, stecken Sie den Stecker in die Steckdose.

Schalten Sie das Gerät am Schalter (9) ein. Die Kontrolllampe 

(6) leuchtet auf und zeigt an, dass das Gerät betriebsbereit ist.

Drehen Sie den Thermostatregler auf die von Ihnen 

gewünschte Temperatur. Die rote Kontrolllampe leuchtet 

auf und zeigt an, dass das Gerät nun aufheizt. Sobald 

die eingestellte Temperatur erreicht ist, erlischt die rote 

Kontrolllampe, die grüne Kontrolllampe leuchtet auf und zeigt 

an, dass die Temperatur der Flüssigkeit im Inneren nun der 

eingestellten Temperatur entspricht.

Fällt die Temperatur um 5°C bis 10°C, erlischt die grüne 

Kontrolllampe und das Gerät heizt automatisch wieder auf; 

die rote Kontrolllampe leuchtet.

Möchten Sie Wasser zum Kochen bringen, drehen Sie den 

Thermostatregler in eine Stellung im Bereich von 100 °C. Das 

Gerät heizt nun auf und bringt das Wasser zum kochen.

Achtung! Das Gerät wird, auch in dieser Position, die 

eingestellte Temperatur halten! Das Gerät wird weiter 

heizen, auch wenn das Wasser bereits kocht; es findet keine 

automatische Abschaltung statt! 

Der Kochvorgang kann lediglich unterbrochen erden, indem 

man den Temperaturregler auf eine niedrigere Temperatur 

stellt oder das Gerät ausschaltet.

Betätigen Sie den Zapfhahn um heißes Wasser oder Getränke 

zu dosieren und in Trinkgefäße zu füllen.

Beachten Sie stets die außenliegende Füllskala, und schalten 

Sie das gerät aus, sobald sich nur noch wenig Flüssigkeit im 

Inneren befindet, bzw. die Min-Markierung erreicht wurde.

Wenn Sie das Gerät nicht mehr benötigen, schalten Sie es 

aus, ziehen Sie den Netzstecker, lassen Sie es abkühlen und 

reinigen und trocknen Sie es gründlich.

Verwahren Sie das Gerät an einem trockenen, Staubfreien Ort, 

außerhalb der Reichweite von Kindern.

OPERATION

To fill the appliance with water or beverages, remove the 

lid by turning it counterclockwise until it detaches from the 

closing device.

Fill the appliance with water to boil it; or with drinks such as 

coffee, mulled wine or tea to heat and keep it warm. Make 

sure that you fill the device at least up to the minimum mark 

and at most up to the maximum mark.

Replace the lid on the container and close it by turning it 

clockwise until it locks into the locking device.

Before connecting the device, make sure that the voltage and 

frequency of the power supply correspond to the information 

on the type plate! Other voltages can lead to overheating of 

the device! If everything fits, plug it in.

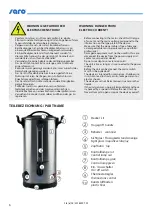
Switch on the device at the switch (9). The control lamp (6) 

lights up and indicates that the unit is ready for operation.

Turn the thermostat control to the temperature you want. The 

red indicator light lights up and indicates that the unit is now 

heating up. As soon as the set temperature is reached, the 

red control lamp goes out, the green control lamp lights up 

and indicates that the temperature of the liquid inside now 

corresponds to the set temperature.

If the temperature drops by 5°C to 10°C, the green control 

lamp goes out and the unit automatically heats up again; the 

red control lamp lights up.

If you want to boil water, turn the thermostat control to a 

position in the range of 100 °C. The appliance heats up and 

makes the water boil.

Attention! The device will maintain the set temperature, even 

in this position! The appliance will continue to heat, even if the 

water is already boiling; there is no automatic switch-off!

The cooking process can only be interrupted by setting the 

temperature controller to a lower temperature or switching 

off the appliance.

Use the tap to dispense hot water or drinks and fill into 

drinking vessels.

Always observe the external filling scale and switch off the 

unit as soon as there is little liquid left inside or the minimum 

mark has been reached.

When you no longer need the unit, turn it off, unplug the 

power cord, allow it to cool, clean and dry thoroughly.

Keep the device in a dry, dust-free place out of the reach of 

children.

Содержание ANCONA 10

Страница 1: ...NCONA 5 213 7500 Modell ANCONA 10 213 7510 Modell ANCONA 30 213 7515 Betriebsanleitung für ANCONA Glühwein und Heißwasserspender ANCONA 5 ANCONA 10 ANCONA 15 English Translation of the original Deutsch Original ...

Страница 2: ...itung vor der Inbetriebnahme des Heißwasserspenders aufmerksam durch Wir wünschen Ihnen viel Freude mit Ihrem neuen SARO ANCONA Glühwein und Heißwasserspender Dear customer Congratulations on your new SARO ANCONA mulled wine and hot water dispenser Our hot water dispensers have been developed for commercial use and therefore have all the features you would expect from a professional unit The stain...

Страница 3: ...planations of symbols 4 Allgemeine Hinweise General information 4 Sicherheitshinweise Safety instructions 5 Teilebezeichnung Part name 6 Auspacken Unpack 7 Erste Inbetriebnahme First commissioning 8 Betrieb Operation 9 Überhitzungsschutz Overheating protection 10 Reinigen und Entkalken Cleaning and descaling 11 Im Falle von Funktionsstörungen In case of malfunctions 12 Verpackungs Entsorgung Packa...

Страница 4: ...lly and observe the information contained therein These operating instructions provide information on the construction setup operation maintenance cleaning and possible disposal of this device These operating instructions are part of the device and should be kept near the device and accessible to all persons involved in the installation operation cleaning or main tenance of this device at all time...

Страница 5: ...Ph Hz kW Connection V Ph Hz kW 230 1 50 1 6 230 1 50 1 6 230 1 50 2 5 Gewicht kg Weight kg 1 8 2 0 3 5 Temperaturbereich C Temperature range C 30 110 30 110 30 110 Sicherheitszapfhahn Safety tap ja yes ja yes ja yes Sicherheitsverriegelung Safety locking ja yes ja yes ja yes Überhitzungsschutz Overheating protection ja yes ja yes ja yes Kontrolllampen Indicator light Kochen Warmhalten heating keep...

Страница 6: ...dingt genau ein und verhalten Sie sich in diesen Fällen besonders vorsichtig WARNING This symbol indicates dangers which can lead to injuries It is imperative that you adhere strictly to the instructions on occupational safety and be particularly careful in such cases WARNUNG GEFAHR DURCH ELEKTRISCHEN STROM Dieses Symbol macht auf gefährliche Situati onen durch elektrischen Strom aufmerksam Bei Ni...

Страница 7: ...um gefüllt ist Min Markierung Um ein Überlaufen der heißen Flüssigkeit bei Erwärmung zu verhindern achten Sie darauf dass der Behälter nie über das Maximum Max Markierung gefüllt ist Sobald der Behälter nur noch minimal befüllt ist Min Mar kierung schalten Sie das Gerät aus um zu verhindern dass der Rest der Flüssigkeit verdunstet und das Gerät trocken läuft SAFETY INSTRUCTIONS Observe the acciden...

Страница 8: ... the mains check that the type of current and the mains voltage correspond to the information on the type plate of the device Make sure that the power cable is free of damage a damaged cable must be replaced by a qualified professional Damaged equipment must not be used In this case disconnect the device from the power supply and contact your specialist dealer Do not use adapters or extension cord...

Страница 9: ...material and place the unit on a horizontal stable non slip and heat resistant surface Ensure a secure stand Make sure that everything is in perfect condition If you discover any damage do not connect the device but contact your dealer Check that all components specified in the scope of delivery are present If this is not the case contact your dealer Keep the packaging of the device The device can...

Страница 10: ...standard detergent Wipe the outside surface with a damp cloth Make sure that the cable and plug do not get wet Wipe the inside and outside dry with a soft cloth Make sure that the thermostat is set to 0 Fill the container with clear water up to the Max mark Turn the thermostat to the highest setting and boil the water Get rid of the water Careful the water s hot There is a risk of scalding from th...

Страница 11: ... im Inneren befindet bzw die Min Markierung erreicht wurde Wenn Sie das Gerät nicht mehr benötigen schalten Sie es aus ziehen Sie den Netzstecker lassen Sie es abkühlen und reinigen und trocknen Sie es gründlich Verwahren Sie das Gerät an einem trockenen Staubfreien Ort außerhalb der Reichweite von Kindern OPERATION To fill the appliance with water or beverages remove the lid by turning it counter...

Страница 12: ... schutz nicht auslösen und die Temperatur über 240 C steigen schmilzt diese Sicherung und unterbricht den Stromkreis Nach dem Auslösen der Schmelzsicherungen ist diese unbrauchbar und muss von einem Fachmann ersetzt werden OVERHEATING PROTECTION The device is equipped with automatic overheating protection This ensures that the unit switches off automatically in the event of overheating Overheating...

Страница 13: ...he lid and the outer surface of the container with a damp cloth and a mild detergent and dry thoroughly Do not use abrasive or abrasive cleaning agents such as scouring milk or steel wool Um eine lange Lebensdauer des Gerätes zu gewährleisten sollte dieses regelmäßig entkalkt werden Es ist dann notwendig das Gerät zu entkalken wenn sich sichtbar Kalk auf dem Boden des Behälters abgesetzt hat Zum E...

Страница 14: ... folgende Informationen bereit 1 Detaillierte Beschreibung der Fehlfunktion 2 Genaue Produktbezeichnung Produktnummer 3 Ihren Namen Adresse und Telefonnummer 5 Datum des Kaufs IN CASE OF MALFUNCTIONS In the event of malfunctions please observe and check the following points before requesting customer service Liquid is not heated Is the power supply interrupted Has the mains plug been removed from ...

Страница 15: ...gestellt dass Altgeräte fachgerecht entsorgt und verwertet werden Vielen Dank Die Verpackungsmaterialien bitte entsprechend trennen und den zuständigen Sammelstellen zur Wiederverwertung und zur Umweltschohnung zuführen Please separate the packaging materials accordingly and return them to the responsible collection points for recycling and environmental housing Once the appliance has been used up...

Отзывы: