3.2 Command 12: Set Time
You must set the time in order to use the audit trail function. The time should
be set in HHmm format based on a 24-hour clock, where HH = hours and
mm = minutes. The time should be set when the lock is first set up. The time
is to always be set in the local standard time. Local standard time must be set
even though daylight savings time may be in effect.
To set time perform the following steps:
Step 1
Enter: 1 2 *
(Note: Clock start command (13*) must be
implemented for changes to take effect)
Step 2
Enter: 8-digit Programmer PIN Code (00) #
Step 3
Enter: Time in HHmm format #
Step 4
Enter: Time in HHmm format #
Example...
To set the time as 1:42 p.m., becoming 13:42 (using the factory default Codes):
Step 1
Enter: 1 2 *
(Note: Clock start command (13*) must be
implemented for changes to take effect).
Step 2
Enter: 0 0 1 2 3 4 5 6 #
Step 3
Enter: 1 3 4 2 #
Step 4
Enter: 1 3 4 2 #
3.3 Command 13: Start the Clock
After setting the time and date values, you must use a separate command to
start the clock. This step helps to match the time in the lock to the current time.
To start the clock, perform the following steps (after programming time & date):
Step 1
Enter: 1 3 *
Step 2
Enter: 8-digit Programmer PIN Code (00) #
Step 3
Enter: sequence to start the clock. 1#
Step 4
Enter: sequence to start the clock. 1#
3.4 Command 22: Changing a PIN Code
Use command sequence 22 in order to change your PIN Code. You should always
leave the safe door open while changing codes. When changing any code, you
will need to enter both the 8-digit PIN Code. The PIN position does not change.
Please note that the 33 command performs the exact same function.
To change a PIN Code, perform the following steps (A PIN Code can contain
any numbers/letters except # or * Personal data that can be related to a code
holder, such as a birth date, street number, or phone number, should not be
used in creating a lock code.
Avoid codes that can be easily guessed (such as 1 2 3 4 5 6 or 1 1 1 1 1 1):
Step 1
Enter: 2 2 *
Step 2
Enter: 8-digit PIN Code #
Step 3
Enter: New 8-digit PIN Code #
Step 4
Enter: New 8-digit PIN Code again #
Example…
Step 1
Enter: 2 2 *
Step 2
0 2 0 2 0 2 0 2 #
Step 3
2 1 2 1 2 1 2 1 #
Step 4
2 1 2 1 2 1 2 1 #
With the above example, the default PIN code of 0 2 0 2 0 2 0 2 has been-
changed to 2 1 2 1 2 1 2 1.
Example…
Step 1
Enter: 2 2 *
Step 2
1 0 1 0 1 0 1 0 #
Step 3
2 0 1 5 2 0 1 5 #
Step 4
2 0 1 5 2 0 1 5 #
With the lower left example, the default PIN code of 1 0 1 0 1 0 1 0 has been
changed to 2 0 1 5 2 0 1 5.
3.5 Command 28: Audit Download
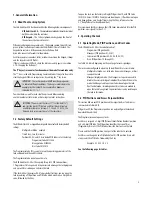
The S&G Audit Lock 2.0 Audit Trail can store as many as 1,000 events that
include the time & date. Some examples of events are:
• Adding or deleting a User code.
• Changing a code.
• Opening or closing the lock.
• Programming commands, such as setting the date.
The audit trail can be downloaded to an approved USB flash drive and uploaded
to a computer using the Sargent and Greenleaf USB Drive Audit Lock Audit Trail
Software. Complete instructions are provided with the software.
To download the Audit Trail, perform the following steps:
Step 1
Enter: 2 8 *
Step 2
Enter: 8-digit Programmer or Manager PIN Code (00,
01, 02, 03) #
Step 3
Enter: The option for number of audit events to
download (1 – 6) #
Step 4
Enter: The option for number of audit events to
download (1 – 6) #
Step 5
Insert the USB flash drive into the corresponding port
on the front of the keypad.
The yellow LED on the keypad will remain on while the audit trail is being
downloaded to the USB flash drive. Depending on the size of the audit trail, this
could take up to 45 seconds.
Step 6
The lock beeps 3 times
( )
when the down
load is complete.
If you hear an error beep (one long continuous beep), the audit trail was not
downloaded properly. You must start the download over, beginning with
Step 1. After you’ve successfully downloaded the audit trail, it is stored in the
USB flash drive.
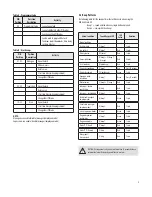
The available options for the number of events to download are as follows…
1 – upload the 1 most recent event in the audit trail
2 – upload the 8 most recent events in the audit trail
3 – upload the 32 most recent events in the audit trail
4 – upload the 64 most recent events in the audit trail
5 – upload the 128 most recent events in the audit trail
6 – upload all of the events in the audit trail (up to 1,000 events)
Example…
Step 1
Enter: 2 8 *
Step 2
Enter: 0 0 1 2 3 4 5 6 #
Step 3
6 #
Step 4
6 #
Step 5
Insert the USB flash drive into the corresponding port
on the front of the keypad.
Step 6
The lock beeps 3 times ( ) when the download
is complete.
IMPORTANT: Try the new PIN Code at least three times to confirm
operation before closing the safe door
7


