


Version 1.0.16
76
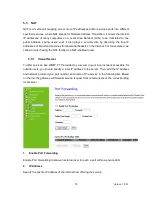
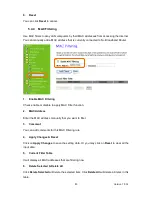
3.
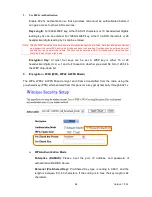
Protocol
Specify the transport layer protocol (TCP or UDP).
4.
Port Range
Enter the Start and End ports in the range you'd like to forward. If you're just forwarding 1 port,
set them both equal. For example 80-80 or 20-22
。
5.
Comment
You can add comments for this port forwarding rule.
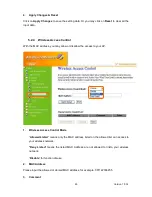
6.
Apply Changes & Reset
Click on Apply Changes to save the setting data. Or you may click on Reset to clear all the
input data.
7.
Current Port Forwarding Table
It will display all port forwarding regulation you made.
8.
Delete Selected & Delete All
Click Delete Selected will delete the selected item. Click Delete All will delete all items in this
table.
9.
Reset
You can click Reset to cancel.
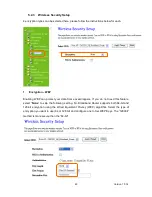
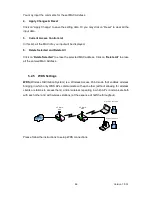
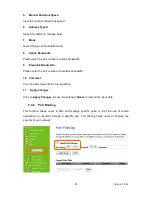
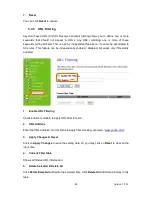
Port Forwarding
The following figure shows the ip forwarding configuration of your web on a local area
network. The web server is located on 192.168.1.100, forwarding port is 80, and type is
TCP+UDP.
Configuration:
Private IP: 192.168.1.100
Port: 80 - 80
Type: TCP+UDP
Содержание RB-1232
Страница 1: ...Version 1 0 16 1 ...
Страница 12: ...Version 1 0 16 12 Step 2 Click on Properties Step 3 Double click on Internet Protocol TCP IP ...
Страница 16: ...Version 1 0 16 16 If it can t work it will show Request timed out ...
Страница 19: ...Version 1 0 16 19 Step 2 Click One Button Setup on the left of the main menu under router mode ...
Страница 30: ...Version 1 0 16 30 Click on Next button to go on next setting page ...
Страница 34: ...Version 1 0 16 34 Click on Next button to go on next setting page ...
Страница 48: ...Version 1 0 16 48 ...
Страница 51: ...Version 1 0 16 51 ...
Страница 100: ...Version 1 0 16 100 Step 2 Fill in the form as required and then click on Create Account button ...
Страница 103: ...Version 1 0 16 103 Step 9 Your hostname has been created when you see the following page ...


