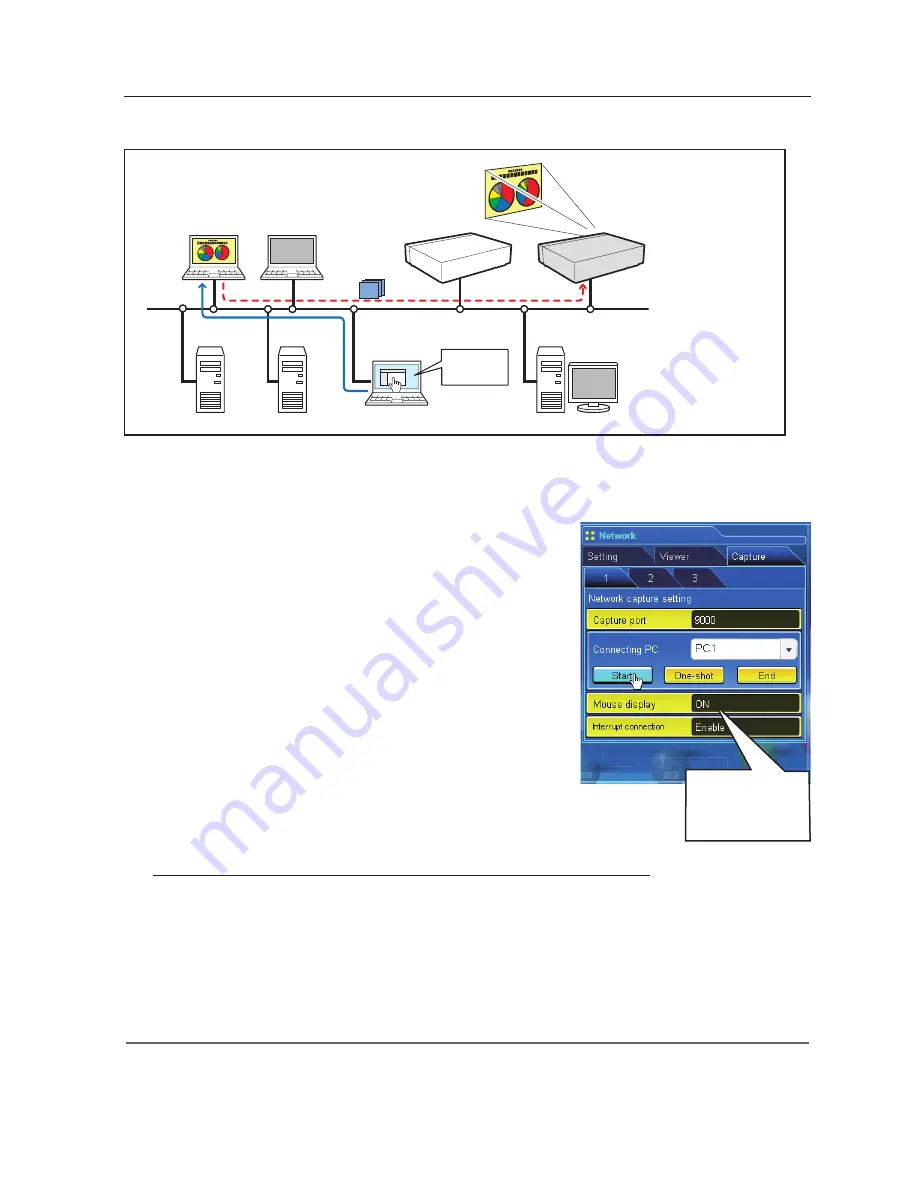
Select "Network" as input mode previously.
1
Access to the control page of the projector by using the web
browser. From the
Network
menu, click
Capture
tab to display
the setting page.
2
Select the computer number from the pull-down menu button
of "Connecting PC" and click
Start
button. The screen image of
the selected computer will appear on the projected screen in
real time.
• To stop capturing, click
One-shot
button. The captured image
of the computer on the screen is frozen.
• To restart capturing, click
Start
button.
3
To end capturing, click
End
button.
✐
The IP address of the connecting PC should be registered previously (
+
p.91).
✐
If the error message appears, check item "Parameter set up" (
+
p.90).
✐
To use the capture function from the web browser or projector, the Network Capture 5 on the captured computer
must be activated.
PC4
PC3
PC6
Capture
PC5
PC2
PC1
* PC provides the Network Capture.
Project a screen
image of PC1 with
PJ2.
PJ2
PJ1
* Start capturing of
the PC1 f rom the
PC5.
[2] Control by the web browser
Set "On" when
using the wireless
mouse function
Using the real time capture
Item
Description
Interrupt connection ............... Set enable or disable the real time capturing
connection from other computers during executing
the real time capturing operation.
Содержание WXU700 - WXGA LCD Projector
Страница 16: ...16 Chapter 1 About LAN functions ...
Страница 64: ...64 Chapter 6 Basic setting and operation ...
Страница 112: ...112 Chapter 8 Network capture functions ...
Страница 132: ...132 Chapter 9 Network Viewer functions ...
Страница 136: ...136 Chapter 10 Network Projector Windows Vista ...
Страница 137: ...Chapter 137 11 11 Appendix Use of telnet Web browser setting Firewall setting Troubleshooting Terminology ...
Страница 154: ...SO WIN KY7AC NETWORK OWNER S MANUAL FOR WINDOWS SANYO Electric Co Ltd ...


