16
REMOTE CONTROL
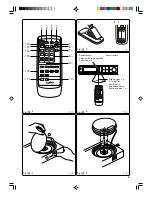
Controls (Fig. 4)
1. Power button (
z
/ON)
2. Sleep timer button (SLEEP)
3. Timer button (TIMER)
4. Clock button (CLOCK)
5. Beam check button (BEAM CHECK)
6. Password button (PASSWORD)
7. Beam select button (BEAM SELECT)
8. Preset/Adjust controls (PRESET/ADJUST)
UP: Up button
DOWN: Down button
MEMORY: Memory button
9. Programme search controls (PROGRAM SEARCH)
PTY: Programme type button
ALPHABET: Alphabet button
SEARCH: Search button
10. Sound select button (SOUND SELECT)
11. Light button (LIGHT)
12. Number/Character buttons (1/ABC - 9/YZ, 0)
13. BC (Broadcaster) select controls (BC SELECT)
NEXT: Next button
PREVIOUS: Previous button
14. SC (Service Components) select button (SC SELECT)
15. Language button (LANGUAGE)
16. Set/Clear button (SET/CLEAR)
Installing batteries
Install two “AA/SUM-3/R6” batteries (not supplied) as shown in
Fig. 5.
Remote control range (Fig. 6)
The buttons on the remote control perform similar functions to
similarly marked buttons on the front panel.
GENERAL OPERATION
Turning the power on and off
Press the
z
/ON button to turn the power on. “WELCOME TO
WORLD SPACE”, “COME ON IN WORLD SPACE” or “LETS
ENJOY WORLD SPACE” appears briefly.
Press the
z
/ON button again to turn the power off. The clock
display remains lit.
-
When the AC adaptor is connected, the unit will respond to
commands from the remote control.
Note:
If the unit is being powered by batteries, the
z
/ON button on the
remote control does not work. In which case, press the
z
/ON
button on the front panel to turn the power on. Then operate the
remote control.
Adjusting the volume
Turn the VOLUME control.
Selecting the sound mode
Press the SOUND SELECT button to enhance the bass sound.
“BASS ON” appears on the display. Press the button again to
return the original setting. “BASS OFF” appears.
Display backlight
Press the LIGHT button to turn the backlight on. Press the button
again to turn it off. When the unit is being powered by batteries,
the backlight goes out after several seconds.
WHAT TO DO IF · · · ·
If the operation of the unit or display is not normal,
1. Disconnect the AC adaptor from the unit.
2. Remove all batteries (D/SUM-1/R20 and AA/SUM-3/R6).
3. Wait approximately 1 minute.
4. Connect the AC adaptor, and install all batteries.
5. Operate the unit.
ANTENNA
Placing the antenna
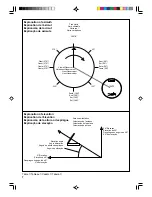
Place the antenna in a position to acquire the satellite. If a line
of site is obstructed, the receiver may not receive signals.
-
Because a signal is weakened by window glass, etc.
place the antenna outdoors when reception is poor.
-
The supplied antenna is water proof. But the antenna is
not usable under extreme weather/condition.
-
To minimize noise, the AC adaptor lead and any other
leads should not come close to the antenna and antenna
cable.
Keep the AC adaptor/AC adaptor lead 30 cm or more
from the antenna/antenna cable.
To attach the antenna
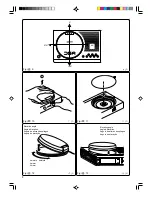
1. While pressing the RELEASE lever, remove the antenna
compartment lid as shown in Fig. 7.
2. Before attaching the antenna, unwind the antenna cable as
desired.
3. Attach the antenna to the unit as shown in Fig. 8.
Note:
-
Match the convex part of antenna compartment on the
unit to the concave part of antenna when attaching the
antenna.
The antenna can be attached to the unit with four
directions (0
°
, 90
°
, 180
°
and 270
°
) as shown in Fig. 9.
-
Pay attention not to pinch the antenna cable into the
antenna and unit.
-
Attach the antenna completely until a click sound is
heard.
To detach the antenna
1. While pressing the RELEASE lever, detach the antenna as
shown in Fig. 10.
2. Replace the antenna compartment lid as shown in Fig. 11.
Note:
Use only the supplied antenna or an antenna of WorldSpace
TM
specification. Do not use other conventional TV or FM antennas,
or the unit may be damaged.

