background image

14

Part Names and Functions

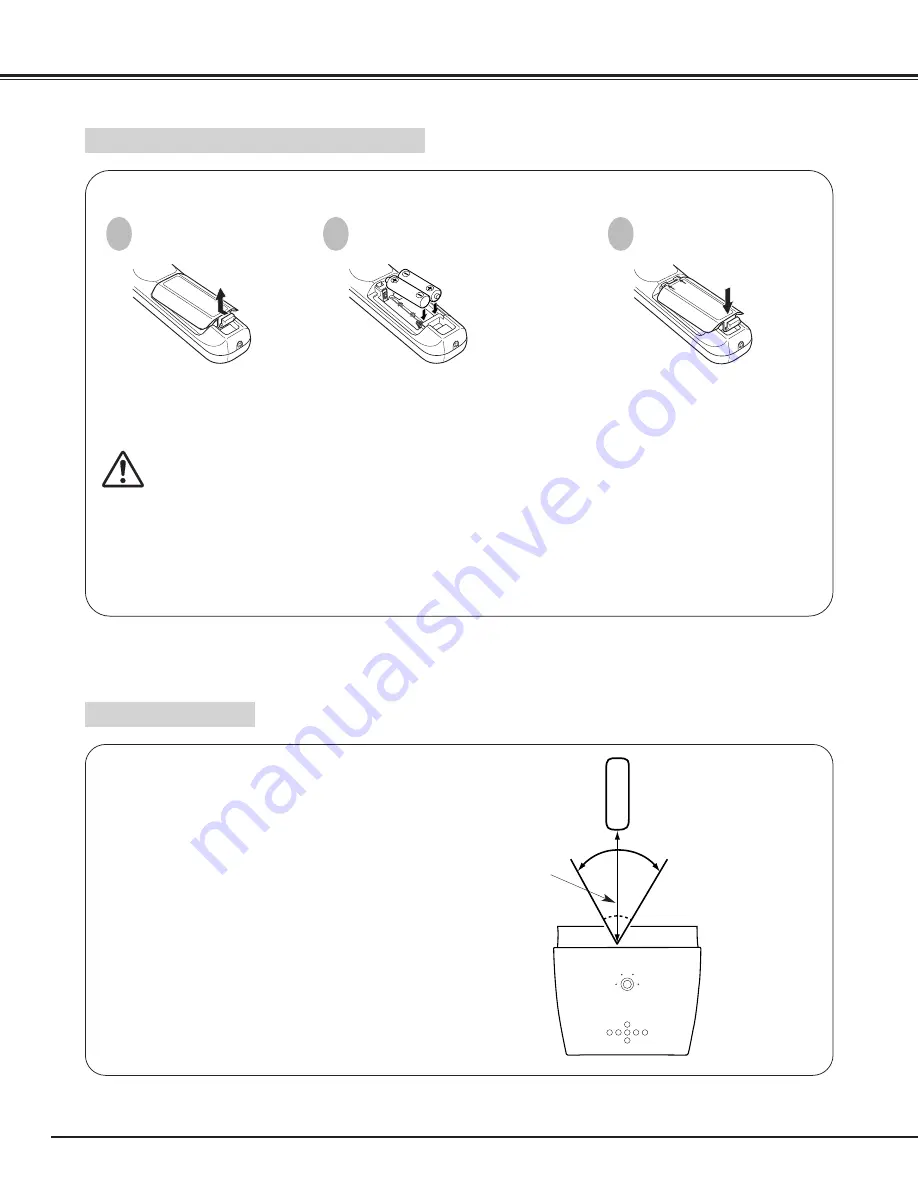
To insure safe operation, please observe the following precautions:

Use (2) AA, UM3 or R06 type alkaline batteries.

Replace two batteries at the same time.

Do not use a new battery with a used battery.

Avoid contact with water or liquid.

Do not expose the remote control to moisture, or heat.

Do not drop the remote control.

If a battery has leaked on the remote control, carefully wipe case clean and install new batteries.

Risk of explosion if battery is replaced by an incorrect type. 

Dispose of used batteries according to the instructions.  

Pull up the lid
and remove it.

Remove the battery
compartment lid.

Slide the batteries
into  compartment.

Replace the compartment lid.

Two AA size batteries

For correct polarity (+ and
–), be sure battery
terminals are in contact
with pins in compartment.

Remote Control Batteries Installation

1

2

3

Point the remote control toward the projector (Infrared
Remote Receiver) whenever pressing any button.  Maximum
operating range for the remote control is about 16.4’ (5m)
and 60° in front  of the projector.

16.4’
(5 m)

Operating Range

60°

* When the batteries of the remote control are replaced, the remote

control code automatically returns to the initial code (Code 2)(p43).

Содержание PLV-Z1

Страница 1: ...Multimedia Projector MODEL PLV Z1 PLV Z1BL Owner s Manual ...

Страница 2: ...ion Menu Operation 38 Image Level Adjustment 39 Screen Size Adjustment Direct Operation 41 Screen Size Adjustment Menu Operation 41 Setting 42 Lamp Replacement 44 Lamp Replace Counter 45 Warning Temp Indicator 46 Air Filter Care and Cleaning 46 Cleaning the Projection Lens 46 Troubleshooting 47 Indicators and Projector Condition 48 Technical Specifications 49 Dimensions 50 Configuration of Termina...

Страница 3: ...f the problem still persists contact the sales dealer where you purchased the projector or the service center SAFETY PRECAUTIONS WARNING TO REDUCE THE RISK OF FIRE OR ELECTRIC SHOCK DO NOT EXPOSE THIS APPLIANCE TO RAIN OR MOISTURE This projector produces intense light from the projection lens Do not stare directly into the lens as it could possibly damage your eyes Be especially careful that child...

Страница 4: ...cabinet slots as they may touch dangerous voltage points or short out parts that could result in a fire or electric shock Never spill liquid of any kind on the projector This projector should be operated only from the type of power source indicated on the marking label If you are not sure of the type of power supplied consult your authorized dealer or local power company Do not overload wall outle...

Страница 5: ...lens and cabinet When the projector is not in use for an extended period put it into a suitable case NOTE Moving the projector from a cool temperature location to a warm temperature location may result in moisture condensation on the Projection lens In such an event leave the projector OFF and wait until condensation disappears Installing the Projector in a Proper Position Install the projector in...

Страница 6: ...s listed by the Underwriters Laboratories UL and certified by the Canadian Standard Association CSA AC Power Cord has a grounding type AC line plug This is a safety feature to be sure that the plug will fit into the power outlet Do not try to defeat this safety feature Should you be unable to insert the plug into the outlet contact your electrician GROUND THE SOCKET OUTLET SHOULD BE INSTALLED NEAR...

Страница 7: ...tral conductor To reduce risk of electrical shock do not plug into any other type of power system Consult your authorized dealer or service station if you are not sure of the type of power being supplied Connect a projector with all peripheral equipment before turning a projector on Refer to page 11 17 and 18 for connection CAUTION For safety unplug AC Power Cord when the projector is not in use W...

Страница 8: ...guage Menu Display Operation menu is displayed in English German French Italian Spanish Portuguese Dutch Swedish Russian Chinese Korean or Japanese One Touch Auto PC Adjustment Incoming computer video signals are recognized and the best adjustment is automatically set by Auto PC Adjustment No complicated setup is necessary and projection is always precise Illumination Buttons The Remote Control em...

Страница 9: ...GHT LENS SHIFT RING UP DOWN CAUTION This projector is equipped with Cooling Fans for protection from overheating Pay attention to the following to ensure proper ventilation and avoid a possible risk of fire and malfunction Do not cover vent holes Keep back and bottom clear of any object Obstructions may block cooling air CAUTION Do not put heat sensitive objects on the top AIR INTAKE VENTS ...

Страница 10: ...Do not touch this area including the top cabinet especially screws and metallic parts This area will become hot while the projector is used This projector detects internal temperature and automatically controls speed of Cooling Fans EXHAUST VENTS POWER CORD CONNECTOR TERMINALS AND CONNECTORS LAMP COVER ADJUSTABLE FEET AND FEET LOCK LATCHES AIR INTAKE VENTS AND AIR FILTERS MAIN ON OFF SWITCH AIR IN...

Страница 11: ...video output from video equipment to VIDEO jack Refer to page 17 VIDEO INPUT JACK VIDEO Connect the component video outputs to Y Pb Cb and Pr Cr jacks Refer to page 17 COMPONENT VIDEO INPUT JACK Y Pb Cb Pr Cr Terminal This projector uses a micro processor to control this unit and occasionally this micro processor may malfunction and need to be reset This can be done by pressing the RESET button wi...

Страница 12: ...management mode p43 Becomes dim when the projector is turned on And it is bright when the projector is in stand by mode Turns yellow when the life of the projection lamp draws to an end p44 Flashes red when internal projector temperature is too high p46 Used to select input source p24 31 Used to select an item or adjust value in the on screen menu They are also used to pan the image in Digital zoo...

Страница 13: ...reen menu They are also used to pan the image in Digital zoom mode p41 POINT BUTTONS SCREEN BUTTON Used to select screen size p30 41 LIGHT BUTTON Used to light the following buttons for about 10 seconds LIGHT ON OFF AUTO MENU SCREEN INPUT and IMAGE NO SHOW BUTTON Used to turn the picture into black image p21 KEYSTONE BUTTONS Used to correct the keystone distortion p21 42 To insure safe operation p...

Страница 14: ...e Dispose of used batteries according to the instructions Pull up the lid and remove it Remove the battery compartment lid Slide the batteries into compartment Replace the compartment lid Two AA size batteries For correct polarity and be sure battery terminals are in contact with pins in compartment Remote Control Batteries Installation 1 2 3 Point the remote control toward the projector Infrared ...

Страница 15: ...ration or the remote control Refer to page 21 and 42 3 CAUTION Tilt the projector within the adjustable range in order not to shorten the life of the lamp Proper angle should be taken Refer to page 5 This projector is designed to project on a flat projection surface The projector can be focused from 3 6 1 1m 19 7 6 0m Refer to the figure below to adjust a screen size 40 100 150 200 169 125 83 31 1...

Страница 16: ...er to the figures below Moving the Lens UPPERMOST LENS SHIFT RING LEFT RIGHT Turn the lens shift ring left right left right to move the lens leftward rightward Turn the lens shift ring up down up down to move the lens upward downward LENS SHIFT RING UP DOWN DOWNMOST LEFTMOST RIGHTMOST LENS SHIFT UP DOWN LENS SHIFT LEFT RIGHT 25 25 NOTE The best image is generally obtained at the center without the...

Страница 17: ...able the power cords of both the projector and the external equipment should be disconnected from AC outlet S VIDEO Y Pb Cb Pr Cr VIDEO Component video output equipment such as DVD player or high definition TV source Composite Video Output Component Video Output Y Pb Cb Pr Cr Video Cable RCA x 3 Connecting to Video Equipment Connect these 3 jacks properly COMPUTER IN RGB Scart 21 pin Output Scart ...

Страница 18: ...ction NOTE When connecting the cable the power cords of both the projector and the external equipment should be disconnected from AC outlet Turn the projector and peripheral equipment on before the computer is switched on MAC Adapter Set slide switches according to the chart VGA Cable HDB 15 pin MAC Adapter When connecting to Macintosh computer option Terminals of the Projector Set switches as sho...

Страница 19: ...e AC Power Cord Do not disconnect the AC Power Cord before the READY indicator lights green Power off Message disappears after 4 seconds Basic Operation OFF ON Open the front cover MAIN ON OFF switch When the WARNING TEMP indicator flashes red the projector is automatically turned off Wait at least 5 minutes before turning on the projector again Refer to the section Warning Temp Indicator on page ...

Страница 20: ...Adjustment Focus Adjustment Move the ZOOM LEVER upward to make the image larger Move the ZOOM LEVER downward to make the image smaller Rotate the FOCUS RING to adjust the projected picture focus FOCUS RING WIDE TELE ZOOM LEVER ...

Страница 21: ...the POINT DOWN button If a projected picture has keystone distortion correct the image with Keystone Adjustment Basic Operation The arrows are white when there is no correction The arrow disappears at the maximum correction The direction of the arrow being corrected turns purple Press the NO SHOW button on the remote control to black out the image To restore to normal press the NO SHOW button agai...

Страница 22: ...OINT RIGHT button to enter the sub menu The selected icon turns yellow 3 2 Sub menu Press the SELECT button to activate the item that you have selected SELECT BUTTON Press the POINT LEFT button to go on or adjust values POINT LEFT BUTTON Press the POINT RIGHT button to go on or adjust values POINT RIGHT BUTTON WARNING TEMP LAMP REPLACE READY LAMP MENU INPUT ON OFF SELECT MENU SCREEN SELECT TOP CON...

Страница 23: ...p mode Remote control and Lamp counter reset Refer to page 42 INPUT SOURCE SELECTION select input source either Computer or Video Auto Video S Video Y Pb Cb Pr Cr Refer to page 31 COMPUTER SYSTEM SELECTION select computer system available Refer to page 32 IMAGE LEVEL SELECTION select image level from Standard Real and Image 1 4 Refer to page 38 IMAGE LEVEL ADJUSTMENT adjust Contrast Brightness Col...

Страница 24: ...its performance KEYSTONE NO SHOW IMAGE INPUT 1 2 3 4 IMAGE AUTO VIDEO S VIDEO COMPO COMPONENT VIDEO REMOTE CONTROL INPUT BUTTON AUTO VIDEO S VIDEO COMPO BUTTON INPUT button AUTO VIDEO S VIDEO COMPO button When selecting the AUTO the projector automatically detects incoming video signal and adjusts itself to optimize its performance The projector selects connection in the following order 1st Y Pb C...

Страница 25: ...to enter the sub menu Choose the Video with the POINT UP DOWN button and press the POINT RIGHT button The source selection menu appears 1 2 Source Selection menu VIDEO Input Source Selection menu Move the pointer to the source that you want to select with the POINT UP DOWN button and press the SELECT button Close the source selection menu 3 pointer Close the source selection menu Input Source Sele...

Страница 26: ...roduce proper video image select a specific component video system among 480i 575i 480p 575p 720p 1035i and 1080i Auto COMPONENT VIDEO SIGNAL FORMAT Video System Selection Video S Video Video System Selection Y Pb Cb Pr Cr The projector automatically detects incoming video system and adjusts itself to optimize its performance However when video system is PAL M or PAL N select either PAL M or PAL N...

Страница 27: ...e level adjusted for the picture with fine tone Cinema User preset picture adjustment in Image Level Adjustment menu p28 29 IMAGE 1 4 Image Level Selection menu Image Level Selection Direct Operation Select the image level among Standard Cinema Image 1 Image 2 Image 3 and Image 4 by pressing the IMAGE button on the remote control See the next section Image Level Selection Menu Operation about each...

Страница 28: ...Image Level Adjustment Press the SELECT button at this icon to display other items Press the SELECT button at this icon to close the item Image Level Adjustment menu 3 To store the adjustment data select the Store with the POINT UP DOWN button and press the POINT RIGHT button Select the Store 4 Choose one of the positions from Image Level 1 to 4 where you want to store with the POINT UP DOWN butto...

Страница 29: ...IGHT button to deepen red tone From 0 to 63 White balance Red Press the POINT LEFT button to lighten green tone and the POINT RIGHT button to deepen green tone From 0 to 63 White balance Green Press the POINT LEFT button to lighten blue tone and the POINT RIGHT button to deepen blue tone From 0 to 63 White balance Blue NOTE Tint cannot be adjusted when the video system is PAL SECAM PAL M or PAL N ...

Страница 30: ...Choose the item that you want to set with the POINT UP DOWN button and then press the SELECT button to activate it Screen Size Adjustment menu Press the SELECT button at this icon to activate the item Screen Size Adjustment menu Provides an image to fit width of screen by expanding the image width uniformly This function can be used for providing a squeezed video signal at wide video aspect ratio ...

Страница 31: ...deo WARNING TEMP LAMP REPLACE READY LAMP MENU INPUT ON OFF SELECT NO SHOW IMAGE INPUT 1 2 IMAGE AUTO VIDEO VIDEO TOP CONTROL REMOTE CONTROL INPUT BUTTON INPUT button Close the Input Source Selection menu Source Selection menu Move the pointer to the source that you want to select with the POINT UP DOWN button and press the SELECT button To select computer input select the RGB To select RGB Scart 2...

Страница 32: ...input from the connected computer Make sure the connection of the computer and the projector is set correctly Refer to the Troubleshooting section on page 47 Auto Computer System Selection menu Press the MENU button and the main menu appears Select the Computer System Selection menu with the POINT UP DOWN button and then press the POINT RIGHT button to enter the sub menu Choose the system that you...

Страница 33: ...4 x 768 61 00 75 70 XGA 15 1024 x 768 35 522 86 96 Interlace 46 90 58 20 XGA 8 1024 x 768 47 00 58 30 XGA 9 1024 x 768 58 03 72 00 SXGA 1 1152 x 864 63 48 79 35 36 00 87 17 Interlace 64 20 70 40 SXGA 11 1152 x 900 SXGA 13 1280 x 1024 SXGA 14 1280 x 1024 61 20 65 20 50 00 86 00 Interlace 720p 50 00 94 00 Interlace 45 00 60 00 Progressive XGA 1 1024 x 768 XGA 2 1024 x 768 575p XGA 4 1024 x 768 48 36...

Страница 34: ...tment follow the step 3 and 4 on page 35 36 Once the parameters are memorized the setting can be done just by selecting Mode in the Computer System Selection menu NOTE The Fine sync Total dots Horizontal and Vertical of some computers cannot be fully adjusted with this Auto PC Adjustment function When the image is not provided properly through this function manual adjustments are required Refer to...

Страница 35: ...c computer whenever you use it Computer Adjustment menu Press POINT LEFT RIGHT button to adjust the value Press the MENU button and the main menu appears Select the Computer Adjustment menu with the POINT UP DOWN button and then press the POINT RIGHT button to enter the sub menu 1 2 Choose the item that you want to adjust and then press the POINT LEFT RIGHT button to adjust the value The Fine sync...

Страница 36: ...rtical picture position Press the POINT LEFT RIGHT button to adjust the position Vertical Press the POINT RIGHT button to show the information of the computer connected Current mode Adjust clamp level When the image has a dark bar s try this adjustment Clamp Press the POINT RIGHT button at the Current mode icon to show the information of the computer connected Current mode This Mode has parameters...

Страница 37: ...GHT button Choose one of the Mode 1 to 5 and press the SELECT button Reset all adjustment before the data is stored The Reset does not work for the stored data Mode free To clear the adjustment parameters previously set select the Mode free and press the POINT RIGHT button Choose the mode that you want to clear and then press the SELECT button NOTE The Display area Display area H V and Full screen...

Страница 38: ...on of halftones This adjustment is suitable for providing better image in brighter place Real User preset picture adjustment in the Image Level Adjustment menu p39 40 IMAGE 1 4 Image Level Selection menu The level being selected Image Level Selection Direct Operation Select the image level among Standard Real Image 1 Image 2 Image 3 and Image 4 by pressing the IMAGE button on the remote control Se...

Страница 39: ...Image Level Adjustment Press the SELECT button at this icon to display other items Press the SELECT button at this icon to close the item Image Level Adjustment menu 3 To store the adjustment data select the Store with the POINT UP DOWN button and press the POINT RIGHT button Select the Store 4 Choose one of the positions from the Image Level 1 to 4 where you want to store with the POINT UP DOWN b...

Страница 40: ...d Press the POINT LEFT button to lighten green tone and the POINT RIGHT button to deepen green tone From 0 to 63 White balance Green Press the POINT LEFT button to lighten blue tone and the POINT RIGHT button to deepen blue tone From 0 to 63 White balance Blue When this function is ON it automatically enhances contrast of bright and dark part of image When this function is ON it produces more vivi...

Страница 41: ...ECT button at this icon to activate the item Screen Size Adjustment menu Provides an image to fit the horizontal size of the screen Full Provides image in its original size When the original image size is larger than screen size 964 X 544 this projector enters Digital zoom automatically True Screen Size Adjustment Menu Operation NOTE The Screen Size Adjustment menu cannot be operated when 1035i HD...

Страница 42: ...o signal message Wait a moment message Blue back When this function is On the projector produces a blue image while input signal is not detected When pressing the SELECT button at the Language the Language menu appears Press the MENU button and the main menu appears Select the Setting menu with the POINT UP DOWN button and then press the POINT RIGHT button to enter the sub menu 1 2 Choose the item...

Страница 43: ...e control code automatically returns to the initial code Code 2 Time left until the lamp goes off Ceiling When this function is On picture is top bottom and left right reversed This function is used to project the image from a ceiling mounted projector Rear When this function is On picture is left right reversed This function is used to project the image to a rear projection screen Logo When this ...

Страница 44: ...AMP REPLACE RE READY LAMP MENU INPUT ON OFF SELECT CAUTION Turn off the projector and disconnect AC plug Allow the projector to be cooled for at least 45 minutes Remove 2 screws with a screwdriver and pull out the Lamp assembly by grasping the handle 1 3 Replace the Lamp assembly with a new one and tighten the 2 screws back into position Make sure that the Lamp assembly is set properly Replace the...

Страница 45: ...s that the lamp should be replaced i e if the LAMP REPLACE INDICATOR lights up replace the lamp with a new one IMMEDIATELY after the projector has cooled down Follow carefully the instructions in the Lamp Replacement section of this manual Continuous use of the lamp with the LAMP REPLACE INDICATOR lighted may increase the risk of lamp explosion A Lamp may explode as a result of vibration shock or ...

Страница 46: ...ower Cord from the AC outlet Turn over the projector and remove the Air filter by pulling the latch upward 1 2 The removable Air filter prevents dust from accumulating on the surface of the projection lens and projection mirror Should the Air filter become clogged with dust particles it will reduce the cooling fans effectiveness and may result in internal heat build up and adversely affect the lif...

Страница 47: ...on screen is at least 3 6 1 1m from the projector Check the projection lens to see if it needs cleaning NOTE Moving the projector from a cool temperature location to a warm temperature location may result in moisture condensation on the Projection Lens In such an event leave the projector OFF and wait until condensation disappears Picture is Left Right reversed Check Ceiling Rear function See the ...

Страница 48: ...ndicators for projector condition The projector is ON Red Light Dim Light Green Light Off The projector is OFF The MAIN ON OFF switch is off AC Power Cord is disconnected or the front cover is closed Red Flashing Off The temperature inside the projector is abnormally high Flashing stops when the temperature returns to normal The projector cannot be turned on until the indicator goes off The projec...

Страница 49: ...Lens Throw Distance Projection Lamp Video Input Jacks VGA HDB 15 Terminal x 1 Computer Input Terminal 0 to 11 8 Feet Adjustment Power Source AA UM3 or R06 Type x 2 Operating Range 16 4 5m 30 Dimensions 1 85 x 1 18 x 6 26 47mm x 30mm x 159mm Net Weight 4 4oz 125g including batteries Remote Control 480i 480p 575i 575p 720p 1035i and 1080i High Definition TV Signal AC 100 120 V 2 4 A Max Ampere 50 60...

Страница 50: ...50 Appendix WARNING TEMP LAMP LAMP REPLACE READY LAMP LAMP MENU INPUT ON OFF SELECT Unit inch mm 13 11 333 9 70 246 5 4 27 108 5 11 8 Max Dimensions ...

Страница 51: ...rt sync Reserved 9 13 10 12 11 14 15 Pin Configuration Terminal Mini DIN 8 PIN 1 2 3 4 5 8 7 6 Pin Configuration SERVICE PORT CONNECTOR R X D GND RTS CTS T X D GND GND Serial 1 2 3 4 5 6 7 8 Optional Parts The parts listed below are optionally supplied When ordering those parts give name and Type No of it to the sales dealer MAC Adapter Type No POA MACAP SCART VGA Cable Type No POA CA SCART This c...

Страница 52: ...Printed in Japan Part No 610 304 8642 1AA6P1P3626A M4JAB SANYO Electric Co Ltd ...

Отзывы: