background image

GB-26

[ENGLISH]

Selecting the action Windows is to take

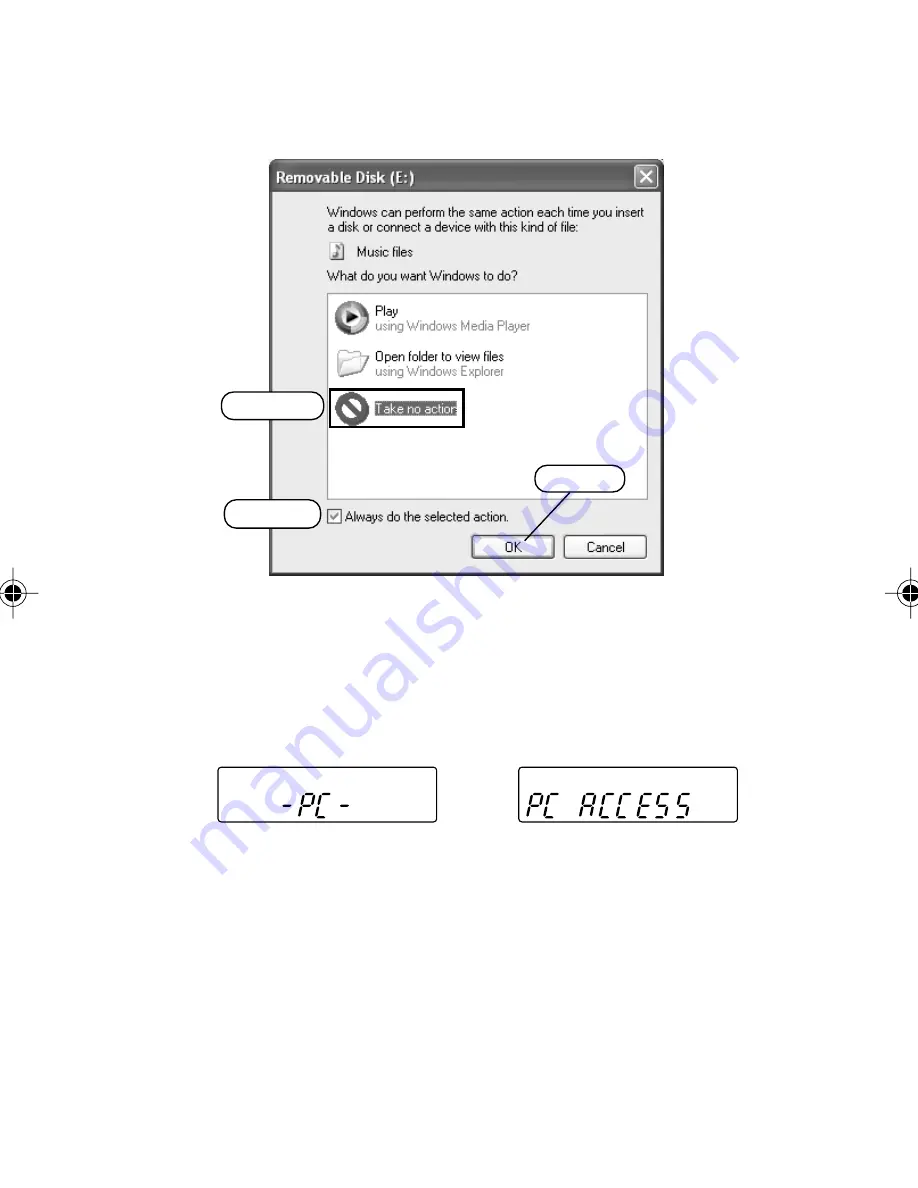
After connection, the following screen will appear (Windows XP only).
-

For Windows98/98SE/ME/2000, this operation is not needed.

The screen shots are of Windows XP.

Adjust your settings to match your PC’s environment.
In this manual, [Take no action] is selected, [Always do the selected action] is
checked, and [OK] is clicked. This completes the connection to the PC.

When connected to the PC, the unit display will be as shown below and none
of the operating buttons will work.

Before disconnecting the unit from the PC, be sure to follow the steps on the
next page. Do not disconnect during data transfer.

Connected to PC

Transmitting to/from PC

3) Click

1) Select

2) Check

Содержание ICR-S240RM

Страница 1: ...ICR S240RM ICR S250RM GB English D Deutsch F Français NL Nederlands Digital Voice Recorder INSTRUCTION MANUAL ...

Страница 2: ...istered trademarks or trademarks of the respective development manufacturers The symbols TM and are not shown in this manual SANYO takes no responsibility for recording failure due to power cuts or damage to the unit To avoid potential risk of data loss caused by accidental operation or malfunction of the unit we recommend that you save a backup copy of your recorded messages on a PC etc Recording...

Страница 3: ...uch instances the instruction manual may not entirely match all the functions of the actual product Therefore the actual product and packaging as well as the name and illustration may differ from the manual The screen LCD display shown as an example in this manual may be different from the actual screen LCD display Accessories Original USB connection cable x 1 USB driver CD ROM x 1 Headphones x 1 ...

Страница 4: ... Hold switch b HOLD 6 Speaker 7 Battery compartment lid 8 USB terminal protector 9 USB terminal 10 Record button m REC 11 Stop Menu button n STOP MENU 12 LCD display 13 Index button INDEX 14 Erase button ERASE 15 Folder Repeat button FOLDER RPT 16 Built in stereo microphones L R 17 Headphones socket Controls 17 1 2 3 4 5 15 14 13 11 12 10 6 7 9 8 16 ...

Страница 5: ...GLISH LCD display 1 Battery 2 Record 3 Recording mode 4 Timer 5 Alarm 6 VAS Voice activated system 7 Microphone sensitivity 8 Repeat Random A B Repeat 9 AM PM 10 Time Message Mode display 9 10 8 7 6 5 4 3 2 1 ...

Страница 6: ...e with all applicable laws Note The date and time initialized on the LCD display will begin to blink when you perform the following Set the date and time See page 8 Turning on the power for the first time since purchasing this product Inserting a battery and turning on the power after removing a battery and leaving this product for an extended period of time When the date and time settings are era...

Страница 7: ...ll the USB cover stand when using it under the condition that this opportunity is made Note Be sure to install the USB cover stand when using it under the condition that this opportunity is made It becomes unstable and fall and sometimes causes a trouble when it is made the condition that this opportunity is made without installing the USB cover stand Keep the removed USB protection cover carefull...

Страница 8: ... for more than 15 minutes turns off the power after creating the recorded file Hold function This prevents operation from stopping by accidentally pressing a button Set the b HOLD switch to the left The hold function is engaged If an operation button is pressed while the hold function is engaged HOLd ON will appear and nothing else happens Set the b HOLD switch to the right HOLd OFF appears and th...

Страница 9: ...Press the Jog switch The second stage menu appears 4 Move the Jog switch up or down to select CALENdAR The unit enters the date and time setting mode 5 Press the Jog switch The year display blinks 6 Move the Jog switch up or down to select the year Then press the Jog switch The month display blinks 7 Set the month day hour display 24H or AM PM hour and minute by following step 6 above When the min...

Страница 10: ...High quality 4 hr 20 min stereo SP Standard 8 hr 40 min stereo LP Long 17 hr 25 min monaural Selecting a recording mode 1 In the stop mode press the n STOP MENU button for at least 2 seconds Move the Jog switch up or down to select VOICE then press the Jog switch 2 MovetheJogswitchupordowntoselect REC MOdE 3 Press the Jog switch The selected recording mode blinks 4 Move the Jog switch up or down t...

Страница 11: ...be recorded to it and is instead recorded automatically to the A folder No recording is possible if the A folder is full The unit can record up to 99 files in one folder FILE FULL appears when attempting to record the 100th file To set index mark If the INDEX button is pressed during recording an index mark is made INdEX 1 appears briefly and recording continues Upto32indexmarksforeachfilecanbemad...

Страница 12: ...ed VAS mode appears 4 Move the Jog switch up or down to select ON Then press the Jog switch 5 Press the n STOP MENU button twice 6 Press the m REC button Recording begins when you are speaking into the microphone When dictation stops recording stops Move the Jog switch up or down to set the microphone s sensing level when recording begins The VAS sensing level appears VAS 1 Low VAS 5 High Selectin...

Страница 13: ...splayed playing time may be at variance with the actual playing time Some MP3 WMA files may not be able to be played on this unit Changing playback speed Press the Jog switch during playback The playback speed changes as follows SLOW Slow speed playback v FAST Fast speed playback v Normal speed playback Note This function may not work on some files Fast forward play Move the Jog switch up e during...

Страница 14: ... for the next index point and playback starts from that point Repeat Random playback Only for files in the MUSIC M folder 1 In the stop mode press the n STOP MENU button for at least 2 seconds Move the Jog switch up or down to select MUSIC then press the Jog switch 2 Move the Jog switch up or down to select REPEAT 3 Press the Jog switch The selected mode blinks 4 Move the Jog switch up or down to ...

Страница 15: ...on again to cancel Dividing a file See page 20 Selecting the stereo wide See page 20 Selecting the sound equalizer See page 20 Selecting the bass sound See page 20 Selecting display In the stop mode press the n STOP MENU button repeatedly The display changes as follows In the VOICE A b C d folder Total playing time v Current date time v Remaining recording time v Recorded date time R blinks on the...

Страница 16: ...rasing all files in the selected folder 1 Select the folder to be erased 2 PresstheERASEbuttonforatleast2seconds 3 While the display is blinking press the ERASE button again for at least 2 seconds All the files in the selected folder are erased Note If you do not want to erase press the n STOP MENU button Note Only MP3 WMA files playable on this unit can be erased Erasing files in other formats is...

Страница 17: ...ssages on a PC etc if required 1 In the stop mode press the n STOP MENU button for at least 2 seconds Move the Jog switch up or down to select COMMON then press the Jog switch 2 Move the Jog switch up or down to select FORMAT Then press the Jog switch 3 Move the Jog switch up or down to select ON Then press the Jog switch FORMATINg then COMPLETE appears and all files are erased FORMAT returns 4 Pr...

Страница 18: ... Move the Jog switch up or down to select TIMER Then press the Jog switch 3 Move the Jog switch up or down to select ALM ON Then press the Jog switch The hour display of alarm on time blinks 4 Move the Jog switch up or down to select the hour Then press the Jog switch The minute display blinks Set the minute in the same way 5 Move the Jog switch up or down to select the alarm sound bEEP Beep sound...

Страница 19: ...or down to select the timer recording time 30MIN 60MIN 120MIN or ALL Then press the Jog switch ALL Recording will continue until the n STOP MENU button is pressed or the end of remaining recording time 5 Move the Jog switch up or down to select the recording folder Then press the Jog switch TIMER returns 6 Press the n STOP MENU button twice 7 Turn the power off if required If you want to cancel th...

Страница 20: ...ved the display changes as follows VOICE menu dIVIdE w v REC MOdE w v MIC MOdE w v VAS w v STEREO w v dIVIdE w v dIVIdE cannot be selected when the MUSIC folder is selected MUSIC menu SOUNd EQ w v bASS w v REPEAT w v SOUNd EQ w v COMMON menu bEEP w v CALENdAR w v TIMER w v FORMAT w v REC LEd w v bACk LEd w v SOFT VER w v MENU MOdE w v bEEP w v Then press the Jog switch 4 To change the setting of t...

Страница 21: ...ed parts of files will overlap for a few seconds with files before and after REC MOdE Selecting the recording mode see page 9 MIC MOdE Selecting the microphone sensitivity LO Low sensitivity HI High sensitivity VAS VAS recording see page 11 STEREO Selecting the stereo wide OFF Stereo wide off ON Stereo wide on MUSIC SOUNd EQ Selecting the sound equalizer OFF Normal PO Pop RO Rock JA Jazz bASS Sele...

Страница 22: ...timer see page 17 FORMAT Formatting see page 16 REC LEd Selecting the recording LED ON Rec LED on OFF Rec LED off bACk LEd Selecting the backlight ON Backlight on OFF Backlight off SOFT VER Checking the version number MENU MOdE Selecting the menu mode EXPERT Displays all menu items SIMPLE Displays only basic menu items REC MOdE SOUNdEQ bASS bEEP CALENdAR SOFT VER and MENU MOdE X XX ...

Страница 23: ...port One required for connection Sound board 16 bit Windows compatible sound board supported Other Speakers or headphones required Note Operation is not guaranteed for Macintosh PCs Operation is not guaranteed for the following environments Upgraded Windows environments Windows 95 Windows NT Dual boot Windows environments Standby suspend and other modes may not work properly with your particular e...

Страница 24: ...be liable for any damages arising out of the use of this driver 1 Turn on your PC and Windows is started Do not connect the unit to the PC yet 2 Load the USB driver CD ROM supplied in the CD ROM drive of the PC Stereo Digital Voice Recorder Setup screen appears automatically Note If the screen is not displayed right click Start select Explore Double click Setup exe file in the CD ROM Stereo Digita...

Страница 25: ...is recognized by the PC automatically and the unit is displayed as Removable Disk How to check whether USB driver has installed correctly or not 1 Start menu Settings ControlPanel System SystemProperties Open Device Manager in tab 2 Double click Disk drives double click Hard disk controllers If the following screen is displayed it means USB driver has installed correctly ...

Страница 26: ...es to right and left a stop position is in each If it is made to rotate by force the terminal may be damaged Do not use an USB hub or USB extension cable Operation is not guaranteed Use only the supplied USB connection cable for connection When you connect the unit to the PC for the first time it sometimes may not be recognized as a Removable Disk In this case disconnect the unit and reconnect it ...

Страница 27: ...environment In this manual Take no action is selected Always do the selected action is checked and OK is clicked This completes the connection to the PC When connected to the PC the unit display will be as shown below and none of the operating buttons will work Before disconnecting the unit from the PC be sure to follow the steps on the next page Do not disconnect during data transfer Connected to...

Страница 28: ... For Windows XP 2000 ME Follow the steps below to disconnect The screen shots are of Windows XP The screen might be different for a different OS 1 Right click the Task tray icon at the bottom right of the Windows screen If the icon is not displayed refer to the Windows help 2 Click Safely Remove Hardware displayed 3 Select USB Mass Storage Device and click Stop ...

Страница 29: ...GB 28 ENGLISH 4 Check that SANYO IC Recorder USB Device is in the list select USB Mass Storage Device and click OK 5 Disconnect the unit from your PC ...

Страница 30: ...ed in this manual start up the Windows XP Explorer as follows The screens displayed on your PC may not exactly correspond to those shown in this manual depending on the OS version and manufacturer Click start then right click My Computer and select Explore from the menu that appears Explorer will start up ...

Страница 31: ...e name rules set for folders A through d can be played For example file IC_B_001 MP3 in b folder cannot be played if it is moved to A folder Also keep in mind that changing a file s name will prevent that file from being played on the unit MUSIC_IC folder Files transferred from your PC are stored in this folder There is no set format for file names for files which are transferred but they must be ...

Страница 32: ...s folder stores data files Excel Word etc as a Removable Disk ALARM folder MP3 WMA files played when the alarm sounds are stored in this folder The alarm will sound if there are no files in the ALARM folder Only one file can be played ...

Страница 33: ...USIC_IC folder in the Removable Disk drive Be sure to place the files in the MUSIC_IC folder in the Removable Disk The files cannot be played if they are placed in the VOICE_IC folder 2 Copying files to your PC Select the MP3 WMA files you wish to copy inside the MUSIC_IC folder on the Removable Disk and drag and drop them into a folder of your choice on your PC 1 2 ...

Страница 34: ... version and manufacturer See http www microsoft com windows windowsmedia to download the Windows Media Player Once it is installed select start menu All Programs Windows Media Player to start the programme 1 Click Copy to CD or Device 2 Select Removable Disk the transfer destination from the pull down menu at the bottom of Item on Device on the right hand side and the files will be displayed If t...

Страница 35: ...unit Transfer from your PC to the unit and or playback are impossible in the following cases Music files which are copyright protected Music files purchased over the Internet Note when ripping a CD transferring CD music files to your PC as WMA files Be sure to remove the copyright protection as described below before ripping a CD using Windows Media Player 1 Start up Windows Media Player 2 Select ...

Страница 36: ...PC and or deleting data will cause the transfer rate to slow If this happens turn the unit off and on Some MP3 WMA files may not be able to be played on this unit Any MP3 or WMA files that you transfer and that are not for your own personal enjoyment may not be used without permission from the copyright holder as stipulated by intellectual copyright law ...

Страница 37: ... start playback on the unit The music in the MUSIC_IC folder will be played Enter the drive and file name in the Playlist Use only alphabets and numbers characters Files names must be 200 characters or shorter The order of the voice data cannot be changed This unit is compatible with m3u files Some file formats cannot be designated for playback order To select the playlist 1 Before starting playba...

Страница 38: ...ss the FOLDER RPT button to select the MUSIC M folder 2 Move the Jog switch up or down to select the desired folder Then press the Jog switch 3 PresstheJogswitchagaintostarttheselectedfolderplayback F appears on the display In the stop mode press the FOLDER RPT button to cancel the folder playback Formatting the unit s data Always format data using the unit itself See page 16 Using your PC to do t...

Страница 39: ...VOICE A b C d folder cannot be played The file name is wrong ChangingfilesnamesusingyourPCwillrenderfilesunplayable Return the file name to IC_X folder name _XXX file number MP3 Files in the MUSIC M folder cannot be played correctly or at all The file is not in a playable format Use MP3 WMA format files Files on the PC were not transferred to the MUSIC_IC folder Transfer them to the MUSIC_IC folde...

Страница 40: ...installed properly Check the installation only for Windows98 98SE operating systems see page 23 A network drive has been assigned If a network drive has been assigned the drive letter the letters used as drive names is already taken so the Removable Disk cannot be created Change the network drive assignments and reconnect Talk to your network administrator about reassigning network drives A file c...

Страница 41: ... Do not use benzene thinner or alcohol since they will mar the finish of the surfaces SERVICE UNITED KINGDOM For online support and assistance contact UK Freephone 0800 328 7060 Mon Fri 8am 5pm Outside of UK 44 1582 730 730 Mon Fri 8am 5pm Email dictationsupport sanyo co uk or visit our website www sanyodictation co uk ...

Страница 42: ...16 44 1kHz 32 160kbps Terminals USB Headphones Microphone Output power 10mW 10mW Power source DC 1 5V AAA LR03 HP16 battery x 1 Dimensions W x H x D Approx 31 x 118 5 x 14 7 mm Weight Approx 57 g including battery Specifications subject to change without notice SANYO Electric Co Ltd XE 1AD6P1P2077 BA Änderungen und Ergänzungen dieser Beschreibung Anleitung sind vorbehalten Für den Inhalt wird kein...

Отзывы: