216
English
DVR VIEWER2
1
INTRODUCTION
S
ETTINGS
N
ETW
O
R
K
CO
NT
RO
L
NETW
ORK
O
P
E
RATION
NE
T
W
ORK
S
E
TTINGS
OTHE
R
OPE
RATION
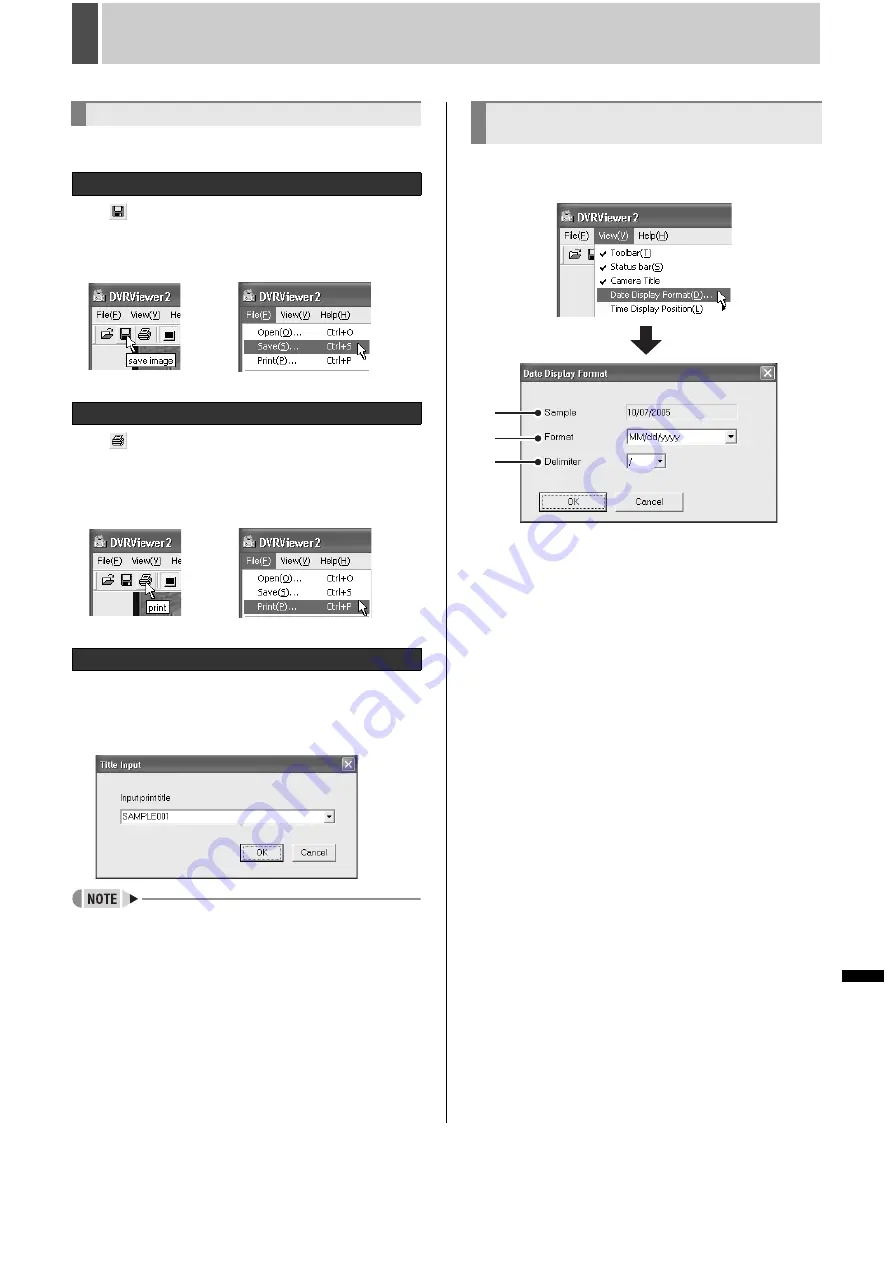
To save or print the image currently being displayed, switch to
“
Full screen display
” and perform the following operations.
Click
in the toolbar or “Save” in the File menu.
The save dialog appears.
Specify the destination folder and file and click [OK]. The
image on the Viewer screen is saved in the bitmap format.
Click
in the toolbar or click “Print” in the File
menu.
The print dialog appears.
Set the printing conditions and click [OK]. The image on the
Viewer screen is printed full size.
Click “Title Input” in the File menu.
The “Title Input” dialog appears. Type the title to be printed in
the input box and click [OK]. The title is displayed at the bottom
of the image when it is printed.
z
The ten most recent input titles are saved which allows you
to choose a title using the pull down menu.
Clicking the “Date Display Format” will display the [Date
Display Format] dialog. Set the format and delimiter and click
[OK].
1
Display format (
indicates default setting)
To set the date display format.
Selections:
MM/dd/yyyy (Month/Day/Year)
dd/MM/yyyy (Day/Month/Year)
yyyy/MM/dd (Year/Month/Day)
2
Delimiter (
indicates default setting)
Selections:
/
(
Slash),
-
(Hyphen),
.
(Period)
3
Sample
When you change the display format or delimiter, the
sample (preview) is updated with the new settings.
Saving and Printing Images
Saving images
Printing Images
Displaying a Title on the Image that is Printed
Setting the Date and Time Display
Format
1
3
2
Содержание DSR-5709P
Страница 158: ......
Страница 159: ...Manual for Remote Operation by Network Connection ...
Страница 235: ......
Страница 236: ...Printed on recycled paper 1AC6P1P3155 L8HBP XE L8HBQ XE 0207TR SY SANYO Electric Co Ltd Printed in Japan ...


