User manual
SNC-331DLNN
_________________________________________________________________________________
- 54 -
•
SN:
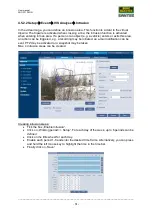
Please select the number of the area (max. 4 areas can be created).
•
Rule name:
You can assign a name to each of the 4 areas.
•
Direction:
Please assign the direction in which to enter the area to trigger an alarm.
o
Abandoned
o
Missing
•
Define the action to be taken if someone enters the area, e.g. start a recording or take
a snapshot, send an e-mail notification, etc.
•
Click on „Draw target“. 2 blue squares are displayed in the video image. You can
change the size and position of each of the squares by grabbing the corners. The
outer (larger) square defines the maximum detection area and the inner (smaller)
square defines the minimum detection area.
•
Click on „Draw rule“. You can now draw the intrusion area. Click and hold the left
mouse key and draw a line. To change the direction and to set a corner, left-click with
the mouse. In this way, you can create the area according to your needs (thus the
area is not restricted to a square). The end point of your area has to meet the starting
point so that a closed area is created. Right-click with the mouse. A message saying “
Drawing is completed” is displayed. You can move the whole area or grab the corners
to edit it.
•
Once you are finished, click on „Save“. The line now becomes blue and cannot be
edited anymore. However, the name and the direction (enter, leave, both) can still be
edited even for a blue area.
By clicking on “Clear“ you can delete the intrusion area.
Note:
The function „Intrusion“ and „Abandoned/Missing“ cannot be activated at the same time.


