background image

79 


6.6.3.


Delete Volume Set   

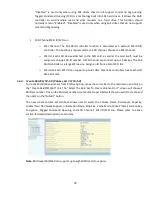
To  delete  a  volume  from  RAID  set,  move  the  cursor  bar  to  the  main  menu  and  click  on  the  “Delete 

Volume Set” link. The “Select The Raid Set To Delete” screen will show all RAID set numbers. Click on a 

RAID set number and the “Confirm The Operation” check box and then click on the “Submit” button to 

show all volume set items in the selected RAID set. Click on a volume set number and the “Confirm The 

Operation” check box and then click on the “Submit” button to delete the volume set.   


6.6.4.


Modify Volume Set   

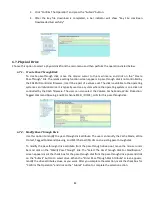
To modify a volume set from a RAID set:   

1.


Click on the “Modify Volume Set” link.   

2.


Click on the volume set check box from the list that you wish to modify.   

3.


Click  on  the  “Submit”  button.  The  following  screen  appears.  Use  this  option  to  modify  the 

volume set configuration. To modify volume set attributes, move the cursor bar to the volume 

set  attribute  menu  on  “Enter  The  Volume  Attribute”  screen  and  then  click  on  the  attribute  to 

modify  the  value.  After  you  complete  the  modification,  click  on  the  “Confirm  The  Operation” 

check box and click on the “Submit” button to complete the action.   


6.6.4.1.


Volume Growth   

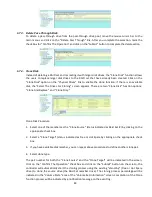
Use “Expand RAID Set" function to add disk to a RAID set. The additional capacity can be used to 

enlarge  the  last  volume  set  size  or  to  create  another  volume  set.  The  “Modify  Volume  Set” 

function  can  support  the  “Volume  Modification”  function.  To  expand  the  last  volume  set 

capacity, move the cursor bar to the “Capacity” item and entry the capacity size. When finished 

the above action, click on the "Submit" button to complete the action. The last volume set starts 

to expand its capacity. If you have free spaces from reserved or delete volumes, you can enlarge 

the last volume set size before the free spaces.   

To expand an existing volume noticed:   


Only the last volume can expand capacity. When expand volume capacity, you can’t modify 

stripe size or modify RAID level simultaneously.   


You can expand volume capacity, but can’t reduce volume capacity size.   

Содержание ES208X12HP

Страница 1: ......

Страница 2: ...implied and provide it as it This includes but is not limited to any implied warranties of merchantability and fitness for a particular purpose The information in this document is subject to change wi...

Страница 3: ...e to radio or television reception which can be determined by turning the equipment off and on the user is encouraged to try to correct the interference by one or more of the following measures Reorie...

Страница 4: ...stallation Tools 10 Personal Safety Instructions 11 Electrostatic Discharge 11 2 4 Installation 11 2 5 Hot plug Drive Replacement 14 2 6 Summary of the installation 14 McRAID Storage Manager 15 ArcHTT...

Страница 5: ...er Installation 60 5 1 For Windows 61 5 2 For Linux 62 5 3 For FreeBSD 64 5 4 For Solaris 10 64 5 5 For Mac OS X 64 5 6 ArcHTTP Configuration 64 6 Web Browser based Configuration 67 6 1 Start up McRAI...

Страница 6: ...03 C 3 Status of BBM 104 C 4 Installation 104 C 5 Battery Backup Capacity 104 C 6 Operation 105 C 7 Changing the Battery Backup Module 105 C 8 Battery Functionality Test Procedure 105 C 9 BBM Specific...

Страница 7: ...6 RAID 0 121 RAID 1 122 RAID 10 1E 122 RAID 3 123 RAID 5 123 RAID 6 123 RAID x0 124 JBOD 124 Single Disk Pass Through Disk 124 Summary of RAID Levels 124...

Страница 8: ...ata and then transfers it out to the host at 12Gb s speeds in order to match the bandwidth between faster hosts and slower SAS or SATA devices Unsurpassed Data Availability Designed and leveraged with...

Страница 9: ...lash image for controller availability Support flash based or battery backup module FBM BBM ready optional RoHS compliant 1 2 1 RAID Features RAID level 0 1 10 1E 3 5 6 30 50 60 Single Disk or JBOD Mu...

Страница 10: ...D VMware only driver package available w o in band management utility Solaris 10 11 x86 x86_64 Mac OS X 10 4 x or higher For latest supported OS listing visit http www sansdigital com 2 Hardware Insta...

Страница 11: ...8644 2 3 Tools Required An ESD grounding strap or mat is required Also required are standard hand tools to open your system s case System Requirement The 12Gb s SAS RAID controller can be installed in...

Страница 12: ...end Before you handle the 12Gb s SAS RAID controller in any way touch a grounded anti static surface such as an unpainted portion of the system chassis for a few seconds to discharge any built up sta...

Страница 13: ...hat includes o MobileSTOR Tower Direct Connect models o TowerSTOR Tower Direct Connect models o EliteSTOR Rackmount Direct Connect models 2 4 5 Adding a FBM BBM Backup Module Optional Please refer to...

Страница 14: ...nual For McRAID storage manager option please refer to Chapter 6 of the user manual Web Browser Based Configuration 2 4 10 Determining the Boot Sequences For PC system 12Gb s SAS RAID controller is a...

Страница 15: ...subsystem if failed drives are inside Available only on SAS expander model 2 5 2 Replacing a Failed Drive With RAID subsystem drive tray you can replace a defective physical drive while your computer...

Страница 16: ...r McRAID storage manager through the PCIe bus you need first to install the ArcHTTP proxy server on your server system If you need additional information about installation and start up of this functi...

Страница 17: ...oller is already installed in the host system no extra connection is necessary Just load the necessary in band Sans Digital SNMP extension agent for the controllers Before launching the SNMP agent in...

Страница 18: ...nu press ESC to skip configuration immediately When activated the McBIOS RAID manager window appears showing a selection dialog box listing the SAS RAID controllers that are installed in the system Th...

Страница 19: ...and automatically display the appropriate RAID level from which the user can select For the Raid Set Function configuration option the user can use the Create Hot Spare option to define the hot spare...

Страница 20: ...or the current volume set are then displayed 4 Use the UP and DOWN arrow keys to select the current volume set stripe size and press the Enter key to confirm This parameter specifies the size of the s...

Страница 21: ...ed RAID set Volume Set Function Create a customized volume set Physical Drives View individual disk information Raid System Function Setup the RAID system configuration Hdd Power Management Manage HDD...

Страница 22: ...et is created it can consume all or a portion of the available disk capacity in this RAID set If you need to add an additional volume set use the main menu Create Volume Set function The total number...

Страница 23: ...w key to set capacity of the volume set and press Enter key to accept this value If the volume set uses only part of the RAID set capacity you can use the Create Volume Set option in the main menu to...

Страница 24: ...re than Quick Volume Raid Setup configuration Select Raid Set Function to manually configure the RAID set for the first time or delete existing RAID sets and reconfigure the RAID set 3 7 2 1 Create Ra...

Страница 25: ...or the RAID set The default RAID set name will always appear as Raid Set 5 Repeat steps 3 to define another RAID sets Note To create RAID 30 50 60 volume you need create multiple RAID sets up to 8 RAI...

Страница 26: ...size Follow the instruction presented in the Modify Volume Set to modify the volume sets operation system specific utilities may be required to expand operating system partitions Note Once the Expand...

Страница 27: ...n is used to activate the RAID set after one of its disk drive was removed in the power off state When one of the disk drives is removed in power off state the RAID set state will change to Incomplete...

Страница 28: ...sk drive is rebuild automatically on the dedicated hot spare disk 3 7 2 7 Delete Hot Spare Select the target hot spare disk to delete by clicking on the appropriate check box Press the Enter key to se...

Страница 29: ...olume sets can exist on a RAID set If multiple volume sets reside on a specified RAID set all volume sets will reside on all physical disks in the RAID set Thus each volume set on the RAID set will ha...

Страница 30: ...After completed the modification of the volume set press the Esc key to confirm it An Initialization Mode screen appears Initialization Mode Select Foreground Faster Completion for faster initializati...

Страница 31: ...he maximum available volume size is the default value for the first setting Enter the appropriate volume size to fit your application The capacity value can be increased or decreased by the UP and DOW...

Страница 32: ...t cannot be converted to Dynamic Disk because 4k sector size is not a standard format Stripe Size This parameter sets the size of the stripe written to each disk in a RAID 0 1 1E 10 5 or 6 logical dri...

Страница 33: ...CSI ID number A SCSI channel can connect up to 15 devices It is necessary to assign a SCSI ID to each device from a list of available SCSI IDs SCSI LUN Each SCSI ID can support up to 8 LUNs Most SAS c...

Страница 34: ...ect IO cache policies apply to read on a specific virtual disk The volume IO mode options are as follows 1 Cache IO Specifies that all reads are buffered in the controller cache memory 2 Direct IO Spe...

Страница 35: ...when using SAS drives that do not support command tag queuing 3 7 3 2 Create Raid30 50 60 Volume Set 30 50 60 To create 30 50 60 volume set from RAID set group move the cursor bar to the main menu and...

Страница 36: ...then press the Enter key The Volume Set Functions menu will show all RAID set items Move the cursor bar to a RAID set number item then press the Enter key to show all volume set items Select the volum...

Страница 37: ...area of the Volume Set Information screen Note Power failure may damage the migration data Please backup the RAID data before you start the migration process 3 7 3 5 Check Volume Set Use this option...

Страница 38: ...al disk and perform the operations listed above Move the cursor bar to an item then press Enter key to select the desired function 3 7 4 1 View Drive Information When you choose this option the physic...

Страница 39: ...er key The Physical Drive Function menu will show all pass through drive number options Move the cursor bar to the desired number and then press the Enter key to show all pass through disk attributes...

Страница 40: ...els To prevent removing the wrong drive the selected disk fault LED indicator will light for physically locating the selected disk when the Identify Selected Device is selected 3 7 4 8 Identify Enclos...

Страница 41: ...rol the SAS RAID controller beeper Select Yes and press the Enter key in the dialog box to turn the beeper off temporarily The beeper will still activate on the next event 3 7 5 2 Alert Beeper Setting...

Страница 42: ...in both the Enter New Password and Re Enter New Password column The existing password will be cleared No password checking will occur when entering the main menu 3 7 5 4 JBOD RAID Function JBOD is an...

Страница 43: ...t Enabled When Enabled the drive s read ahead cache algorithm is used providing maximum performance under most circumstances 3 7 5 8 Volume Data Read Ahead The volume read data ahead parameter specifi...

Страница 44: ...fault LED light ON or OFF when there is no HDD installed When each slot has a power LED for the HDD installed identify user can set this option to OFF Choose option ON the SAS RAID controller will lig...

Страница 45: ...shows how to change the McBIOS RAID manager setting to disable the warning beeper function 3 7 5 12 Auto Activate Raid Set When some of the disk drives are removed in power off state or boot up stage...

Страница 46: ...s from different vendors are more likely to be usable as spares for one another Drive truncation slightly decreases the usable capacity of a drive that is used in redundant units The controller provid...

Страница 47: ...nter key The More System Functions menu will show multiple items Move the cursor bar to an item then press Enter key to select the desired function 3 7 6 1 Smart Option For HDD This option is used to...

Страница 48: ...the RAID array before which has no RAID signature on it So when a previously removed disk is self re inserted it won t trigger the degraded RAID array to rebuild and so that the administrator has a c...

Страница 49: ...es to come ready at the optimum time without straining the system power supply Staggering drive spin up in a multiple drive environment also avoids the extra cost of a power supply designed to meet sh...

Страница 50: ...Ethernet port and HTTP service to function these functions are built into the controller firmware Move the cursor bar to the main menu Ethernet Configuration Function item and then press the Enter ke...

Страница 51: ...your client computers manually no DHCP make sure that the assigned IP address is in the same range as the default router address and that it is unique to your private network However it is highly reco...

Страница 52: ...umber of the controller move the cursor bar to the main menu Ethernet Configuration function item and then press Enter key The Ethernet Configuration menu appears on the screen Move the cursor bar to...

Страница 53: ...o view the SAS RAID controller s system events information move the cursor bar to the main menu and select the View System Events link then press the Enter key The SAS RAID controller s events screen...

Страница 54: ...display controller name firmware version BOOT ROM version SAS firmware version serial number main processor CPU instruction cache and data cache size system memory and current IP address To check the...

Страница 55: ...User s Manual The following procedures detail installing the SAS RAID controller driver while installing Windows 8 Server 2012 7 2008 Vista XP 2003 Have your bootable Microsoft Windows CD and follow...

Страница 56: ...ailable drive letter to it and then it will appear in Windows Explorer 4 1 2 Installing Controller on an Existing Windows In this scenario you are installing the controller in an existing Windows syst...

Страница 57: ...trol Panel and start the Add Remove Program icon and uninstall and software for the SAS RAID controller 3 Go to Control Panel and select System Select the Hardware tab and then click the Device Manage...

Страница 58: ...ease refer to the readme txt file on the SAS RAID controller software CD or website to make driver diskette and install driver to the system 4 4 Driver Installation for Solaris This chapter describes...

Страница 59: ...e background that allows capturing of events for mail and SNMP traps notification Refer to the section 5 6 ArcHTTP Configuration for details about the mail and SNMP traps configuration Command Line In...

Страница 60: ...reate a volume through McRAID storage manager the Mac OS X recognizes that a new disk is avail and displays a message asking what you next want to do If the message does not show up start the Disk Uti...

Страница 61: ...ed before they are ready to use The user interface for these tasks can be accessed through the built in configuration that resides in the controller s firmware It provides complete control and managem...

Страница 62: ...RAID storage manager directly 5 1 For Windows You must have administrative level permissions to install SAS RAID software This procedure assumes that the SAS RAID hardware and Windows are installed an...

Страница 63: ...ure the System Function of ArcHTTP please refer to section 5 6 ArcHTTP Configuration 5 2 For Linux You should have administrative level permissions to install SAS RAID software This procedure assumes...

Страница 64: ...wise it will use the setting in the archttpsrv conf or default 81 This is the port address assigning for the ArcHTTP configuration Cfg Assistant Such as archttp64 1553 b ArcHTTP server console started...

Страница 65: ...Insert the SAS RAID controller software CD in the CD ROM drive 2 Login as root Copy CD ROM PACKAGES FreeBSD http ArcHTTP file to a local directory The next steps are same as Linux Please see section 5...

Страница 66: ...methodology for setting this up in the SMTP Server Configurations 1 SMTP Server Configuration SMTP Server IP Address Enter IP address of the SMTP server to configure your mail program correctly Ex 192...

Страница 67: ...MP extension agent on the host If SNMP manager requests to query the SNMP information from RAID storage please refer the Appendix D SNMP Operation Installation To set up SNMP traps sending function cl...

Страница 68: ...l need to install the controller card to the computer If you need to boot up the operating system from a RAID volume set you must first create a RAID volume by using McBIOS RAID manager Please refer t...

Страница 69: ...y When you click on the ArcHTTP from MRAID icon it shows all RAID controllers available on the host system and create an individual RAID controller icon located on left column of the ArcHTTP Configura...

Страница 70: ...ic software platform independent via standard web browsers directly connected to the 10 100Mbit RJ45 LAN port To configure SAS RAID controller on a remote machine you need to know its IP address Launc...

Страница 71: ...ntroller information The Raid Set Hierarchy can be viewed through the Raid Set Hierarchy item 6 4 Quick Function The Quick Create option configures the arrays with just a few steps Although drives of...

Страница 72: ...ble disk member you can repeat above procedures to define another RAID sets 128 volumes is the default mode for SAS RAID controller the 16 volumes mode is used for support roaming this raidset to SATA...

Страница 73: ...to have chance to modify RAID level or stripe size 4 Follow the instruction presented in the Modify Volume Set to modify the volume sets operation system specific utilities may be required to expand o...

Страница 74: ...ate If the user wants to continue to operate the controller without power off the SAS RAID controller the user can use the Activate Incomplete Raid Set option to active the RAID set After the user com...

Страница 75: ...the target hot spare disk to delete by clicking on the appropriate check box Click on the Confirm The Operation check box and click on the Submit button on the screen to delete the hot spares 6 5 9 R...

Страница 76: ...The maximum addressable size of a single volume set is not limited to 2TB because the controller is capable of 64 bit LBA mode However the operating system itself may not be capable of addressing mor...

Страница 77: ...tialization the initialization proceeds as a background task the volume set is fully accessible for system reads and writes The operating system can instantly access to the newly created arrays withou...

Страница 78: ...l be hidden by algorithm developed by Sans Digital With this scramble process no one can see and access into the hidden volume data without access key The RAID adapters support 128 and 256 bit encrypt...

Страница 79: ...D controller is a large SCSI device Assign an ID from a list of SCSI IDs o SCSI LUN Each SCSI ID can support up to 8 LUNs Most SAS controllers treat each LUN like a SAS disk 6 6 2 Create Raid30 50 60...

Страница 80: ...ter The Volume Attribute screen and then click on the attribute to modify the value After you complete the modification click on the Confirm The Operation check box and click on the Submit button to c...

Страница 81: ...chy screen Note If the volume is RAID level 30 50 or 60 you cannot change the volume to another RAID level If the volume is RAID level 0 1 10 1E 3 5 or 6 you cannot change the volume to RAID level 30...

Страница 82: ...ks are marked those blocks are not used again This is critical and important because a bad disk block can prevent a disk rebuild from completing We strongly recommend that you run consistency checks o...

Страница 83: ...ID firmware The user can also select the Volume Cache Mode Write Protection Tagged Command Queuing and SCSI channel SCSI_ID SCSI_ LUN for this pass through disk 6 7 2 Modify Pass Through Disk Use this...

Страница 84: ...nd Replace and Clone Only Clone Disk Procedure 1 Select one of the members as the Clone Source status indicated as Raid Set by clicking on the appropriate check box 2 Select a Clone Target status indi...

Страница 85: ...6 7 5 Abort Cloning Use this function to stop the ongoing clone disk action 6 7 6 Set Disk To Be Failed It sets a normal working disk as failed so that users can test some of the features and function...

Страница 86: ...e To prevent removing the wrong drive the selected disk fault LED indicator will light for physically locating the selected disk when the Identify Selected Device is selected 6 8 System Controls 6 8 1...

Страница 87: ...r to select the SATA NCQ support Enabled or Disabled HDD Read Ahead Cache Allow Read Ahead Default Enabled When Enabled the drive s read ahead cache algorithm is used providing maximum performance und...

Страница 88: ...be not able to monitor the backplane information Max Command Length Max Command Length is used to set a best IO size for the RAID controller Auto Activate Incomplete Raid When some of the disk drives...

Страница 89: ...ther Drive truncation slightly decreases the usable capacity of a drive that is used in redundant units The controller provides three truncation modes in the system configuration Multiples Of 10G Mult...

Страница 90: ...new option from WD to support RAID features that were traditionally missing from standard desktop drives TLER is a method of signaling the system RAID controller in the event that an error recovery p...

Страница 91: ...ard parsing activities The Amount of Read Ahead parameter is used to allocate an amount of memory in the cache memory the frequently executed queries and return the result set back to the host without...

Страница 92: ...write margin AV stream recording Read And Discard Parity Data This function is used to determine if parity data is to be read and discarded BIOS Selection It combines the Legacy BIOS UEFI BIOS and EF...

Страница 93: ...lected from 0 4 to 6 seconds per step which powers up one drive 6 8 3 2 Time to Hdd Low Power Idle This option delivers lower power consumption by automatically unloading recording heads during the se...

Страница 94: ...ation of IP client configurations for a specific time period called a lease period and to eliminate the work necessary to administer a large IP network To configure the RAID controller Ethernet port m...

Страница 95: ...lative to Coordinated Universal Time UTC via a Global Positioning Service GPS receiver for example Note NTP feature works through onboard Ethernet port You must make sure the Ethernet port is connecte...

Страница 96: ...eper To view the SAS RAID controller s event information click on the View Event Mute Beeper link The SAS RAID controller System events Information screen appears The mute beeper function automaticall...

Страница 97: ...ring the main menu from the initial screen The SAS RAID controller will automatically go back to the initial screen when it does not receive any command in 5 minutes Do not use spaces when you enter t...

Страница 98: ...the fully statistic page 6 9 3 System Information To view the SAS RAID controller s system information move the mouse cursor to the main menu and click on the System Information link The SAS RAID con...

Страница 99: ...12Gb s SAS RAID controller README TXT contains the history information of the software code change in the main directory Read this file first to make sure you are upgrading to the proper binary file...

Страница 100: ...n directly plug an Ethernet cable to the controller LAN port then enter the McBIOS RAID manager to configure the network setting After network setting configured and saved you can find the current IP...

Страница 101: ...OT FIRM and MBR0 through the utility To update the controller firmware follow the procedure below Appendix B Flash based Backup Module AC SAN 1883FBM B 1 Overview The AC SAN 1883FBM kit includes the F...

Страница 102: ...View 2 FBM with Battery Top View Upper View B 4 Status of FBM The following table provides the LED status of the FBM D2 Blue Status D14 Blue Status On Power On Charge Slow Flash 1Hz Off Power Off Char...

Страница 103: ...rear panel behind the selected PCIe slot 3 Insert the FBM in the PCIe slot and press down gently but firmly to ensure that the card is properly seated in the slot 4 Screw the bracket into the computer...

Страница 104: ...ntroller event log make sure the event shows Power On With Battery Backup B 9 FBM Specifications Mechanical Module Dimension W x H x D with battery 64 4 x 16 97 x 127 mm with supercap 64 4 x 18 72 x 1...

Страница 105: ...y backup module Connect the BBM cable to the 14 pin battery connector on the controller 3 You can also use pre drilled holes in their cabinet for securing the BBM using its three mounting positions 4...

Страница 106: ...s battery connector 3 Disconnect the battery pack cable from JP2 on the BBM 4 Install a new battery pack and connect the new battery pack to JP2 5 Connect the BBM to 12Gb s SAS RAID controller s batte...

Страница 107: ...a is organized in a hierarchical data structure called the Management Information Base MIB These MIBs are defined and sanctioned by various industry associations Each type of device on your network ha...

Страница 108: ...is process is known as compiling the MIB into the application This process is highly vendor specific and should be well covered in the User s Guide of your SNMP manager application Ensure the compilat...

Страница 109: ...P Proxy Server Installation section to install it The ArcHTTP proxy server will automatically assign one additional port for setup its configuration If you want to change the archttpsrv conf setting u...

Страница 110: ...e SNMP Trap IP Address 2 SNMP System Configurations Community name acts as a password to screen accesses to the SNMP agent of a particular network device Type in the community names of the SNMP agent...

Страница 111: ...ion Agent Installation The SNMP extension agent on the device is able to return meaningful highly useful information to the SNMP manager The Sans Digital RAID controllers have supported the extension...

Страница 112: ...ck on the Install button to continue 6 A Progress bar appears that measures the progress of the SNMP extension agent setup When this screen completes you have completed the Sans Digital SNMP extension...

Страница 113: ...s This value is case sensitive SNMP Trap Notification Configurations The Community Name should be the same as firmware embedded SNMP Community The SNMP Trap Notification Configurations includes level...

Страница 114: ...M packages FreeBSD SNMP readme txt or download from www sansdigtial com Appendix E Event Notification Configurations The controller classifies disk array events into four levels depending on their sev...

Страница 115: ...n completed Complete Check Warning Volume parity checking completed Create Volume Warning New volume created Delete Volume Warning Volume deleted Modify Volume Warning Volume modified Volume Degraded...

Страница 116: ...ng HTTP Log In Serious a HTTP login detected Telnet Log Serious a Telnet login detected InVT100 Log In Serious a VT100 login detected API Log In Serious a API login detected Lost Rebuilding MigrationL...

Страница 117: ...arrays without requiring a reboot and without waiting for initialization to complete Furthermore the volume set is protected against disk failures while initialing If using Foreground Initialization...

Страница 118: ...onfiguration The unused capacity on the expand RAID set can then be used to create an additional volume set with a different fault tolerance setting if required by the user Online RAID Level and Strip...

Страница 119: ...sed by the operating system without creating a new operating system partition You can use the Diskpart exe command line utility included with Windows Server 2003 or the Windows 2000 Resource Kit to ex...

Страница 120: ...starts automatically when a drive fails The RAID controllers automatically and transparently rebuild failed drives in the background at user definable rebuild rates If a hot spare is not available the...

Страница 121: ...nd to a new location and map out the defective location If there is a recoverable read error the correct data will be transferred to the host and that location will be tested by the drive to be certai...

Страница 122: ...ing This reduces the risk of system failure due to firmware crash Appendix G Understanding RAID RAID is an acronym for Redundant Array of Independent Disks It is an array of multiple independent hard...

Страница 123: ...tion of RAID 0 and RAID 1 combing stripping with disk mirroring RAID Level 10 combines the fast performance of Level 0 with the data redundancy of level 1 In this configuration data is distributed acr...

Страница 124: ...g concentrated on a dedicated parity disk If one drive in the system fails the parity information can be used to reconstruct the data from that drive All drives in the array system can be used for see...

Страница 125: ...cal drive Important RAID level 00 100 30 50 and 60 can support up to eight RAID set If volume is RAID level 00 100 30 50 or 60 you cannot change the volume to another RAID level If volume is RAID leve...

Страница 126: ...ormally stored on a dedicated parity disk 3 Up to one disk failure 5 Also known Block Interleaved Distributed Parity Data and parity information is subdivided and distributed across all disk Parity in...

Отзывы: