06
GB
NAVIGATING THE RADIO MENUS
The radio’s menus can be navigated using either a
combination of the Volume control (4) and Previous
(5) and Next (6) buttons on the radio itself or the arrow
buttons (d, e, p, and r) and Enter button (s) on the remote
control.
In horizontally displayed menus (such as the menus
that are displayed during the setup wizard and the main
menu), an item or submenu can be highlighted by either
rotating the Volume control (4) or pressing the Previous (5)
and Next (6) buttons on the radio or using the Left (e) and
Right (r) buttons on the remote and then pressing either
the Volume control (4) on the radio or the Enter button (s)
on the remote to confirm.
In vertically displayed menus (most other menus), the
Volume control (4) on the radio and Up (d) and Down (p)
buttons on the remote can be used to highlight an item,
while pressing the Volume control (4) on the radio or the
Enter button (s) on the remote can be used to confirm
your choice. The Previous button (5) on the radio and the
Left button (e) on the remote can now be used to go back
to the previous menu and the Next button (6) and Right
button (r) can be used to go to the next menu.
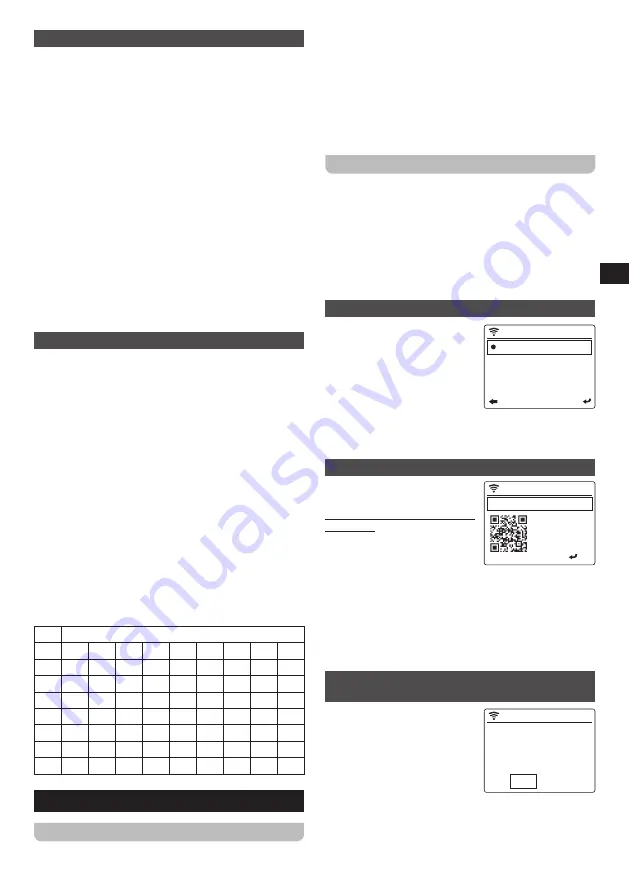
ENTERING CHARACTERS
In some cases, you will have to input characters on
the radio, for instance when connecting to a password
protected Wi-Fi network or when entering the date and
time. In this case, both the buttons on the radio and the
buttons on the remote control can be used as well.
When using the buttons on the radio, rotate the Volume
control (4) to select the desired character and when
it is displayed, press the Next button (6) to go to the
next character. The Previous button (5) can be used to
move the cursor back one step and delete the selected
character, while pressing the Volume control (3) confirms
the input.
When using the remote, characters can be input in the
same way, using the Up (d) and Down (p) buttons to
select the character, while the Left (e) and Right (r) are
used to go to previous or next character. The remote also
offers a faster alternative for inputting characters using
the numeric buttons (c), however. The table below shows
which numeric button corresponds to which characters.
Cycle through the characters by repeatedly pressing a
button. Confirm input by pressing the Enter button (s).
1
Special characters (@, !, ", etc.)
2
A
B
C
a
b
c
3
D
E
F
d
e
f
4
G
H
I
g
h
i
5
J
K
L
j
k
l
6
M
N
O
m
n
o
7
P
Q
R
S
p
q
R
s
8
T
U
V
t
u
v
9
W
X
Y
Z
w
x
Y
z
4. GETTING STARTED
CONNECTING THE AC POWER ADAPTER
The WFR-32 can be powered using the supplied power
adapter. Before connecting the AC power adapter to a
wall socket, please ensure that the voltage that the socket
supplies is within the supported range (100~240 Vac,
50/60Hz).
If the wall socket does supply a voltage that is within the
supported range, first connect the small plug of the power
cord to the DC IN socket (18) on the radio, then connect
the AC power adapter to the wall socket and turn on the
Power Switch (19) at the back of the radio.
INITIAL SETUP
After the radio has been supplied with power, it will
automatically turn on. “Sangean” will be shown on the
radio’s display (12) and a bar below this message will
indicate the progress of the startup process.
Once the radio has finished starting up, it will immediately
switch over to the initial setup process. During the initial
setup process, the startup wizard will guide you through
the configuration of the language of the on-screen menus
and the network configuration of the radio.
SETTING THE MENU LANGUAGE
Once the language selection
22:36
1/18
English
Deutsch
Español
Français
menu appears on the display.
The English language is the
d e f a u l t l a n g u a g e a n d i s
therefore highlighted by default.
Select the desired language as
described previously in the
“ N AV I G AT I O N A N D T E X T
INPUT” section in chapter 3. After selecting the desired
language, the radio will display all menus in the selected
language.
THE MOBILE APP’S PRIVACY POLICY
Next, the radio will display a QR
12:00
AM
Scan QR code or Visit:
WWW.mediayou.net
/policy.php
Privacy
:OK
code and the URL
https://www.mediayou.net/
policy.php to direct you to the
Privacy Policy.
Be sure to read this Policy
b e f o r e u s i n g t h e o n l i n e
functionality of the radio and only use the internet radio
feature if you agree to all terms and conditions in the
Privacy Policy. If you do not agree, do not use the internet
radio feature and use the radio for playback in other
modes instead.
Press the Volume control (4) or Enter button (s) to
continue setting up the radio using the setup wizard.
C O N F I G U R I N G T H E N E T W O R K
CONNECTION
When configuring the network
12:00
AM
Enable ’Check Network
when Power On’ ?
No
Yes
connection, the first question
the setup wizard will ask is
whether you want it to check for
network connections when your
turn the radio on. There are two
options here:
1.
Yes:
The radio will automatically scan for Wi-Fi
networks when it is turned on and it is not or cannot
connect to networks it has previously connected to.


