04
GB
F
E
NL
D
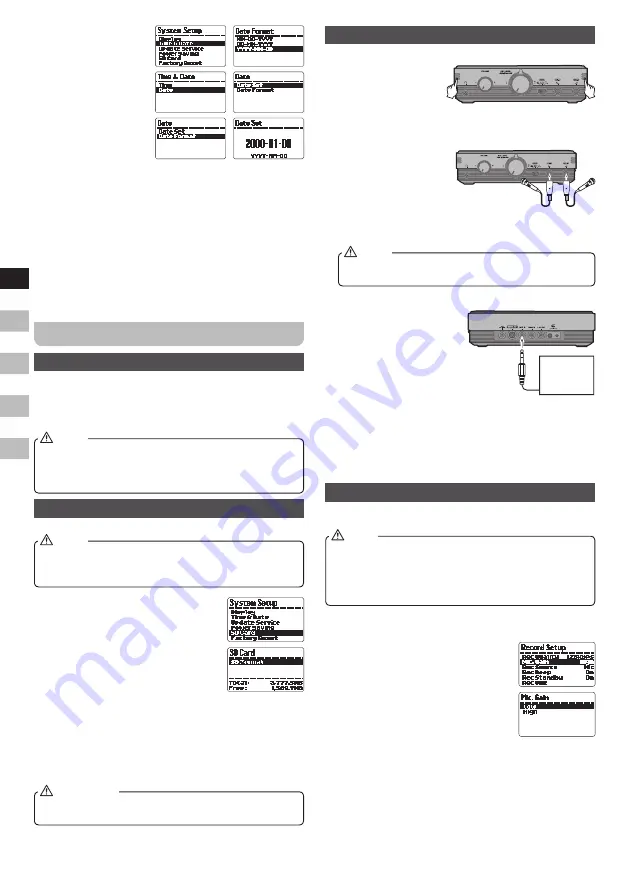
Preparing recording inputs
1.
Recording with the built-in MIC
Point the microphones
at the sound source
and place the unit in a
stable location where
there is little vibration.
2.
Recording with external MIC
C o n n e c t e x t e r n a l
microphones to the
MIC-L jack and MIC-R
jack at the front panel.
Point the mics at the
s o u n d s o u r c e a n d
place the unit in a stable location where there is little
vibration.
Built-in mics is disabled if external microphones are
plugged in.
NOTE
3.
Recording an external device (LINE IN)
To r e c o r d t h e s i g n a l
of an external source
component such as a CD
player, connect the output
of the audio device to the
LINE IN jack at the rear
panel.
4.
Recording a telephone call (please refer to
later section of ‘Telephone mode’ for telephone
connection)
To record the signal of telephone calls, connect the
output of a telephone to the Telephone jack at the rear
panel.
Adjusting the recording input level
For best results, the input sensitivity and the recording
level must be set to appropriate values.
In addition to adjusting the INPUT recording level,
try changing the distance and angle between the
microphone and the sound source. The angle and
distance of the microphone can also change the
character of the recorded sound.
NOTE
1.
Set the sensitivity of the external / internal
microphone
Setting the input sensitivity means
adjusting the gain of the input section
of the DAR-101, so that the signal
from the built-in mics or from the
external mics can be recorded with
minimal noise and distortion.
Press the Menu button > Press the
Enter button to get into ‘Record
Setup’ > Press Enter button to get into ’Mic Gain’ >
Select options of ‘High’ or ‘Low’.
High:
Select this option if the sound source is at distant
from the DAR-101.
Low:
Select this option if the sound source is close
to the DAR-101 or if you are recording a band
performance or other loud sound source.
3.
Rotate the Tuning
control until TIME &
DATE is highlighted,
and press the Enter
button to enter the
setting.
4.
Rotate the Tuning
control until DATE
is highlighted, then
press the Enter button
to enter the setting.
5.
Rotate the Tuning control until DATE FORMAT is
highlighted, and press the Enter button to enter the
setting. Rotate the Tuning control to select your
required date format, then press the Enter button
to confirm the setting. The display will revert to the
previous setting.
6.
Rotate the Tuning control until DATE SET is highlighted
and press the Enter button to enter the setting. Rotate
the Tuning control to select the desired number for
each setting, then press the Enter button to confirm
and proceed to the next setting.
Preparing for recording
Inserting and removing SD cards
1.
Open the SD slot on the right side panel.
2.
Insert the SD card into the slot until it clicks into place.
If you want to remove the card, press the SD card in
gently and then release it to allow it to come out.
SD cards up to 2GB and SDHC cards up to 32GB are
supported. However, there are many different card
variants available and not all cards can be guaranteed
to work with this unit.
NOTE
Preparing an SD card for use
In order to use an SD card in this unit, please format it first.
SD card format cannot be performed in DAR-101. Instead,
the unit can only erase the files in it. If SD card format is
demanded, this can be performed on your computer.
NOTE
1.
Make sure an SD card is installed
and turn the power on. Press the
Menu button to enter the main menu.
2.
Rotate the Tuning control until
‘System Setup’ is highlighted and
press the Enter button to enter the
setting.
3.
Rotate the Tuning control until ‘SD
Card’ is highlighted and press the Enter button to enter
the setting. It shows the status of the currently inserted
SD card.
4.
Press the Enter button to enter the SD card format
setting. Rotate the Tuning control to highlight YES to
start formatting.
A standard '2GB' SD card Must be formatted into FAT 16
and all the SDHC card MUST be formatted into FAT 32.
IMPORTANT
Microphones
Other audio
equipment or
external sound
source


