background image

12

Dynamic Range Control setting

Dynamic Range Control (also known as DRC) can make quieter sounds easier to hear when 
your radio is used in a noisy environment by reducing the dynamic range of the audio signal.
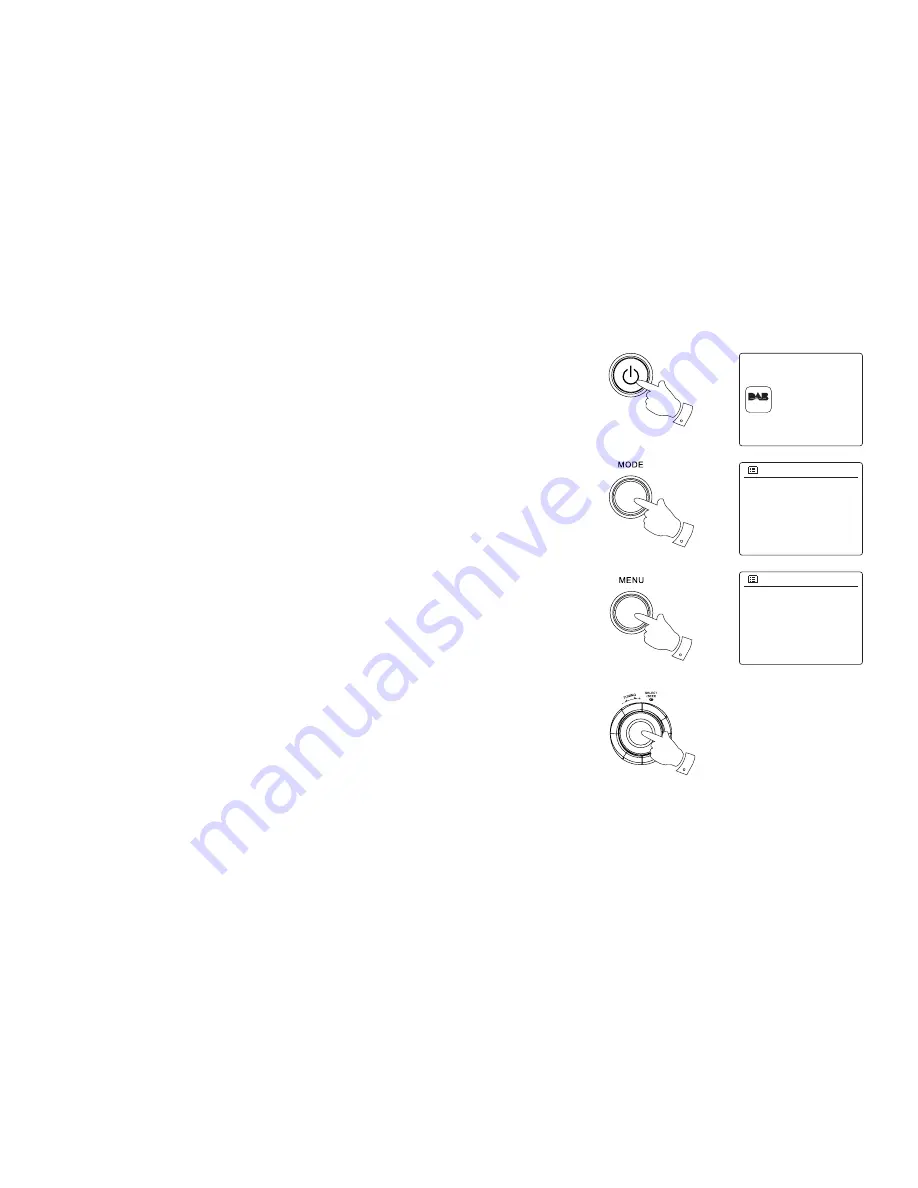
1. Press the 

Standby 

button to switch on your radio.

2.   Press  the 

Mode 

button and rotate the 

Tuning Control Rotary 

as needed to highlight DAB 

radio mode. Press the Tuning Control to select the option.

3. Press the 

Menu 

button to enter the DAB menu.

4. Rotate the 

Tuning Control Rotary 

until 'DRC' is highlighted on the display.

5.   Press  the 

Tuning Control Rotary 

to enter the DRC adjustment mode. The current DRC 

setting will be indicated with an asterisk.

6. Rotate the Tuning Control Rotary to highlight the required DRC setting (the default is Off).
  'DRC high' - DRC is set as sent by broadcaster.
  'DRC low' - DRC level is set to 1/2 that sent by broadcaster.
  'DRC Off' - DRC is switched off, Broadcast DRC will be ignored.
7. Press the 

Tuning Control Rotary 

to confirm the setting.

Note:

Not all DAB broadcasts use the DRC function. If the broadcast does not provide DRC 
information, then the DRC setting in the radio will have no effect.

4-7

1

3

2

DAB 

radio

DAB Radio

DAB

Station list
Scan
Manual tune
Prune invalid      
DRC                    

>

>

>

DRC

DRC high
DRC low     
DRC off                     *

Содержание BTR-160

Страница 1: ...GB BTR 160 DPR 16C Version 1 ...

Страница 2: ...1 GB The Bluetooth word mark and logos are registered trademarks owned by Bluetooth SIG Inc and any use of such marks by SANGEAN ELECTRONICS INC is under license ...

Страница 3: ...2 Controls and connections BTR 160 DPR 16C ...

Страница 4: ...ob 11 Volume button 12 Mute button 13 BTR 160 Preset 5 Fast forward button DPR 16C Preset 5 14 BTR 160 Preset 4 Play Pause button DPR 16C Preset 4 15 BTR 160 Preset 3 Rewind button DPR 16C Preset 3 16 Preset 2 17 BTR 160 Preset 1 Bluetooth pairing button DPR 16C Preset 1 18 Telescopic aerial 19 USB socket for software upgrade 20 Headphone jack 21 DC in jack 22 Battery compartment 23 Alkaline NiMH ...

Страница 5: ...sert 4 UM 1 batteries into spaces in the compartment Make sure all batteries are inserted with the correct polarity as shown on the rear cabinet The radio is also designed to be used with NiMH rechargeable batteries Note Do not use a mix of old and new rechargeable batteries Do not use a mix of full and empty rechargeable batteries Do not use batteries that have a different mAh capacity Do not use...

Страница 6: ...the Mode button gives you access to each of the operating modes DAB radio FM radio and BLUETOOTH available only in BTR 160 3 Pressing the Menu button will access the menu system whereas the Info button allows the display of information relating to the radio station or music file being played 4 Many operations require the user to make a selection from the menu Highlight the menu item using the Tuni...

Страница 7: ...ed on the screen Press the Tuning Control Rotary to start the setup wizard The screen will ask if you wish to run the setup wizard again at the next start up This will lead to the main menu 4 Rotate the Tuning Control Rotary on the right hand side of the unit to highlight the desired clock format either 12 or 24 hour then press the Tuning Control Rotary to enter your selection A menu allowing you ...

Страница 8: ...rease and the stations will be added to the list which is stored in the radio The bar graph indicates the progress of the scan 5 When scanning is completed the radio will list the stations found in numeric alpha order 0 9 A Z unless it has previously been tuned to a DAB station Rotate the Tuning Control Rotary to scroll through the list of available DAB radio stations Press the Tuning Control Rota...

Страница 9: ...ecently been detected by the radio It may still be available Secondary services Some DAB radio stations can have one or more secondary stations associated with them Typically these are not broadcast continually If a station has a secondary station available then the secondary will appear in the list of station names beneath the main or primary station Examples are the programs Daily Service and Pa...

Страница 10: ...when positioning the radio or its antenna For good reception the graph should occupy three or more blocks e Bit rate and audio type Displays the digital bit rate and audio coding information for the station being listened to f Date Displays the current date A signal strength indicator is always shown in the lower area of the display on the right hand side If the broadcast being received is in ster...

Страница 11: ...ed to highlight DAB radio mode Press the Tuning Control Rotary to select the option 2 Once in DAB mode press the Menu button 3 Rotate the Tuning Control Rotary until Scan is highlighted on the display 4 Press the Tuning Control Rotary to initiate the scan The display will show Scanning and your radio will perform a scan of the DAB Band III frequencies As new stations are found the station counter ...

Страница 12: ...f the DAB multiplex found if any A bar graph shows the signal strength and is useful if you need to reposition the radio or its aerial The minimum signal marker I which separates the left and right parts of the signal graph shows the minimum signal level required for satisfactory reception Any new radio stations found on the tuned DAB multiplex will be added to the list stored in the radio 6 Press...

Страница 13: ... on the display 5 Press the Tuning Control Rotary to enter the DRC adjustment mode The current DRC setting will be indicated with an asterisk 6 Rotate the Tuning Control Rotary to highlight the required DRC setting the default is Off DRC high DRC is set as sent by broadcaster DRC low DRC level is set to 1 2 that sent by broadcaster DRC Off DRC is switched off Broadcast DRC will be ignored 7 Press ...

Страница 14: ...y until Station order is highlighted Press the Tuning Control Rotary to enter the station order adjustment mode 5 Rotate the Tuning Control Rotary to choose between Alphanumeric Ensemble and Valid Alphanumeric sorts the station list alpha numerically 0 9 A Z Ensemble organizes the station list by DAB multiplex Valid shows only those stations for which a signal can be found The current setting is i...

Страница 15: ... option 3 Press the Menu button to enter the DAB menu 4 Press the Tuning Control Rotary until Prune invalid is highlighted Press the Tuning Control Rotary 5 To cause the stations list to be pruned eliminating unavailable stations rotate the Tuning Control Rotary until YES is highlighted on the display 6 Press the Tuning Control Rotary to cause the invalid station names to be removed from the stati...

Страница 16: ...nd If RDS information is available after a few seconds the display will show the radio station name If you only hear hiss or interference simply press the Tuning Control Rotary to scan further Your radio may have found a spurious interference signal 5 To find more FM stations press the Tuning Control Rotary to repeat the scan operation To scan down in frequency rotate the Tuning Control Rotary in ...

Страница 17: ...he Tuning Control Rotary to select the option 3 Rotate the Tuning Control Rotary to control the frequency that the radio will tune to The frequency will change in steps of 50kHz When the end of the waveband is reached the radio will recommence tuning from the opposite end of the waveband 4 Use the Volume buttons to adjust the sound level as needed 1 2 4 FM radio 104 90MHz FM 10 38 FM Radio V H B N...

Страница 18: ...hen the radio will only be able to display the frequency There will be no text or program type information available under these conditions The radio only provides displays when there is information available So if there is no text for example that display is not available The RDS indicator at the bottom of the display shows that there is some RDS data present in the broadcast being received The s...

Страница 19: ...ting is indicated with an asterisk 4 To set your radio so that only the stations with the strongest signals are found during scanning rotate Tuning Control Rotary until YES is highlighted Press the Tuning Control Rotary to confirm the setting Normally this will restrict scanning to local transmissions Alternatively to set your radio so that all available stations are found during scanning local an...

Страница 20: ...ing is highlighted on the display Press the Tuning Control Rotary to enter the audio setting mode The current setting is indicated with an asterisk 4 To switch to mono in order to reduce the hiss from a weak FM signal rotate the Tuning Control Rotary until YES is highlighted Press the Tuning Control Rotary to confirm the setting Alternatively to return to the normal automatic stereo or mono mode p...

Страница 21: ...rocedure as needed for the remaining presets 4 Stations which are already stored in the presets may be over written by following the above procedure Note The radio station presets are retained in memory when the radio is switched off and disconnected from the mains supply Recalling a preset in DAB and FM modes 1 Press the Standby button to switch on your radio 2 Select the required operating mode ...

Страница 22: ...connected Bluetooth device will show on the display You can simply select and play any music from your source device The volume control can be adjusted from your source device or directly from the radio 4 Use the controls on your Bluetooth enabled device or on the radio to play pause and navigate tracks Note 1 If 2 Bluetooth devices are pairing for the first time both must search for your radio it...

Страница 23: ...etooth mode When you have successfully connected your radio with the chosen Bluetooth device you can start to play your music using the controls on your connected Bluetooth device 1 Once playing has started adjust the volume to the required setting using the Volume control on your radio or on your enabled Bluetooth device 2 Use the controls on your device to play pause and navigate tracks Alternat...

Страница 24: ...not automatically updated In this case the clock must always be set manually after a power interruption 1 With your radio switched on press the Menu button to access the menu for the current mode 2 Rotate the Tuning Control Rotary until System settings is highlighted on the display Press the Tuning Control Rotary to enter the system settings menu 3 Rotate the Tuning Control Rotary until Time Date ...

Страница 25: ...nter the time setup 4 Rotate the Tuning Control Rotary until Set format is highlighted on the display Press the Tuning Control Rotary to enter the clock format menu The current clock display format is marked with an asterisk 5 Rotate the Tuning Control Rotary to select either 12 or 24 hour format Press the Tuning Control Rotary to confirm your choice of clock format The display will then revert to...

Страница 26: ...l then flash 7 Rotate the Tuning Control Rotary to select the correct month Press the Tuning Control Rotary The year digits will then flash 8 Rotate the Tuning Control Rotary to select the correct year Press the Tuning Control Rotary to enter the selection The hour digits will then flash 9 Rotate the Tuning Control Rotary to select the correct hour Press the Tuning Control Rotary to enter the sele...

Страница 27: ...e alarm minute Press the Tuning Control Rotary to confirm the setting The display will then return to the alarm setting menu If the radio has been set to use a 12 hour clock format there will also be an option here for setting AM or PM for the alarm time 7 Rotate the Tuning Control Rotary to highlight Enable and press the Tuning Control Rotary The display will show the Frequency options for the al...

Страница 28: ...alarm when it sounds Set the required volume using the Tuning Control Rotary to confirm the setting 11 In order to store the alarm settings rotate the Tuning Control Rotary until Save is highlighted Press the Tuning Control Rotary to store the alarm settings Your radio will show saved and will then go back to the list of alarms with the new alarm setting shown in the display If you decide not to s...

Страница 29: ...rm is sounding the sound of the alarm will come out from your earphone Disabling alarms 1 To disable a single alarm enter the alarm setup menu and rotate the Tuning Control Rotary until the desired alarm is highlighted on the display Press the Tuning Control Rotary to confirm 2 Rotate the Tuning Control Rotary until the Enable option is highlighted on the display Press the Tuning Control Rotary 3 ...

Страница 30: ...ed Press the Tuning Control Rotary to enter the menu 2 Rotate the Tuning Control Rotary until Sleep is highlighted Press the Tuning Control Rotary to enter the setup Sleep off will appear on the display 3 Rotate the Tuning Control Rotary to select the desired sleep time The options are 15 to 120 minutes in 15 minutes increment Use the OFF option to cancel the sleep function 4 Your radio will switc...

Страница 31: ... to enter the setup Options for idle time will appear on the display 3 Rotate the Tuning Control Rotary to select the desired idle time Use the OFF option to cancel the inactive standby function 4 You radio will switch to standby mode when your radio idle for a preset period of time Mute function Pressing the Mute button will mute the output from the loudspeakers 1 Press the Mute button to mute th...

Страница 32: ...ighlighted Press the Tuning Control Rotary to enter the setup 2 Rotate the Tuning Control Rotary until Equalizer is highlighted on the display Press the Tuning Control Rotary to confirm 3 Rotate the Tuning Control Rotary to cycle through and highlight the various modes Press the Tuning Control Rotary to confirm your selection a Flat b Rock c Pop d Jazz e Classic f News g Movie h My EQ The currentl...

Страница 33: ... enter the adjustment mode and rotate the Tuning Control Rotary until the desired level between 14 and 14 is displayed The sound will change as you adjust the level Press the Tuning Control Rotary when you are happy with the treble setting 5 To adjust the loudness rotate the Tuning Control Rotary until Loudness is highlighted on the display Press the Tuning Control Rotary to enter the setting and ...

Страница 34: ...trol Rotary to select your option and press the Tuning Control Rotary to confirm your setting Language selection By default your radio will display all menus and messages in English You can choose your preferred language 1 Access the menu for the current mode by pressing the Menu button Rotate the Tuning Control Rotary until System settings is highlighted on the display Press the Tuning Control Ro...

Страница 35: ...re that the sensitivity of headphones can vary widely We therefore recommend setting volume to a low level before connecting headphones to the radio It is also recommended to reduce the volume before unplugging your headphones IMPORTANT Excessive sound pressure from earphones and headphones can cause hearing loss To prevent possible hearing damage do not listen at high volume levels for long perio...

Страница 36: ...h to carry out a system reset highlight NO and then press the Tuning Control Rotary to confirm the setting The display will revert to the previous menu 4 With YES highlighted a full reset will be performed and the radio will restart as if first plugged in The DAB stations list together with any preset stations will be erased All configuration settings will be restored to their defaults the clock a...

Страница 37: ... our Head Office by sending an email to info sangean com 1 Using the micro USB cable not supplied to connect the USB socket on the left hand side of the radio and your PC USB port 2 Go to the website above to download the latest software Follow the on screen instructions on your PC provided with the upgrade software to complete the software upgrade Software version display The software version dis...

Страница 38: ... be restricted by covering it with items such as newspapers tablecloths curtains etc No naked flame sources such as lighted candles should be placed on the product It is recommended to avoid using or storing the product at extremes of temperature Avoid leaving the unit in cars on windows sills in direct sunlight etc The radio must be used in a moderate climate The apparatus shall not be exposed to...

Страница 39: ...ent model names are applied according to various market areas Specifications Power Requirements Mains Power Supply AC 100 240 V 50 60 Hz 12W Batteries 4 x UM 1 D size LR20 Alkaline or NiMH battery Frequency Coverage FM 87 5 108 MHz DAB 174 928 239 200 MHz Bluetooth available only in BTR 160 Bluetooth specification Bluetooth 4 1 EDR compliant Profile Support A2DP AVRCP Bluetooth Audio CODEC AAC SBC...

Отзывы: