background image

Remote Control Operation Range

•  The remote control sensor on the front unit is 

sensitive to the remote control’s commands up 

to a maximum of 5 metres away and within a 

maximum of a 40° arc.

•  Please note that the operating distance may 

vary depending on the brightness of the room.

Wall Mounting

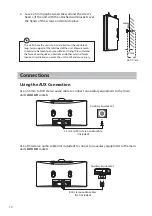
1.  Remove the screws from the main unit.

1


CD

INFO

/PAIR

FM

AUX

INTRO

SLEEP

TIMER

BASS

REPEAT

ALBUM/PRESET

2

3

4

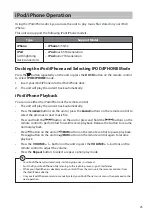
5

7

8

9

DIMMER

CLOCK

EQ

6

VOL

VOL

0

PROG

SHUFFLE

SCA

N

DAB

BT

MENU

DOCK

20°

20°

Max. 5 m

2.  Fix the two screws (not included) onto the wall. They should be parallel to each other. 

The distance between the two screws should be 121 mm.

121 mm

13

Содержание SHLIDAB14

Страница 1: ...iPod and iPhone are not included Instruction Manual Micro System CD with docking SHLIDAB14...

Страница 2: ......

Страница 3: ...ON OFF 15 Selecting Modes 15 Adjusting the Bass 15 Adjusting the Volume 15 Adjusting the Sound Effect 16 Adjusting the Brightness 16 Setting of the Clock 16 Time Display 16 Synchronising the Clock 16...

Страница 4: ...4 Random Playback 24 Repeat Playback 24 Programme Setting 24 iPod iPhone Operation 25 Docking the iPod iPhone and Selecting IPOD IPHONE Mode 25 iPod iPhone Playback 25 Charging your iPod iPhone 26 Blu...

Страница 5: ...s damage Switch it off at the mains immediately Withdraw the mains plug and consult your dealer Ventilation To prevent the risk of electric shock or fire hazard due to overheating ensure that curtains...

Страница 6: ...dangerous voltage within the unit s enclosure that may be of sufficient magnitude to constitute a risk of electric shock The exclamation point within an equilateral triangle is intended to alert the...

Страница 7: ...some time reading this instruction manual in order that you fully understand all the operational features offered You will also find some hints and tips to help you resolve any issues Read all the saf...

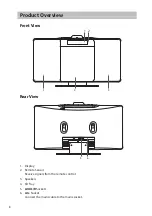
Страница 8: ...ar View 1 2 Product Overview Front View 1 Display 2 Remote Sensor Receive signals from the remote control 3 Speakers 4 CD Tray 5 AUX L R Sockets 6 AC Socket Connect the mains cable to the mains socket...

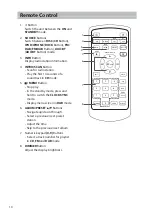
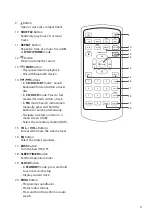
Страница 9: ...M and DAB mode 5 Button Play pause resume playback Pair a Bluetooth device in Bluetooth mode 6 Button Press to skip to the next track in CD IPOD IPHONE and BT mode Press and hold to fast forwards the...

Страница 10: ...y In the standby mode press and hold to switch the CLOCK SYNC mode Display menu screen in DAB mode 6 ALBUM PRESET Buttons Navigate up down through Select a previous next preset station Adjust the time...

Страница 11: ...the button to search automatically Navigate to select an item on a menu screen DAB Select the secondary station DAB 15 VOL VOL Buttons Increase Decrease the volume level 16 EQ Button Select the preset...

Страница 12: ...hing to impact the remote control Do not spill water or liquid on the remote control Do not place the remote control on a wet object Remove the battery from the remote control when not in use for a lo...

Страница 13: ...distance may vary depending on the brightness of the room Wall Mounting 1 Remove the screws from the main unit 1 CD INFO PAIR FM AUX INTRO SLEEP TIMER BASS REPEAT ALBUM PRESET 2 3 4 5 7 8 9 DIMMER CL...

Страница 14: ...screws and slot into place The wall where the unit is to be installed must be capable of long term support of the total load of the unit Measurements should also be taken to ensure sufficient strengt...

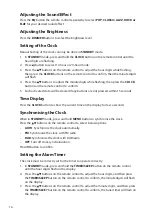
Страница 15: ...dby mode Disconnect the mains plug from the mains socket if you want to switch the unit off completely Selecting Modes Tap the icon repeatedly on the unit to switch between DAB FM DISC AUX BT and IPOD...

Страница 16: ...ed within 15 seconds Time Display Press the CLOCK button to show the current time on the display for few a seconds Synchronising the Clock When in STANDBY mode press and hold MENU button to synchronis...

Страница 17: ...ifferent timer settings The number of minutes shown will display in this sequence SLEEP 90 SLEEP 60 SLEEP 00 SLEEP 15 SLEEP 30 2 The system is now set to turn off after the number of minutes you have...

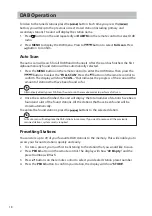
Страница 18: ...ave been found so far Alternatively directly press SCAN on the unit or on the remote control to perform a full scan 2 Once the scan has finished the unit will display the total number of stations have...

Страница 19: ...e control to select your desired preset number 2 Preset number and station name will show on the display to indicate the preset station you are listening to The stored stations will be saved into the...

Страница 20: ...collection of radio stations that are bundled and transmitted on one frequency There are national and local multiplexes Local ones contain stations that are specific to that area Channel Number DAB di...

Страница 21: ...ually In FM mode repeatedly press the buttons until the desired frequency reception quality is found With FM radio it may be necessary to fine tune each station by pressing the buttons on the remote c...

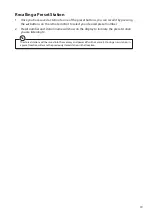
Страница 22: ...ion strength from strongest to weakest Recalling a Preset Station Once you have saved a station to one of the preset buttons you can recall it by pressing the buttons on the remote control to select y...

Страница 23: ...e unit also supports Playback Transfer Rate in 32 320 kbps for MP3 If there is no disc or the disc can t be read NO DISC will show on the display CD MP3 Operation Tap the icon repeatedly on the unit o...

Страница 24: ...lay The unit will play all tracks repeatedly 3 Press the REPEAT button again The REPEAT function will be cancelled Programme Setting The user can programme up to 20 tracks in CD mode in any desired or...

Страница 25: ...emote control to select the previous or next music file Press and hold the button on the unit or press and hold the buttons on the remote control to perform fast forward reverse playback Release the b...

Страница 26: ...In the STANDBY or ON mode you can automatically charge the iPod iPhone through the unit when it is docked The iPod iPhone battery is fully charged in about a few hours If you charge it while playing m...

Страница 27: ...disable the function from your Bluetooth device If the signal strength is weak your Bluetooth receiver may disconnect but it will re enter pairing mode automatically Press and hold PAIR button on the...

Страница 28: ...r audio device using the AUX IN L R sockets via a RCA stereo audio cable not included 2 While in the ON mode tap the icon repeatedly on the unit or press the AUX BT button on the remote control to sel...

Страница 29: ...Wipe the disc from the centre outwards with a soft cloth Always keep the disc clean If you cannot wipe off the dust with a cloth wipe the disc lightly with a slightly moistened cloth and finish with...

Страница 30: ...display Insert the disc correctly with the label side facing up Clean the disc PAUSE mode may be activated deactivate it A non valid disc has been inserted Condensation may have formed inside the uni...

Страница 31: ...on my bluetooth device Ensure the bluetooth function is activated on your bluetooth device If any functional abnormality is encountered unplug the unit from the mains socket and reconnect it again Sp...

Страница 32: ...ical spares and accessories With over 1 million spares and accessories available we can deliver direct to your door the very next day Visit www partmaster co uk or call 0844 800 3456 UK customers only...

Отзывы: