background image

3

Thank you


for purchasing your new 

Sandstrøm Satellite Recorder.
We recommend that you spend some time reading 

this instruction manual in order that you fully 

understand all the operational features it offers. You 

will also find some hints and tips to help you resolve 

any issues.
Read all the safety instructions carefully before use 

and keep this instruction manual for future reference.

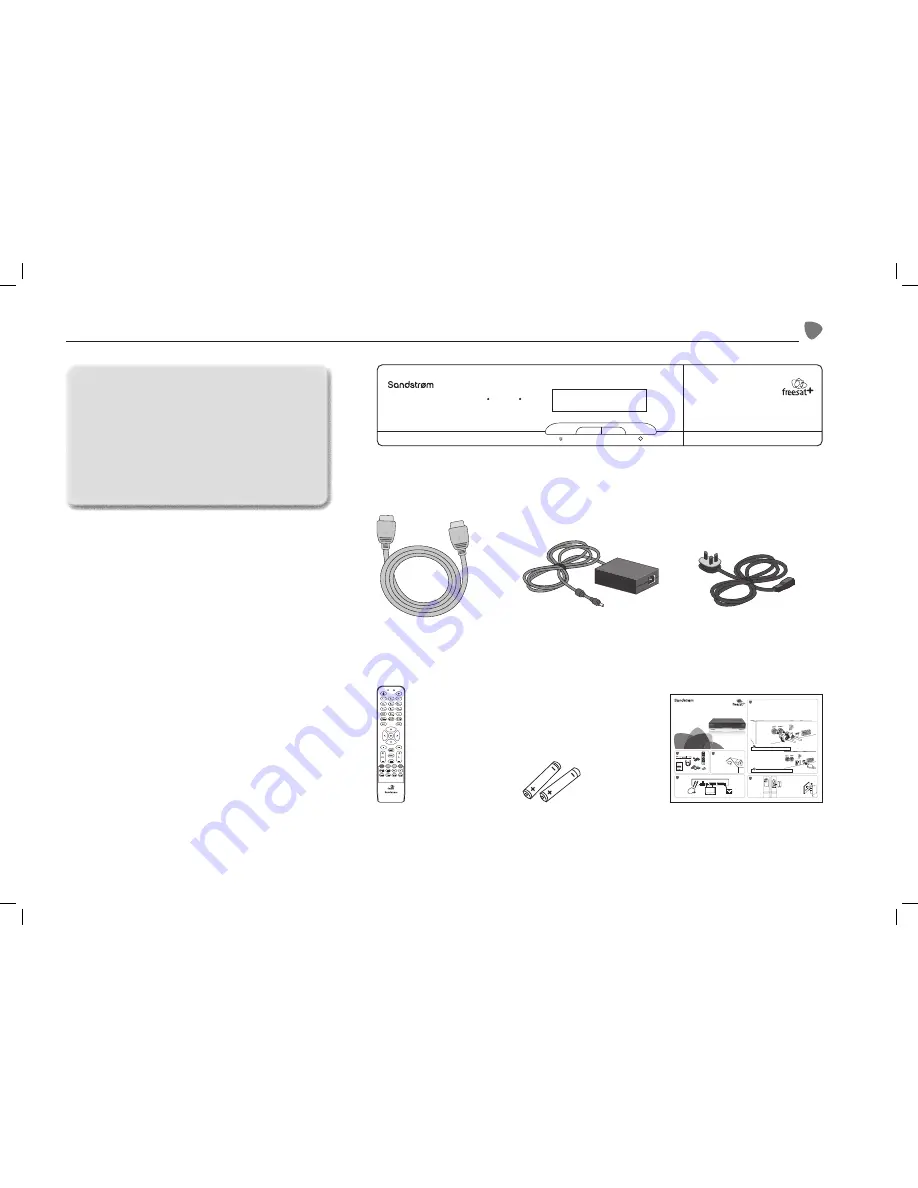
The Unit

Remote Control

Batteries

Mains Adapter

Mains Cable

HDMI Cable

Quick Start Guide

Power

Rec

CH+

CH-

R

Quick Start Manual

Welcome to your new 500GB satellite recorder.

How to set up and use your
SHDFSAT12

Connect to a Dish

2

To receive freesat, you must 

connect your unit to an appropriate 
satellite dish.
For safety reasons and to  

provide reliable reception,  

we strongly recommend  
that the satellite dish is 
professionally installed. If you  
have any questions about the 
satellite dish, please consult  
your installer.

Place your unit on a firm, level surface close to your TV, a mains electricity socket, and the cables from the satellite dish.
1.  Connect the cables from your satellite dish to the sockets on the back of the unit. For full functionality of your recorder you will 

need to connect two cables from your satellite dish. If you only have one cable, please consult your retailer or installer for advice.

Remove the battery 

compartment cover from 

the back of the remote 
control by lifting it up while 
pushing the catch. Insert the 
two AAA sized batteries as 
shown on the inside of the 
compartment. Replace the 
compartment cover.

Unpack

1

The Unit

Power

Rec

CH+

CH-

R

Remote Control

Batteries

HDMI Cable

Mains Adapter

Mains Cable

Instruction Manual

Connection

4

Switch On

5

Turn on your TV set and choose the HDMI input  

(see your TV’s instruction manual).
Switch on the mains socket the unit  

is connected to. After a few seconds,  
the first freesat installation screen  
will show on the TV screen.
If you do not see this screen on the  

TV screen, see the Hints and Tips  
section in the main instruction manual.

Connection Overview

3

TUNER 2 TUNER 1

LNB in

14/19V

350mA Max

ETHERNET

USB

HDMI

TV

VCR

DC 12V

2.5A

S/PDIF

These cables only need to be hand tightened, overtightening could result in damage to the unit.

To access On Demand TV you will have to connect an Ethernet cable (not supplied) to your Freesat box.

Satellite Dish

Mains Power

TV

OR

Connecting the two cables
This allows you to watch one TV station and record another.
 Connect the two separate cables from your satellite dish to each of the 

TUNER 1 (LNB IN) and TUNER 2 sockets. For this your Satellite Dish must be fitted with a Low Noise Block (LNB) that has at least two 

outputs. Please check with your installer if you are not certain about this.

2.  Ensure your TV is turned off, then connect the HDMI cable 

supplied to the 

HDMI socket at the back of the unit and an HDMI 

socket on your TV. There may be more than one 

HDMI socket 

on your TV. If you are not sure which one to use, check the TV’s 
instruction manual. If your TV does not have an HMDI socket, you 
can connect the unit using a SCART cable (not supplied), but will 
not be able to view freesat channels in high definition. 

3.  Connect the mains cable to the mains adapter and then connect  

to the power socket at the back of the unit.

For help with set-up or for more information about  

freesat please visit 

www.freesat.co.uk or call 0845 313 0051.  

For specific queries about this box and handy hints and tips 

please visit 

www.knowhow.com/knowledgebank  

or call 

0844 5611234.

(QSG-SHDFSAT12-130613V3)

SHDFSAT12_Quick Start Guide.indd   1

13/06/2013   12:13

Remove all packaging from the unit. 

Retain the packaging. If you dispose of it please do so 
according to local regulations.

In addition to this manual the items shown on the right 
are included:

 Unpacking 

SHDFSAT12_IB_V2.indd   3

13/06/2013   12:19

Содержание SHDFSAT12

Страница 1: ...your SHDFSAT12 For help with set up or for more information about freesat please visit www freesat co uk or call 0845 313 0051 For specific queries about this box and handy hints and tips please visi...

Страница 2: ...ites List 19 Non Freesat Channels 20 Tuning in Non Freesat Channels 20 Watching Non Freesat Channels 21 The Channel List 21 Setting Up Your Freesat Unit 22 Accessing the Main Menu 22 HDMI Output 22 Di...

Страница 3: ...appliances which may cause electromagnetic interference If you do it may adversely affect the operating performance of the unit and cause a distorted picture or sound Standby The button on the remote...

Страница 4: ...it is connected to After a few seconds the first freesat installation screen will show on the TV screen If you do not see this screen on the TV screen see the Hints and Tips section in the main instru...

Страница 5: ...ects the previous channels 7 R Button Records live TV 8 TUNER 2 Socket Connects to the satellite dish 9 TUNER 1 LNB in Socket Connects to the satellite dish 10 S PDIF Socket Connects to a digital audi...

Страница 6: ...guides OK Button Confirms the selection on a menu screen 12 Button Stops playback 13 Button Plays pauses resumes playback 14 MENU Button Displays the main menu 15 BACK Button Returns to the previous m...

Страница 7: ...personal injury or damage property Only use the battery type indicated in this manual When the batteries are exhausted the remote will not function Replace both batteries at the same time with new on...

Страница 8: ...ou will need to connect two cables from your satellite dish If you only have one cable please consult your retailer or installer for advice Connecting the two cables This allows you to watch one TV st...

Страница 9: ...nnect the unit s TV SCART or VCR SCART socket s to the analogue inputs on your sound system to listen in stereo 4 If you connect an optical lead between the S PDIF socket on your unit and digital soun...

Страница 10: ...to restore the sound Widescreen and Standard Viewing Formats Programmes can be viewed in a number of alternative formats Press the WIDE button repeatedly to toggle the available aspect ratios TV DTV...

Страница 11: ...esat receiver has been connected correctly before continuing the installation If signal strength is less than 50 please check the dish alignment and connections Signal Strength 100 50 25 75 Step 6 of...

Страница 12: ...r your choice of PIN by pressing the 0 9 buttons on the remote control for each of the four PIN digits 6 Re enter the PIN When new freesat channels are introduced you do not need to retune the unit be...

Страница 13: ...he screen and an orange line at the top of the table shows the present time in the schedule 1 Press the buttons to move through the channels and the buttons to highlight programmes showing at differen...

Страница 14: ...i 1 May 7 48pm Programme Guide All Channels Entertainment News and Sport Movies Lifestyle Music Record Reminder Exit Menu 24 Hrs 24 Hrs Library 8 00pm 9 00pm The Restaurant Raymond Blanc adds to the p...

Страница 15: ...fering their restaurant food to go 101 BBC One 102 BBC Two 103 ITV1 Anglia S 104 Channel 4 106 BBC Three 107 BBC Four 108 BBC HD 110 BBC ALBA 8 00pm 8 30pm 9 00pm Fri 1 May Big Cat Live Silent Wit Her...

Страница 16: ...eview Guide Protect Series 09 09 2011 BBC One HD 8 00pm 9 00pm Gardeners World 29 30 Four Seasons A special programme following a year in the lives of gardeners Tony and Marie Newton who have transfor...

Страница 17: ...deners Tony and Marie Newton who have transformed their garden into a stunning Yellow Book garden HD AD S Top Gear BBC2 England 05 09 70 Remaining EXIT GUIDE OK Never Mind the Buzzcocks Gardeners Worl...

Страница 18: ...splayed 1 Press the button to see details of the next programme and the button to go back again 2 Press the buttons to see what is on another channel 3 To move to the new channel press OK while the ba...

Страница 19: ...e buttons to select your desired audio channel 4 To close the menu press EXIT on the remote control OR 5 Select the Exit Menu option from the display and press OK Pausing Live TV This function is some...

Страница 20: ...riation of a channel in the channel list 1 Highlight a channel from the Channel List 2 Press the button while the channel is highlighted The current list will change to show the regional variations of...

Страница 21: ...he unit displays the number of TV and radio channels found so far When it is finished the unit will display a list of all the channels found 8 You can choose to watch a non freesat channel from this l...

Страница 22: ...n freesat channels and the button to see the programmes on next The Channel List When you have non freesat channels stored the channel list displays both freesat and non freesat channels 1 Press the C...

Страница 23: ...e OK button to confirm your choice 6 Press the BACK button or the EXIT button to exit the main menu Digital Audio This setting only applies if the unit is connected via a digital optical cable to an e...

Страница 24: ...Out and 4 3 Letterbox Press the OK button to confirm your choice 4 Press the BACK button or the EXIT button to exit the main menu SCART Output 1 Access the Settings menu 2 Press the buttons to select...

Страница 25: ...ttons to select Language in the section bar and then press the buttons to select Audio Description 3 Press the buttons to switch on audio description for all channels that provide it and then press th...

Страница 26: ...e 2 Press the buttons to turn on or off the parental guidance lock When turned on the broadcast programme displays a GUIDE parental guidance warning and cannot be watched without first entering the Lo...

Страница 27: ...uttons to select Allow Hard Disk Drive Format Press OK 2 Press the buttons to switch between enabled or disabled Press OK Exit Menu Select EXIT OK Weds 8 Oct 8 22pm Settings Display Audio Language Par...

Страница 28: ...Add to End of Recording 2 Press the buttons to add the additional recording time after the programme finish and then press the OK button to confirm 3 Press the BACK button or the EXIT button to exit t...

Страница 29: ...the MENU button to enter the Main Menu Press the buttons to select Settings in the section bar and then press the OK button to confirm 2 Press the buttons to select freesat in the section bar and then...

Страница 30: ...carefully check the broadband connection and the Network Configuration or consult your internet service provider for assistance 5 Press the BACK button or the EXIT button to exit the main menu Networ...

Страница 31: ...you know the channel number of the station you can enter it directly from the remote control When you switch to an online TV channel there may be a delay of a few seconds 900 On Demand 901 BBC iPlayer...

Страница 32: ...utomatic or Manual and then press the OK button to confirm 3 Press the BACK button or the EXIT button to exit the main menu First Time Installation 1 Press the buttons to select First Time Installatio...

Страница 33: ...Press the BACK button or the EXIT button to exit the main menu System HDD Control Network USB Exit Menu Manufacturer Model Number Hardware Version Serial Number Software Version Goodmans 00 12345678...

Страница 34: ...UK Call Centre on 0844 561 1234 Our UK Customer Contact Centre is open Monday Saturday 8am 8pm or Sunday 8am 6pm Problem Possible Cause Solution Standby Indicator Off Mains adapter disconnected Check...

Страница 35: ...and letter box Audio TV VCR SCART Output Audio Left Right Optical S PDIF Output Dolby Digital Dolby Digital PCM USB Host 2 0 5V 1A max for software upgrade only Internet Connectivity Ethernet RJ 45 1...

Страница 36: ...etailer where you purchased the product DSG Retail Limited Registered in England No 504877 Maylands Avenue Hemel Hempstead Hertfordshire HP2 7TG UK This symbol on the product or in the instructions me...

Отзывы: