background image

SAMWONTECH 

1st  Edition  of  TEMP2020_Series  IM  :  Dec.  15.  2008                                                                            Page    65  /  71 


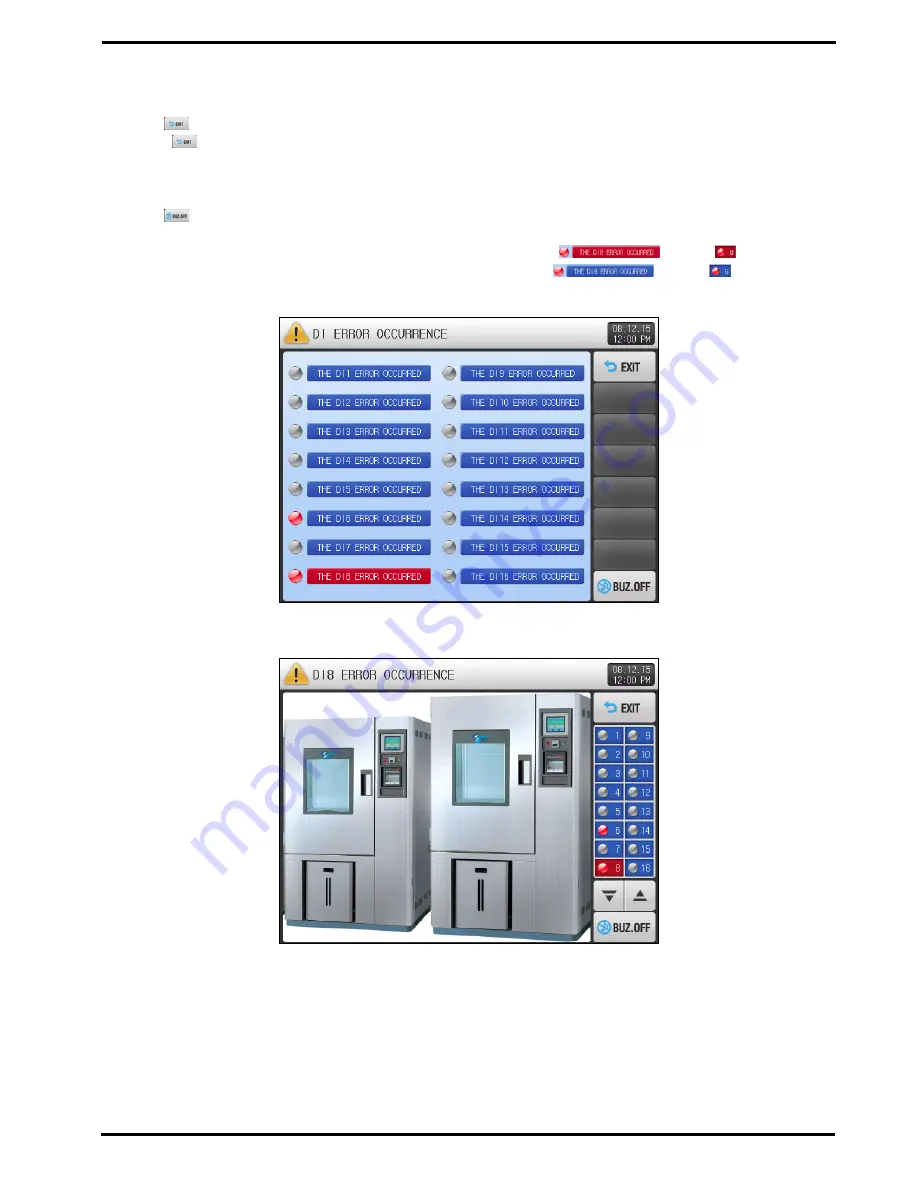
[Figure 7-4] and [Figure 7-5] are screens when occurring DI ERROR. 


DISPLAY METHOD for DI ERROR occur between TEXT and PICTURE can be set on [11. DI CONFIG] of 
the [Instruction Manual].


The 

(EXIT) button is used to return to the Operation screen. 


The 

(EXIT) button after DI ERROR occurring makes system ignores same DI ERROR for one minute. 

Ex.)


Exiting  by  “Exit”  from  Error  during  DI1  occurrence,  it  will  ignore  for  1  minute  even  though  DI1   
occurs, and it displays DI Error screen when DI1 is still in effect. 


‘Ignore’ means the DI ERROR screen is not shown. 


The 

(BUZ.OFF) button stops the BUZZER SOUND under DI ERROR. 

Ex.)


This will be explained according to the lamp situation. 


While DI ERROR, the related DI lamp will be ‘ON’ with red. (

(TEXT), 

(PICTURE)) 


After release the DI ERROE, this lamp will become ‘OFF.’ (

(TEXT), 

(PICTURE)) 


[Figure 7-4] DI ERROR screen on TEXT mode


[Figure 7-5] DI ERROR screen on PICTURE mode


Содержание TEMP2020 series

Страница 1: ...OPERATION MANUAL Programmable Controller TEMP2020 SERIES TEMP2320 TEMP2520 TEMP2720 ...

Страница 2: ... Operation 16 3 4 FIX and PROGRAM Operation 23 3 5 AUTO TUNING screen 27 3 6 AUTO TUNING and TUNING POINT 32 4 FUNCTION FIX OPERATION setting 4 1 Operation mode Functions 33 4 2 FUZZY function 35 4 3 SP SLOPE function 36 5 PROGRAM setting 5 1 Program PATTERN setting 38 5 2 REPEAT operation 46 5 3 Pattern FILE EDIT 47 5 4 TIME SIGNAL 49 5 5 WAIT function 52 5 6 PATTERN NAME input 54 6 GRAPH REC set...

Страница 3: ... 2 2 7 SCREEN DISPLAY setting 7 1 Screen Display setting 62 7 2 DI ERROR HISTORY 64 8 RESERVE OPERATION setting 66 9 USER SCREEN setting 9 1 USER SCREEN viewer 68 9 2 Creating BMP File for USER SCREEN image 69 10 Communication Errors massage 70 Engineering Units ...

Страница 4: ... operating C Symbolizes Supplementary Explanation The information with this symbol describes additional explanation for features D Symbolizes Reference This symbol indicates further information and page to refer 음 Precautionary Remarks on this Operation Manual음 A This manual should be passed on the End User and kept at a suitable place for easy review in time B Read and understand this Operation M...

Страница 5: ... malfunction 음 Limitation of Liability음 A SAMWONTECH does not guarantee or accept responsibility for this product other than the clauses stated in our warranty policy B SAMWONTECH assumes no liability to any party for any loss or damage direct or indirect caused by the use or any unpredictable defect of the product 음Warranty Policy 음 A Warranty term of this TEMP2520 is one year after delivery to t...

Страница 6: ...will appear for loading time then Initial Logo screen will be displayed The screen will automatically progress to the STOP screen It takes around 22 seconds for loading Press the MAIN button at the top right hand corner on PROGRAM STOP screen to move to the MAIN MENU where the general parameter group located Initial Logo screen can be changed as user want Refer to the 13 INITIAL SETTING on Install...

Страница 7: ... will appear Button to set target Set Point of temperature and humidity and process time for each segment on 5 1 Program PATTERN Input Keypad will appear Button to select on of several modes or options ON OFF INACTIVE Button to set whether or not to use each parameter ON OFF INACTIVE Screen move button to move to the next previous Screen in the same group Page move button to move to the next previ...

Страница 8: ...sing this Input Keypad If the setting value is out of the available range LIMIT ERROR message will appear with a BEEP sound and input will be rejected Numeric Keypad to input numerical values Alpha Numeric Keypad to input Pattern name or DI error name For DI ERROR name refer to the 11 2 DI ERROR NAME on Installation Manual TIME SIGNAL setting Keypad Input Key to set Seg Alarm Segment Alarm ...

Страница 9: ...gh Input Keypad can be performed after releasing KEY LOCK function switch ON to OFF For further information refer to 4 FUNCTION FIX OPERATION setting 2 3 1 Setting input validity test TEMP2500 confirms key input process and its validity of value by sound Beep indicates key input accessed normally within available range Three Beeps indicates key input denied Precautions in Operation Do not press th...

Страница 10: ...Name of Input Keypad Displays available range Displays new Set Point If the Set Point is out of range LIMIT ERROR message will appear Escape button to cancel and disappear Input Keypad Enter button to accept new set point and disappear Input Keypad Button to input decimal point Button to input negative or positive number BackSpace button to delete one numeral of Set Point at a time Clear button to...

Страница 11: ...APH REC Section for display recoding data graph and its setting for SD card operation OPER SCREEN Operation status section to start display and set main operation parameters FUNCTION FIX Function section to set parameters for additional operation function and mode PROGRAM SET Program setting section organized into 6 groups RESERVE SET Time section to set current time and scheduled operation DISPLA...

Страница 12: ... on 4 FUNCTION FIX OPERATION setting when you press OPER SCREEN button on the MAIN MENU screen this FIX STOP screen will appear Figure 3 2 is displayed when ASYNCH OPER is selected at 4 FUNCTION FIX OPERATION Figure 3 3 is displayed when SYNCH OPER is selected at 4 FUNCTION FIX OPERATION Figure 3 2 FIX STOP screen ASYNCH Figure 3 3 FIX STOP screen SYNCH ...

Страница 13: ...layed when touch SET POINT in the screen to enter set value Table 3 1 FIX STOP Screen Parameter Parameter Range Unit Default CH1 Set Point SP CH1 EU 0 0 100 0 CH1 EU CH1 EU 0 0 CH2 Set Point SP CH2 EU 0 0 100 0 CH2 EU CH2 EU 0 0 CH1 CH2 EU Sensor Input Value Range Refer to Engineering Unit Figure 3 4 CH1 CH2 Set Value Input Screen ...

Страница 14: ... Displays CH1 operation status The arrow rotates clockwise during operation Displays CH1 Set Point Red status lamp in CH1 indicates ON and dark gray for OFF status Status Lamp can be set at SYSTEM INITIAL SET Screen in Installation Manual Up to 20 Status lamp per channel can be set at SYSTEM INITIAL SET Screen and only 16 status lamps are displayed at The 1 st FIX RUN screen Only 8 Status lamps ar...

Страница 15: ... Date Time button at RUN Screen Green Lamp is turned on when pressing Date Time button when one only one channel is running Move to Figure 3 1 MAIN MENU screen Display Keypad to enter Password when set Main Button Restriction Refer to Figure 4 2 Move to next screen from current screen STOP RUN Screen of CH1 Able to STOP RUN individually USER KEY button To remove this U KEY button from this screen ...

Страница 16: ... RUN operation Following screen is CH1 explanation and CH2 is same as CH1 operation Indicate current Process Value Indicate PID Group number currently applied Able to check applied PID Group at PID GROUP in Installation Manual Move to CH1 or CH2 Screen Run or Release AUTO TUNING to current Set Value Able to set Tuning Button Yes No from PID GROUP in Installation Manual Display FIX RUN PROCESS TIME...

Страница 17: ...nternal memory will be wiped out by POWER OFF Store all important recorded data to SD card before POWER OFF Refer to 6 2 TREND GRAPH view DATA processing While the data is recording into internal memory that can not be downloaded to SD card Indicate current operating Process Value Set Point and Control Output Value of CH1 CH2 Displays available internal memory volume About 25days can be saving on ...

Страница 18: ...ion is stopped by force pressing STOP button That message will disappear with pressing any part of touch screen This also applies to PROGRAM STOP 3 2 5 1 FIX OPERATION STOP Screen Asynch This is CH1 CH2 Time Set Operation completed screen There is completion time difference between CH1 and CH2 according to the Time Set Operation 3 2 5 1 FIX OPERATION STOP Screen Synch This is CH1 CH2 Time Set Oper...

Страница 19: ...his PROGRAM STOP screen will appear Figure 3 11 is displayed when Asynch Operation is selected at 4 FUNCTION FIX OPERATION Figure 3 12 is displayed when Synch Operation is selected at 4 FUNCTION FIX OPERATION For program settings refer to 5 Program PATTERN Press the RUN button on Figure 3 12 PROGRAM STOP screen to start running operation and move to Figure 3 15 The 1 st PROGRAM RUN Screen Figure 3...

Страница 20: ...ATTERN NUMBER FOR OPER area for pattern number input Table 3 2 PROGRAM STOP Screen Parameter Parameter Range Unit Default CH1 Pattern No 1 40 ABS 1 CH2 Pattern No 1 40 ABS 1 Caution for Program Operation The Operation does not run when the displayed Pattern Number does not includes program Refer to 5 1 PATTERN SET Figure 3 14 CH1 CH2 Pattern Number Input Screen ...

Страница 21: ...clockwise during operation Displays CH1 Segment Set Point Red status lamp in CH1 indicates ON and dark gray for OFF status Status Lamp can be set at SYSTEM INITIAL SET Screen in Installation Manual Up to 20 Status lamp per channel can be set at SYSTEM INITIAL SET Screen and only 16 status lamps are displayed at The 1 st PROGRAM RUN Screen Only 8 Status lamps are displayed when User Tag is set The ...

Страница 22: ...e button at RUN Screen Green Lamp is turned on when pressing Date Time button when one only one channel is running Move to Figure 3 1 MAIN MENU screen Display Keypad to enter Password when set Main Button Restriction Refer to Figure 4 2 Move to next screen from current screen STOP RUN Screen of CH1 Able to STOP RUN individually USER KEY button To remove this U KEY button from this screen refer to ...

Страница 23: ...ber indicates repeated number and latter indicates repeat set value Displays Segment Repeat status SEGMENT REPEAT 00 00 Former number indicates repeated number and latter indicates repeat set value Displays current Aux Output Able to select from 4 1 CONTROL OUTPUT SET in Installation Manual AUX Out set can be made from 5 1 PROGRAM PATTERN SET Displays currently applying PID Group number Able to ch...

Страница 24: ...RECORD button on the right hand side to record trend data established at of current program operation and it starts recording with activating RECORD button Press the activated RECORD button to stop recording and recorded data will be stored in internal memory as a file New file will be created by every single turning ON OFF recording All data stored in internal memory will be wiped out by POWER OF...

Страница 25: ...GRAM operation will stop and PATTERM OPERATION END message appears show as Figure 3 20 Figure 3 21 However this message will not appear if the operation is stopped by force pressing STOP button That message will disappear with pressing any part of touch screen This also applies to FIX STOP Figure 3 20 PROGRAM operation STOP Screen Asynch Figure 3 21 PROGRAM operation STOP Screen Synch ...

Страница 26: ...synch selected screen at 4 FUNCTION FIX OPERATION Figure 3 23 is Synch selected screen at 4 FUNCTION FIX OPERATION Refer to 5 1 PROGRAM PATTERN SET for Pattern Set method Press RUN button at bottom right side from Figure 3 22 FIX AND PROGRAM STOP screen will transfer the screen to Figure 3 28 The 1 st FIX AND PROGRAM RUN screen Figure 3 22 The 1 st FIX AND PROGRAM STOP screen Asynch Figure 3 23 Th...

Страница 27: ...ouching Set Point area in the screen for CH1 set point input Input key is displayed when touching Pattern No area in the screen for CH2 pattern no input Table 3 3 FIX AND PROGRAM STOP Screen Parameter Parameter Range Unit Default CH1 Set Point SP CH1 EU 0 0 100 0 CH1 EU CH1 EU 0 0 CH2 Pattern No 1 40 ABS 1 Figure 3 24 Pattern Number Input Screen 1 Figure 3 25 Pattern Number Input Screen 2 ...

Страница 28: ...ouching Pattern No area in the screen for CH1 pattern no input Input key is displayed when touching Set Point area in the screen for CH2 set point input Table 3 4 FIX AND PROGRAM STOP Screen Parameter Parameter Range Unit Default CH1 Pattern No 1 40 ABS 1 CH2 Set Point SP CH2 EU 0 0 100 0 CH2 EU CH2 EU 0 0 Figure 3 27 Pattern Number Input Screen 4 Figure 3 26 Pattern Number Input Screen 3 ...

Страница 29: ...creen and 3 3 3 The 2 nd PROGRAM RUN screen for The 2 nd FIX AND PROGRAM RUN screen Refer to 3 2 4 The 3 rd FIX RUN screen and 3 3 4 The 3 rd PROGRAM RUN screen for The 3 rd FIX AND PROGRAM RUN screen Refer to 3 2 5 FIX OPERATION STOP Screen and 3 3 5 PROGRAM operation STOP Screen for FIX AND PROGRAM Operation STOP Screen Asynch Operation has individual STOP RUN button for CH1 CH2 so that user can...

Страница 30: ...is set by Auto Tuning Parameter Current set point becomes Auto Tuning Set Point during Auto Tuning execution Segment is held during Program Run When Auto Tuning is completed it runs with current Set Point Segment progresses during Program Run Following screen explains for CH1 and it is same for CH2 Able to set PID No Store the tuning value to selected number when Auto Tuning is completed Moves to ...

Страница 31: ...M AUTO TUNING SEG INRH INRL Indicates input sensor range Threshold 1 4 Indicates threshold value of PID No Auto Tuning Indicates PID No selected for Auto Tuning Auto Tuning Set Point Indicates currently running Set Point FIX OPERATION AUTO TUNING SEG PROGRAM OPERATION AUTO TUNING SEG ...

Страница 32: ...eted current Set Point is changed to Set Point prior to Auto Tuning Segment progresses during Program Run Following screen explains for CH1 and it is same for CH 2 Tuning value is stored to the selected number when Auto Tuning is completed Number in the box indicates PID number Moves to CH1 or CH2 screen Table 3 4 Auto Tuning Zone Parameter Parameter Range Unit Default Auto Tuning OFF 1 6 Auto ABS...

Страница 33: ...int Indicates currently running Set Point PID No Auto Tuning Set Point Auto Tuning INRL INRH Threshold3 Threshold1 350 900 500 1000 800 400 0 1 100 1 3 500 3 2 300 2 4 700 4 600 Threshold2 5 900 5 Threshold4 200 150 650 PID No Auto Tuning Set Point Auto Tuning INRL INRH Threshold3 Threshold1 350 900 500 1000 800 400 0 1 100 1 3 500 3 2 300 2 4 700 4 600 Threshold2 5 900 5 Threshold4 200 150 650 FI...

Страница 34: ...shold 3 PID4 Auto Tuning Set Point Threshold 3 2 Tuning Point 5 Execute PID5 Segment Auto Tuning INRH Threshold 4 PID5 Auto Tuning Set Point Threshold 4 2 Tuning Point 6 Execute PID6 Segment Auto Tuning INRH INRL PID6 Auto Tuning Set Point INRL 2 Tuning Point Auto Execute Auto Tuning for PID1 6 Segment sequentially Store Auto Tuning value to PID1 6 Segments Threshold 1 INRL PID1 Auto Tuning Set Po...

Страница 35: ...o from Auto Tuning Parameter Auto tuning procedure with a set point Parameter Settings Operation Type Fix Operation Input Sensor Temperature K2 Range 200 00 1370 00 Auto Tuning Point 0 25 EUS 0 25 0 5 Set Point SP 50 0 OL 0 0 OH 100 0 Tuning Procedure Auto Tuning Precautions The tuning point does not change even if the SP is changed during auto tuning When auto tuning has completed operation conti...

Страница 36: ...fer to 4 2 FUZZY function OFF Not using FUZZY function ON Using FUZZY function Setup box to set SP SLOPE for ramping rate on FIX operation Refer to 4 3 SP SLOPE function Setup box to set whether or not using TIME OPERATION for total process time on FIX Operation Moves to CH1 or CH2 screen Button to select between Synch Operation or Asynch Operation Synch Operation It has one STOP RUN button in PRO...

Страница 37: ... CH1 EUS MIN CH1 EUS 0 00 MIN CH2 SP Slope CH2 EUS 0 00 100 00 MIN CH2 EUS MIN CH2 EUS 0 00 MIN Time Operation Unuse Use ABS Unuse Hour 0 9999 HOUR ABS 0 Minute 0 59 MIN ABS 0 Main Button Restriction Unuse Use ABS Unuse Run Stop Operation Synch Asynch Operation ABS Asynch Operation Key Lock OFF ON ABS OFF Following shows Main Button Restriction set screen Password Set Keypad is displayed when pres...

Страница 38: ...rol the overshoot that may occur when intense fluctuating load or frequent Set Point changing Before PV approaches to SP automatically calculated SUPER SP can restrain overshoot FUZZY OFF FUZZY ON NPV Time SP SP NPV Generating MV by assuming SUPER SP as real SP SUPER SP Overshoot control Time SUPER SP Calculating SUPER SP ...

Страница 39: ...peration NSP current SP will be changed from current PV to Target SP gradually by assigned ramping rate SP SLOPE Operation Operation Fix Operation Temperature Change Ratio 20 0 Min Amount of change to TSP SP TSP PV and Slope 20 0 min 70 0 30 0 40 0 it will take 2 min to ramp up to TSP For 2 minutes NSP will be changed from 30 0 to 70 0 at a constant rate of 20 min TSP SP PV 2 Min SP Change 40 0 70...

Страница 40: ...ET menu is composed with 6 groups concerned program operation setting No Instructions Description PATTERN SET Pattern Segment setting group REPEAT SET Pattern Segment repeat operation setting group FILE EDIT Pattern editing by copy and delete TIME SIGNAL TIME SIGNAL setting group WAIT SET Group to set WAIT function settings PATTERN NAME Group to input the name of each pattern Figure 5 1 PROGRAM SE...

Страница 41: ...int SSP When program operation starts SP starts from SSP and operates until SP1 under 1SEG for set time TM1 Set the value of Segment to run Setup box to input process time for each segment Setup box to input Time Signal number to use for each segment Four TIME SIGNALs can be set for each segment among 20 different types Refer to 5 4 TIME SIGNAL SET Set Seg Alarm of the segment to run Set Seg PID o...

Страница 42: ... Value PV and operates until Setting Point 1 SP1 under SEG1 Based on the contents of program patten remaining time is calculated as time is passed till operation starting point When Segment 2 is the first maintaining section When Segment 3 is the first maintaining section When there is no maintaining section SSP TM1 TM2 SP1 a b c d e Present Pointing Value Program Operation Start C C C D E SSP a b...

Страница 43: ...Point SP starts from the present pointing value regardless of slope or Starting Setting Point SSP and progresses till Setting Point 1 SP1 for set time 1 2 3 4 Segment d e b c Present Pointing Value Program Operation Start b d E SSP B a c e Operation Not started C D 1 2 Segment a b c 1 2 Segment Present Pointing Value Program Operation Start a c b B B A SSP E D C B A Present Pointing Value Program ...

Страница 44: ... is to set Aux Output Select Aux Output from CONTROL TRANSMISSION SET in Installation Manual It is displayed in red color at PATTERN SET screen and can set Aux Output Press the setup box and Input Keypad will appear Input key is displayed to set Start Code when pressing START CODE ...

Страница 45: ... 1st Edition of TEMP2020_Series IM Dec 15 2008 Page 42 71 It displays the Start Code which is set to SPV It displays the Start Code which is set to SSP Insert Delete buttons are activated when button is activated ...

Страница 46: ...y is displayed to set the setting value when pressing the Set Value button Input key is displayed to set Segment Time when pressing the Time Input key is displayed to set Time Signal when pressing Time Signal button Able to set Time Signal of TS1 TS8 when pressing the TS button ...

Страница 47: ...displayed to set when pressing Time Signal button and AUX button appears when pressing the TS button at top right side to set Aux Output Input key is displayed to set Seg Alarm when pressing the Seg Alarm button Input key is displayed to set Seg PID when pressing the Seg PID button ...

Страница 48: ...5 1 PATTERN SET Parameters Parameter Range Unit Default CH1 Pattern Number 1 40 ABS 1 CH2 Pattern Number 1 40 ABS 1 Start Code TPV SPV SSP ABS TPV Start Condition SSP n EU 0 0 100 0 n EU n EU 0 0 Segment n Target SP n EU 0 0 100 0 n EU n EU 0 0 Segment n Time 00 00 01 OFF 999 59 59 Hr Min Sec ABS 00 00 01 Segment n Time Signal 1 8 0 20 ABS 0 Segment n Seg Alarm 1 4 0 8 ABS 0 Segment n Seg PID 0 6 ...

Страница 49: ...nt number for partial repeat operation Set Setup box to input count number for partial repeat operation Displays of experiment name for current pattern The experiment name can be set at 5 6 PATTERN NAME This Displays is just READ ONLY and cannot be changed on this screen Move to CH1 or CH2 screen Button to set PATTERN END MODE for operation state after complete of operation RESET Make program oper...

Страница 50: ...last target pattern to paste If setting 0 at END PATTERN only START PATTERN will be copied Displays total number of pattern set on 5 1 Program PATTERN This Displays is just READ ONLY and cannot be changed by itself Displays total number of segment set on 5 1 Program PATTERN This Displays is just READ ONLY and cannot be changed by itself Setup box to input number of the first last target pattern to...

Страница 51: ...EL DEL CH n END PATTERN 0 40 ABS 0 ALL DEL USE UNUSE ABS UNUSE n 1 2 Refer to Table 5 4 for Message Display Table 5 4 Message Display Message Description NO ITEM STORED IN SELECTED PATTERN Displayed when there is nothing stored in the Pattern Number to copy COPY COMPLETED TO SELECTED PATTERN Displayed when selected Pattern copy is completed SELECTED PATTERN DELETE COMPLETED Displayed when selected...

Страница 52: ...etting on 5 1 Program PATTERN 5 4 1 ON OFF Mode TIME SIGNAL operation TIME SIGNAL 0 is used for OFF not generating TS output duration of the program segment This is fixed READ ONLY and cannot be changed TIME SIGNAL 1 is used for ON generating TS output duration of the program segment This is fixed READ ONLY and cannot be changed Button to display next previous 6 TIME SIGNALs page 5 4 2 Timer mode ...

Страница 53: ...nerating TIME SIGNAL ON at segment TS event output will be generating ON signal for OPER TIME When DEALY TIME OPER TIME Segment time TIME SIGNAL output will be generating on just concerned segment and will not affect next segment Table 5 4 TIME SIGNAL setting Parameters Parameter Range Units Default Delay Time 000 00 00 OFF 999 59 59 Hr Min Sec ABS 000 00 00 Operation Time 000 00 00 OFF 999 59 59 ...

Страница 54: ...ME SIGNAL 3 3 DELAY TIME 000 00 00 TIME SIGNAL 4 N SEG TIME DELAY TIME OPER TIME Does not affect the next segment 4 DELAY TIME 000 00 00 TIME SIGNAL 5 OPER TIME ON OFF N 1 SEG TIME N SEG TIME N 1 SEG TIME TS1 SEGMENT N 1 SEG TIME N SEG TIME N 1 SEG TIME SEGMENT OPER TIME ON OFF TS2 DELAY TIME N 1 SEG TIME N SEG TIME N 1 SEG TIME SEGMENT OPER TIME ON OFF TS3 N 1 SEG TIME N SEG TIME N 1 SEG TIME SEG...

Страница 55: ...ogram operation will step to the next segment N 1 Setup box to set whether or not using WAIT Function Setup box to establish WAIT ZONE to release WAIT Operation Set Wait Time to apply when the Process Value does not reach Wait Zone When 00 00 default value of WAIT TIME WAIT operation will be pending infinitely until released Setup box for applicable range of WAIT Function When All is selected Wait...

Страница 56: ...sure Point does not reach Wait Zone within Wait Time Wait Time Set Point Wait Zone Wait Zone PV Segment n Segment n 1 Segment n 2 WAIT Operation Actual Delay Time Release WAIT Operation Step to the next Segment n 1 progression Wait Set Wait Zone Wait Zone PV Segment n Segment n 1 Segment n 2 WAIT Operation Actual Delay Time Release WAIT Operation Step to the next Segment n 1 progression ...

Страница 57: ... as CH1 To input experiment name of each pattern Alpha numeric Input Keypad will pop up Button to move to the previous next 9 PATTERN SET page Press the button and the Alpha numeric Input Keypad will appear Table 5 6 PATTERN NAME setting Parameter Parameter Range Units Default CH1 PATTERN NAME SET 1 40 0 9 A Z Special Character Max 24 Characters ABS EXPERIMENT OF PATTERN 1 40 CH2 PATTERN NAME SET ...

Страница 58: ...Pattern No View Time during graph is in progressing Button to activate Graph Setting Menu Graph Setting Menu will popup at the bottom of the screen depending on ON OFF state of GRP SET button Setup box to input the pattern number to display by trend graph Press the setup box and Input Keypad will popup on the screen Refer to Figure 6 4 Pattern number input keypad for graph Time interval for X axis...

Страница 59: ...move to the next previous paragraph by time interval This is the PATTERN GRAPH VIEW screen when displaying process time of current pattern operation Indicates PV of temperature Green part indicates completed process of current operating pattern Indicates process time of current operating pattern Figure 6 3 Graph Storage Screen 1 Program Operation ...

Страница 60: ...ut Keypad for pattern number to display by trend graph Table 6 1 PATTERN GRAPH VIEW setting Parameters Parameter Range Units Default CH n PATTERN NUMBER 1 40 ABS 1 VIEW TIME 30 Min 1 Hour 3 Hour 6 Hour 12 Hour 24 Hour ABS 30 Min n 1 2 Figure 6 4 Pattern Number Input Screen ...

Страница 61: ...on Refer to Figure 6 5 Figure 6 6 GRAPH STORAGE SET Screen 2 Button to move to the previous next screen Button to display the first last section of current trend data graph Page move button to the next previous page of current trend data graph Button to move the view point Blue line up down by 1 dot point of current trend data graph The value where the view point Blue line is indicating of each it...

Страница 62: ... data file Files list stored in internal memory will popup with pressing the PV FILE button to be active Displays file list by 8 units at once You can select one specific file to open and display by graph Up Down button to list up and down for previous next 8 files Button to store all PV FILES on internal memory into SD card Not available to use without SD CARD option or while recording data at OP...

Страница 63: ...out 37days can be saving on 1 second of sampling time Set CH1 display range in the graph Set CH2 display range in the graph Table 6 2 Trend Graph setting screen Parameters Parameter Set Range Units Primary Value Sampling Time 00 01 99 59 Min Sec ABS 00 01 CH1 Display High Limit CH1 EU CH1 EU 100 0 CH1 Display Low Limit CH1 EU 2 5 102 5 CH1 Display Low Limit CH1 High Limit CH1 EU CH1 EU 0 0 CH2 Dis...

Страница 64: ...card Download Transfer internal data of TEMP2520 to the SD card Upload Transfer data in SD CARD to TEMP2520 Pattern Program pattern profile information established on 5 1 Program PATTERN PARA Established all parameter information All Patterns and parameters information Displays current memory status of SD card Only shows when the SD card has been inserted Data transmission will be activated by pre...

Страница 65: ... by the buttons Sets rotation between CH1 and CH2 Display Screen After set the screen rotation time and it beep 1 minute after without any screen touch at RUN Screen 2 then it repeats rotation between CH1 and CH2 after setting time All touch becomes Key Lock state when screen is rotating Key Lock is released by touching any area in the screen It operates only at The 2 nd Fix Program Fix and Progra...

Страница 66: ...t PV PONT SELECT HEAD NORM ART ABS HEAD BACKLIGHT SAVING 0 99 MIN ABS 10 LED BRIGHTNESS 1 8 ABS 8 units BUZZER SOUND UNUSE USE ABS USE Channel Rotation Time 0 99 SEC ABS 0 User Tag UNUSE USE ABS UNUSE CH1 Tag Name 0 9 A Z Special Character Max 6 Characters ABS TOP 01 CH2 Tag Name 0 9 A Z Special Character Max 6 Characters ABS BOT 01 Figure 7 2 USER TAG NAME SET Screen ...

Страница 67: ...ecent 30 data will be displayed Displays DI ERROR history Name of settings are displayed within the 11 2 Error Name section of the Installation Manual This is READ ONLY and cannot be changed Button to delete entire history of DI error recorded Button to move to the next previous page for DI error history Table 7 2 DI ERROR HISTORY Parameters Parameter Range Units Default ALL CLR OFF ON ABS OFF Fig...

Страница 68: ...e DI ERROR for one minute Ex Exiting by Exit from Error during DI1 occurrence it will ignore for 1 minute even though DI1 occurs and it displays DI Error screen when DI1 is still in effect Ignore means the DI ERROR screen is not shown The BUZ OFF button stops the BUZZER SOUND under DI ERROR Ex This will be explained according to the lamp situation While DI ERROR the related DI lamp will be ON with...

Страница 69: ...Setup box to adjust the current year month date and time The time cannot be changed when the measured values are being recorded Setup box for the starting time of RESERVE Operation Move to CH1 or CH2 screen Button to activate RESEVER Operation based on RESEVE TIME setting The RESERVE button will be active to RESERVE and notice message for RESERVE Operation will display on the Operation screen same...

Страница 70: ...2099 ABS Month 1 12 ABS Date 1 31 ABS AM PM AM PM ABS Hour 1 12 ABS CURRENT TIME Minute 0 59 ABS Year 2000 2099 ABS 2009 Month 1 12 ABS 4 Date 1 31 ABS 1 AM PM AM PM ABS AM Hour 1 12 ABS 12 RESERVE TIME Minute 0 59 ABS 0 Reserve Press to activate RESERVE Operation AM12 00 Midnight 00 00 PM12 00 Noon 12 00 Figure 8 3 PROG Operation screen on RESERVE Synch ...

Страница 71: ...display if DI ERROR occurs while USER SCREEN viewing This button group will be popup on the screen by pressing touch screen during USER SCREEN viewing STOP button of USER SCREEN viewer and return to the Operation screen After passing the START TIME with no key input the USER SCREEN viewer will be activated again Move button to the previous USER SCREEN image Not available when using only one USER S...

Страница 72: ...IR PICTURE 520 X 422 pixels Required File Name USER SCREEN CS1 BMP CS2 BMP CS3 BMP CS14 BMP CS15 BMP CS16 BMP 16 in total INITIAL SCREEN INIT BMP DI ERROR PICTURE DI1 BMP DI2 BMP DI3 BMP DI14 BMP DI15 BMP DI16 BMP 16 in total File name for each image should be fixed as mentioned above USER SCREEN INITIAL SCREEN and DI ERROR PICTURE cannot be replaced by files with names other than the specified on...

Страница 73: ... between the CONTROL UNIT and the DISPLAY PANEL occurs I O BOARD WAS DISCONNECTED message will appear on Operation screen shown as Figure 10 2 Communication Error with I O BOARD when communication error between the I O BOARD and the DISPLAY PANEL occurs Factors for Communication Error Defect Communication Cable Connection error with communication cable Figure 10 1 Communication Error with CONTROL ...

Страница 74: ...strument EUS The Engineering unit range based on the span of instrument EU EUS Range Range Central Point EU 0 100 RL RH RH RL 2 RL EU 100 100 RH RL RL RH RL EUS 0 100 0 RH RL RH RL 2 EUS 100 100 RH RL RH RL 0 Example INPUT T C K2 RANGE 200 00 RL 1370 00 RH Range Central Point EU 0 100 200 00 1370 00 585 00 EU 100 100 1770 00 1370 00 200 00 EUS 0 100 0 1570 00 785 00 EUS 100 100 1570 00 1570 00 0 0...

Страница 75: ...Wonmi gu Buchon si Gyeonggi do Korea 420 773 TEL 82 32 326 9120 FAX 82 32 326 9119 Website http www samwontech com e mail webmater samwontech com The contents of this document are subject to change without prior notice All Rights Reserved Copyright ⓒ 2008 SAMWONTECH CO LTD Printed in Korea 2008 A ...

Отзывы: