background image

Samsung Electronics

3-1

Disassembly & Reassembly

3. Disassembly & Reassembly

3-1  Disassembly Method

-  Be careful to follow the disassembly sequence described in the manual. Otherwise, the product 

may be damaged.

-  Be sure to carefully read and understand the safety instructions before performing any work as 

the IC chips on the PCB are vulnerable to static electricity.

-  Assemble in the reverse order of disassembly.

No

Part Name

Description

Description Photo

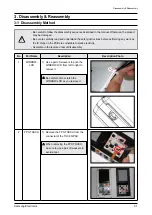
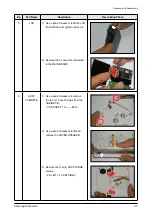
1

WINDOW-

LCD

1)  Use a pair of tweezers to push the 

WINDOW-LCD from left to right to 
remove it.

 Be careful not to scratch the 

WINDOW-LCD as you remove it.

2

FPC-TOUCH 1)  Remove the FPC-TOUCH from the 

connector of the TOUCH-PAD.

 When removing the FPC-TOUCH, 

be sure to use a pair of tweezers to 
avoid a tear. 

Содержание YP-S5

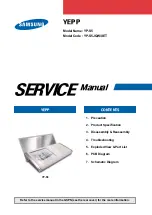
Страница 1: ...S5JQW XET YEPP Refer to the service manual in the GSPN see the rear cover for the more information CONTENTS 1 Precaution 2 Product Specification 3 Disassembly Reassembly 4 Troubleshooting 5 Exploded View Part List 6 PCB Diagram 7 Schematic Diagram YP S5 ...

Страница 2: ...r domestic law GSPN Global Service Partner Network Area Web Site North America service samsungportal com Latin America latin samsungportal com CIS cis samsungportal com Europe europe samsungportal com China china samsungportal com Asia asia samsungportal com Mideast Africa mea samsungportal com Samsung Electronics Co Ltd Nov 2007 Printed in Korea ...

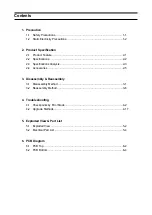
Страница 3: ...fications 2 2 2 3 Specifications Analysis 2 3 2 4 Accessories 2 5 3 Disassembly Reassembly 3 1 Disassembly Method 3 1 3 2 Reassembly Method 3 6 4 Troubleshooting 4 1 Checkpoints by Error Mode 4 2 4 2 Upgrade Methods 4 17 5 Exploded View Part List 5 1 Exploded View 5 2 5 2 Electrical Part List 5 4 6 PCB Diagram 6 1 PCB Top 6 2 6 2 PCB Bottom 6 4 ...

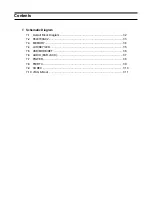
Страница 4: ...7 Schematic Diagram 7 1 Overall Block Diagram 7 2 7 2 S5L8700A02 7 3 7 3 MEMORY 7 4 7 4 LCD KEY LED 7 5 7 5 USB MODE DET 7 6 7 6 AUDIO EAR JACK 7 7 7 7 POWER 7 8 7 8 FM RTC 7 9 7 9 CODEC 7 10 7 10 JTAG Boot 7 11 ...

Страница 5: ...itical damage 3 You should not use this product near water such as bathtub swimming pool or lake etc 4 Power supply A type of battery as displayed on the label should be only used 5 You should not put any object or liquid into product Otherwise it may cause failure or mal operation 6 If replacement material is required service engineer should use materials with the same standard The use of non sta...

Страница 6: ...tor or devices with elements for semi conductor You should purchase and use static electricity arm rings or commercially available You should remove it due to potential shock before supplying power to the device under test 2 You should place appliance on the conductive surface like aluminum film to prevent that static electricity is accumulated or the device is disclosed outside after removing ele...

Страница 7: ...eo speaker When the speaker part is pushed the speaker comes out and you can listen to lively music You can share your favorite songs with others at any time and from any where Wireless Speaker Teleconference You can make and receive calls wirelessly while listening to music Hands Free Wireless Conference Call Call Recording feature External Speaker feature Use as an external speaker for you PC Us...

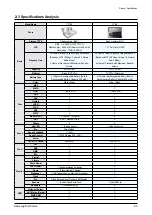
Страница 8: ...35 23 95 FM Frequency 87 5 108 0MHz FM Signal to Noise Ratio 50dBu FM Distortion 1 FM Effective Sensitivity 38dBu Battery Type Li Polymer Rechargeable Battery Built in Rechargeable Battery Capacity 600 mAh Playback Time 30 Hours of Music Playback Based on MP3 128kbps Volume 15 Normal Audio Mode Supported Files File Formats MP3 WMA Ogg Music MPEG1 2 2 5 Layer3 8kbps 320kbps 22kHz 48kHz WMA 48kbps 1...

Страница 9: ...pe Li Polymer Rechargeable Battery Built in Rechargeable Battery Capacity 600 mAh Li Polymer Rechargeable Battery Built in Rechargeable Battery Capacity 830 mAh Color White Black Silver Black Files MP3 WMA OGG up to Q10 up to Q10 WAV X X AAC X X Audible X X JPEG FLAC X APE X WMV X X MPEG4 SVI 176x208 15 Frame X Swf V4 0 Game UI Only X Others X X Sound User EQ 9 band control 9 band control Etc Stre...

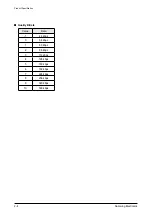
Страница 10: ...2 4 Samsung Electronics Product Specification Quality Bitrate Value Data 1 44 kbps 0 64 kbps 1 80 kbps 2 96 kbps 3 112 kbps 4 128 kbps 5 160 kbps 6 192 kbps 7 224 kbps 8 256 kbps 9 320 kbps 10 500 kbps ...

Страница 11: ...uct Specification 2 4 Accessories 2 4 1 Supplied Accessories Accessories Item Item code Remark Earphones White AH59 01885A Samsung Service center USB Cable AH39 00899A Audio in Cable AH39 00900A Program Installation CD AH46 00051A ...

Страница 12: ...2 6 Samsung Electronics MEMO ...

Страница 13: ...e performing any work as the IC chips on the PCB are vulnerable to static electricity Assemble in the reverse order of disassembly No Part Name Description Description Photo 1 WINDOW LCD 1 Use a pair of tweezers to push the WINDOW LCD from left to right to remove it Be careful not to scratch the WINDOW LCD as you remove it 2 FPC TOUCH 1 Remove the FPC TOUCH from the connector of the TOUCH PAD When...

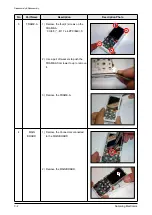
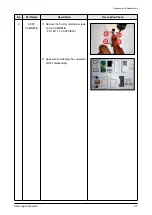
Страница 14: ...cription Photo 3 FRAME A 1 Remove the four 4 screws on the FRAME A CH 0 5 M1 7 L4 ZPC BLK S 2 Use a pair of tweezers to push the FRAME A from lower to up to remove it 3 Remove the FRAME A 4 MAIN BOARD 1 Remove the Connectors connected to the MAIN BOARD 2 Remove the MAIN BOARD ...

Страница 15: ...he LCD from left top from right to remove it 2 Remove the Connectors connected to the MAIN BOARD 6 ASSY CABINET B 1 Use a pair of tweezers to remove the two 2 Cover Screws from the CABINET B YP S5 ABS T1 0 BLK 2 Use a pair of tweezers to lift and remove the COVER SPEAKER 3 Remove the four 4 ASS Y HINGE screws PH M1 7 L3 0 ZPC BLK ...

Страница 16: ...ABINET C 1 Remove the six 6 screws on the CABINET C CH 0 5 M1 7 L4 ZPC BLK S 2 Use a pair of tweezers to push the CABINET C from left to right to remove it 8 FPC BATTERY 1 Remove the ASS Y FPC BATTERY from the CABINET C Do not remove the BATTERY and the FPCB Do not remove the BATTERY and the SPEAKER ...

Страница 17: ...s 3 5 Disassembly Reassembly No Part Name Description Description Photo 9 ASSY CABINET B 1 Remove the four 4 retention screws on the CABINET B PH M1 7 L3 0 ZPC BLK 2 Appearance following the completion of SET disassembly ...

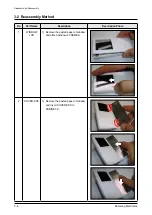
Страница 18: ... Reassembly 3 2 Reassembly Method No Part Name Description Description Photo 1 WINDOW LCD 1 Remove the pasted paper of window and attach window to FRAME A 2 COVER SPK 1 Remove the pasted paper of window and insert COVER SPK to CABINET C ...

Страница 19: ...Samsung Electronics 4 1 Troubleshooting 4 Troubleshooting 4 1 Checkpoints by Error Mode 4 2 4 2 Upgrade Methods 4 17 ...

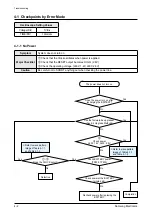
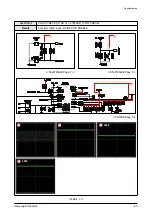
Страница 20: ...pplied 2 Check that the RESET output becomes HIGH 2 8V 3 Check the operating voltage L602 1 2V L603 2 8V Caution Be careful not to SHORT anything out when checking the power line Recheck power after replacing the BATTERY Yes No 3 Check power L602 1 2V L603 2 8V Check power at the BATTERY single part No No No No Check BATTERY power TP602 TP603 1 2 Does the CLOCK occur No Defective Yes Completion Ye...

Страница 21: ...onics 4 3 Troubleshooting Test Point CLOCK CHECK X TAL101 32 768KHz S W100 RESET Result Check for HIGH input DC DC CON ENABLE S5L8700A02 Page 7 3 S5L8700A02 Page 7 3 POWER Page 7 8 Table 4 1 1 1 2 3 1 2 3 3 L602 L603 ...

Страница 22: ...4 4 Samsung Electronics Troubleshooting IC800 IC702 IC700 IC103 CON400 PCB Bottom Page 6 4 IC601 IC501 IC500 CON301 PCB Top Page 6 2 Table 4 1 2 3 3 1 2 ...

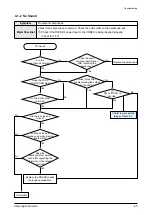
Страница 23: ...L CHs output normally Are there skips and noises Completion Are the skips and noises even when playing another file Does the same symptom persist even after upgrading the firmware to the latest version Replace the BOARD needs thorough examination Yes No Yes Yes Yes Yes Yes Does the same symptom persist even after replacing the earphones Does it play after supplementing the solder on the JACK 1 Che...

Страница 24: ...4 6 Samsung Electronics Troubleshooting Test Point Check the LDO power Result Check if 1 8V is output AUDIO EAR JACK Page 7 7 IC601 IC501 IC500 IC400 CON301 CON300 PCB Top Page 6 2 Table 4 2 1 1 1 ...

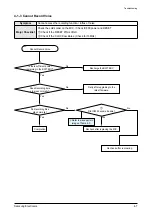
Страница 25: ...N is HIGH 2 Check if the CLOCK oscillates Check for 13MHz Recharge the BATTERY Retry after upgrading to the latest firmware 1 Did IC802 become Enable Recheck after replacing the MIC Recheck after reordering Completion Yes No Yes Yes No No No Yes Is there sufficient power remaining in the BATTERY Does Recording time progress normally Do Recording files play normally Cannot Record Voice Refer to wav...

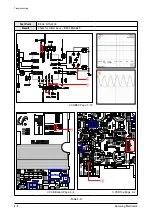
Страница 26: ...ting Test Point IC802 X TAL800 Result Check for HIGH input IC802 ENABLE CODEC Page 7 10 IC800 IC702 IC700 IC103 CON400 00 IC200 CON302 IC201 PCB Bottom Page 6 4 IC601 IC501 IC500 IC400 CON301 CON300 PCB Top Page 6 2 Table 4 3 1 2 1 2 2 1 ...

Страница 27: ...he SWITCH in the HOLD OFF position Is the TOUCH PAD malfunctioning Check the top of the unit to see if it is set to HOLD SW ON Disassemble the unit and check if FPCB is defective If the TOUCH is poor replace the TOUCH PAD Replace the BOARD needs thorough examination Disassemble the unit and check if the TOUCH PAD has come off the framework Yes No Yes No Yes No TOUCH PAD Does Not Work ...

Страница 28: ...K signal input to the FM TUNER is being inputted properly 2 Check the I2C interface connection 2 Does I2C work properly 1 Is there 32 768 KHz CLOCK Completion Replace the IC Yes No Yes No No Does IC700 RTC work Yes Recheck after reordering Cannot Receive FM Radio Refer to wave pattern image of Table 4 4 Refer to wave pattern image of Table 4 4 ...

Страница 29: ...g Electronics 4 11 Troubleshooting Test Point FM CLOCK CHECK Result Check if 32 768 KHz is being inputted FM RTC Page 7 9 IC800 IC702 IC700 IC103 CON400 IC200 CON3 IC201 PCB Bottom Page 6 4 Table 4 4 1 1 2 1 ...

Страница 30: ...n check if the PORT below maintains at HIGH 2 Check if the LCD backlight connector is broken LCD single part check Does it work after replacing the LCD Can the USB connection be made and MP3 files be played Completion Completion Yes No Yes No Does it work after upgrading to the latest firmware Replace the BOARD needs thorough examination 1 Did IC300 2PIN become Enable No Yes Yes No LCD Backlight R...

Страница 31: ...Samsung Electronics 4 13 Troubleshooting Test Point IC300 2PIN LED ENABLE CHECK Result Check for HIGH input LED ON LCD KEY LED Page 7 5 IC300 IC200 CON302 IC201 PCB Bottom Page 6 4 Table 4 5 1 1 1 ...

Страница 32: ...er check the battery terminal connections after disassembling the unit Is the BATTERY FPCB connected properly Completion Yes No Yes No Does it work after upgrading to the latest firmware Yes 2 Check power at the BATTERY single part Yes No Recheck after replacing the BATTERY No Replace the BOARD needs thorough examination Does it work when the power adapter is connected Cannot Recharge 1 Did IC601 ...

Страница 33: ...Samsung Electronics 4 15 Troubleshooting Test Point IC601 12PIN Result Check for HIGH input DC DC CON ENABL POWER Page 7 8 IC601 IC501 IC500 IC400 CON301 CON300 PCB Top Page 6 2 Table 4 6 1 1 1 ...

Страница 34: ...ble storage Is there USB connection icon displayed on the LCD Completion Recheck after installing the driver Yes No Yes Yes Is there an Unknown Device show in Device Manager Can NAND FORMAT and BOOT Update be performed with DFU No No Yes No Can formatting be done in Explorer Is the USB connection established after a RESET No Defective Yes Yes Yes No No Is it accessible USB connection ...

Страница 35: ...ownload the firmware upgrade file to a folder and decompress it 2 Check the contents of the folder that was decompressed 3 Connect the YP S5 to the PC 4 Open the Removable Disk folder of the YP S5 5 Select the installation file in the folder that was decompressed and then copy the upgrade files to the Removable Disk folder of the YP S5 6 Perform Safely Remove Hardware and then disconnect the devic...

Страница 36: ...g the POWER ON KEY When RESET is pressed it will be connected in DFU Mode After the DFU connection is made you may release the POWER KEY 2 You need to make a USB connection and then install the device After the initial installation it will be connected automatically next time you connect Once the device is recognized it will be connected to USB DFU DEVICE Specify the folder in which DFU is stored ...

Страница 37: ...he Bluesdfu exe file in the DFU folder to launch the DFU program 1 Select UpdateNAND bin 2 Select Bootloader_V0 51 3 Run Download If the Browse button is not active the DFU connection has not been made You need to disconnect the USB cable and retry 3 2 1 ...

Страница 38: ... S5 case and check the MAC Address sticker inside 2 Enter the following MAC Address in a blank text file and save it with the name shown below 3 Make a USB connection and copy and paste it to the SYSTEM folder 4 Disconnect the USB connection and Power On the YP S5 5 Go to Menu Bluetooth Bluetooth Settings My Device Info and check the MAC Address 6 If an error occurs the address at which the error ...

Страница 39: ...Samsung Electronics 5 1 Exploded View Part List This Document can not be used without Samsung s authorization 5 Exploded View Part List 5 1 Exploded View 5 2 5 2 Electrical Part List 5 4 ...

Страница 40: ...ed View Part List This Document can not be used without Samsung s authorization 5 1 Exploded View AW120 AC357 B AS079 AF001 AA250 B B B AL197 AC300 AA002 AK290 AG085 B AA135 B B A A AA003 AC004 B B AC401 AC003 AC304 B B AC402 AA004 ...

Страница 41: ... 0 1 SNA AC402 AH63 01377A CUSHION SHIELD R YP S5 PORON T0 8 W25 0 1 SNA AF001 AH61 02403B FRAME A YP S5 PC WHT T1 0 W46 3 L9 1 SA AG085 AH61 02404B GUIDE SLIDE YP S5 POM T1 6 W2 0 L43 0 WH 2 SNA AK290 AH64 04333B KNOB POWER YP S5 PC T2 4 W3 2 L4 0 WHT 1 SNA AL197 AH67 00473B LENS TOUCH YP S5 PC ABS BLACK CLEAR 41 4 1 SA AS079 AH63 01437A SHEET FRAME YP S5 DOUBLE FACE TAPE T0 15 1 SNA AW120 AH64 0...

Страница 42: ...20 16V Y5V 16 1 SA C310 2203 005015 C CER CHIP 150nF 80 20 16V Y5V 16 1 SA C311 2203 005015 C CER CHIP 150nF 80 20 16V Y5V 16 1 SA C312 2203 006093 C CER CHIP 1000nF 80 20 6 3V Y5V 1 SA C313 2203 002709 C CER CHIP 100nF 80 20 16V Y5V 10 1 SA C315 2203 000278 C CER CHIP 0 01nF 0 5pF 50V C0G 100 1 SA C321 2203 005493 C CER CHIP 220nF 80 20 16V Y5V 10 1 SA C322 2203 005493 C CER CHIP 220nF 80 20 16V ...

Страница 43: ...LAG08U0M 16Gbit 2 1 SA IC300 1203 003708 IC DC DC CONVERTER AAT3151 DFN 12P 1 SA IC400 0801 002800 IC CMOS LOGIC 7SV08 AND GATE SC 70 1 SA IC401 1009 001018 IC HALL EFFECT S W HED52XXU11 3P 1 SA IC500 1203 004690 IC DC DC CONVERTER MAX1760 TDFN 10P 1 SA IC501 0505 002229 FET SILICON FDMA1028NZ N 20V 3 7A 0 1 SA IC600 1203 003549 IC POSI FIXED REG S 1206B15 SOT 23 1 SA IC601 1203 004684 IC DC DC CO...

Страница 44: ...HIP 220ohm 5 1 16W TP 1005 1 SA R519 2007 000143 R CHIP 4 7Kohm 5 1 16W TP 1005 1 SA R520 2007 000143 R CHIP 4 7Kohm 5 1 16W TP 1005 1 SA R521 2007 000162 R CHIP 100Kohm 5 1 16W TP 1005 1 SA R522 2007 000162 R CHIP 100Kohm 5 1 16W TP 1005 1 SA R523 2007 000171 R CHIP 0ohm 5 1 16W TP 1005 1 SA R524 2007 000171 R CHIP 0ohm 5 1 16W TP 1005 1 SA R525 2007 000140 R CHIP 1Kohm 5 1 16W TP 1005 1 SA R600 ...

Страница 45: ...LE USB CABLE 49338 0001 YP T 1 SA AH39 00900A CBF CABLE 49596 0001 YP S5 24 200 1 SA AH46 00051A S W CD YP S5 MTP CD YP S5 1 SA AH59 01885A EARPHONE EP 150 EP 150 WHITE EP 15 1 SA AH63 01488B SHEET BOTTOM YP S5 PAPER T0 6 W230 1 SNA AH68 00650C MARK RECYCLE WARRANTY CARD YP K3 XE 1 SNA AH68 00650H MARK RECYCLE CARD YP T10 XEU XET XE 1 SA AH68 02027C MANUAL QG YP S5 XEF XET ENG I S F G 1 SA AH68 40...

Страница 46: ...5 8 Samsung Electronics MEMO ...

Страница 47: ...Samsung Electronics 6 1 PCB Diagram 6 PCB Diagram 6 1 PCB Top 6 2 6 2 PCB Bottom 6 4 ...

Страница 48: ...Electronics PCB Diagram 6 1 PCB Top 1 6 4 5 TP10 TP3 2 3 TP4 1 LCD sticking face 2 BLUETOOTH ANTENA 3 FM Tuner 4 USB Connector 5 KEY FPCB Connector 6 BATTERY Connector TP5 TP7 IC601 IC501 IC500 IC400 CON301 CON300 ...

Страница 49: ...ACK 5 T_DATA 6 T_CLOCK 7 2 8VDD 8 2 8VDD 4 USB Connector Pin No Signal 1 BAT ID Low current 450mA 2 UART DETECT 3 VCC IO 2 8V 4 ADAPTOR INPUT 5 ADAPTOR INPUT 6 NC 7 NC 8 NC 9 NC 10 NC 11 LINE OUT MUTE 12 GROUND 13 UART RX 14 UART TX 15 USB D 16 USB POWER 17 LINE OUT R 18 LINE OUT L 19 GROUND 20 NC 21 BATTERY INPUT 22 BATTERY INPUT 23 EXTERNAL BATTERY DETECT 24 PBA_CE ...

Страница 50: ...om 5 0 4 2 3 1 9 TP9 TP1 TP6 7 6 TP2 TP8 8 1 LCD Connector 31 PIN 2 SDRAM 32MB 3 MAIN DSP 4 24MHz USB Clock 5 EARPHONE JACK 3 PIN 6 CODEC 7 32 768KHz System Clock 8 BLUETOOTH Module 9 MIC 0 NAND IC800 IC702 IC700 IC103 CON400 IC300 IC200 CON302 IC201 ...

Страница 51: ...ROUND 1 3 LED GROUND 2 4 LED GROUND 3 5 LCD CHIP SELECT 6 LCD RESISTER SELECT 7 LCD WRITE 8 LCD READ 9 GROUND 10 LCD DATA 0 11 LCD DATA 1 12 LCD DATA 2 13 LCD DATA 3 14 LCD DATA 4 15 LCD DATA 5 16 LCD DATA 6 17 LCD DATA 7 18 GROUND 19 LCD DATA 8 20 LCD DATA 9 21 LCD DATA 10 22 LCD DATA 11 23 LCD DATA 12 24 LCD DATA 13 25 LCD DATA 14 26 LCD DATA 15 27 LCD RESET 28 GROUND 29 VCC 2 8V 30 VCC 2 8V 31 ...

Страница 52: ...6 6 Samsung Electronics MEMO ...

Страница 53: ...an not be used without Samsung s authorization 7 Schematic Diagram 7 1 Overall Block Diagram 7 2 7 2 S5L8700A02 7 3 7 3 MEMORY 7 4 7 4 LCD KEY LED 7 5 7 5 USB MODE DET 7 6 7 6 AUDIO EAR JACK 7 7 7 7 POWER 7 8 7 8 FM RTC 7 9 7 9 CODEC 7 10 7 10 JTAG Boot 7 11 ...

Страница 54: ...ART Line In Line Out USB Controller I2S Uart RX TX The Main System contains basic circuit blocks such as Processor S5L8700 SDRAM Flash Memory Power Block Audio DAC etc and function blocks such as FM Tuner Bluetooth Block Hal IC and etc The display is connected to a 1 8 inch TFT LCD Serial Interfaces between ICs are implemented with various Protocols throughout the System A host processor S5L8700 U...

Страница 55: ...Samsung Electronics 7 3 Schematic Diagram This Document can not be used without Samsung s authorization 7 2 S5L8700A02 TP2 TP1 TP2 POWER AUDIO TP1 ...

Страница 56: ...7 4 Samsung Electronics Schematic Diagram This Document can not be used without Samsung s authorization 7 3 MEMORY POWER ...

Страница 57: ...Samsung Electronics 7 5 Schematic Diagram This Document can not be used without Samsung s authorization 7 4 LCD KEY LED POWER AUDIO TP9 TP9 ...

Страница 58: ...7 6 Samsung Electronics Schematic Diagram This Document can not be used without Samsung s authorization 7 5 USB MODE DET POWER ...

Страница 59: ...Samsung Electronics 7 7 Schematic Diagram This Document can not be used without Samsung s authorization 7 6 AUDIO EAR JACK TP5 TP5 POWER AUDIO ...

Страница 60: ...7 8 Samsung Electronics Schematic Diagram This Document can not be used without Samsung s authorization 7 7 POWER TP3 TP10 TP4 TP10 TP3 TP4 POWER ...

Страница 61: ...Samsung Electronics 7 9 Schematic Diagram This Document can not be used without Samsung s authorization 7 8 FM RTC TP8 TP8 POWER ...

Страница 62: ...7 10 Samsung Electronics Schematic Diagram This Document can not be used without Samsung s authorization 7 9 CODEC TP6 TP6 TP7 TP7 POWER AUDIO ...

Страница 63: ...Samsung Electronics 7 11 Schematic Diagram This Document can not be used without Samsung s authorization 7 10 JTAG Boot POWER ...

Страница 64: ...7 12 Samsung Electronics MEMO ...

Отзывы: