background image

ENGLISH

22

22

How to Use the Battery Pack

Prepare an extra battery if you use the CAM outdoors.

Contact the Samsung service centre to purchase new battery pack.

If you zoom in or out, the recording time becomes shorter.

‘Continuous Recording Time’ indicates the time that you neither use zooming function 
nor play video files and record the video file continuously when the EIS(      ) function is off.

When you eject the battery pack from the CAM, hold the battery pack to prevent it dropping to the floor.

If you close the LCD screen, it switches off automatically.
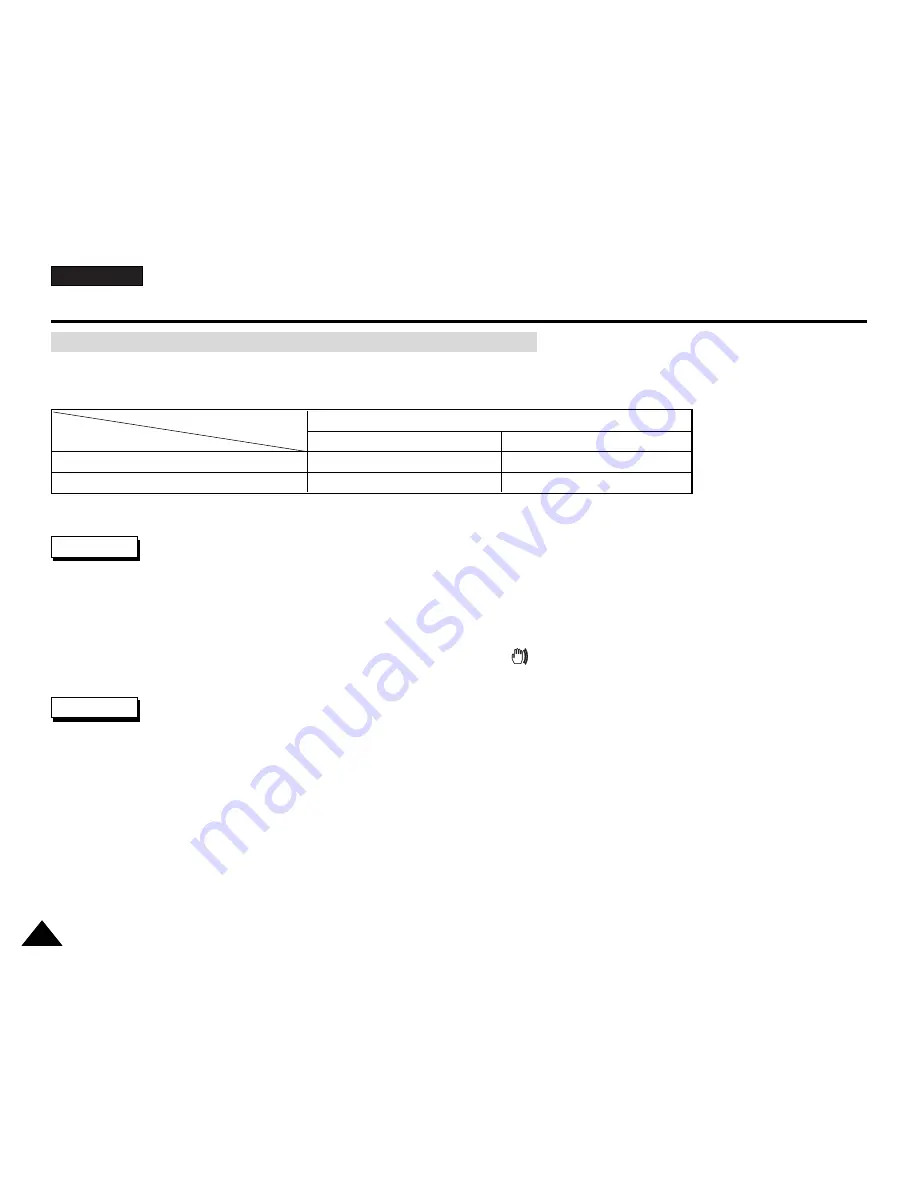
The continuous recording times given in the table below are approximations. Actual recording time depends on usage.

Continuous recording time based on battery type

Continuous Recording Time

LCD ON

Backlight OFF

SB-P90A (900mAh) 

SB-P180A (1800mAh) (option)

Approx. 60 min.

Approx. 120 min.

Approx. 80 min.

Approx. 160 min.

Battery 

Time

Warning

Notes

Содержание VP-X105

Страница 1: ...fore operating the unit please read this Instruction Book thoroughly and retain it for future reference This product meets the intent of Directive 89 336 CEE 73 23 CEE 93 68 CEE AF Auto Focus CCD Charge Coupled Device LCD Liquid Crystal Display VP X105L X110L ...

Страница 2: ... Parts 11 Features 12 Accessories Supplied with the CAM 13 Rear Left View 14 Right Bottom View 15 External Camera Module View 16 LCD Display 17 OSD On Screen Display in Video Record Mode Video Play Mode 17 OSD On Screen Display in Photo Capture Mode Photo View Mode 18 OSD On Screen Display in MP3 Play Mode Voice Record Play Mode 19 Battery Pack Installation Ejection 20 Maintain the Battery Pack 21...

Страница 3: ...ory Stick Optional Accessory 34 Mode and Menu Selection 35 Recording 37 Recording 37 Zooming In and Out 38 Setting the Video In 39 Playing 40 Playing on the LCD Monitor 40 Selecting File Options 42 Deleting Video files 42 Locking Video files 43 Copying Video files 44 Setting the PB Option 45 Setting Various Functions 46 Setting the Video file Size 46 Setting the Video file Quality 47 Setting the F...

Страница 4: ... Setting DPOF Digital Print Order Format Function 61 Copying Photo files 62 Setting Various Functions 63 Setting the Photo file Size 63 Setting the Light 64 Setting the Focus 65 Setting the EIS Electronic Image Stabilizer 66 Setting the White Balance 67 Setting the Program AE Programmed Auto Exposure 68 Setting the BLC Backlight Compensation 69 Storing Music in the CAM 72 Copying Music files to th...

Страница 5: ...les 80 Locking Voice files 81 Copying Voice files 82 Deleting Files or Folders 83 Locking Files 84 Copying Files or Folders 85 Viewing File Information 86 Adjusting the LCD Monitor 88 Adjusting the LCD Brightness 88 Adjusting the LCD Colour 89 Adjusting Date Time 90 Setting Time 90 Setting Date 91 Setting Date Format 92 Setting Time Format 93 ENGLISH Contents 5 5 Voice Recorder Mode 78 Using File ...

Страница 6: ...ronment 104 Using PC Cam 105 Connecting the CAM to a Printer 106 Connecting the External Camera Module 108 Connecting the External Camera Module to CAM 108 Recording Video Using the External Camera Module 108 Wearing the External Camera Module 109 Connecting the extension cable while the set is in the Carrying Case 109 Mounting the External Camera Module on Rubber Mount 109 Using the Short and Lon...

Страница 7: ...For Windows98SE only 120 Printing Photos 122 Printing with PictBridge Function 122 Printing Photos with DPOF Files 123 Cleaning and Maintaining the CAM 124 After using the CAM 124 Cleaning the Body 125 Using the Built in Rechargeable Battery 125 Regarding the Battery 126 Using the CAM Abroad 127 Self Diagnosis Display 128 ENGLISH 7 7 Specifications 132 Index 134 Power Sources United Kingdom Only 1...

Страница 8: ... the device is not working properly please consult your nearest dealer or authorized Samsung service facility Disassembling the device yourself may cause irrecoverable damage which will be difficult to repair Clean the device with a dry soft cloth Use a soft cloth moistened with a mild detergent solution for removing stains Do not use any type of solvent especially benzene as they may seriously da...

Страница 9: ...ed materials may infringe on the rights of the Copyright owners and is contrary to copyright laws All the trade names and registered trademarks mentioned in this manual or other documentation provided with your Samsung product are trademarks or registered trademarks of their respective holders Notes Regarding the CAM Notes Regarding COPYRIGHT Notes Regarding Moisture Condensation 1 Do not leave th...

Страница 10: ...ct is not charged Before using the battery pack you need to fully charge it Do not drop the battery pack Dropping the battery pack may damage it Fully discharging a Lithium Polymer battery damages the internal cells The battery pack may be prone to leakage when fully discharged To avoid damage to the battery pack make sure to remove the battery when no charge remains Clean the terminal to remove f...

Страница 11: ...e technician has used replacement parts specified by the manufacturer and having the same characteristics as the original part Unauthorized substitutions may result in fire electric shock or other hazards Correct Disposal of This Product Waste Electrical Electronic Equipment Applicable in the European Union and other European countries with separate collection systems This marking shown on the pro...

Страница 12: ...nterface PC Cam for multi entertaining You can use this the CAM as a PC camera for video chatting video conference and other PC camera applications Plus Advantage MP3 With the CAM you can play back MP3 files stored in the internal memory Memory Stick and Memory Stick Pro Option Enjoy your favourite songs with the MP3 files with the CAM A Sports CAM equipped with External Camera Module Equipped wit...

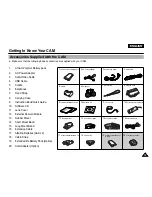
Страница 13: ...Strap 19 Extended life Battery Pack Option 20 Scart Adapter Option Make sure that the following basic accessories are supplied with your CAM Accessories Supplied with the CAM 3 Audio Video Cable 2 AC Power Adapter 1 Lithium Polymer Battery pack 5 Cradle 6 Earphones 4 USB Cable 11 Lens Cover 20 Scart Adapter Option 18 Velcro Strap 19 Extended life Battery Pack Option 10 Software CD 12 External Came...

Страница 14: ...Left Multi Play Mode button 8 switch Zoom out W Rewind switch 9 OK button Play Pause 11 Record Stop button 12 Power Charging indicator 13 OFF switch Mode Selector 14 Menu button 15 Memory Stick Slot 2 LCD Monitor 4 LCD DISPLAY button 5 MP3 LOCK switch 6 Built in Speaker 1 Built in MIC 6 Back Multi Play Mode button 7 switch Zoom out RPS switch 8 OK button Play Pause 9 switch Zoom in FPS switch 10 R...

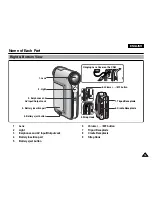
Страница 15: ... insertion part 5 Battery eject button 6 Volume MF button 7 Tripod Receptacle 8 Cradle Receptacle 9 Strap Hook 1 Lens 2 Light 4 Battery insertion part 5 Battery eject button 3 Earphones and AV Input Output Jack 6 Volume MF button Hanging Lens Cover on the CAM 7 Tripod Receptacle 8 Cradle Receptacle 9 Strap Hook ...

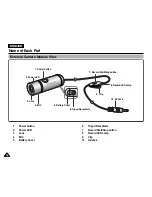
Страница 16: ...button 2 Power LED 3 Lens 4 MIC 5 Battery Cover 6 Tripod Receptacle 7 Record Start Stop button 8 Record LED Lamp 9 Clip 10 AV Jack 1 Power button 3 Lens 6 Tripod Receptacle 5 Battery Cover 7 Record Start Stop button 9 Clip 10 AV Jack 8 Record LED Lamp 4 MIC 2 Power LED ...

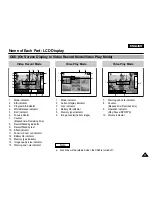
Страница 17: ...13 Memory type indicator 14 Image quality size indicator 15 Warning and note indicator 1 Mode indicator 2 Current display indicator 3 Lock indicator 4 Battery life indicator 5 Memory type indicator 6 Image counter Current image 7 Warning and note indicator 8 Counter Elapsed time Recorded time 9 Operation indicator Play Pause RPS FPS 10 Volume indicator Video Record BLC 00 16 24 32 SF 720 STBY Sepi...

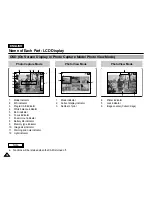
Страница 18: ...ery life indicator 9 Memory type indicator 10 Image size indicator 11 Warning and note indicator 12 Light indicator 1 Mode indicator 2 Current display indicator 3 Number of print 4 Printer indicator 5 Lock indicator 6 Image counter Current image Photo Capture Mode Sepia 800 Photo Capture BLC 1 3 2 4 5 6 7 8 9 10 11 12 Photo View Mode 1 2 3 Photo View Mode Photo View 100 0025 2 Copies 6 4 5 Functio...

Страница 19: ...tor 2 File number Date and Time 3 Sampling Rate Bit Rate 4 Elapsed time Full time 5 Operation indicator 6 Record Standby text 7 Progress Bar 8 Lock indicator 9 Volume indicator Functions will be retained when the CAM is turned off Note MP3 Play Mode MP3 Play 2 I believe I can fly mp3 3 6 Mbytes Stereo 44 1KHz 128Kbps 00 34 03 46 1 2 3 4 5 6 Voice Record Mode Voice Record 2 2005 01 01 12 51 04 AM S...

Страница 20: ...your area Keep them away from small children Do not mix old and new batteries When replacing the batteries replace them both If the External Camera Module will not be in use for a while remove the batteries Do not insert a foreign material or electric conducting material in the battery compartment It can cause device failure Do not open the battery cover with an excessive force The connected cable...

Страница 21: ...k will be reduced if it is used in temperatures below 32 F 0 C or left in temperatures above 104 F 40 C for a long period Do not put the battery pack near any heat sources fire or flames for example Do not disassemble process press or heat the Battery Pack Do not allow the and terminals of the battery pack to be short circuited It may cause leakage heat generation induce fire and overheating It is...

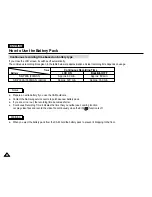
Страница 22: ... file continuously when the EIS function is off When you eject the battery pack from the CAM hold the battery pack to prevent it dropping to the floor If you close the LCD screen it switches off automatically The continuous recording times given in the table below are approximations Actual recording time depends on usage Continuous recording time based on battery type Continuous Recording Time LCD...

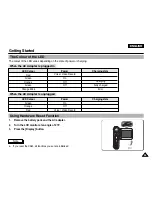
Страница 23: ...indicator is green If you are charging the battery the colour of the charge indicator is orange The charge indicator flickers if the battery is abnormal Battery Level Indicator State Fully charged 40 60 used 60 80 used 80 95 used Exhausted flickers The device will soon turn off Change the Battery Pack as soon as possible flickers The device will be forced to turn off after 5 seconds Message Batter...

Страница 24: ...e AC adapter by pressing the buttons on the sides of the adapter cable plug while pulling it out 5 Insert the AC power adapter into the outlet You can charge the battery pack when you use the CAM Connect the AC power adapter with the CAM directly It is recommended you fully charge the battery pack before use You should only charge the battery in an environment between 0 C and 40 C Warning Note Cha...

Страница 25: ...Red Green Orange Green Orange Blink Power Voice Video Record On Off Off Charging state Charging Fully charged Error When the AC Adapter is unplugged LED Colour Green Orange Red Power On Off Voice Video Record Charging state 1 Remove the battery pack and the AC adapter 2 Turn the LCD monitor at an angle of 270 3 Press the Display button If you reset the CAM all functions you set are initialized Not...

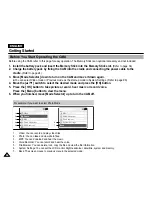
Страница 26: ... press the OK button 5 Press the OK button to take pictures record hear music or record voice Press the Menu button to view the menu 6 When you finished move Mode Selector up to turn the CAM off For example If you want to select Photo Mode Mode Selection Mode Selection MP3 Voice Recorder File Browser Video Photo 1 2 3 4 5 Mode Selection Mode Selection MP3 Voice Recorder File Browser System Setting...

Страница 27: ...e Select up Select down Return to previous menu Confirm selecting Button Recording Picture taking Playing Viewing Selecting Select up Select menu Return to previous menu Select down Select menu Move to Video Play Photo View Move to Settings Move to Video Recoed Photo Capture Move to File Options Button Video Record Photo Capture Video Play Photo View Press for about 2 seconds If there is no file w...

Страница 28: ...pen Close Menu Off Close Mode Selection Select Mode Select Mode Help Back Prev Rew Play Next FF Menu Off Mode Selection Play Help Play Help Play Mode Zoom Out Play Last Zoom In Menu Record Off Record Capture Help Mode Selection Record Capture Help Cancel Up Next Down Menu Off Mode Selection Time Date Dialog Help Time Date Dialog Help Once The display indicators turn off Twice The back light turns ...

Страница 29: ...e the switch to select System Settings and press the OK button 3 Move the switch to select Display and press the OK button 4 Move the switch to select LCD Brightness or LCD Colour and press the OK button 5 Move the switch to select desired brightness or colour and press the OK button Refer to pages 88 89 for details If you select Back in the menu the previous menu appears If it is too bright adjus...

Страница 30: ...ils about Memory Stick You can store general data in files and folders of the CAM The number of the file is up to 9 999 and folder is up to 999 DCAM JPG Photo file SMOV AVI Video file SWAV WAV Voice file MP3 MP3 file MISC DPOF files are stored Do not change the file or folder name except Free You can freely change the file or folder name of Free Video files that you have not made with the CAM may ...

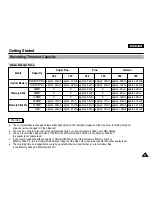
Страница 31: ...evel The recording time and capacity may vary by generating the bad sector when you record video files in the Memory Stick and Memory Stick Pro Warning Media Internal Memory Memory Stick Memory Stick Pro Capacity 512MB VP X105L 1GB VP X110L 32MB 64MB 128MB 256MB 512MB 1GB Super Fine 352 approx 21min approx 44min X X X approx 10min approx 20min approx 42min 720 approx 10min approx 22min X X X appro...

Страница 32: ... recording time and the number of images shown are maximum figures based on using one function In actual use using more than one function will reduce the capacity of each If you set the light you can take fewer photos than mentioned number of image If you format the Memory Stick or Memory Stick Pro use the Memory Stick Formatter in the supplied software CD Notes 800 600 approx 5019 approx 9803 app...

Страница 33: ...Stick is an optional accessory The video file and the photo files are stored in internal memory by default 1 Insert the Memory Stick Refer to page 34 2 Move Mode Selector down to turn on the CAM and move it down again The Mode Selection screen appears 3 Move the switch to select System Settings and press the OK button 4 Move the switch to select Memory and press the OK button 5 Move the switch to ...

Страница 34: ... erasing files or formatting the Memory Stick Please turn the power off before you insert or eject the Memory Stick to avoid losing data Do not place the Memory Stick near a strong electro magnetic device Do not allow metal substances to come in contact with the terminals on the Memory Stick Do not bend the Memory Stick After pulling the card out from the CAM keep the Memory Sticks in a soft case ...

Страница 35: ...ch to select a desired mode and press the OK button Mode Selection 1 Press the Menu button after selecting the desired mode 2 Move the switch to select a desired menu and press the OK button Menu Selection SPECIAL OPERATION 1 Press the Menu button for 2 seconds The menu screen of the selected mode appears User s manual only describes the first way of performing an operation There may be other and ...

Страница 36: ...iles 43 Copying Video files 44 Setting the PB Option 45 Setting Various Functions 46 Setting the Video file Size 46 Setting the Video file Quality 47 Setting the Focus 48 Setting the EIS 49 Setting the White Balance 50 Setting the Program AE 51 Setting the BLC 52 Setting the Effect 53 Setting the Digital Zoom 54 1 1 You can set the time and date in System Settings Refer to pages 90 91 Note 36 36 ...

Страница 37: ...e is displayed and it starts recording 3 Press the Record Stop button again to stop recording It stops recording and the CAM is ready again 4 Move Mode Selector up to turn off the CAM Notes If you press the Record button and press it in 1 second new video file is not made If the Auto Shut Off is set the CAM turns off automatically after 5 minutes Detach the Battery Pack when you finish recording t...

Страница 38: ...to page 96 2 Press the Record Stop button to start recording BLC Video Record SF 720 00 16 10 50 REC BLC Video Record SF 720 00 16 10 50 REC BLC Video Record SF 720 00 16 10 50 REC Zoom In Zoom Out Notes Frequent use of zooming may result in higher battery power consumption Refer to page 54 about Digital Zoom Move the switch up to zoom out The subject appears farther away when you zoom out Move th...

Страница 39: ... Camera when using the external camera or Normal when using just the camcorder then press the OK button If External Camera is selected External appears on the screen and enables you to record signal from External Camera Module If Normal is selected Normal appears on the screen and enables you to record signal from external sources It is recommended that only digital devices DVD DVC etc are used as...

Страница 40: ...ess the Menu button and move the switch Press the OK button after selecting Play 3 Move the switch to find the video file you want to play Each time you move the switch the frame moves horizontally Each time you press the button a page 6 frame moves 4 Press OK button to play the video file you want Each time you press the OK button play or pause is selected repeatedly 5 Press the OK button again t...

Страница 41: ...an adjust the volume up to 10 steps You can also play the video file on a TV screen by connecting the CAM to a TV Refer to page 112 It is necessary to install Image Mixer for playback video files recorded on the CAM on your PC OK Button Play or pause the video file Switch In Video Play mode Press it to move to previous file Press and hold it to use RPS function RPS rate 2x 4x 8x 16x 32x 64x 128x S...

Страница 42: ...utton You can select File Options only in Video Play mode 5 Move the switch to select Delete and press the OK button 6 Move the switch to select the followings Press the OK button Selected The selected video file is deleted All All video files are deleted Cancel Cancel deleting video files Video Record 00 00 10 57 SF 720 STBY Video In Record Settings Back Play Settings Back Note Press and hold the...

Страница 43: ...ct File Options only in Video Play mode 5 Move the switch to select Lock and press the OK button 6 Move the switch to select the followings and press the OK button Selected The selected video file is locked All All video files are locked Cancel Cancel locking video files Video Record 00 00 10 57 SF 720 STBY Video In Record Settings Back Play Settings Back 01 03 Video In File Options Record Back Pl...

Страница 44: ...tions only in Video Play mode 5 Move the switch to select Copy To and press the OK button If you selected video External as the Storage type the file is copied to internal and vice versa 6 Move the switch to select the followings and press the OK button Selected Copy the selected video file All Copy all video files Cancel Cancel copying video files Video Record 00 00 10 57 SF 720 STBY Video In Rec...

Страница 45: ...ons and press the OK button You can select File Options only in Video Play mode 5 Move the switch to select PB Option and press the OK button 6 Move the switch to select the following and press the OK button Selected Play the selected video file All Play all video files Cancel Cancel setting PB Option Video Record 00 00 10 57 SF 720 STBY Video In Record Settings Back Play Settings Back 01 03 Video...

Страница 46: ...0 Select 720 pixel 352 Select 352 pixel 4 Move the switch to select the video file size and press the OK button 5 Press the Menu button to finish setting The icon of selected function is displayed Video Record SF 720 00 00 10 57 STBY Video In Record Settings Back Play Settings Back White Balance Auto EIS On Focus AF Quality Super Fine White Balance Auto Video Settings EIS On Focus AF Quality Super...

Страница 47: ...ality N Normal Select normal quality 4 Move the switch to select the video file quality and press the OK button 5 Press the Menu button to finish setting The icon of selected function is displayed Video Record SF 720 00 00 10 57 STBY Video In Record Settings Back Play Settings Back White Balance Auto Size 720 EIS On Focus AF White Balance Auto Video Settings Size 720 EIS On Focus AF Quality Super ...

Страница 48: ...Press the Menu button to finish setting The icon of selected function is displayed If you select the AF any icon is not displayed Notes If you select Back in the menu the previous menu appears Press and hold the Menu button in Video Record mode you can move to Settings directly Video Record SF 720 00 00 10 57 STBY Video In Record Settings Back Play Settings Back White Balance Auto Quality Super Fi...

Страница 49: ... selecting Settings 3 Move the switch to select EIS and press the OK button On Set the EIS function Off Cancel the EIS function 4 Move the switch to select desired setting and press the OK button 5 Press the Menu button to finish setting The icon of selected function is displayed White Balance Auto Focus AF Quality Super Fine Size 720 White Balance Auto Focus AF Video Settings Quality Super Fine S...

Страница 50: ...ght Natural light Indoor Record with the balanced light Glow lamp or light in the studio 4 Move the switch to select desired setting and press the OK button 5 Press the Menu button to finish setting The icon of selected function is displayed If you select Auto any icon is not displayed Notes If you select Back in the menu the previous menu appears Turn the Digital Zoom off for more accurate White ...

Страница 51: ...oo bright under strong direct light such as spotlight It is suitable for concert and school performance Sand Snow Use when the light is very strong such as on the beach or in the snow HS Shutter Allows fast moving images to be captured one frame at a time 4 Move the switch to select desired setting and press the OK button 5 Press the Menu button to finish setting The icon of selected function is d...

Страница 52: ...ect BLC and press the OK button On Set the BLC function Off Cancel the BLC function 4 Move the switch to select desired setting and press the OK button 5 Press the Menu button to finish setting is displayed Notes If you select Back in the menu the previous menu appears Press and hold the Menu button in Video Record mode you can move to Settings directly White Balance White Balance Auto Program AE ...

Страница 53: ...icture is displayed in sepia colour similar to that of an old photograph Negative Reverses the colours creating the look of a negative Mirror This mode cuts the picture in half using a Mirror effect B W Changes the images into Black and White Emboss Embossing effects on your video file White Balance White Balance Auto Program Program AE Auto Digital Zoom Off Off BLC Off Off White Balance Auto Prog...

Страница 54: ...n On Set the Digital Zoom X100 Off Cancel the Digital Zoom 4 Move the switch to select desired setting and press the OK button 5 Press the Menu button to finish setting 4 zoom indicators increase after setting the Digital Zoom Effect White Balance White Balance Auto Program Program AE Auto Off BLC Off Effect White Balance Auto Program AE Auto Off Digital Zoom Off BLC Off Video Settings Video Setti...

Страница 55: ...ecting File Options 59 Deleting Photo files 59 Locking Photo files 60 Setting DPOF Function 61 Copying Photo files 62 Setting Various Funtions 63 Setting the Photo file Size 63 Setting the Light 64 Setting the Focus 65 Setting the EIS 66 Setting the White Balance 67 Setting the Program AE 68 Setting the BLC 69 Photo Mode 2 2 ...

Страница 56: ...ars 2 Move the switch to select Photo mode and press the OK button The CAM is ready for taking pictures indicator is displayed on LCD 3 Press Record Stop button to take pictures Mode Selection MP3 Voice Recorder File Browser Video Photo Capturing 800 Photo Capture 800 Photo Capture Note If the battery is low and the battery charge icon blinks the light will not operate and light icon is set to off...

Страница 57: ...e the switch to select Photo mode and press the OK button To take pictures press the Record Stop button again BLC 800 Photo Capture 800 Photo Capture 800 Photo Capture Video Reco 00 16 24 3 Zoom In Zoom Out Note Frequent use of zooming may result in higher battery power consumption Move the switch up to zoom out The subject appears farther away when you zoom out Move the switch down to zoom in The...

Страница 58: ...en appears 3 Press the Menu button and move the switch Press the OK button after selecting View 4 Move the switch to find the photo you want to view Each time you move the switch the frame moves horizontally Each time you press the button another page of 6 frames is displayed 5 Press OK button to view the photo you want The full screen is displayed 2 3 4 5 Mode Selection MP3 Voice Recorder File Br...

Страница 59: ... select File Options and press the OK button You can select File Options only in Photo View mode 6 Move the switch to select Delete and press the OK button 7 Move the switch to select the followings and press the OK button Selected The selected photo file is deleted All All photo files are deleted Cancel Cancel deleting photo files 800 Photo Capture View Capture Settings Back 01 03 Photo View 100 ...

Страница 60: ...ons and press the OK button You can select File Options only in Photo View mode 6 Move the switch to select Lock and press the OK button 7 Move the switch to select the followings and press the OK button Selected The selected photo file is locked All All photo files are locked Cancel Cancel locking photo files 800 Photo Capture View Capture Settings Back 01 03 Photo View 100 0022 View File Options...

Страница 61: ...ress the OK button You can select DPOF only when you ve selected storage type External Refer to page 33 7 Move the switch to select copies you want to print and press the OK button to set Setting DPOF Digital Print Order Format Function 800 Photo Capture View Capture Settings Back 01 03 Photo View 100 0022 View File Options Capture Back 01 03 Photo View 100 0022 Lock Copy To Delete DPOF Back Photo...

Страница 62: ...ect Photo mode and press the OK button The Photo Capture screen appears 3 Press the Menu button and move the switch Press the OK button after selecting View 4 Move the switch to select the photo file you want to copy 5 Press the Menu button to select File Options and press the OK button You can select File Options only in Photo View mode 6 Move the switch to select Copy To and press the OK button ...

Страница 63: ...nce Auto Focus AF Size 640 Photo Capture 1 Move Mode Selector down to turn on the CAM and move it down again The Mode Selection screen appears 2 Move the switch to select Photo mode and press the OK button The Photo Capture screen appears 3 Press the Menu button and move the switch Press the OK button after selecting Settings 4 Move the switch to select Size and press the OK button You can select ...

Страница 64: ... and press the OK button Auto Set the light automatically On Turn on the light Off Turn off the light 6 Press the Menu button to finish setting The icon of selected function is displayed Notes If you select Back in the menu the previous menu appears Press and hold the Menu button in Photo Capture mode you can move to Settings directly If the battery is low and the battery charge icon blinks the li...

Страница 65: ...ove the switch to select Photo mode and press the OK button The Photo Capture screen appears 3 Press the Menu button and move the switch Press the OK button after selecting Settings 4 Move the switch to select Focus and press the OK button AF Set the focus automatically When the CAM turns on AF is selected in default MF Set the focus manually 5 Move the switch to select the desired setting and pre...

Страница 66: ... switch to select the desired setting and press the OK button 6 Press the Menu button to finish setting The icon of selected function is displayed 800 Photo Capture View Capture Settings Back Size 800 x 600 White Balance Auto Focus AF Light Auto Photo Settings Photo Settings Size 800 x 600 White Balance Auto Focus AF Light Auto EIS On Size White Balance Auto Focus AF Light Auto 800 x 600 Photo Set...

Страница 67: ...displayed If you select Auto no icon is displayed 800 Photo Capture View Capture Settings Back Focus EIS Size Light Auto 800 x 600 AF On On Photo Settings Photo Settings Focus EIS Size Light Auto 800 x 600 AF On White Balance Auto Focus EIS Size Light Auto 800 x 600 AF On Photo Settings Photo Settings Focus EIS Size Light Auto 800 x 600 AF On White Balance Hold Capturing BLC 800 Photo Capture Note...

Страница 68: ...cting Settings 5 Move the switch to select the desired setting and press the OK button 6 Press the Menu button to finish setting The icon of selected function is displayed If you select Auto any icon is not displayed Notes If you select Back in the menu the previous menu appears Press and hold the Menu button in Photo Capture mode you can move to Settings directly 4 Move the switch to select Progr...

Страница 69: ...ject is too dark to distinguish You can use this function when using the CAM in the bright backgrounds including snow scenes 1 Move Mode Selector down to turn on the CAM and move it down again The Mode Selection screen appears 2 Move the switch to select Photo mode and press the OK button The Photo Capture screen appears 3 Press the Menu button and move the switch Press the OK button after selecti...

Страница 70: ...ENGLISH MEMO 70 70 ...

Страница 71: ...ocking Music files 76 Copying Music files 77 MP3 Mode Recording 78 Recording Voice 78 Playing 79 Playing Voice files 79 Selecting File Options 80 Deleting Voice files 80 Locking Voice files 81 Copying Voice files 82 Voice Recorder Mode Deleting Files or Folders 83 Locking Files 84 Copying Files or Folders 85 Viewing File Information 86 Using File Browser MP3 Voice Recorder Mode Using File Browser ...

Страница 72: ...to the Memory Stick directly 1 Connect the CAM to a PC with the USB cable Refer to page 103 Your computer recognizes this device and the symbol for removable drive will appear in My Computer 2 Double click the new removable drive to open 3 Select the MP3 folder and double click to enter 4 Copy the MP3 file you want from PC to the CAM Refer to the folder structure on page 30 for copying MP3 files A...

Страница 73: ... OK button 4 Move the switch to find the music you want to hear and press the OK button The selected music is played 5 Press the OK button again to stop hearing music Each time you press the OK button play or pause is selected repeatedly Notes is displayed depending on the title of MP3 file If you slide the MP3 External Camera Hold switch to on all buttons except the Power switch and volume button...

Страница 74: ...y Options and press the OK button 5 Move the switch to select Repeat and press the OK button All All files are repeated Off Cancel the Repeat Play function One One file is repeated 6 Move the switch to select desired setting and press the OK button 7 Press the Menu button to finish setting 3 black or white mp3 5 What a wonderful world mp3 MP3 Play 4 Let it be mp3 1 hey jude mp3 2 I believe I can f...

Страница 75: ...cted The selected music file is deleted All All music files are deleted Cancel Cancel deleting music files 3 black or white mp3 5 What a wonderful world mp3 MP3 Play 4 Let it be mp3 1 hey jude mp3 2 I believe I can fly mp3 2 I belive i can fly mp3 3 black or white mp3 1 hey jude mp3 5 What a wonderful world mp3 MP3 Play 4 Let it be mp3 File Options Back Play Options Lock Copy To Delete Back 2 I be...

Страница 76: ...p3 2 I believe I can fly mp3 2 I belive i can fly mp3 3 black or white mp3 1 hey jude mp3 5 What a wonderful world mp3 MP3 Play 4 Let it be mp3 File Options Back Play Options Lock Copy To Delete Back 2 I belive i can fly mp3 3 black or white mp3 1 hey jude mp3 5 What a wonderful world mp3 MP3 Play 4 Let it be mp3 Lock Copy To Delete Back MP3 Play 2 I belive i can fly mp3 5 6 Mbytes Stereo 44 1KHz ...

Страница 77: ...elected Copy the selected music file All Copy all music files Cancel Cancel copying music files 3 black or white mp3 5 What a wonderful world mp3 MP3 Play 4 Let it be mp3 1 hey jude mp3 2 I believe I can fly mp3 2 I belive i can fly mp3 3 black or white mp3 1 hey jude mp3 5 What a wonderful world mp3 MP3 Play 4 Let it be mp3 File Options Back Play Options Lock Copy To Delete Back 2 I belive i can ...

Страница 78: ...o select Voice Recorder mode and press the OK button 3 Press the Record Stop button to record voice The elapsed time and REC is displayed It starts recording 4 Press the Record Stop button to stop recording voice STBY is displayed and it stops recording Mode Selection File Browser Video Photo MP3 Voice Recorder Voice Record 9 2005 01 01 12 18 12 AM Stereo 8KHz 128Kbps 00 00 16 00 24 32 REC Voice R...

Страница 79: ...ce Record 10 Stereo 8KHz 128Kbps STBY 00 00 16 00 24 32 Voice Record Stereo 8KHz 128Kbps Play Record Back STBY 00 00 16 00 24 32 1 2005 01 01 12 22 00 AM 2 2005 01 02 01 23 00 AM 3 2005 01 03 05 39 00 AM 4 2005 01 07 07 13 00 AM 5 2005 01 07 11 54 00 AM Voice Play Voice Play 2 2005 01 02 01 23 AM 5 0 Mbytes Stereo 8KHz 128Kbps 00 00 12 00 05 12 Note Press the Back button while recording standby st...

Страница 80: ...ess the OK button 8 Move the switch to select the followings and press the OK button Selected The selected voice file is deleted All All voice files are deleted Cancel Cancel deleting voice files Voice Record Stereo 8KHz 128Kbps Play Record Back STBY 00 00 16 00 24 32 1 01 01 2005 12 22 00 AM 2 01 01 2005 01 23 00 AM 3 01 02 2005 05 39 00 AM 4 2005 01 07 07 13 00 AM 5 2005 01 07 11 54 00 AM Voice ...

Страница 81: ... Back Selected All Cancel Choose the file s you would to lock 1 Move Mode Selector down to turn on the CAM and move it down again The Mode Selection screen appears 2 Move the switch to select Voice Recorder mode and press the OK button 3 Press the Menu button when the Voice Record screen appears 4 Move the switch to select Play and press the OK button 5 Move the switch to select the voice file you...

Страница 82: ...ancel Choose the file s to copy to memory stick 1 Move Mode Selector down to turn on the CAM and move it down again The Mode Selection screen appears 2 Move the switch to select Voice Recorder mode and press the OK button 3 Press the Menu button when the Voice Record screen appears 4 Move the switch to select Play and press the OK button 5 Move the switch to select the voice file you want to copy ...

Страница 83: ...y until the file you want to delete appears 4 Press the Menu button Move the switch to select Delete and press the OK button 5 Move the button to select the setting you want Press the OK button Selected The selected file is deleted All All files are deleted Cancel Cancel deleting files Mode Selection Video Photo MP3 Voice Recorder File Browser DCIM MSAMSUNG MISC 100SSWAV SWAV0004 WAV Up One Level ...

Страница 84: ...select Lock and press the OK button 5 Move the button to select the followings Press the OK button Selected The selected file is locked All All files are locked Cancel Cancel locking files Mode Selection Video Photo MP3 Voice Recorder File Browser DCIM MSAMSUNG MISC 100SSWAV SWAV0004 WAV Up One Level SWAV0001 WAV SWAV0002 WAV SWAV0003 WAV Lock Copy To Delete File Info Back 100SSWAV SWAV0004 WAV Up...

Страница 85: ...appears 4 Press the Menu button Move the switch to select Copy To and press the OK button If you selected the Storage type External the file is copied to Internal 5 Move the button to select the followings Press the OK button Selected Copy the selected file All Copy all files Cancel Cancel copying files Mode Selection Video Photo MP3 Voice Recorder File Browser DCIM MSAMSUNG MISC 100SSWAV SWAV0004...

Страница 86: ...ile information appears 5 Press the OK button to finish viewing file information If you select Close in the screen the screen disappears 4 Press the Menu button Move the switch to select File Info and press the OK button The screen with file name format size and date appears Mode Selection Video Photo MP3 Voice Recorder File Browser DCIM MSAMSUNG MISC 100SSWAV SWAV0004 WAV Up One Level SWAV0001 WA...

Страница 87: ...97 Setting the Beep Sound 98 Viewing Version Information 99 Setting Memory 100 Selecting the Storage Type 100 Formatting the Memory 101 Viewing Memory Space 102 Using USB Mode 103 Storing Files to the External Memory 103 USB Speed depending on the System 104 System Environment 104 Using PC Cam 105 Connecting the CAM to a Printer 106 Setting the CAM 4 4 Adjusting the LCD Monitor 88 Adjusting the LC...

Страница 88: ...election screen appears 2 Move the switch to select System Settings and press the OK button 3 Move the switch to select Display and press the OK button 4 Move the switch to select LCD Brightness and press the OK button You can adjust the LCD Brightness from 0 to 100 5 Move the switch to select the brightness you want 6 Press the Back button to finish setting Mode Selection MP3 Voice Recorder File ...

Страница 89: ...ode Selection screen appears 2 Move the switch to select System Settings and press the OK button 3 Move the switch to select Display and press the OK button 4 Move the switch to select LCD Colour and press the OK button You can adjust the LCD Colour from 0 to 100 5 Move the switch to select the colour you want Mode Selection MP3 Voice Recorder File Browser System Settings Back System Settings Date...

Страница 90: ... 5 Move the switch to set time and press the OK button Move the switch to change the setting and press the OK button to confirm selection and move to the next setting 6 Press the Back button to finish setting Mode Selection MP3 Voice Recorder File Browser System Settings Back System Settings Date Time System Display Memory Back Settings Date Time Time Format Back Date Format YY MM DD 12 Hour 2005 ...

Страница 91: ...n 5 Move the switch to set date and press the OK button Move the switch to change the setting and press the OK button to confirm selection and move to the next setting 6 Press the Back button to finish setting Mode Selection MP3 Voice Recorder File Browser System Settings Back System Settings Date Time System Display Memory Back Settings Date Time Time Format Back Date Format YY MM DD 12 Hour Set ...

Страница 92: ...e desired format and press the OK button YY MM DD The date is displayed in order as Year Month Date DD MM YY The date is displayed in order as Date Month Year MM DD YY The date is displayed in order as Month Date Year 6 Press the Back button to finish setting Mode Selection MP3 Voice Recorder File Browser System Settings Back System Settings Date Time System Display Memory Back Settings Date Time ...

Страница 93: ...ton 5 Move the switch to select the desired format and press the OK button 12 Hour The time is displayed as the unit of 12 hours 24 Hour The time is displayed as the unit of 24 hours 6 Press the Back button to finish setting Mode Selection MP3 Voice Recorder File Browser System Settings Back System Settings Date Time System Display Memory Back Settings Date Time Back Date Format DD MM YY 12 Hour S...

Страница 94: ...l the Auto Shut off function 5 Minutes the CAM turns off after 5 minutes 6 Press the Back button to finish setting Mode Selection MP3 Voice Recorder File Browser System Settings Back System Settings Date Time System Display Memory Back Settings System Beep Sound File No Reset Off 5 Minutes Video Mode On Demo Auto Shut off Start up Settings System Beep Sound Start up Video Mode Off Off Reset On Dem...

Страница 95: ...on 5 Move the switch to select the desired setting and press the OK button Off Cancel the Demo function 5 Minutes Start the Demo function in 5 minutes Play Now Start the Demo function now 6 Press the Back button to finish setting Mode Selection MP3 Voice Recorder File Browser System Settings Back System Settings Date Time System Display Memory Back Settings System Beep Sound Start up Video Mode Of...

Страница 96: ...press the OK button 5 Move the switch to select the desired setting and press the OK button Video Mode The CAM starts up in the Video Mode Previous Mode The CAM starts up in the mode you used last 6 Press the Back button to finish setting Mode Selection MP3 Voice Recorder File Browser System Settings Back System Settings Date Time System Display Memory Back Settings System Beep Sound File No Reset...

Страница 97: ...icks so that the first file number assigned on a new Memory Stick is 1 more than the last file number assigned on the previous Memory Stick Reset When the Memory Stick is formatted the file number resets to its default value 100 0001 6 Press the Back button to finish setting Mode Selection MP3 Voice Recorder File Browser System Settings Back System Settings Date Time System Display Memory Back Set...

Страница 98: ...utton 5 Move the switch to select the desired sound and press the OK button On Turn the effect sound on Off Turn the effect sound off 6 Press the Back button to finish setting Mode Selection MP3 Voice Recorder File Browser System Settings Back System Settings Date Time System Display Memory Back Settings System Beep Sound Off 5 Minutes Reset On Demo Auto Shut off File No Video Mode Start up Settin...

Страница 99: ...glish Off High Language Demo Sys Sound Close Samsung Elec Co LTD Miniket DSP 0 01X Mar 04 2005 22 09 25 Micom 0 02X Mar 07 2005 01 09 26 1 Move Mode Selector down to turn on the CAM and move it down again The Mode Selection screen appears 2 Move the switch to select System Settings and press the OK button 3 Move the switch to select System and press the OK button 4 Move the switch to select Versio...

Страница 100: ... select the desired setting and press the OK button Internal The video photo mp3 file or voice file is stored in internal memory External The video photo mp3 file or voice file is stored in external memory Memory stick or Memory stick pro Mode Selection MP3 Voice Recorder File Browser System Settings Back System Settings Date Time System Display Memory Back Settings Memory Memory Space Back Intern...

Страница 101: ...select the desired setting and press the OK button Internal Format the internal memory If you select Internal the message is displayed to confirm External Format the external memory If you select External the message is displayed to confirm 6 Press the OK button to format Select Cancel to cancel formatting System Settings Date Time System Display Memory Back Settings Memory Back Internal Internal ...

Страница 102: ...o select System Settings and press the OK button 3 Move the switch to select Memory and press the OK button 4 Move the switch to select Memory Space 5 Press the Back button to finish setting Mode Selection MP3 Voice Recorder File Browser System Settings Back System Settings Date Time System Display Memory Back Settings Memory Back Internal Internal Format Storage Type Memory Space 357MB 493MB Note...

Страница 103: ...ridge USB 2 0 MassStorage USB 1 1 MassStorage Notes Select USB 1 1 MassStorage when USB 2 0 MassStorage does not work depending on your PC environment If you disconnect the USB cable from the PC or the CAM during the data transfer the data transfer will stop and the data may be damaged If you connect the USB cable to a PC using a USB HUB or with other device at the same time it might cause conflic...

Страница 104: ... privileges to install the OS If the capacity of PC is low the video file may not be played normally or the file is often stopped If the capacity of PC is low it may take long time to edit the video file Pentium III 600MHz Windows 98SE ME 128MB 200MB For applications only Apart from this 1GB or more free space 800x600 dots 16 bit colour USB 1 1 CPU OS Memory Free space on the hard disk Display Res...

Страница 105: ...ton Notes This function requires the specified USB Streaming Driver and Software to be installed Refer to page 112 for further details The CAM can be used as a PC Camera for programmes such as Windows Messenger The use of the PC Cam varies depending on the Software Refer to the documentation of the respective software products PC Cam function is operated as Full Speed in the capacity of Windows ME...

Страница 106: ...e and press the OK button 5 Move the switch to select On or Off and press the OK button 6 Move the switch to select Copies and press the OK button 7 Move the switch to select desired number and press the OK button You can select the number of copy from 1 to 99 8 Move the switch to select Print and press the OK button Notes If you select Back in the menu the previous menu appears If you want to sel...

Страница 107: ... Recording Video Using the External Camera Module 108 Wearing the External Camera Module 109 Connecting the extension cable while the set is in the Carrying Case 109 Mounting the External Camera Module on Rubber Mount 109 Using the Short and Long Mount Bands 110 Using the External Camera Module 5 5 ...

Страница 108: ... on the External Camera Module 4 Press the Record Start Stop button on the External Camera Controller to start recording LED lamp lights in red The elapsed and remaining times are displayed and it starts recording 5 Press the Record Start Stop button again to stop recording It stops recording and the CAM is ready again 6 Press the Power button again to turn off the External Camera Module Power but...

Страница 109: ...cable s jack into the AV Input Output terminal of the set 3 Fix the extension cable by covering the cable cover strap non woven fabric 1 Insert the velcro strap velcro face down into the small slot located on the side of the rubber mount 2 Pull the lead end along the bottom through the opposite slot 3 Spread the rubber on top of the mount and insert 4 Run the Velcro Strap through its buckle 5 Run ...

Страница 110: ...the strap through the buckle to adjust the tightness 3 Fasten the strap Notes Adjust and shorten the extension cable connected to the External Camera Module to avoid accidental catching of surrounding objects Otherwise the extension cable may disconnect or cause an accident Dropping the External Camera Module or bumping it to other objects may cause device failure When using the device you must at...

Страница 111: ...contents from other digital devices 115 Connecting the CAM to a PC using the USB cable 116 Installing Programmes 117 Installing Image Mixer 117 Installing for using PC Cam 119 Installing Windows98SE Driver For Windows98SE only 120 Printing Photos 122 Printing with PictBridge Function 122 Printing Photos with DPOF Files 123 Miscellaneous Information 6 6 111 111 ...

Страница 112: ...t signal decreases to 50 Connect the AV Jack to the only one side ENGLISH 112 112 Miscellaneous Information Connecting the CAM with other Devices 1 Connect the Audio Video cable to the AV Output Jack of the CAM or cradle 2 Connect the Audio Video cable to the external input terminal of your TV set by matching the colours of the terminals 3 Move Mode Selector down to turn on the CAM The Video Recor...

Страница 113: ...AV Output Jack of the CAM or cradle 2 Connect the Audio Video cable to the external input terminal of your VCR set by matching the colours of the terminals 3 Connect the Audio Video cable to the Video line Output and TV line Input 4 Select the Input on the TV VCR or the remote control of TV 1 2 3 4 5 6 7 8 9 10 ALARM IN ALARM OUT ALARM RESET GND TRIGGER OUT TAPE END OUT SERIES OUT GND SERIES IN 1 ...

Страница 114: ...Mode Selection screen appears 3 Select Play in the Video mode to find the desired video file with the switch Refer to page 40 4 Move the switch to find the video file you want to copy and press the OK button 5 Press the Record Stop button on the VCR to start recording Notes Refer to operating instructions of your TV or VCR for detailed information on connecting external devices You can stop and pl...

Страница 115: ...output cable to the AV input output Jack of the CAM or Cradle 2 Connect the Audio Video cable to the external output terminal of your digital devices DVD DVC etc by matching the cable to the colors of the terminals 3 Move Mode Selector down to turn on the CAM The Video Record screen appears 4 Press the Menu button and move the switch Press the OK button after selecting Video In 5 Move the switch t...

Страница 116: ... to a PC that supports USB connections Use the provided USB cable for connection to a PC 1 Insert the cradle into the CAM 2 Connect the provided USB cable to USB port of the cradle 3 Move Mode Selector down to turn on the CAM and move it down again The Mode Selection screen appears 4 Connect the other side of the USB cable to the USB port of your PC ...

Страница 117: ...he PC Camera function 1 Quit the file and folder you work 2 Insert the programme CD into the CD ROM drive The Setup screen appears automatically Open the CD ROM Drive in My Computer and double click Iminst exe 3 Click ImageMixer 4 Select the language 5 Follow the steps appeared on the monitor You can use the Image Mixer after restarting your PC Windows ...

Страница 118: ...peared on the monitor You can use ImageMixer after restarting your PC Macintosh Notes If Image Mixer appears to not be installed re install it again but you should first attempt to uninstall it Uninstalling Image Mixer should be done via the Control Panel on your PC If you play the MPEG4 video file the ratio of the screen may not match due to the pixel If you click ImageMixer all softwares in the ...

Страница 119: ...e CD into the CD ROM drive 2 Fix the CAM into the cradle and connect it to a PC with the USB cable 3 Locate the G PC_CAM folder on the CD 4 Follow the steps on the monitor If the message of Windows Logo Test to confirm compatibility appears press Next Windows Installing for using PC Cam ...

Страница 120: ... removable drive on Windows98SE you may need to install the Windows98SE Driver 1 Insert the programme CD into the CD ROM drive 2 Fix the CAM into the cradle and connect it to a PC with the USB cable The PC recognises the CAM and Found New Hardware Wizard appears 3 Locate the G Storage folder on the CD 4 Follow the steps on the monitor ...

Страница 121: ... If you connect the USB cable to a PC using a USB HUB or with other device at the same time it might cause conflict and may not work properly If this occurs remove all other devices and try the connection again The CAM may operates abnormally in the recommended system environment depending on the assembling of PC For example the video file is played abnormally Once you select the USB 2 0 MassStora...

Страница 122: ...K button 4 Move the switch to select Copies and press the OK button 5 Move the switch to select desired number and press the OK button You can select the number of copies from 1 to 99 6 Move the switch to select Print and press the OK button Back USB Mode PC Cam PictBridge USB 2 0 MassStorage USB 1 1 MassStorage Print Next Photo Previous Photo Date Off Copies 5 PictBridge 100 0056 Print Next Photo...

Страница 123: ...Memory Stick or Memory Stick Pro You can easily make prints on a DPOF compatible printer or order copies Note For further details about printing photos refer to the User s manual of the printer 1 Set the print information for the photo you want to print Refer to page 61 2 Insert the Memory Stick into the photo printer 3 Follow the steps of the printer to print out photos Printing DPOF files of the...

Страница 124: ...g on the condition of use Recording with many starts and stops frequent zooming and recording in low temperatures will shorten actual recording times Dispose of used battery packs promptly Do not dispose of them in fire The battery pack will become warm during charging and use This is not a malfunction The battery pack has a limited service life If the period of use becomes noticeably shorter with...

Страница 125: ...ning Otherwise the finish may be damaged Cleaning should be done only after the battery pack has been removed and other power sources have been disconnected Using the Built in Rechargeable Battery The CAM incorporates a rechargeable lithium cell that maintains the date and other settings even when the AC adaptor and the battery are removed The rechargeable lithium cell is automatically recharged w...

Страница 126: ... with a clean dry cloth to ensure proper contact Do not pick up the battery using metal tools as this may cause a short circuit Do not short the battery or dispose of the battery in fire Do not disassemble the battery The battery could explode or catch fire Use only recommended batteries and accessories Use of batteries not expressly recommended for this equipment may cause an explosion or leakage...

Страница 127: ...s on a television set or to copy it to a video cassette recorder VCR the television set or the VCR must comply with PAL compatible and have the appropriate Audio Video ports Otherwise you may need to use a separate Video Format Transcoder PAL NTSC format Converter Colour System PAL Compatible Countries Regions Australia Austria Belgium Bulgaria China CIS Czech Republic Denmark Egypt Finland France...

Страница 128: ... card is corrupted Format the memory card Failed to write Failed to read The format is not supported Memory Stick is protected to write The video file is corrupted Not enough free space Corrupted file Paper error Printer error Ink error Wrong error USB transfer error Low battery Holding the key Card error Not formatted Write error Read error Not supported format Write protected MPEG decoding error...

Страница 129: ... is formatted by different devices Light is forced to cancel Light is not available for recording The Photo Mode is selected To save power consumption the LCD screen and Camera s power turns off if there is no button operation for a certain period of time depending on operation mode which is not a malfunctioning Battery is exhausted Set proper white balance page 67 Turn off the digital special eff...

Страница 130: ... Sepia Negative Mirror B W Emboss BLC Off On Digital Zoom Back Off On 5 Back Program AE Auto Sports Spotlight Sand Snow HS Shutter BLC Off On Back Photo MP3 White Balance Auto Hold Outdoor Indoor Delete Selected All Cancel Lock Selected All Cancel Copy To Selected All Cancel Back White Balance Auto Hold Outdoor Indoor 1 Record 2 Video In 3 Play 4 File Options Delete Selected All Cancel External Ca...

Страница 131: ...ghtness 0 100 LCD Brightness 0 100 LCD Colour 0 100 Back 2 Date Time Set Time Set Date Date Format Back YY MM DD DD MM YY MM DD YY Time Format 12 Hour 24 Hour 3 System Auto Shut off Version Info Off 5 Minutes Demo Off 5 Minutes Play Now Start up Video Mode Previous Mode File No Series Reset Beep Sound On Off 4 Memory 5 Back Storage Type Internal External Format Internal External Back Memory Space ...

Страница 132: ...X105L X110L MPEG4 AVI Format JPEG DPOF Exif 2 2 Stereo Playing WAVE file record play 8KHz Sampling 16 bit Stereo Internal memory Memory Stick Memory Stick Pro Refer to page 30 1 6 inch CCD 800K Maximum x10 Optical x100 Digital f 2 4 24mm F1 8 2 4 3 0 Lux 2 0 Trans Reflective 210K Mini B type USB 2 0 High Speed Special 22Pin Connector Video 1 0Vp_p Audio 7 5dBm 47K Input mono Output stereo Special ...

Страница 133: ...P External Camera Module 1 4 inch CMOS 320K Maximum 640x480 VGA Auto Auto Fixed f 4 0mm F2 6 Video 1 0Vp_p Audio 7 5dBm 47K Mono 0 C 40 C 32 F 104 F 20 80 1 5V x 2 Alkaline AAA Battery 0 9W 85mm x 27mm x 26mm 105g Without the Alkaline AAA Battery Omni directional condenser microphone Alkaline Battery Maximum 60minutes Nickel Hydrogen Rechargeable Battery Maximum 100 minutes not included Model Name...

Страница 134: ...91 Demo 95 Digital Zoom 54 Display button 28 DPOF 61 123 E Effect 53 EIS 49 66 External Camera Module 108 110 F File Browser 83 Focus 48 65 Format 101 Function button 27 I Image Mixer 117 L LCD Brightness 88 LCD Colour 89 Light 64 Lithium Polymer Battery pack 13 M Memory Space 102 Memory Stick 34 Memory type 33 Menu button 14 MF 48 65 ...

Страница 135: ...tion 45 PictBridge 122 Power switch 14 Program AE 51 68 R Repeat Play 74 S Start up Mode 96 Storage type 100 T Time 90 Troubleshooting 128 U USB Cable 13 USB mode 103 Y Version Information 99 W White Balance 50 67 Z Zooming In and Out 38 57 ...

Страница 136: ...6 136 Power Sources United Kingdom Only The plug used on this product is a unitary transformer plug and is designed specifically for this camcorder it must never be replaced or removed with any other type of plug ...

Страница 137: ...is not considered to be defective in materials nor workmanship by reason that it requires adaptation in order to conform to national or local technical or safety standards in force in any Country other than the one for which the product was originally designed and manufactured This warranty will not cover and no re imbursement will be made for such adaptation nor any damage which may result 5 This...

Страница 138: ...oskomisqeiv kai to timolovgio hv h apovdeixh lianikhvı pwvlhshı pavnw sthn opoiva o seiriakovı ariqmovı tou proiovntoı prevpei na eivnai eukrinhvı 2 H upocrevwsh thı SAMSUNG aforav movno thn episkeuhv tou proiovntoı 3 H episkeuhv tou proiovntoı prevpei na anativqetai movno se exousiodothmevna kevntra service hv exousiodothmevnouı antiproswvpouı thı SAMSUNG Kamiva apozhmivwsh den qa givnei apodekth...

Страница 139: ...u proiovntoı me trovpouı pou antivkeintai stiı tecnikevı prodiagrafevı asfaleivaı pou iscuvoun katav thn crhvsh tou proiovntoı B Episkeuhv pou evgine apov mh exousiodothmevna sunergeiva service G Atuchvmata qeomhniveı hv opoiadhvpote aitiva pevra tou elevgcou thı SAMSUNG sumperilambanomevnwn allav mh periorismevnwn twn keraunwvn tou nerouv thı fwtiavı twn dhmosivwn anataracwvn tou kakouv aerismouv...

Страница 140: ...ENGLISH Samsung Electronics Internet Home Page United Kingdom http www samsungelectronics co uk AD68 00876G THE CAM IS MANUFACTURED BY ELECTRONICS ...

Отзывы: