background image

Getting Started

English - 9

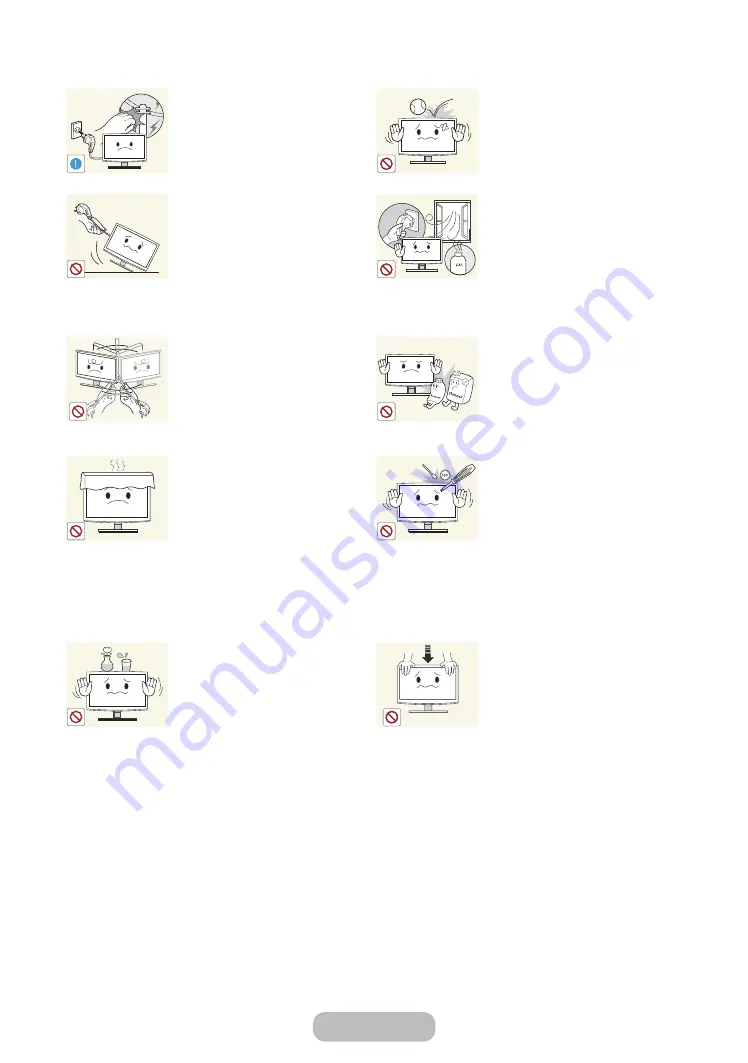
When thunder or lighting occurs, 

unplug the power cord and under 

no circumstance touch the aerial 

cable as this is dangerous.


Otherwise, it may result in 

electric shock or fire.

Avoid dropping an object over the 

product or cause impact to the 

product.


Otherwise, it may result in 

electric shock or fire.

Avoid moving the product by 

pulling the power cord or aerial 

cable.


Otherwise, it may result 

in electric shock, fire or a 

problem with the product due 

to damage to the cable.

When a gas leak occurs, do not 

touch the product or the power 

plug and ventilate immediately.


A spark may result in an 

explosion or fire.


During a thunder or lighting 

storm, do not touch the power 

cord or aerial cable.

Avoid lifting up or moving the 

product by holding only the power 

cord or signal cable.


Otherwise, it may result 

in electric shock, fire or a 

problem with the product due 

to damage to the cable.

Avoid using or placing inflammable 

spray or objects near the product.


This may result in an explosion 

or fire.

Take care not to block the vent by a 

table cloth or curtain.


Otherwise, it may result in fire 

due to internal overheating.

Avoid inserting metal objects such 

as a chopsticks, coins or hairpins, 

or inflammable objects into the 

product (the vents, ports, etc).


If water or substances enters 

the product, turn the power 

off, unplug the power cord and 

contact a service centre.


Otherwise, it may result in 

a problem with the product, 

electric shock or fire.

Avoid placing a liquid container 

such as a vase, flowerpot, 

beverage, cosmetics or drugs, or a 

metal object over the product.


If water or substances enter 

the product, turn the power 

off, unplug the power cord and 

contact a service centre.


Otherwise, it may result in 

a problem with the product, 

electric shock or fire.

Do not press down hard on the 

product. The product may become 

deformed or damaged.

Содержание V32F390FE Series

Страница 1: ...SERIES V27F390FE V32F390FE Thank you forpurchasing this Samsung product To receive more complete service please registeryourproduct at www samsung com register Model_________________ Serial No _______________________ ...

Страница 2: ... areas where this TV set is used some cable TV providers may charge an additional fee for such a service and you may be required to agree to terms and conditions of their business 5 Some Digital TV functions might be unavailable in some countries or regions and DVB C might not work correctly with some cable service providers 6 For more information please contact your local Samsung customer care ce...

Страница 3: ...re Settings 31 Changing the Picture Size 32 Calibrating the Screen Display 34 Picture In Picture PIP 35 Changing the Picture Options 36 Changing the Preset Sound Mode 38 Adjusting Sound Settings 39 Memorising Channels 41 Using the INFO button Now Next guide 43 Using the Channel Menu 43 Other Features 49 Preference Features Setting the Time 52 Economical Solutions 54 Blocking Programmes 55 Other Fe...

Страница 4: ...marked with the symbol is DC voltage This symbol indicates that this product has included important literature concerning operation and maintenance Caution Consult Instructions for use This symbol instructs the user to consult the user manual for further safety related information Power Related The following images are foryour reference and may differ depending on models and countries Warning Avoi...

Страница 5: ...e it may result in electric shock or fire Connect the power plug to a wall outlet that can be easily reached When a problem occurs with the product you must unplug the power plug to cut the power off completely You cannot cut the power off completely using only the power button on the product Installation Related Warning Avoid placing burning candles mosquito coil cigarettes on the product Otherwi...

Страница 6: ...his may result in injury Since the front part is heavier install the product on a flat and stable surface Bend the outdoor aerial cable downwards at the location where it comes in the house so that rainwater does not flow in If rainwater enters the product it may result in electric shock or fire Install the aerial far away from any high voltage cables If the aerial touches or falls onto a high vol...

Страница 7: ...e it may result in electric shock or fire When cleaning the product do not spray water directly over the product parts Make sure that water does not enter the product Otherwise it may result in fire electric shock or a problem with the product Caution Avoid spraying cleansing agent directly onto the product This may result in discolouration or cracking of the exterior of the product or the panel c...

Страница 8: ...ower off and unplug the power cord the aerial cable and any other wires connected to the product Otherwise it may result in electric shock or fire due to the damaged power cord If the product generates a strange noise a burning smell or smoke unplug the power plug immediately and contact a service centre Otherwise it may result in electric shock or fire Avoid letting children hang or climb onto th...

Страница 9: ...t in electric shock fire or a problem with the product due to damage to the cable Avoid using or placing inflammable spray or objects near the product This may result in an explosion or fire Take care not to block the vent by a table cloth or curtain Otherwise it may result in fire due to internal overheating Avoid inserting metal objects such as a chopsticks coins or hairpins or inflammable objec...

Страница 10: ...jury Watching the product from too close a distance continuously may damage your eyesight Avoid using a humidifier or cooker near the product Otherwise it may result in electric shock or fire It is important to give your eyes some rest 5 minutes every hour when viewing the product screen for long periods of time This will alleviate any eye strain Since the display panel is hot after using it for a...

Страница 11: ... for recycling The customer can return used or rechargeable batteries to a nearby public recycling centre or to a store selling the same type of the battery or rechargeable battery Do not place the adapter on top of another adapter Otherwise it may result in fire Keep power adaptor away from any other heat source Otherwise it may result in fire Remove the vinyl cover of the adapter before using th...

Страница 12: ...r product using a stand or a wall mount we strongly recommend you use parts provided by Samsung Electronics only If you use parts provided by another manufacturer it may cause difficulties with the product or result in injury caused by the product falling Installation with a stand Installation with a wall mount 10 cm 10 cm 10 cm 10 cm 10 cm 10 cm 10 cm OtherWarnings The actual appearance of the pr...

Страница 13: ...he packing materials An administration fee may be charged in the following situations a An engineer is called out at your request but there will be no defect with the product i e where the user manual has not been read b You bring the unit to a repair centre but there will be no defect identified the product i e where the user manual has not been read You will be informed of the administration fee...

Страница 14: ...na or cable outlet and your peripheral devices Blu ray players DVD players etc Component Composite AV Coaxial RF HDMI DVI Stereo Cable D sub Cable For the best cable connections to this product use cables no thicker than the cable illustrated below Maximum thickness 0 55 inches 14mm Getting Started English 14 ...

Страница 15: ...Installing the Stand Getting Started English 15 ...

Страница 16: ...changing the channel adjusting the volume and switching the input source Standby mode Your product enters Standby mode when you turn it off and continues to consume a small amount of electric power To be safe and to decrease power consumption do not leave your product in standby mode for long periods of time when you are away on vacation for example It is best to unplug the power cord Setup The in...

Страница 17: ...Use these buttons in a specific feature Give direct access to channels Alternately select Teletext ON Double Mix or OFF Adjust the volume View the Media Play Display channel list on the screen page 43 Open the OSD Menu Quickly select frequently used functions Use this button in a specific feature Move the cursor select the on screen menu items and change the values seen on the TV s menu Return to ...

Страница 18: ...o that the polarity of the batteries matches the illustration in the battery compartment Use the remote control within 7 m of the product Bright light may affect the performance of the remote control Avoid using it near fluorescent lights or neon signs The colour and shape of the remote may vary depending on the model Getting Started English 18 ...

Страница 19: ...vailable 3 E and Direction buttons Use the Direction buttons to move the cursor and highlight an item Use the E button to select an item or confirm the setting 4 RETURNR button Returns to the previous menu 5 EXITe button Exits the on screen menu How to Operate the Main Menu OSD On Screen Display The access steps may differ depending on the menu option you select 1 MENUm The main menu options appea...

Страница 20: ... your product to a cable or satellite box using HDMI Component or Composite connections you do not need to connect the ANT IN jack to an aerial or a cable connection Use caution when you move or swivel the product if the aerial cable is tightly connected You could break the aerial jack off the product Connecting the Power The picture may vary depending on the model Power Input Getting Started Engl...

Страница 21: ...ot require an audio cable To connect the product to a digital device that does not support HDMI output use an HDMI to DVI cable and audio cables If you connect an external device to the product that uses an olderversion of HDMI the video and audio may not work If this occurs ask the manufacturer of the device about the HDMI version and if it is out of date request an upgrade Be sure to purchase a ...

Страница 22: ... the official MHLwebsite http www mhlconsortium org MHL USE Connect an MHL cable to the mobile device and the displayer Press SOURCEs button and then select the MHL connector to display the mobile device s screen on the displayer The following remote control functions will also be available REW FF Play Pause Stop R Previous menu Restrictions MHL has several requirements If you are using an HDMI ad...

Страница 23: ...VCRs Device Device Audio Cable Not Supplied Component Cable Not Supplied Red Red Blue White Green Audio Cable Video Cable For better picture quality we recommend the Component connection over the A V connection When you connect a Video cable to COMPONENT AV IN the colour of the COMPONENT AV IN VIDEO jack green will not match the video cable yellow English 23 Connections ...

Страница 24: ...t jack on your product While the headphones are connected the sound from the built in speakers will be disabled The sound function may be restricted when you connect headphones to the product Headphone volume and product volume are adjusted separately The earphone jack supports only the 3 conductor tip ring sleeve TRS type English 24 Connections ...

Страница 25: ...speakers for audio HDMI Cable D sub Cable HDMI to DVI Cable Stereo Cable Stereo Cable NOTE For an HDMI to DVI cable connection you must use the HDMI IN1 DVI jack For PC s with DVI video out jacks use an HDMI to DVI cable to connect the DVI out on the PC to the HDMI IN1 DVI jack on the product Use the PC s speakers for audio English 25 Connections ...

Страница 26: ...hed the message Updating Completed is displayed indicating the channel list is updated NOTE You must obtain a CI or CI CARD from a local cable service provider When removing the CI or CI CARD carefully pull it out with your hands since dropping the CI or CI CARD may cause damage to it Insert the CI or CI CARD in the direction marked on the card The location of the COMMON INTERFACE slot may be diff...

Страница 27: ...T 800 x 600 72Hz 48 077 72 188 50 000 VESA DMT 800 x 600 75Hz 46 875 75 000 49 500 MAC 832 x 624 75Hz 49 726 74 551 57 284 VESA DMT 1024 x 768 60Hz 48 363 60 004 65 000 VESA DMT 1024 x 768 70Hz 56 476 70 069 75 000 VESA DMT 1024 x 768 75Hz 60 023 75 029 78 750 VESA DMT 1152 x 864 75Hz 67 500 75 000 108 000 MAC 1152 x 870 75Hz 68 681 75 062 100 000 VESA DMT 1280 x 720 60Hz 45 000 60 000 74 250 VESA...

Страница 28: ... access Edit Name open the Tools menu when the Source list is displayed The following selections appear under Edit Name VCR DVD Cable STB Satellite STB PVR STB AV Receiver Game Camcorder PC DVI PC DVI Devices TV IPTV Blu ray HD DVD DMA Select an input jack and then select the name of the device connected to that jack from the list that appears If you connect a PC to the HDMI IN1 DVI port with an H...

Страница 29: ... not reflect on the screen Keep your forearms perpendicular to your upper arms and level with the back of your hands Keep your elbows at about a right angle Adjust the height of the product so you can keep your knees bent at 90 degrees or more your heels attached to the floor and your arms lower than your heart English 29 Basic Features ...

Страница 30: ...s apply preset adjustments to the picture Dynamic Suitable for a bright room Standard Suitable for a normal environment Movie Suitable forwatching movies in a dark room Entertain Sharpens the picture Suitable for games It is only available when connecting a PC English 30 Basic Features ...

Страница 31: ...NU Picture Colour Adjust colour saturation levels Tint G R MENU Picture Tint G R Adjust tint levels for green and red To adjust picture quality follow these steps 1 Select an option you want to adjust When you select an option a slider screen appears 2 Adjust the option value using your remote When you make change to option value the OSD will be adjusted accordingly You can adjust and store Settin...

Страница 32: ...rn which is not covered by the warranty Screen Fit Displays the full image without any cut off when HDMI 720p 1080i 1080p or Component 1080i 1080p signals are inputted Adjusts the Position by using u d l r button Custom Magnifies or shrinks 16 9 pictures vertically and or horizontally A magnified or shrunk picture can be moved left right up and down Depending on the input source the picture size o...

Страница 33: ... Component 1080i 1080p 16 9 Wide Zoom Zoom 4 3 Screen Fit Custom HDMI 480i p 576i p 16 9 Wide Zoom Zoom 4 3 Custom HDMI 720p 1080i 1080p 16 9 Wide Zoom Zoom 4 3 Screen Fit Custom Depending on the input source the picture size options may vary The available items may differ depending on the selected mode HD High Definition 16 9 1080i 1080p 1920x1080 720p 1280x720 You can adjust and store settings f...

Страница 34: ...ings Using Your Product as a Computer PC Display Entering the Video Settings Based on Windows 7 8 10 Foryour product to work properly as a computer display you must enter the correct video settings Depending on yourversion of Windows and yourvideo card the procedure on your PC will probably differ slightly from the procedure presented here However the same basic information will apply in most case...

Страница 35: ...the sub picture If you turn the product off while watching in the PIP mode the PIP function is reset to Off When you turn your product on you must turn PIP on again to watch in the PIP mode You may notice that the picture in the PIP screen becomes slightly unnatural when you use the main screen to view a game or karaoke PIP Settings Main picture TV PC AV Component HDMI1 DVI HDMI2 Sub picture TV PC...

Страница 36: ...h Flesh Tone Emphasise pink Flesh Tone RGB Only Mode Off Red Green Blue Displays the Red Green and Blue colour for making fine adjustments to the hue and saturation Colour Space Auto Native Adjust the range of colours available to create the image White Balance Adjusts the Colour temperature of the picture so that white objects look white instead of for example slightly pink or slightly yellow and...

Страница 37: ...is displayed Auto Visualisation When changing analogue channels displays signal strength This function is available for analogue channels only When bar is green you are receiving the best possible signal MPEG Noise Filter Off Low Medium High Auto Reduces MPEG noise to provide improved picture quality HDMI Black Level Low Normal Selects the black level on the screen to adjust the screen depth Avail...

Страница 38: ... to its default settings Changing the Preset Sound Mode Sound Mode MENU Sound Sound Mode Sound modes apply preset adjustments to the sound Standard Selects the normal sound mode Music Emphasises music overvoices Movie Provides the best sound for movies ClearVoice Emphasises voices over other sounds Amplify Increase the intensity of high frequency sound to allow a better listening experience for th...

Страница 39: ...nd change the slider s value To Reset the Equaliser select the Reset A pop up appears asking if you want to reset select Yes otherwise select No To exit select Close Balance L R Adjusts the balance between the right and left speaker 100Hz 300Hz 1kHz 3kHz 10kHz Bandwidth Adjustment Adjusts the loudness of specific bandwidth frequencies Reset Resets the equaliser to its default settings English 39 B...

Страница 40: ...se the volume adjust between the range 0 and 10 respectively HDMI Audio Format PCM Bitstream Sets the audio input signal format suitable for the external device connected to the TV s HDMI port Dolby Digital Comp Line RF This function minimises signal disparity between a dolby digital signal and a voice signal i e MPEG Audio HE AAC ATV Sound Select Line to obtain dynamic sound and RF to reduce the ...

Страница 41: ...to Tuning function The process can take up to 30 minutes to complete If Starting the Auto Tuning function when there is an existing index of channels overwrites the previous index Auto Tuning Scans for channels automatically and stores them in the TV s memory Cable Search Option when the aerial was set to Cable Depending on the country Sets additional search options such as the frequency and symbo...

Страница 42: ...finished a channel is updated in the channel list Analogue Channel Tuning Scans for a analogue channel 1 Select the New 2 Set the Programme Colour System Sound System Channel and Search 3 Select the Store When scanning has finished a channel is updated in the channel list Channel mode P programme mode When tuning is complete the broadcasting stations in your area have been assigned to position num...

Страница 43: ...NU Broadcasting Channel List Press CH LIST button while viewing TV to display a list you can use to jump between channels The list also displays the programme info favourites channels and the Schedule Viewing and Schedule Recording programmes The Channel List screen icons indicate the following An analogue channel A favourites channel A locked channel Change Channels Select a channel to jump to it...

Страница 44: ...View each digital channel s programming schedule including showtimes Check the programming schedules and even setup a Schedule Viewing Press Guide to launch the guide Make sure that the date and time is set properly under the System Time Clock menu Using Channel View a Quick Nav Press a button A popup window will open Each press of l or r arrow button moves the focus 24 hours back or forward enabl...

Страница 45: ...urrent time first to use this function 1 Press the E button to select Schedule 2 Press the u d l r buttons to set the Aerial Channel Repeat Date or Start Time Aerial Select the desired antenna source Channel Select the desired channel Repeat Select Once Manual Sat Sun Mon Fri or Everyday to set at your convenience If you select Manual you can set the day you want The mark indicates the date is sel...

Страница 46: ...y specifying the time and date Run Schedule Manager and then select Schedule A popup menu will appear Select Schedule Viewing to proceed Specify that programme s Channel Repeat and Start Time and then select OK to finish Cancel a Schedule Viewing To cancel a Schedule Viewing for a specific programme select the programme from the Schedule Manager screen A popup menu will appear Select Delete to can...

Страница 47: ...sing them again 2 Press b button A pop up appears asking Delete the selected channels select Yes The selected channel s will be deleted Rename Analogue Channels Select a channel you wish to rename from the Edit Channel screen press TOOLST button and then select Rename channels from the list Analogue channels only You can now rename the selected channel The new name can be up to 5 characters long E...

Страница 48: ...ame Favourites from the list 2 Rename the list in the popup window The new name can be up to 20 characters long Rearrange the Favourites Channels List Rearrange the order of the channels in a Favourites Channels List 1 Press b button to bring up a favourites channels list and select the channel you wish to move 2 Press a button to rearrange the order of the selected channel Press E button Copy a F...

Страница 49: ...this function The PIN input screen appears Enter the PIN using your remote Import from USB Import channel list from USB Export to USB Export channel list to USB This function is available when USB is connected USB format should be FAT32 and NTFS Delete CAM Operator Profile MENU Broadcasting Channel Settings Delete CAM Operator Profile Selects the CAM operator to delete Subtitle t MENU Broadcasting...

Страница 50: ...ction on or off Volume Adjust the audio description volume This function is not available on certain models in specific geographical areas Teletext Language MENU Broadcasting Teletext Language Set a desired language for teletext English is the default in cases where the selected language is unavailable in the broadcast Digital Text UK only MENU Broadcasting Digital Text If the programme broadcasts...

Страница 51: ...deo codec Application Info View information on the CAM inserted into the CI slot and on the CI or CI CARD which is inserted into the CAM You can install the CAM anytime whether the TV is on or off 1 Purchase a CI CAM module at your nearest dealer or by phone 2 Firmly insert the CI or CI CARD into the CAM in the direction of the arrow 3 Insert the CAM with the CI or CI CARD into the common interfac...

Страница 52: ...rrect In this case set the time manually Manual Set the current time manually Clock Set Set the Date and Time manually You can set the current date and time using your remote Available only when the Clock Mode is set to Manual Time Zone Select your time zone This function is only available when the Clock Mode is set to Auto GMT Selects your time zone When Country is set to Others you can use this ...

Страница 53: ...taining music or photo files you want played when the product turns on automatically If there is no music file on the USB device oryou don t select a folder containing a music file the Timer function does not operate correctly If there is only one photo file in the USB the slide show will not play If a folder name is too long the folder cannot be selected Each USB you use is assigned its own folde...

Страница 54: ... remain on if it s not receiving a signal Auto Power Off The product will automatically turn off if you don t press a button on your remote or product controllerwithin 4 hours to prevent overheating Auto Protection Time MENU System Auto Protection Time If the screen displays a still image for a certain period of time you define the product activates the screen saver to prevent the formation of bur...

Страница 55: ...Programme Rating Lock will block it The screen will go blank and the popup message appears Enter the PIN to unblock the programme or movie using your remote Change PIN MENU System Change PIN The Change PIN screen will appear Choose any 4 digits foryour PIN and enter them in the Enter New PIN Reenter the same 4 digits in the Confirm New PIN When the Confirm screen disappears select Close The produc...

Страница 56: ...nnecting a game console and connecting another external device set Game Mode to Off If you display the product menu in Game Mode the screen shakes slightly Game Mode is not available when the input source is set to TV or PC source Set Game Mode to On only after connecting a game console If you turn Game Mode on before you have attached the game console you may notice reduced picture quality If the...

Страница 57: ...CEC instructions page 69 DivX Video On Demand MENU System DivX Video On Demand Shows the registration code authorised for the product If you connect to the DivX web site and registerwith 10 digit registration code you can download the VOD activation file Once you play it using Media Play the registration is completed For more information on DivX R VOD visit http vod divx com English 57 Preference ...

Страница 58: ...lect No if you can hear sound from the speakers There may be a problem with your external equipment Please check your connections If the problem persists refer to the external device s user manual Signal Information Digital channels only The reception quality of over the aerial HD channels is either perfect or the channels are unavailable Signal Information displays HD channel signal strength so y...

Страница 59: ...root directory of a flash drive Insert the flash drive into the USB port to install the update Auto update The TV will be updated automatically at the time you have set or after power off Use Mode MENU Support Use Mode Select the Use Mode suitable foryour place We strongly recommend you select Home Use Home Use Home Use is the default setting Store Demo Store Demo is for retail environments only I...

Страница 60: ... Mass Storage Class Bulk Only Transport device Examples of MSC are Thumb drives Flash Card Readers USB HUB are not supported Devices should be connected directly to the TV s USB port Before connecting your device to the TV please back up your files to prevent them from damage or loss of data SAMSUNG is not responsible for any data file damage or data loss The HDD Hard Disk Drive connected to USB i...

Страница 61: ...elect a desired USB device and then press the TOOLST button The Tools menu appears 3 Select Disconnect USB Device and then wait until the selected USB device is disconnected You can remove a USB device from the TV To remove a USB device from the TV we recommend use Disconnect USB Device function Media Play MENU Applications Media Play Enjoy photos music and movie files saved on a USB Mass Storage ...

Страница 62: ... through the file in 10 second increments Press This changes the playback speed by up to 300 To restore normal playback speed press Alternatively pause the video and then press to reduce the playback speed 1 8 normal 1 4 normal 1 2 normal Slow playback doesn t support audio and is available in the forward direction only Press to pause the screen and then to scan through the paused video in 1 frame...

Страница 63: ...d Mode Select the Settings on screen button and then select Sound Mode Select a sound mode Information Select the Settings on screen button and then select Information to view detailed information about the current video Subtitle Settings Select the Settings on screen button and then select Subtitle Settings to play the video with subtitles This function only works if the subtitles are the same fi...

Страница 64: ...select Effects Playlist Creation From the Options list located at the top of the screen select Play Selected specify all the photos you want to play and then select Play This creates a playlist If the list is displayed in Folderview mode only the files contained in the current folder can be selected To select files from other folders change the view mode Opening a Different File Press l r Select t...

Страница 65: ...the Zoom on screen button Zoom in by up to a factor of 4 Rotate Select the Rotate on screen button This rotates the photo Picture Mode Select the Settings on screen button and then select Picture Mode Select a picture mode Sound Mode Select the Settings on screen button and then select Sound Mode Select a sound mode Information Select the Settings on screen button and then select Information to vi...

Страница 66: ...itional Music Playback Settings Shuffle Select the On on screen button Choose between normal and random play Repeat Select the Repeat on screen button This changes the repeat mode One Song repeats the current file only whereas All repeats all files contained in the playlist Sound Mode Select the Sound Mode on screen button Select a sound mode Information Press INFO from the playlist to view detail...

Страница 67: ...tion Personalization Display Settings Advanced Settings Monitor and adjust Refresh rate under Monitor settings Windows 7 Go to Control Panel Appearance and Personalization Display Screen Resolution Advanced settings Monitor and adjust Refresh rate under Monitor settings Windows 8 Windows 8 1 Go to Settings Control Panel Appearance and Personalization Display Screen Resolution Advanced settings Mon...

Страница 68: ...you are using a graphics card from a different manufacturer AMD Radeon R9 300 Series AMD Radeon R9 Fury X AMD Radeon R7 360 AMD Radeon R9 295X2 AMD Radeon R9 290X AMD Radeon R9 290 AMD Radeon R9 285 AMD Radeon R7 260X AMD Radeon R7 260 How do you enable FreeSync The following contents are just for reference as an example 1 Set FreeSync to Standard Engine or Ultimate Engine in the OSD menu 2 Enable...

Страница 69: ... buttons on the product The product remote control may not work under certain conditions If this occurs reselect the Anynet device The Anynet functions do not operate with other manufacturers products For instructions explaining how to connect Anynet external devices refer to the device s user manual You must connect an Anynet device using an HDMI cable Some HDMI cables may not support Anynet func...

Страница 70: ...lable device_name Title Menu Shows the title menu of the disc in the connected device E g If a DVD player is connected the title menu of the movie in the DVD playerwill appear Depending on the device this menu may not be available Setting up Anynet HDMI CEC Anynet HDMI CEC To use the Anynet Function Anynet HDMI CEC must be set to On When the Anynet HDMI CEC function is disabled all the Anynet rela...

Страница 71: ...ompleted The menu appears only when you set Anynet HDMI CEC to On in the System menu Switching to the selected device may take up to 2 minutes You cannot cancel the switching operation while switching is in progress If you have selected an Anynet device using the Source function you cannot use the Anynet function Make sure to switch to an Anynet device English 71 Advanced Features ...

Страница 72: ...to the correct jacks For example if you use the Component jacks labeled Pb Pr and Y to connect your product and video source make sure you have connected the blue Pb jack on the video source to the blue Pb jack on the product the red Pr jack on the source to the red Pr jack on the product Screen Brightness If you find that the colours on your Samsung product are correct but just a little too dark ...

Страница 73: ...stem Setup or run Auto Tuning Go to MENU Broadcasting Auto Tuning Issues Solutions and Explanations PC Connection A Mode Not Supported message appears Set your PC s output resolution so it matches a resolution supported by the product PC is always shown on the source list even if a PC is not connected This is normal PC is always shown in the source list regardless of whether a PC is connected The ...

Страница 74: ... the Picture options in the product menu go to Picture Mode Colour Brightness Sharpness Adjust the Energy Saving option in the product menu go to MENU System Eco Solution Energy Saving Try resetting the picture to view the default picture settings go to MENU Picture Reset Picture There is a dotted line on the edge of the screen If the Picture Size is set to Screen Fit change it to 16 9 Change the ...

Страница 75: ...st feature MENU Support Self Diagnosis Sound Test RF Cable Aerial Connection The product is not receiving all channels Make sure the coaxial cable is connected securely Please try Setup to add available channels to the channel list Go to MENU System Setup and wait for all available channels to be stored Verify the aerial is positioned correctly The picture is distorted macro block error small bloc...

Страница 76: ...video Check the cable connections and reconnect them Loss of audio orvideo can be caused by using overly rigid or thick cables Make sure the cables are flexible enough for long term use If mounting the product to a wall we recommend using cables with 90 degree connectors You see small particles when you look closely at the edge of the frame of the product This is part of the product s design and i...

Страница 77: ...the device is an Anynet device The Anynet system supports Anynet devices only You can connect only one receiver home theatre Check if the Anynet device power cord is properly connected Check the Anynet device s Video Audio HDMI cable connections Check whether Anynet HDMI CEC is set to On in the Anynet setup menu Check whether the product remote control is in product mode Check whether the remote c...

Страница 78: ... devices again Anynet requires an HDMI connection Make sure the device is connected to your product with an HDMI cable Some HDMI cables may not support Anynet functions If the connection is terminated because there has been a power failure or the HDMI cable has been disconnected please repeat the device scan Some functions and pictures shown in this manual are available on specific models only To ...

Страница 79: ...tion Alpha ass Powerdivx psb Internal Xsub Container AVI SubStation Alpha Container MKV Advanced SubStation Alpha Container MKV SubRip Container MKV MPEG 4 Timed text Container MP4 Supported image resolutions File Extension Type Resolution jpg jpeg JPG 15360 x 8640 bmp BMP 4096 x 4096 mpo MPO 15360 x 8640 CMYK YCCK Colour space JPEG are not supported English 79 Other Information ...

Страница 80: ...n is not supported type 0 and type 1 Video Codec File Extension Container Video Codec Resolution Frame rate fps Bit rate Mbps Audio Codec avi mkv asf wmv mp4 3gp vro mpg mpeg ts tp trp mov flv vob svi divx AVI MKV ASF MP4 3GP VRO VOB PS TS Divx 3 11 4 5 6 1920 x 1080 6 30 30 Dolby Digital LPCM ADPCM IMA MS AAC HE AAC WMA Dolby Digital Plus MPEG MP3 DTS Core G 711 A Law μ Law MPEG4 SP ASP H 264 BP ...

Страница 81: ...SB digital camera devices may not be compatible with the player HEVC codec is only available in MKV MP4 TS containers for Italy Video Decoders Supports up to H 264 Level 4 1 does not support FMO ASO RS Supports up to H 265 Main Main10 L4 L4 1 for Italy VC1 AP L4 is not supported GMC 2 is not supported Frame speed Below1280x720 60 frame max Above 1280x720 30 frame max Audio Decoders WMA10 Pro suppo...

Страница 82: ...ly To undo press it again 6 Colour buttons red green yellow blue If the FASTEXT system is used by the broadcasting company the different topics on a Teletext page are colour coded and can be selected by pressing the coloured buttons Press the colour corresponding to the topic of your choice A new colourcoded page is displayed Items can be selected in the same way To display the previous or next pa...

Страница 83: ... a soft cloth or cushion on a flat surface to protect the panel and place the product face down 3 Hold the main body of the product with your hand Pull the stand in the direction of the arrow as shown in the figure to separate it Attaching a Wall Mount Desktop Stand B A Wall Desktop Stand Mount B Wall mount kit desktop stand not supplied English 83 Other Information ...

Страница 84: ...desktop stand to the product and firmly fix the wall mount desktop stand by fastening the screw 2 Align the groove of the part of the product that is to be connected to the stand with the groove in the stand desk top stand wall mount stand or another stand and firmly fix the stand by fastening the screw English 84 Other Information ...

Страница 85: ...ation manual and all parts necessary for assembly are provided Do not use screws that do not comply with the VESA standard screw specifications Do not use screws that are longer than the standard dimension or do not comply with the VESA standard screw specifications Screws that are too long may cause damage to the inside of the TV set Forwall mounts that do not comply with the VESA standard screw ...

Страница 86: ...not supplied by Samsung Optional Please find a K icon on the rear of the product The Kensington slot is beside the K icon To lock the product follow these steps 1 Wrap the Kensington Lock cable around a large stationary object such as desk or chair 2 Slide the end of the cable with the lock attached through the looped end of the Kensington Lock cable 3 Insert the locking device into the Kensington...

Страница 87: ...get scratched during cleaning Be sure to wipe the exterior and screen carefully using a soft cloth to prevent scratches Do not spray water directly onto the product Any liquid that goes into the product may cause a failure fire or electric shock Clean the product with a soft cloth dampened with a small amount of water Do not use a flammable liquid e g benzene thinners or a cleaning agent English 8...

Страница 88: ...roduct accessories or literature indicates that the product and its electronic accessories e g charger headset USB cable should not be disposed of with other household waste at the end of theirworking life To prevent possible harm to the environment or human health from uncontrolled waste disposal please separate these items from other types of waste and recycle them responsibly to promote the sus...

Страница 89: ... x 1080 60Hz Sound Output 5W x 2 Dimensions W x H x D Body 724 3 x 428 0 x 30 4 mm With stand 724 3 x 519 1 x 247 7 mm Weight Body 5 5 kg With stand 6 3 kg Design and specifications are subject to change without prior notice For information about power supply and more about power consumption refer to the label attached to the product Some models may not be available for purchase depending on the r...

Страница 90: ...tion 37 Licence 88 M Media Play 61 Menu Language 56 Motion Lighting 36 MPEG Noise Filter 37 Music playback 66 N No Signal Power Off 54 O Off Timer 53 On Timer 53 P Panel Lock 56 Photo Playback 64 Picture Mode 30 Picture Options 37 Picture Size 32 Picture Test 58 PIP 35 Programme Rating Lock 55 R Reset Picture 38 Reset Sound 40 RGB Only Mode 36 S Schedule Manager 45 Self Diagnosis 58 Setting up Any...

Страница 91: ...ranty 4 This product is not considered to be defective in materials norworkmanship by reason that it requires adaptation in order to conform to national or local technical or safety standards in force in any country other than the one for which the product was originally designed and manufactured 5 This warranty covers none of the following a Periodic check ups maintenance and repair or replacemen...

Страница 92: ...proved extension lead or consult your de aler for assistance However if there is no alternative but to cut off the plug remove the fuse and then safely dispose of the plug Do NOT connect the plug to a mains socket as there is a risk of shock hazard from the bared flexible cord IMPORTANT The wires in the mains lead are coloured in accordance with the following code BLUE NEUTRAL BROWN LIVE As these ...

Страница 93: ...SM A3514_ESM Manufacturer Powernet Adaptor model A3514_FPN A4514_FPN To reduce the risk of fire or electric shock do not expose this apparatus to rain or moisture Apparatus shall not be exposed to dripping or splashing and no objects filled with liquids such as vases shall not be placed onthe apparatus For power cord use see user manual ATENCION SOLO PARA USO EN INTERIORES ...

Страница 94: ...landline toll free www samsung com gr support GREECE 80111 SAMSUNG 80111 726 7864 only from land line 30 210 6897691 from mobile and land line HUNGARY 0680SAMSUNG 0680 726 786 0680PREMIUM 0680 773 648 http www samsung com hu support ITALIA 800 SAMSUNG 800 7267864 www samsung com it support LATVIA 8000 7267 www samsung com lv support LITHUANIA 8 800 77777 www samsung com lt support LUXEMBURG 261 03...

Отзывы: