background image

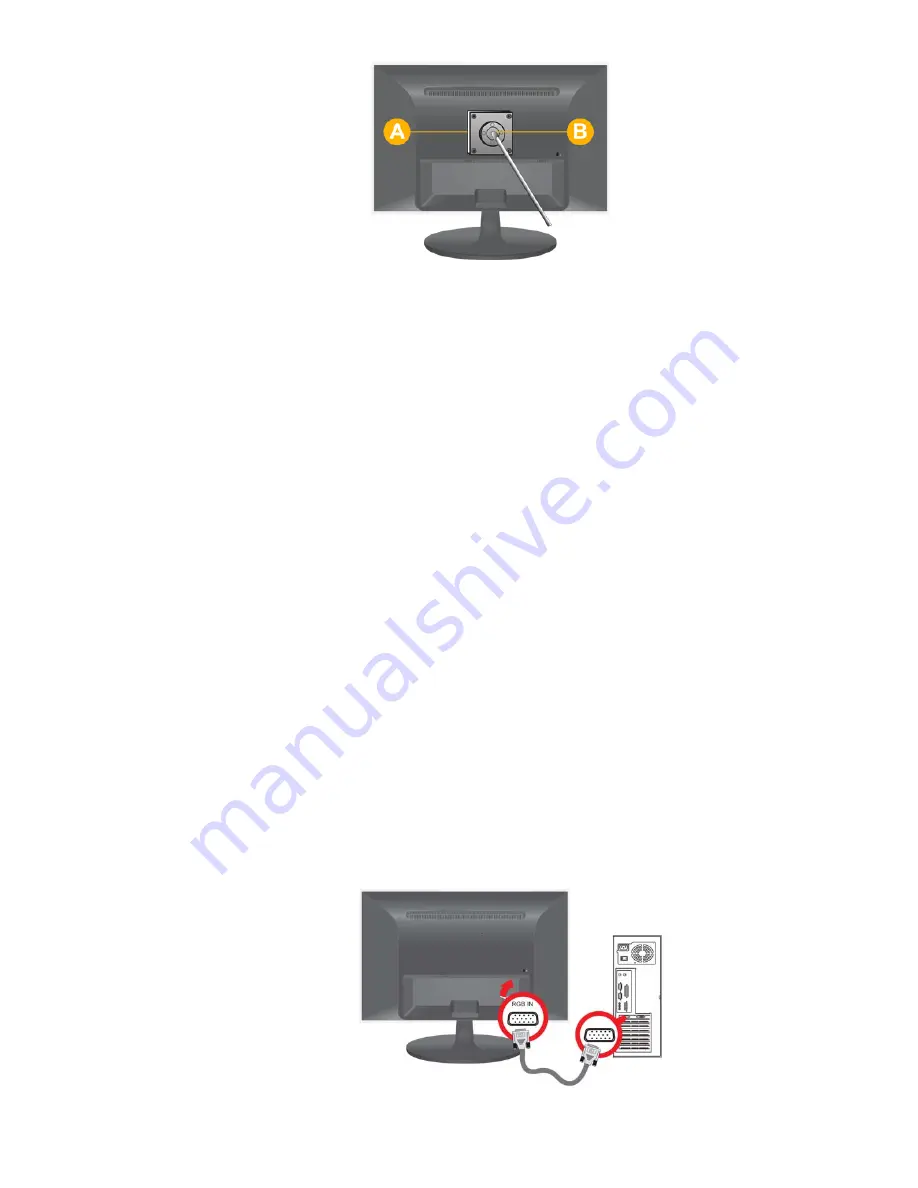
A. Stand Mount

B. Stand (Optional)

1.

Turn the product off and unplug the power cord from the wall outlet.

2.

Place a soft cloth or cushion on a flat surface to protect the panel and place the product down on the cloth so that the front of the product faces
downwards.

3.

Separate the stand.

4.

Align the groove of the part of the product that is to be connected to the stand with the groove in the stand (desk-top stand, wall mount stand or
another stand) and firmly fix the stand by fastening the screw.

If you use a screw that is longer than the standard specifications, the inside of the product may be damaged.

For wall mounts that are not compatible with the standard VESA specifications, the length of the screw may differ depending on the corresponding
specifications.

Do not use screws that are incompatible with the standard VESA specifications and do not assemble them using excessive force.

This may result in damage to the product or injury due to the product falling.

The company shall not be held liable for any damage or injury.

The company shall not be held liable for any damage to the product or injury caused by using a stand that is not compatible with the specified
specifications or due to an installation not performed by an authorized installation engineer.

When installing the product using a wall mount, purchase a wall mount that provides at least 10 cm of space from the wall.

The company shall not be held liable for any problems caused by using a stand that is not compatible with the specified specifications.

Use the wall mount according to the international specifications.

2-5. Connecting with a PC

The connecting part may differ depending on the product model.

1.

Connect the product to a PC depending on the video output supported by the PC.

When the graphics card provides D-Sub (

analog

) output

Connect the [RGB IN] port of the product to the [D-Sub] port of the PC with the D-Sub cable.

2.

Connect one end of the power cord to the POWER port of the product and connect the other end of the power cord to the 220V or 110V wall
outlet.

Содержание SYNCMASTER P2050N

Страница 1: ...SyncMaster P2050N P2250N P2350N LCD Monitor User Manual...

Страница 2: ...red trademarks of Microsoft Corporation VESA DPM and DDC are the registered trademarks of the Video Electronics Standard Association The ENERGY STAR logo is the registered trademark of the U S Environ...

Страница 3: ...marked with this sign may result in a personal injury or property damage Meaning of Signs Do not perform Must be followed Do not disassemble The power plug must be unplugged from the wall out let Do n...

Страница 4: ...Make sure to use the specified wall mount Avoid installing the product in a badly ventilated location such as inside a bookshelf or closet Otherwise it may result in fire due to internal over heating...

Страница 5: ...off be sure to use the recommended cleansing agent only You can purchase the recommended cleansing agent from a service center Before cleaning the product unplug the power cord Otherwise it may resul...

Страница 6: ...roduct or cause impact to the product Otherwise it may result in electric shock or fire Avoid moving the product by pulling the power cord or antenna cable Otherwise it may result in electric shock fi...

Страница 7: ...e product screen for long periods of time This will alleviate any eye strain Since the display panel is hot after using it for a long time do not touch the product Keep small accessories away from the...

Страница 8: ...Installation Manual Product Warranty User Manual D Sub Cable Power Cord Cleaning Cloth Cable Arrangement Link Stand Connector Stand The cleaning cloth is supplied with black high glossy models only 2...

Страница 9: ...th over the table to protect the product and place the product onto the cloth so that the front of the product is facing downwards Hold the main body of the product with your hand as shown by the figu...

Страница 10: ...rds Hold the main body of the product with your hand as shown by the figure Pull the stand in the direction of the arrow as shown in the figure to separate it Turn the connecting screw at the bottom o...

Страница 11: ...product or injury due to the product falling The company shall not be held liable for any damage or injury The company shall not be held liable for any damage to the product or injury caused by using...

Страница 12: ...e may differ depending on the model and the manufacturer for more information refer to the User Manual supplied with the locking device You have to purchase an additional locking device Locking the pr...

Страница 13: ...size It is recommended setting the resolution to the optimal resolution of the product If the signal from the PC is one of the following standard signal modes the screen is set automatically However i...

Страница 14: ...y is called the vertical frequency The vertical frequency is represented in Hz 3 3 Installing the Device Driver If you install the device driver you can set up the appropriate resolution and frequency...

Страница 15: ...the OSD Use these buttons to navigate the menu or to adjust a value in the OSD Use this button to select a function AUTO Press AUTO button to adjust the screen settings automatically This function is...

Страница 16: ...ate for editing a document Internet This mode provides the picture setting appropriate for surfing the Internet text picture Game This mode provides the picture setting appropriate for playing games t...

Страница 17: ...ilable when MagicColor is set to Full mode or Intelligent mode Color Tone You can set the color temperature according to your preference Cool Sets the color temperature of the screen to a cooler color...

Страница 18: ...et to Auto or Wide Menu H Position You can adjust the horizontal position of the OSD Menu V Position You can adjust the vertical position of the OSD 3 5 4 SETUP RESET Menu Description Reset Use this f...

Страница 19: ...You can set the function of the Customized Key to one of the following MagicBright MagicColor Color Effect Image Size 3 5 5 INFORMATION Menu Description INFORMATION Shows the frequency and resolution...

Страница 20: ...nline help of the software F1 Installing Natural Color 1 Insert the installation CD into the CD ROM drive 2 Select Install Natural Color on the start screen 3 Select the installation language 4 Comple...

Страница 21: ...OS Windows 2000 Windows XP Home Edition Windows XP Professional Windows Vista For MagicTune Windows 2000 or later is recommended Hardware At least 32MB of memory At least 60MB of free space on the ha...

Страница 22: ...the installation The MultiScreen icon may not appear depending on the computer system and the product specifications If the shortcut icon does not appear press the F5 key Restrictions and Problems wit...

Страница 23: ...ank screen displayed and does the power LED blink at a 1 second interval This occurs when the power saving function is running If you click the mouse or press any key the screen will be turned on The...

Страница 24: ...booting the computer If the beep sound is generated 3 or more times when booting up the computer please request service for the computer 5 3 FAQ FAQ Please try the following How can I change the freq...

Страница 25: ...x 189 4mm 21 9 X 16 4 X 7 5 inch 5 kg 11 0 Ibs With Stand Environ mental Con ditions For Operations Temperature 50 F 104 F 10 C 40 C Humidity 10 80 non condensing For Custody Temperature 4 F 113 F 20...

Страница 26: ...tp www samsung com latin REP DOMINICA 1 800 751 2676 http www samsung com latin TRINIDAD TOBAGO 1 800 SAMSUNG 726 7864 http www samsung com latin VENEZUELA 0 800 100 5303 http www samsung com latin Eu...

Страница 27: ...1880 http www samsung com cn HONG KONG 3698 4698 http www samsung com hk INDIA 3030 8282 1800 110011 1 800 3000 8282 http www samsung com in INDONESIA 0800 112 8888 http www samsung com id JAPAN 0120...

Страница 28: ...harm to the environment or human health from uncontrolled waste disposal please separate these items from other types of waste and recycle them responsibly to promote the sustainable reuse of material...

Страница 29: ...3 1 Setting the Optimal Resolution 3 2 Standard Signal Mode Table 3 3 Installing the Device Driver 3 4 Product Operating Buttons 3 5 Using the Screen Adjustment Menu OSD On Screen Display 4 Installing...

Отзывы: