


Operating Instructions
4-14
Samsung Electronics
Recor
ding a Pr
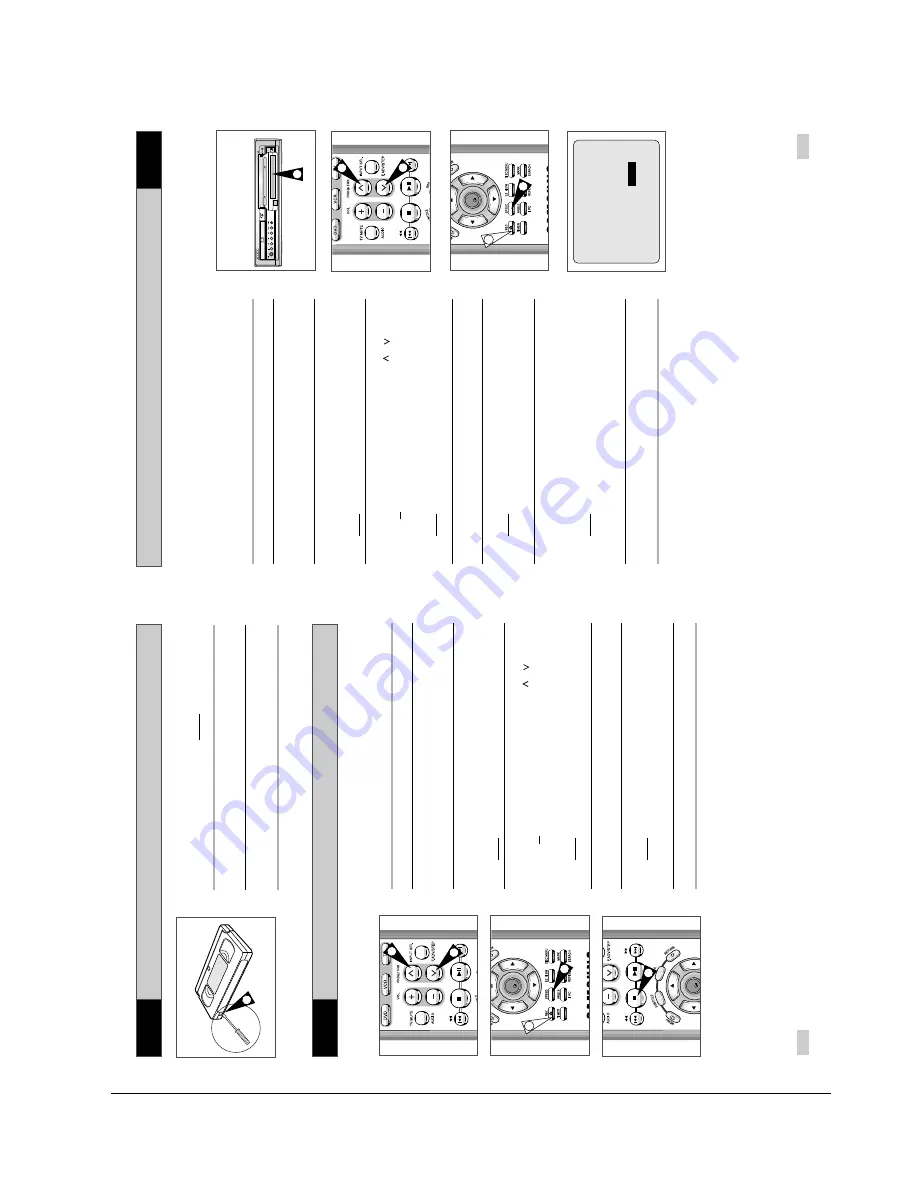
ogramme Immediately
Pr
otecting a Recor
ded Cassette
33
32
VCR
VCR
Recor
ding a Pr
ogramme with Automatic Stop
Video cassettes have a safety tab to prevent accidental erasure.
When this tab has been removed, you cannot
record on the tape.
1
If you wish to protect a cassette, break off the tab using a small
screwdriver.
2
To re-record over a protected cassette (safety tab broken), cover
the hole with adhesive tape.
1
Before recording a programme, you must have preset the corres-
ponding station (unless you are recording via an external video
source). If you have not done so, refer to pages 21 and 22.
1
Switch on the television.
2
To monitor the programme being recorded, select the television
channel reserved for use with your DVD-VCR (or the AV input if
used).
3
Insert the cassette on which the programme is to be recorded,
with the window visible and the safety tab intact or the opening
covered with adhesive tape.
Result
:
The DVD-VCR is switched on automatically.
4
Select:
◆
The station to be recorded using
the PROG
( or
)
buttons
or
◆
The AV1, AV2 or AUX source using the INPUT SEL. button
for a satellite tuner or external video source
Result
:
The station number is displayed and the programme
can be seen on the television.
5
Select the recording speed by pressing the SPEED button as
many times as required (see page 31).
6
Hold REC (
●
) down for a while to start recording.
Result
:
The record indicator appears on the television and
DVD-VCR display. An index is recorded on the tape
(see page 41).
7
To stop recording, press
■
once.
➢
◆
If your DVD-VCR ejects the cassette when you start
recording, check to make sure that the cassette’s
safety tab is intact or that the opening (created by a
broken safety tab) is covered with adhesive tape.
◆
If you reach the end of the tape while recording, the
cassette rewinds automatically.
OK
7
OK
6
4
4
5
This function enables you to record up to nine
hours (LP) of
programmes.
Your DVD-VCR stops automatically after the requested length of
time.
1
Switch on the television.
2
To monitor the programme being recorded, select the television
channel reserved for use with your DVD-VCR (or the AV input if
used).
3
Insert the cassette on which the programme is to be recorded,
with the window visible and the safety tab intact or the opening
covered with adhesive tape.
Result
:
The DVD-VCR is switched on automatically.
4
Select:
◆
The station to be recorded using the
PROG
( or
)
buttons
or
◆
The AV1, AV2 or AUX source using the INPUT SEL. button
for a satellite tuner or external video source
Result
:
The channel number is displayed and the programme
can be seen on the television.
5
Select the recording speed by pressing the SPEED button as
many times as required (see page 31).
6
Hold the REC button (
●
) down for a while to start recording.
Result
:T
he record indicator appears on the television screen
and DVD-VCR display. An index is recorded on the
tape (see page 41).
7
Press the REC button (
●
) several times to increase the
recording time in:
◆
30-minute intervals up to four hours
◆
1-hour intervals up to nine hours
Result
:
The length is displayed on the television displays. The
selected programme is recorded for the length of time
requested. At the end of that time, the DVD-VCR stops
recording automatically and power off.
8
If you wish to cancel the recording before the end, press
STANDBY/ON.
☛
If the end of the tape is reached while recording:
◆
The recording stops and power off.
☛
This function is not available in DVD recording
EJECT
ST
ANDBY/ON
DVD
PROG
VCR
AUX
3
OK
6
4
4
5
LENGTH 2:30
SET LENGTH :
PRESS
REC
●
VCR
Содержание SV-DVD50
Страница 26: ...Exploded View and Parts List 3 10 Samsung Electronics MEMO ...
Страница 88: ...VCR Deck Operating Description 8 12 Samsung Electronics Fig 8 14 Mecha Timing Chart ...
Страница 102: ...VCR Deck Operating Description 8 26 Samsung Electronics MEMO ...
Страница 109: ...Circuit Operating Descriptions 7 7 Fig 7 12 Block Diagram ...
Страница 143: ...Circuit Operating Descriptions 7 41 3 Block Diagram Fig 7 38 LA70100M Block Diagram ...
Страница 158: ...Block Diagram 10 2 Samsung Electronics MEMO ...
Страница 159: ...Samsung Electronics 11 1 11 Wiring Diagram ...
Страница 160: ...Block Diagram 11 2 Samsung Electronics MEMO ...
Страница 162: ...Schematic Diagrams 12 2 Samsung Electronics 6 1 S M P S ...
Страница 163: ...Schematic Diagrams Samsung Electronics 12 3 6 2 Power Drive ...
Страница 164: ...Schematic Diagrams 12 4 Samsung Electronics DT701 6 3 Display Function ...
Страница 165: ...Schematic Diagrams Samsung Electronics 12 5 6 4 System Control Servo ...
Страница 166: ...Schematic Diagrams 12 6 Samsung Electronics 6 5 A V ...
Страница 167: ...Schematic Diagrams Samsung Electronics 12 7 6 6 Hi Fi ...
Страница 168: ...Schematic Diagrams 12 8 Samsung Electronics 6 7 A2 NICAM ...
Страница 169: ...Schematic Diagrams Samsung Electronics 12 9 6 8 SECAM Option ...
Страница 170: ...Schematic Diagrams 12 10 Samsung Electronics 6 9 OSD VPS PDC ...
Страница 171: ...Schematic Diagrams Samsung Electronics 12 11 6 10 TM ...
Страница 172: ...Schematic Diagrams 12 12 Samsung Electronics 6 11 Input Output ...
Страница 173: ...Schematic Diagrams Samsung Electronics 12 13 6 12 DVD AV Decoder ...
Страница 174: ...Schematic Diagrams 12 14 Samsung Electronics 6 13 DVD Servo ...
Страница 175: ...Schematic Diagrams Samsung Electronics 12 15 6 14 DVD Audio Video ...
Страница 176: ...Schematic Diagrams 12 16 Samsung Electronics MEMO ...


