background image

Using Your Printer in Linux

25

Using the Unified Driver 
Configurator

Unified Linux Driver Configurator is a tool primarily intended for 

configuring Printer or MFP devices. Since an MFP device 
combines the printer and scanner, the Unified Linux Driver 
Configurator provides options logically grouped for printer and 

scanner functions. There is also a special MFP port option 
responsible for the regulation of access to an MFP printer and 
scanner via a single I/O channel.
After installing the Unified Linux driver, the Unified Linux Driver 
Configurator icon will automatically be created on your desktop.

Opening the Unified Driver 
Configurator

1

Double-click Unified Driver Configurator on the 
desktop.
You can also click the Startup Menu icon and select 
Samsung Unified Driver and then Unified Driver 
Configurator
.

2

Press each button on the Modules pane to switch to the 
corresponding configuration window.   

You can use the onscreen help by clicking Help.

3

After changing the configurations, click Exit to close the 
Unified Driver Configurator.

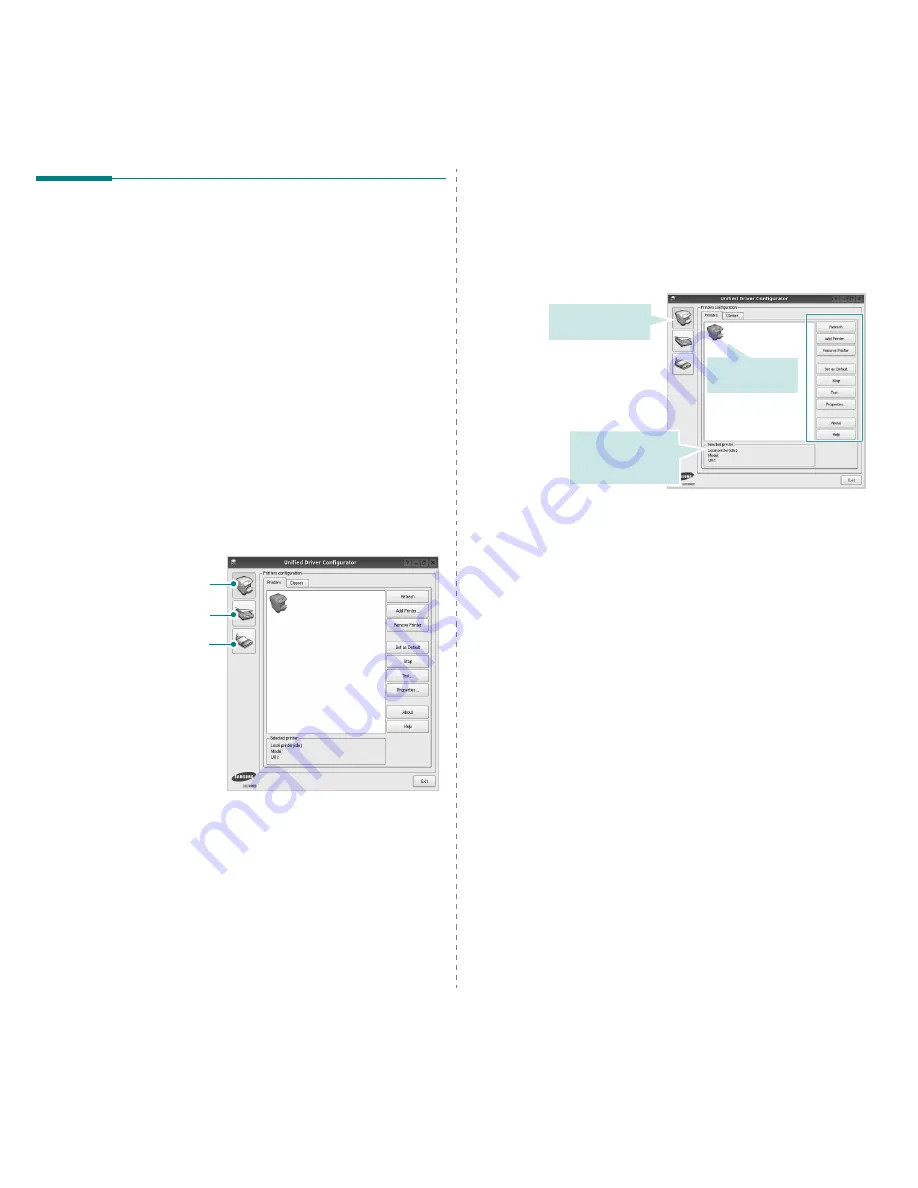
Printers Configuration button

Scanners Configuration button

Ports Configuration button

Printers Configuration

Printers configuration has the two tabs: Printers and Classes

Printers Tab

You can see the current system’s printer configuration by 
clicking on the printer icon button on the left side of the Unified 

Driver Configurator window.

You can use the following printer control buttons:
• Refresh: renews the available printers list.
• Add Printer: allows you to add a new printer.
• Remove Printer: removes the selected printer.
• Set as Default: sets the current printer as a default 

printer.

• Stop/Start: stops/starts the printer.
• Test: allows you to print a test page to check if the 

machine is working properly.

• Properties: allows you to view and change the printer 

properties. For details, see page 27.

Shows all of the 
installed printer.

Switches to Printer 
configuration.

Shows the status, 
model name and 
URI of your printer.

Содержание SCX-4500 Series

Страница 1: ...User s Guide Monochrome Laser Multifunction ...

Страница 2: ... this user s guide SCX 4500 is model names of Samsung Electronics Co Ltd Samsung and Samsung logo are trademarks of Samsung Electronics Co Ltd Microsoft Windows Windows XP and Windows Vista are either registered trademarks or trademarks of Microsoft Corporation UFST and MicroType are registered trademarks of Monotype Imaging Inc TrueType LaserWriter and Macintosh are trademarks of Apple Computer I...

Страница 3: ...LA 1 800 299 0013 www samsung com latin HONDURAS 800 7919267 www samsung com latin HONG KONG 3698 4698 www samsung com hk HUNGARY 06 80 SAMSUNG 726 7864 www samsung com hu INDIA 3030 8282 1800 110011 1 800 3000 8282 www samsung com in INDONESIA 0800 112 8888 www samsung com id ITALIA 800 SAMSUNG 726 7864 www samsung com it JAMAICA 1 800 234 7267 www samsung com latin JAPAN 0120 327 527 www samsung...

Страница 4: ...TRINIDAD TOBAGO 1 800 SAMSUNG 726 7864 www samsung com latin TURKEY 444 77 11 www samsung com tr U A E 800 SAMSUNG 726 7864 8000 4726 www samsung com ae U K 0845 SAMSUNG 726 7864 www samsung com uk U S A 1 800 SAMSUNG 726 7864 www samsung com us UKRAINE 8 800 502 0000 www samsung ua UZBEKISTAN 8 10 800 500 55 500 www samsung com kz_ru VENEZUELA 0 800 100 5303 www samsung com latin VIETNAM 1 800 58...

Страница 5: ...t media Loading originals 4 1 Selecting print media 4 2 Guidelines for selecting and storing print media 4 2 Specifications on print media 4 3 Media sizes supported in each mode 4 3 Guidelines for special print media 4 4 Loading paper in the tray 4 5 Changing the paper size in the tray 4 5 Setting the paper size and type 4 6 5 Copying Copying originals 5 1 Changing the settings for each copy 5 1 R...

Страница 6: ...ams 9 1 Clearing paper jams 9 1 In the paper feed area and rear the machine 9 1 Rear and inside the machine 9 3 In the exit area 9 5 Understanding display messages 9 7 Solving other problems 9 8 Paper feeding problems 9 8 Printing problems 9 8 Printing quality problems 9 10 Copying problems 9 12 Scanning problems 9 13 Common Windows problems 9 13 Common Linux problems 9 14 Common Macintosh problem...

Страница 7: ...on Used to guide users to the reference page for the additional detailed information See page 1 1 for more information Finding more information You can find information for setting up and using your machine from the following resources either as a print out or onscreen Quick Install Guide Provides information on setting up your machine and this requires that you follow the instructions in the guid...

Страница 8: ...ubsequently used 13 Unplug the machine from the telephone jack PC and AC wall outlet and refer servicing to qualified service personnel under the following conditions When any part of the power cord plug or connecting cable is damaged or frayed If liquid has been spilled into the machine If the machine has been exposed to rain or water If the machine does not operate properly after instructions ha...

Страница 9: ...t This product should not be mixed with other commercial wastes for disposal Radio Frequency Emissions FCC Information to the User This device complies with Part 15 of the FCC Rules Operation is subject to the following two conditions This device may not cause harmful interference and This device must accept any interference received including interference that may cause undesired operation This e...

Страница 10: ...n order to assure proper service from the telephone company In some cases a sum of five may not be usable on your line If any of your telephone equipment is not operating properly you should immediately remove it from your telephone line as it may cause harm to the telephone network WARNING FCC Regulations state that changes or modifications to this equipment not expressly approved by the manufact...

Страница 11: ...ards Institute ETSI has issued an advisory document EG 201 121 which contains notes and additional requirements to ensure network compatibility of TBR21 terminals The product has been designed against and is fully compliant with all of the relevant advisory notes contained in this document Replacing the Fitted Plug for UK Only Important The mains lead for this machine is fitted with a standard BS ...

Страница 12: ...vi ...

Страница 13: ...rmarks You can customize your documents with words such as Confidential See Software section Print Posters The text and pictures of each page of your document are magnified and printed across the sheet of paper and can then be taped together to form a poster See Software section Save time and money Print in various environments Copy the original in high quality Scan the original To save paper you ...

Страница 14: ...our machine The surface of the output tray may become hot if you print a large number of pages at once Please make sure that you do not touch the surface and do not allow children near it 1 control panel 7 tray open button 2 scanner lid 8 scanner glass 3 top cover 9 top cover lever 4 output tray 10 toner cartridge 5 output support 11 inner cover 6 tray ...

Страница 15: ...1 3 Introduction Rear view 1 rear cover 3 power receptacle 2 power switch 4 USB port ...

Страница 16: ... the machine Check the display message to release the jammed paper See page 9 7 about more information on the display messages copy buttons 2 Copies Increases the number of printouts Number can be changed by using up down arrows Possible values can be added up to 99 3 Reduce Enlarge Press this button to reduce or enlarge an image on the paper You have to use up down arrows to change the size 4 Dar...

Страница 17: ...ogram allows you to monitor the machine s status and alerts you when an error occurs during printing SmarThrua This is the accompanying Windows based software for your multifunctional machine User s Guide in PDF a Allows you to edit a scanned image in many ways using a powerful image editor and to send the image by email You can also open another image editor program like Adobe Photoshop from Smar...

Страница 18: ...ng O X O Watermark O X X Overlay O X X System requirements Before you begin ensure that your system meets the following requirements Windows Your machine supports the following Windows operating systems Note Internet Explorer 5 0 or higher is the minimum requirement for all Windows operating systems Users who have an administrator right can install the software OS Requirement recommended CPU RAM f...

Страница 19: ...her Software Linux Kernel 2 4 or higher Glibc 2 2 or higher CUPS SANE Note It is necessary to claim swap partition of 300 MB or larger for working with large scanned images The Linux scanner driver supports the maximum optical resolution Item Requirements Operating system Macintosh 10 3 10 5 CPU Intel processor PowerPC G4 G5 RAM 512 MB for an Intel based Mac 128 MB for a Power PC based Mac Free HD...

Страница 20: ...ine on a flat and stable surface for not letting it lean more than 2 mm 0 08 inches Otherwise it may affect the printing quality 2 Unpack the machine and check all the enclosed items 3 Remove the tape holding the machine tightly 4 Install both the toner cartridge 5 Load paper See Loading paper in the tray on page 4 5 6 Make sure that all the cables are connected to the machine 7 Turn the machine o...

Страница 21: ... such as loose toner or light imaging Before you set the altitude setting find the altitude where you are using the machine To set the machine for high altitude follow next step Note The following procedure is for Windows XP For other Windows OS refer to the corresponding Windows User s Guide or online help 1 Click the Windows Start menu 2 Select Printers and Faxes 3 Select Samsung SCX 4500 Series...

Страница 22: ...s to load an original for copying and scanning 1 Lift and open the scanner lid 2 Place the original face down on the scanner glass and align it with the registration guide at the bottom left corner of the glass 3 Close the scanner lid Note Leaving the scanner lid open while copying may affect copy quality and toner consumption Dust on the scanner glass may cause black spots on the printout Always ...

Страница 23: ...g large quantities of print media ensure that it meets the requirements specified in this user s guide Guidelines for selecting and storing print media When selecting or loading paper or other print materials keep these guidelines in mind Always use print media that conform with the specifications listed on page 4 3 Attempting to print on damp curled wrinkled or torn paper can cause paper jams and...

Страница 24: ...eets of 75 g m2 20 lb bond paper for the tray A4 210 x 297 mm 8 26 x 11 69 inches JIS B5 182 x 257 mm 7 16 x 10 11 inches ISO B5 176 x 250 mm 6 93 x 9 84 inches A5 148 x 210 mm 5 82 x 8 26 inches A6 105 x 148 mm 4 13 x 5 82 inches Executive 184 x 267 mm 7 25 x 10 5 inches Transparencyc c Recommended media Transparency for a Laser Printers produced by HP Xerox and 3M It is not recommended to use pa...

Страница 25: ... between them Labels can peel off sheets that have spaces between the labels causing serious jams Curl Prior to printing labels must lie flat with no more than 13 mm of curl in any direction Condition Do not use labels with wrinkles bubbles or other indications of separation Make sure that there is no exposed adhesive material between labels Exposed areas can cause labels to peel off during printi...

Страница 26: ...g Note You can load previously printed paper The printed side should be facing up with an uncurled edge at the rear If you experience problems with paper feed turn the paper around Note that print quality is not guaranteed Changing the paper size in the tray To load different sizes of paper such as custom sized paper you need to adjust the paper guides 1 Adjust the paper length guide to the desire...

Страница 27: ...adjust the paper width guides it may cause paper jams Setting the paper size and type The settings you change remain in effect only while you are using the current program To make your changes permanent make them in the Printers folder Note The following procedure is for Windows XP For other Windows OS refer to the corresponding Windows User s Guide or online help 1 Click the Start button on the c...

Страница 28: ...ike documentation such as magazine start copying with the scanner lid open Reducing or enlarging copies You can reduce or enlarge the size of a copied image from 50 to 199 1 Press Reduce Enlarge 2 Press up down arrows to select the setting you want Note When you make a reduced copy black lines may appear at the bottom of your copy Changing the darkness If you have an original containing faint mark...

Страница 29: ...u to control the scanning process Via the SmarThru program supplied with your machine Scanning an image launches SmarThru and enables you to control the scanning process Via the Windows Images Acquisition WIA driver See the Software Section Via the TWAIN compliant software You can use other software including Adobe Photoshop Deluxe and Adobe Photoshop Scanning to an application using a local conne...

Страница 30: ... from the Selet Printer list 4 To start the print job click OK or Print in the Print window For details about printing see Software section Canceling a print job If the print job is waiting in a print queue or print spooler such as the printer group in Windows delete the job as follows 1 Click the Windows Start menu 2 For Windows 2000 select Settings and then Printers For Windows XP 2003 select Pr...

Страница 31: ... to remove any moisture Cleaning the outside Make sure to brush off the dirt on the cloth provided before cleaning the cabinet Make sure to spray water 4 to 6 times onto the cloth provided or another cloth suitable for this purpose before cleaning the cabinet wiping in on direction Cleaning the inside During the printing process paper toner and dust particles can accumulate inside the machine This...

Страница 32: ...to fabric 4 Locate the long strip of glass LSU inside the front door and gently swab the glass to see if dirt turns the white cotton black 5 Slide the toner cartridge back into the machine 6 Hold the top cover and close it slowly and carefully until the cover is the cover is securely latched Note If the top cover is not completely closed the machine will not operate Caution Be careful not to pinch...

Страница 33: ...ronment as your machine To prevent damage to the toner cartridge do not expose it to light for more than a few minutes Expected cartridge life The toner cartridge yield depends on the amount of toner that print jobs require Average yield for a new toner cartridge is 2 000 standard pages in accordance with the ISO IEC 19752 standard Average yield for the original toner cartridge supplied with the m...

Страница 34: ...r the front of the toner cartridge with your hands or any other material Use the handle on each cartridge in order to avoid touching this area If you leave the top cover open for more than a few minutes the OPC drum can be exposed to light This will cause damage to the OPC drum Close the top cover should the installation need to be halted for any reason Note If toner gets on your clothing wipe it ...

Страница 35: ...r LED blinks rapidly and the toner related messages on the display indicate when toner cartridge should be replaced For detailed information about error message see page 9 7 The machine stops printing At this stage the toner cartridge needs to be replaced Check the type of toner cartridge for your machine See Supplies on page 10 1 1 Turn the machine off then wait a few minutes for the machine to c...

Страница 36: ... and remove the paper covering the toner cartridge Caution Do not touch the green surface the OPC drum or the front of each toner cartridge with your hands or any other material Use the handle on each cartridge in order to avoid touching this area If you leave the top cover open for more than a few minutes the OPC drum can be exposed to light This will cause damage to the OPC drum Close the top co...

Страница 37: ...tion the following condition the following items will need to be replaced after the specified number of pages or when the life span of each item has expired We highly recommend that this maintenance be performed by an authorized service provider dealer or the retailer where you bought the machine The warranty does not cover the replacement of the maintenance parts after their lifespan Items Yield ...

Страница 38: ...ot use creased damp or highly curled paper Do not mix paper types in a tray Use only recommended print media see page 4 6 Ensure that the recommended side of the print media is facing down in the tray Clearing paper jams Refer to the table below to locate and clear the paper jam Caution To avoid tearing the paper pull the jammed paper out gently and slowly Follow the instructions in the following ...

Страница 39: ...he top cover is not completely closed the machine will not operate Caution Be careful not to pinch your fingers since the top cover is very heavy 7 If the paper jam LED blinks go to next step 8 Open the rear cover 9 Carefully take the jammed paper out of the machine Caution Do not touch the fuser inside the machine It is hot and could cause burns The fuser s operating temperature is very hot Take ...

Страница 40: ...med in the rear and inside the machine follow the next steps to release the jammed paper 1 Open the rear cover 2 Carefully take the jammed paper out of the machine Caution Do not touch the fuser inside the machine It is hot and could cause burns The fuser s operating temperature is very hot Take care when removing paper from the machine 3 Hold both edges of the rear cover and align it as shown in ...

Страница 41: ...ch the green surface the OPC drum or the front of the toner cartridge with your hands or any other material Use the handle on each cartridge in order to avoid touching this area If you leave the top cover open for more than a few minutes the OPC drum can be exposed to light This will cause damage to the OPC drum Close the top cover should the installation need to be halted for any reason Note If t...

Страница 42: ...er is jammed in the paper exit area follow the next steps to release the jammed paper 1 Press the top cover lever completely open the top cover 2 If a long portion of the paper is visible pull it straight out If there is any resistance removing the paper stop pulling and go to step 4 Caution Do not touch the fuser inside the machine It is hot and could cause burns The fuser s operating temperature...

Страница 43: ...ry heavy 4 Open the inner cover Caution Do not touch the fuser inside the machine It is hot and could cause burns The fuser s operating temperature is very hot Take care when removing paper from the machine 5 Carefully take the jammed paper out of the machine 6 Close the inner cover 7 After removing the jammed paper check for paper which may be jammed in other parts of the machine 8 Close the top ...

Страница 44: ...nks slowly The corresponding toner cartridge is almost empty Take out the corresponding toner cartridge and thoroughly shake it By doing this you can temporarily reestablish printing operations Page 8 3 LED blinks rapidly Replace the toner cartridge with a new one Page 8 5 The toner cartridge is installed improperly or not installed Reinstall the toner cartridge two or three times If the problem p...

Страница 45: ...required by the machine See Specifications on print media on page 4 3 There may be debris inside the machine Open the top cover and remove the debris Printing problems Condition Possible cause Suggested solutions The machine does not print The machine is not receiving power Check the power cord connections Check the power switch and the power source The machine is not selected as the default print...

Страница 46: ...omputer and try a print job that you know works Finally try a new printer cable The wrong printer driver was selected Check the application s printer selection menu to ensure that your machine is selected The software application is malfunctioning Try printing a job from another application The operating system is malfunctioning Exit Windows and reboot the computer Turn the machine off and then ba...

Страница 47: ...rally rounded occur randomly on the page A single sheet of paper may be defective Try reprinting the job The moisture content of the paper is uneven or the paper has moist spots on its surface Try a different brand of paper See Specifications on print media on page 4 3 The paper lot is bad The manufacturing processes can cause some areas to reject toner Try a different kind or brand of paper If th...

Страница 48: ...s on print media on page 4 3 If characters are improperly formed and producing a wavy effect the scanner unit may need service Contact a service representative Page skew Ensure that the paper is loaded properly Check the paper type and quality See Specifications on print media on page 4 3 Ensure that the paper or other material is loaded correctly and the guides are not too tight or too loose agai...

Страница 49: ...sheets or loose toner light print or contamination occurs You machine is probably being used at an altitude of 1 000 m 3 281 ft or above The high altitude may affect the print quality from loose toner or light imaging You can set this option through the Printer Tab in printer driver s properties See page 3 2 Condition Suggested solutions Copies are too light or too dark Use Darkness arrows to dark...

Страница 50: ...is completed try again Invalid handle Scanning has failed There may be a copying or printing job in progress Try your job again when that job is finished try your job again The selected port is currently being used Restart your computer and try again The scanner driver is not installed or the operating environment is not set up properly Ensure that the machine is properly connected and the power i...

Страница 51: ... properly Check if your application has special print option such as oraw If oraw is specified in the command line parameter then remove it to print properly For Gimp front end select print Setup printer and edit command line parameter in the command item The machine does not appear on the scanners list Check if your machine is attached to your computer Make sure that it is connected properly via ...

Страница 52: ...distribution CD or Gimp Front end application If you wish to use other kind of scan application refer to the Help for application Problem Possible cause and solutions Common Macintosh problems I encounter error Cannot open port device file when printing a document Please avoid changing the print job parameters via LPR GUI for example while a print job is in progress Known versions of CUPS server b...

Страница 53: ...ung authorized supplies or accessories contact your local Samsung dealer or the retailer where you purchased your machine or visit www samsungprinter com and select your country region to obtain information on calling for technical support Type Average yielda a Declared yield value in accordance with ISO IEC 19752 Caution When you purchase a new toner cartridge or supplies you must purchase them i...

Страница 54: ...es Starter Standard Toner Cartridge Declared yield value in accordance with ISO IEC 19752 Printer specifications Memory 8 MB Non extendable External dimension W x D x H 332 x 393 x 162 3mm 13 1 x 15 5 x 6 4 inches Weight 8 6 Kg 18 96 lbs including consumables Package weight Paper 1 84 Kg 4 06 lbs Plastic 0 267 Kg 0 59 lbs Duty cycle Monthly print volume Up to 4 000 pages a For details about paper ...

Страница 55: ...hoto Print up to 600 x 600 dpi Text Text Photo Photo Zoom rate 50 to 199 Multiple copies 1 to 99 pages Scanner specifications Item Description Compatibility TWAIN standard WIA standard Scanning method Color CIS Resolution Optical Max 600 x 600 dpi Mono and color Enhanced 4 800 x 4 800 dpi Effective scanning length Max 297 mm 11 7 inches Effective scanning width Max 208 mm 8 2 inches Color bit dept...

Страница 56: ...Standardization ISO is an international standard setting body composed of representatives from national standards bodies It produces world wide industrial and commercial standards LED A light emitting diode LED is a semiconductor device that indicates the status of a machine Print Media Media such as papers labels and transparencies which can be used on a printer a scanner a fax or a copier OPC Dr...

Страница 57: ...g jam 9 1 paper feeding problems 9 8 setting the paper size of the tray 4 6 Power switch 1 3 print media guidelines 4 2 media sizes 4 3 selecting print media 4 2 specification 4 3 Printer software CD 2 1 printing 7 1 problem solving 9 8 printing report 8 1 problem solve Linux 9 14 problems copying 9 12 display message 9 7 Macintosh 9 15 paper feeder 9 8 printing 9 8 printing quality 9 10 scanning ...

Страница 58: ...Samsung Printer Software section ...

Страница 59: ...Changing the Software Language 5 Reinstalling Printer Software 6 Removing Printer Software 6 Chapter 2 BASIC PRINTING Printing a Document 7 Printing to a file PRN 8 Printer Settings 8 Layout Tab 9 Paper Tab 9 Graphics Tab 10 Extras Tab 11 About Tab 11 Printer Tab 11 Using a Favorite Setting 12 Using Help 12 ...

Страница 60: ... 15 Deleting a Watermark 15 Using Overlays 16 What is an Overlay 16 Creating a New Page Overlay 16 Using a Page Overlay 16 Deleting a Page Overlay 16 Chapter 4 SHARING THE PRINTER LOCALLY Setting Up a Host Computer 17 Setting Up a Client Computer 17 Chapter 5 SCANNING Scanning Using Samsung SmarThru 18 Uninstalling Samsung SmarThru 18 Using Samsung SmarThru 18 Using Onscreen Help File 19 Scanning ...

Страница 61: ...r 24 Using the Unified Driver Configurator 25 Opening the Unified Driver Configurator 25 Printers Configuration 25 Scanners Configuration 26 Ports Configuration 26 Configuring Printer Properties 27 Printing a Document 27 Printing from Applications 27 Printing Files 28 Scanning a Document 28 Using the Image Manager 29 Chapter 8 USING YOUR PRINTER WITH A MACINTOSH Installing Software 31 Scan driver ...

Страница 62: ...e Wizard window appears during the installation procedure click in the upper right corner of the box to close the window or click Cancel This is recommended for most users All components necessary for printer operations will be installed 1 Make sure that the printer is connected to your computer and powered on 2 Insert the supplied CD ROM into your CD ROM drive The CD ROM should automatically run ...

Страница 63: ...ndow asking you to print a test page appears If you choose to print a test page select the checkbox and click Next Otherwise just click Next and skip to step 7 6 If the test page prints out correctly click Yes If not click No to reprint it 7 To register yourself as a user of Samsung Printers in order to receive information from Samsung select the checkbox and click Finish You are now sent to the S...

Страница 64: ...nding on the printer and interface in use 4 Select the components you want to reinstall and click Next If you you select your printer driver name and reinstall the printer software for local printing the window asking you to print a test page appears Do as follows a To print a test page select the check box and click Next b If the test page prints out correctly click Yes If it doesn t click No to ...

Страница 65: ...r printing from various Windows applications The exact steps for printing a document may vary depending on the application program you are using Refer to the User s Guide of your software application for the exact printing procedure 1 Open the document you want to print 2 Select Print from the File menu The Print window is displayed It may look slightly different depending on your application The ...

Страница 66: ...iffer depending on the printer in use If you access printer properties through the Printers folder you can view additional Windows based tabs refer to your Windows User s Guide and the Printer tab see Printer Tab on page 11 NOTES Most Windows applications will override settings you specify in the printer driver Change all print settings available in the software application first and change any re...

Страница 67: ... for more information on accessing printer properties Click the Paper tab to access various paper properties Copies Copies allows you to choose the number of copies to be printed You can select 1 to 999 copies Paper Options Size Size allows you to set the size of paper you loaded in the tray If the required size is not listed in the Size box click Custom When the Custom Paper Setting window appear...

Страница 68: ...ion to allow the printer to use less toner on each page Off If you don t need to save toner when printing a document select this option Darkness Use this option to lighten or darken your print job Some printers do not support this feature Normal This setting is for normal documents Light This setting is for bolder line widths or darker gray scale images Dark This setting is for finer line width hi...

Страница 69: ...es from the last page to the first page Print Odd Pages Your printer prints only the odd numbered pages of the document Print Even Pages Your printer prints only the even numbered pages of the document About Tab Use the About tab to display the copyright notice and the version number of the driver If you have an Internet browser you can connect to the Internet by clicking on the web site icon See ...

Страница 70: ...tem from the Favorites drop down list The printer is now set to print according to the Favorites setting you selected To delete a Favorites item select it from the list and click Delete You can also restore the printer driver s default settings by selecting Printer Default from the list Using Help Your printer has a help screen that can be activated by clicking the Help button in the printer prope...

Страница 71: ... on One Sheet of Paper N Up Printing You can select the number of pages to print on a single sheet of paper To print more than one page per sheet the pages will be reduced in size and arranged in the order you specify You can print up to 16 pages on one sheet 1 To change the print settings from your software application access printer properties See Printing a Document on page 7 2 From the Layout ...

Страница 72: ...ed or Enlarged Document You can change the size of a page s content to appear larger or smaller on the printed page 1 To change the print settings from your software application access printer properties See Printing a Document on page 7 2 From the Paper tab select Reduce Enlarge in the Printing Type drop down list 3 Enter the scaling rate in the Percentage input box You can also click the or butt...

Страница 73: ... message displays in the preview window When the First Page Only box is checked the watermark prints on the first page only 4 Select watermark options You can select the font name style size or grayscale level from the Font Attributes section and set the angle of the watermark from the Message Angle section 5 Click Add to add a new watermark to the list 6 When you have finished editing click OK an...

Страница 74: ...ST Dear ABC Regards WORLD BEST Using a Page Overlay After an overlay has been created it is ready to be printed with your document To print an overlay with a document 1 Create or open the document you want to print 2 To change the print settings from your software application access printer properties See Printing a Document on page 7 3 Click the Extras tab 4 Select the desired overlay from the Ov...

Страница 75: ...D ROM Setting Up a Host Computer 1 Start Windows 2 From the Start menu select Printers and Faxes 3 Double click your printer driver icon 4 From the Printer menu select Sharing 5 Check the Share this printer box 6 Fill in the Shared Name field and then click OK Setting Up a Client Computer 1 Right click the Windows Start button and select Explore 2 Select My Network Places and then right click Sear...

Страница 76: ...on ensure that all applications are closed on your computer 1 From the Start menu select Programs 2 Select SmarThru 4 and then select Uninstall SmarThru 4 3 When your computer asks you to confirm click OK 4 Click Finish You may be prompted to restart your computer In this case you must shut the computer down and then restart it before the changes will be saved Using Samsung SmarThru Follow these s...

Страница 77: ... To basic functions Allows you to customize settings for Application E mail OCR and Web functions 5 Click the service icon according to your job 6 SmarThru 4 opens for the selected service Adjust the scan settings 7 To start scanning click Scan NOTE If you want to cancel the scan job click Cancel Using Onscreen Help File For more information about SmarThru click at the top right corner of the wind...

Страница 78: ...mera Wizard launches 4 Choose your scanning preferences and click Preview to see how your preferences affect the picture 5 Click Next 6 Enter a picture name and select a file format and destination to save the picture 7 Follow the on screen instructions to edit the picture after it is copied to your computer Windows Vista 1 Load the document s face up into the DADF or ADF OR Place a single documen...

Страница 79: ...om the Start menu select Programs or All Programs your printer driver name Smart Panel NOTES If you have already installed more than one Samsung printer first select the printer model you want in order to use the corresponding Smart Panel Right click in Windows or Linux or click in Mac OS X the Smart Panel icon and select your printer name The Smart Panel window and its contents shown in this Soft...

Страница 80: ...e Printer Settings Utility you can configure and check print settings 1 Right click the Smart Panel icon and select Printer Setting 2 Change the settings 3 To send the changes to the printer click the Apply button Using Onscreen Help File For more information about Printer Settings Utility click Changing the Smart Panel Program Settings Right click in Windows or Linux or click in Mac OS X the Smar...

Страница 81: ...ied with a smart and flexible installation program You don t need to search for additional components that might be necessary for the Unified Linux Driver software all required packages will be carried onto your system and installed automatically this is possible on a wide set of the most popular Linux clones Installing the Unified Linux Driver Installing the Unified Linux Driver 1 Make sure that ...

Страница 82: ... in root in the Login field and enter the system password NOTE You must log in as a super user root to install the printer software If you are not a super user ask your system administrator 2 Insert the printer software CD ROM The CD ROM will automatically run If the CD ROM does not automatically run click the icon at the bottom of the desktop When the Terminal screen appears type in If the CD ROM...

Страница 83: ...esponding configuration window You can use the onscreen help by clicking Help 3 After changing the configurations click Exit to close the Unified Driver Configurator Printers Configuration button Scanners Configuration button Ports Configuration button Printers Configuration Printers configuration has the two tabs Printers and Classes Printers Tab You can see the current system s printer configura...

Страница 84: ...lected port Sharing Ports Between Printers and Scanners Your machine may be connected to a host computer via the parallel port or USB port Since the MFP device contains more than one device printer and scanner it is necessary to organize proper access of consumer applications to these devices via the single I O port The Samsung Unified Linux Driver package provides an appropriate port sharing mech...

Страница 85: ...clicking Options you can set the default device options Jobs shows the list of print jobs Click Cancel job to cancel the selected job and select the Show completed jobs check box to see previous jobs on the job list Classes shows the class that your printer is in Click Add to Class to add your printer to a specific class or click Remove from Class to remove the printer from the selected class 4 Cl...

Страница 86: ...m To print any document file 1 Type lpr file_name from the Linux shell command line and press Enter The LPR GUI window appears When you type only lpr and press Enter the Select file s to print window appears first Just select any files you want to print and click Open 2 In the LPR GUI window select your printer from the list and change the printer and print job properties For details about the pro...

Страница 87: ...or further details about editing an image see page 29 Drag the pointer to set the image area to be scanned 10When you are finished click Save on the toolbar 11Select the file directory where you want to save the image and enter the file name 12Click Save Adding Job Type Settings You can save your scan option settings to retrieve for a later scanning To save a new Job Type setting 1 Change the opti...

Страница 88: ...gh the image Crops the selected image area Zooms the image out Zooms the image in Allows you to scale the image size you can enter the size manually or set the rate to scale proportionally vertically or horizontally Allows you to rotate the image you can select the number of degrees from the drop down list Allows you to flip the image vertically or horizontally Allows you to adjust the brightness ...

Страница 89: ...r printer into the CD ROM drive 3 Double click CD ROM icon that appears on your Macintosh desktop 4 Double click the MAC_Installer folder 5 Double click the Installer icon 6 Enter the password and click OK 7 The Samsung Installer window opens Click Continue 8 Select Easy Install and click Install Easy Install is recommended for most users All components necessary for printer operations will be ins...

Страница 90: ...e Applications folder Utilities and Print Setup Utility For MAC OS 10 5 open System Preferences from the Applications folder and click Printer Fax 3 Click Add on the Printer List For MAC OS 10 5 press the icon then a display window will pop up 4 For MAC OS 10 3 select the USB tab For MAC OS 10 4 click Default Browser and find the USB connection For MAC OS 10 5 click Default and find the USB connec...

Страница 91: ...n you finish setting the options Mac OS 10 3 Make sure that your printer is selected Changing Printer Settings You can use advanced printing features when using your printer From your Macintosh application select Print from the File menu The printer name which appears in the printer properties window may differ depending on the printer in use Except for the name the composition of the printer prop...

Страница 92: ...ting allows you to scale your print job to any selected paper size regardless of the digital document size This can be useful when you want to check fine details on a small document Printing Multiple Pages on One Sheet of Paper You can print more than one page on a single sheet of paper This feature provides a cost effective way to print draft pages 1 From your Macintosh application select Print f...

Страница 93: ...essage appears disconnect the USB cable and reconnect it If the problem persists please refer to the Image Capture s help 4 Set the scan options on this program 5 Scan and save your scanned image NOTE For more information about using Image Capture please refer to the Image Capture s help You can also scan using TWAIN compliant softwares such as Adobe Photoshop Scan process differ according to TWAI...

Страница 94: ...nux 23 N n up printing Macintosh 34 Windows 13 O orientation print 28 Windows 9 overlay create 16 delete 16 print 16 P Paper properties set 9 paper size set 9 print 28 paper source set 28 Windows 9 paper type set print 28 poster print 14 print document 7 fit to page 14 from Macintosh 33 from Windows 7 N up Macintosh 34 Windows 13 overlay 16 poster 15 PRN 8 scaling 14 watermark 15 print resolution ...

Страница 95: ...tion 10 software install Macintosh 31 Windows 4 reinstall Windows 6 system requirements Macintosh 31 uninstall Macintosh 31 Windows 6 status monitor use 21 T toner save set 10 TWAIN scan 19 U uninstall software Macintosh 31 Windows 6 uninstalling MFP driver Linux 24 W watermark create 15 delete 15 edit 15 print 15 WIA scan 20 ...

Страница 96: ...Rev 5 00 www samsungprinter com ...

Отзывы: